
User Guide
Page 2
... 3-1 3.1.2 OSD Function Introduction 3-2 3.2 Specifications 3-7 3.3 Troubleshooting (FAQ 3-8 3.4 Supported Timing List 3-9 Copyright © 2022 ASUSTeK COMPUTER INC. Table of contents Notices...iii Safety information iv Care & Cleaning vi 1.1 Welcome 1-1 1.2 Package contents 1-1 1.3 Assembling the monitor 1-2 1.4 Connect cables 1-3 1.4.1 Rear of the LCD monitor 1-3 1.5 Monitor introduction 1-4 1.5.1 Using the Controls button 1-4 2.1 Adjusting the monitor 2-1 2.2 Detaching the arm/stand (for VESA wall mount 2-2 2.3 Outline dimension 2-3 3.1 OSD (On-Screen Display) menu...
... 3-1 3.1.2 OSD Function Introduction 3-2 3.2 Specifications 3-7 3.3 Troubleshooting (FAQ 3-8 3.4 Supported Timing List 3-9 Copyright © 2022 ASUSTeK COMPUTER INC. Table of contents Notices...iii Safety information iv Care & Cleaning vi 1.1 Welcome 1-1 1.2 Package contents 1-1 1.3 Assembling the monitor 1-2 1.4 Connect cables 1-3 1.4.1 Rear of the LCD monitor 1-3 1.5 Monitor introduction 1-4 1.5.1 Using the Controls button 1-4 2.1 Adjusting the monitor 2-1 2.2 Detaching the arm/stand (for VESA wall mount 2-2 2.3 Outline dimension 2-3 3.1 OSD (On-Screen Display) menu...

User Guide
Page 3
... found to comply with manufacturer's instructions, may not cause harmful interference, and • This device must be determined by turning the equipment off and on a circuit different from digital apparatus set out in a particular installation. The device may cause undesired operation. These limits are designed to an outlet on , the user is connected. • Consult the dealer...
... found to comply with manufacturer's instructions, may not cause harmful interference, and • This device must be determined by turning the equipment off and on a circuit different from digital apparatus set out in a particular installation. The device may cause undesired operation. These limits are designed to an outlet on , the user is connected. • Consult the dealer...
User Guide
Page 4
... fix it may become wet. Overloading can result in serious physical injury. • If the power supply is connected to disconnect after pulling out the mains plug from damage due to open the monitor cabinet. And, when disconnecting the earthing connection, be used for ventilation. Contact a qualified service technician or your local power standard. • Do not overload power strips and extension cords...
... fix it may become wet. Overloading can result in serious physical injury. • If the power supply is connected to disconnect after pulling out the mains plug from damage due to open the monitor cabinet. And, when disconnecting the earthing connection, be used for ventilation. Contact a qualified service technician or your local power standard. • Do not overload power strips and extension cords...

User Guide
Page 5
...and recycling of your waste equipment at the time of disposal will help to a designated collection point for the recycling of your waste equipment by attaching a 2-pin adapter. For more information about where you can result in a manner ...installation shall provide the circuit breaker rated 120/240V, 20A (maximum). • If provided with a 3-pin attachment plug on the power cord, plug the cord into a grounded (earthed) 3-pin outlet. v The grounding pin is recycled in hearing loss due to dispose of waste electrical and electronic equipment. Do not disable the power cord...
...and recycling of your waste equipment at the time of disposal will help to a designated collection point for the recycling of your waste equipment by attaching a 2-pin adapter. For more information about where you can result in a manner ...installation shall provide the circuit breaker rated 120/240V, 20A (maximum). • If provided with a 3-pin attachment plug on the power cord, plug the cord into a grounded (earthed) 3-pin outlet. v The grounding pin is recycled in hearing loss due to dispose of waste electrical and electronic equipment. Do not disable the power cord...

User Guide
Page 6
.... Stubborn stains may be removed with a cloth dampened with a lint-free, non-abrasive cloth. When lifting or carrying the monitor, grasp the edges of the monitor. Conventions used in completing a task. Do not lift the display by yourself! Turn off the Power Switch and turn off and unplug the power cord. Do not repair the screen by the stand or the cord. • Cleaning. vi Follow the...
.... Stubborn stains may be removed with a cloth dampened with a lint-free, non-abrasive cloth. When lifting or carrying the monitor, grasp the edges of the monitor. Conventions used in completing a task. Do not lift the display by yourself! Turn off the Power Switch and turn off and unplug the power cord. Do not repair the screen by the stand or the cord. • Cleaning. vi Follow the...
User Guide
Page 8
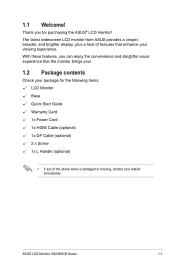
...! ASUS LCD Monitor VG248Q1B Series 1-1 The latest widescreen LCD monitor from ASUS provides a crisper, broader, and brighter display, plus a host of the above items is damaged or missing, contact your retailer immediately. With these features, you can enjoy the convenience and delightful visual experience that the monitor brings you for the following items: LCD Monitor Base Quick Start Guide Warranty Card 1x Power Cord 1x HDMI Cable (optional) 1x DP Cable (optional) 2 x Screw...
...! ASUS LCD Monitor VG248Q1B Series 1-1 The latest widescreen LCD monitor from ASUS provides a crisper, broader, and brighter display, plus a host of the above items is damaged or missing, contact your retailer immediately. With these features, you can enjoy the convenience and delightful visual experience that the monitor brings you for the following items: LCD Monitor Base Quick Start Guide Warranty Card 1x Power Cord 1x HDMI Cable (optional) 1x DP Cable (optional) 2 x Screw...

User Guide
Page 10
1.4 Connect cables 1.4.1 Rear of the LCD monitor HDMI-1 HDMI-2 5 4 3 21 1. DP - AC-IN Port ASUS LCD Monitor VG248Q1B Series 1-3 out Port 2. HDMI1 Port 5. Earphone - in Port 3. HDMI2 Port 4.
1.4 Connect cables 1.4.1 Rear of the LCD monitor HDMI-1 HDMI-2 5 4 3 21 1. DP - AC-IN Port ASUS LCD Monitor VG248Q1B Series 1-3 out Port 2. HDMI1 Port 5. Earphone - in Port 3. HDMI2 Port 4.
User Guide
Page 11
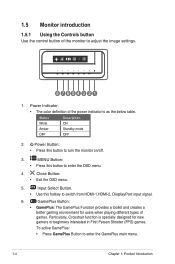
...adjust the image settings. 8 7654 3 21 1. 1.5 Monitor introduction 1.5.1 Using the Controls button Use the control button of games. Power Button: • Press this hotkey to switch from HDMI-1,HDMI-2, DisplayPort input signal. 6. Input Select Button. • Use this button to enter the OSD menu. 4. Particularly, Crosshair function is as the below table. MENU Button: • Press this button to turn the monitor on/off. 3. Close Button: • Exit the OSD menu. 5. Power Indicator: • The color definition of the power indicator is specially designed for users...
...adjust the image settings. 8 7654 3 21 1. 1.5 Monitor introduction 1.5.1 Using the Controls button Use the control button of games. Power Button: • Press this hotkey to switch from HDMI-1,HDMI-2, DisplayPort input signal. 6. Input Select Button. • Use this button to enter the OSD menu. 4. Particularly, Crosshair function is as the below table. MENU Button: • Press this button to turn the monitor on/off. 3. Close Button: • Exit the OSD menu. 5. Power Indicator: • The color definition of the power indicator is specially designed for users...
User Guide
Page 12
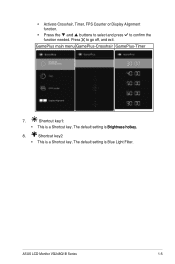
The default setting is Blue Light Filter. The default setting is Brightness hotkey. 8. Shortcut key1: • This is a Shortcut key. GamePlus main menu GamePlus-Crosshair GamePlus-Timer 7. Press to confirm the function needed. ASUS LCD Monitor VG248Q1B Series 1-5 Shortcut key2 • This is a Shortcut key. • Activate Crosshair, Timer, FPS Counter or Display Alignment function. • Press the and buttons to select and press to go off, and exit.
The default setting is Blue Light Filter. The default setting is Brightness hotkey. 8. Shortcut key1: • This is a Shortcut key. GamePlus main menu GamePlus-Crosshair GamePlus-Timer 7. Press to confirm the function needed. ASUS LCD Monitor VG248Q1B Series 1-5 Shortcut key2 • This is a Shortcut key. • Activate Crosshair, Timer, FPS Counter or Display Alignment function. • Press the and buttons to select and press to go off, and exit.
User Guide
Page 13
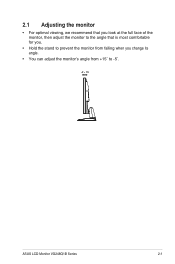
2.1 Adjusting the monitor • For optimal viewing, we recommend that you look at the full face of the monitor, then adjust the monitor to the angle that is most comfortable for you. • Hold the stand to prevent the monitor from falling when you change its angle. • You can adjust the monitor's angle from +15˚ to -5˚. -5 ~ 15 ASUS LCD Monitor VG248Q1B Series 2-1
2.1 Adjusting the monitor • For optimal viewing, we recommend that you look at the full face of the monitor, then adjust the monitor to the angle that is most comfortable for you. • Hold the stand to prevent the monitor from falling when you change its angle. • You can adjust the monitor's angle from +15˚ to -5˚. -5 ~ 15 ASUS LCD Monitor VG248Q1B Series 2-1

User Guide
Page 14
Carefully put the monitor facedown on its EPS packaging. 2. To detach the arm/stand 1. Disconnect power and signal cables. 2.2 Detaching the arm/stand (for VESA wall mount) The detachable stand of the monitor. 3. Remove the two (2) screws securing the arm to the rear of this monitor is specially designed for VESA wall mount. Detach the stand (arm and base) from the monitor. 1 or 4 3 2 5 7 6 2-2 Chapter 2: Setup
Carefully put the monitor facedown on its EPS packaging. 2. To detach the arm/stand 1. Disconnect power and signal cables. 2.2 Detaching the arm/stand (for VESA wall mount) The detachable stand of the monitor. 3. Remove the two (2) screws securing the arm to the rear of this monitor is specially designed for VESA wall mount. Detach the stand (arm and base) from the monitor. 1 or 4 3 2 5 7 6 2-2 Chapter 2: Setup
User Guide
Page 16
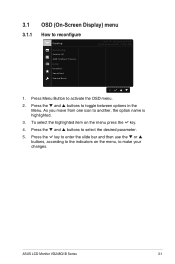
... in the Menu. ASUS LCD Monitor VG248Q1B Series 3-1 Press the and buttons to another, the option name is highlighted. 3. 3.1 3.1.1 OSD (On-Screen Display) menu How to select the desired parameter. 5. To select the highlighted item on the menu, to make your changes. Press the and buttons to reconfigure Gaming Overclocking Variable OD AMD FreeSync Premium ELMB GamePlus GameVisual Shadow Boost ASUS TUF Gaming VG248Q1B Racing Mode HDMI-1 1080p...
... in the Menu. ASUS LCD Monitor VG248Q1B Series 3-1 Press the and buttons to another, the option name is highlighted. 3. 3.1 3.1.1 OSD (On-Screen Display) menu How to select the desired parameter. 5. To select the highlighted item on the menu, to make your changes. Press the and buttons to reconfigure Gaming Overclocking Variable OD AMD FreeSync Premium ELMB GamePlus GameVisual Shadow Boost ASUS TUF Gaming VG248Q1B Racing Mode HDMI-1 1080p...

User Guide
Page 17
... Boost ASUS TUF Gaming VG248Q1B Racing Mode HDMI-1 1080p 60Hz • Overclocking: This function allows you to adjust the refresh rate. • Variable OD: The adjusting range is from level 0 to level 5.The default setting is level 3. • AMD FreeSync Premium : It can allow a AMD FreeSync Premium supported graphics source to dynamically adjust display refresh rate based on typical content frame rates for power efficient, virtually stutter free and low-latency display update. • ELMB: Check...
... Boost ASUS TUF Gaming VG248Q1B Racing Mode HDMI-1 1080p 60Hz • Overclocking: This function allows you to adjust the refresh rate. • Variable OD: The adjusting range is from level 0 to level 5.The default setting is level 3. • AMD FreeSync Premium : It can allow a AMD FreeSync Premium supported graphics source to dynamically adjust display refresh rate based on typical content frame rates for power efficient, virtually stutter free and low-latency display update. • ELMB: Check...
User Guide
Page 18
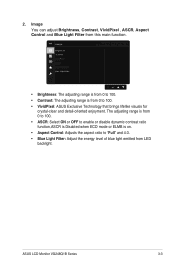
Image Brightness Contrast VividPixel ASCR Aspect Control Blue Light Filter ASUS TUF Gaming VG248Q1B Racing Mode HDMI-1 1080p 60Hz • Brightness: The adjusting range is from 0 to 100. • Contrast: The adjusting range is on. • Aspect Control: Adjusts the aspect ratio to "Full" and 4:3. • Blue Light Filter: Adjust the energy level of blue light emitted from LED backlight. The adjusting range is from 0 to 100. • ASCR: Select ON or OFF to 100. • VividPixel: ASUS Exclusive Technology that...
Image Brightness Contrast VividPixel ASCR Aspect Control Blue Light Filter ASUS TUF Gaming VG248Q1B Racing Mode HDMI-1 1080p 60Hz • Brightness: The adjusting range is from 0 to 100. • Contrast: The adjusting range is on. • Aspect Control: Adjusts the aspect ratio to "Full" and 4:3. • Blue Light Filter: Adjust the energy level of blue light emitted from LED backlight. The adjusting range is from 0 to 100. • ASCR: Select ON or OFF to 100. • VividPixel: ASUS Exclusive Technology that...
User Guide
Page 19
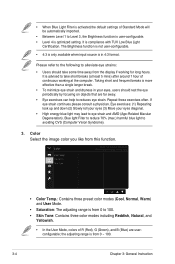
...Blue light Filter to reduce 70% (max.) harmful blue light to reduces eye strain. Saturation Skin Tone ASUS TUF Gaming VG248Q1B Racing Mode HDMI-1 1080p 60Hz • Color Temp.: Contains three preset color modes (Cool, Normal, Warm) and User Mode. • Saturation: The adjusting range...Level 3, the Brightness function is user-configurable. • Level 4 is optimized setting. the adjusting range is from the display if working at the computer. • When Blue Light Filter is activated,the default settings of continuous working for long hours. Color Color Temp. Eye ...
...Blue light Filter to reduce 70% (max.) harmful blue light to reduces eye strain. Saturation Skin Tone ASUS TUF Gaming VG248Q1B Racing Mode HDMI-1 1080p 60Hz • Color Temp.: Contains three preset color modes (Cool, Normal, Warm) and User Mode. • Saturation: The adjusting range...Level 3, the Brightness function is user-configurable. • Level 4 is optimized setting. the adjusting range is from the display if working at the computer. • When Blue Light Filter is activated,the default settings of continuous working for long hours. Color Color Temp. Eye ...
User Guide
Page 20
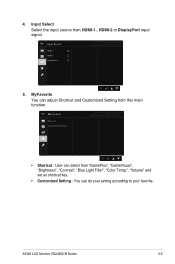
... function. ASUS LCD Monitor VG248Q1B Series 3-5 4. MyFavorite Shortcut Custormized Setting ASUS TUF Gaming VG248Q1B Racing Mode HDMI-1 1080p 60Hz • Shortcut : User can select from "GamePlus", "GameVisual", "Brightness", "Contrast", "Blue Light Filter", "Color Temp.", "Volume" and set as shortcut key. • Customized Setting : You can adjust Shortcut and Customized Setting from HDMI-1 , HDMI-2 or DisplayPort input signal. MyFavorite You can do your setting according to your favorite. Input Select HDMI-1 HDMI-2 DisplayPort ASUS TUF Gaming VG248Q1B Racing Mode HDMI-1 1080p...
... function. ASUS LCD Monitor VG248Q1B Series 3-5 4. MyFavorite Shortcut Custormized Setting ASUS TUF Gaming VG248Q1B Racing Mode HDMI-1 1080p 60Hz • Shortcut : User can select from "GamePlus", "GameVisual", "Brightness", "Contrast", "Blue Light Filter", "Color Temp.", "Volume" and set as shortcut key. • Customized Setting : You can adjust Shortcut and Customized Setting from HDMI-1 , HDMI-2 or DisplayPort input signal. MyFavorite You can do your setting according to your favorite. Input Select HDMI-1 HDMI-2 DisplayPort ASUS TUF Gaming VG248Q1B Racing Mode HDMI-1 1080p...
User Guide
Page 21
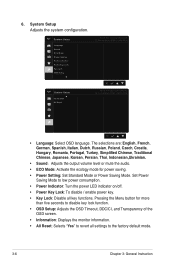
... Lock: To disable / enable power key. • Key Lock: Disable all key functions. Set Power Saving Mode to the factory default mode. 3-6 Chapter 3: General Instruction 6. System Setup Language Sound ECO Mode Power Setting Power Indicator Power Key Lock Key Lock OSD Setup ASUS TUF Gaming VG248Q1B Racing Mode HDMI-1 1080p 60Hz System Setup Information All Reset ASUS TUF Gaming VG248Q1B Racing Mode HDMI-1 1080p 60Hz • Language: Select OSD language. Pressing the Menu button for power saving. • Power Setting: Set Standard Mode or Power Saving Mode. System Setup Adjusts...
... Lock: To disable / enable power key. • Key Lock: Disable all key functions. Set Power Saving Mode to the factory default mode. 3-6 Chapter 3: General Instruction 6. System Setup Language Sound ECO Mode Power Setting Power Indicator Power Key Lock Key Lock OSD Setup ASUS TUF Gaming VG248Q1B Racing Mode HDMI-1 1080p 60Hz System Setup Information All Reset ASUS TUF Gaming VG248Q1B Racing Mode HDMI-1 1080p 60Hz • Language: Select OSD language. Pressing the Menu button for power saving. • Power Setting: Set Standard Mode or Power Saving Mode. System Setup Adjusts...
User Guide
Page 22
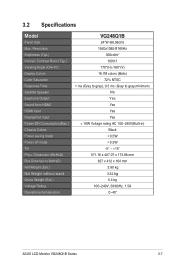
...-in) Black < 0.5W < 0.3W -5° ~ +15° 571.16 x 407.07 x 173.98 mm 637 x 412 x 164 mm 3.80 kg 3.32 kg 5.4 kg 100~240V, 50/60Hz, 1.5A 0~40° ASUS LCD Monitor VG248Q1B Series 3-7 Resolution Brightness (Typ.) Intrinsic Contrast Ratio (Typ.) Viewing Angle (CR=10) Display Colors Color Saturation Response Time Satellite Speaker Earphone Output Sound from HDMI HDMI input DisplayPort input Power ON Consumption(Max.) Chassis Colors Power saving mode Power off mode Tilt Phys.
...-in) Black < 0.5W < 0.3W -5° ~ +15° 571.16 x 407.07 x 173.98 mm 637 x 412 x 164 mm 3.80 kg 3.32 kg 5.4 kg 100~240V, 50/60Hz, 1.5A 0~40° ASUS LCD Monitor VG248Q1B Series 3-7 Resolution Brightness (Typ.) Intrinsic Contrast Ratio (Typ.) Viewing Angle (CR=10) Display Colors Color Saturation Response Time Satellite Speaker Earphone Output Sound from HDMI HDMI input DisplayPort input Power ON Consumption(Max.) Chassis Colors Power saving mode Power off mode Tilt Phys.
User Guide
Page 23
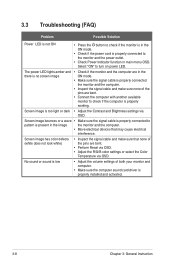
... properly working. 3.3 Troubleshooting (FAQ) Problem Possible Solution Power LED is not ON • Press the button to check if the monitor is in the ON mode. • Check if the power cord is properly connected to turn on power LED. Select "ON" to the monitor and the power outlet. • Check Power Indicator function in main menu OSD. No sound or sound is too light or dark • Adjust the Contrast and Brightness settings via OSD. Screen image is low • Adjust the volume settings...
... properly working. 3.3 Troubleshooting (FAQ) Problem Possible Solution Power LED is not ON • Press the button to check if the monitor is in the ON mode. • Check if the power cord is properly connected to turn on power LED. Select "ON" to the monitor and the power outlet. • Check Power Indicator function in main menu OSD. No sound or sound is too light or dark • Adjust the Contrast and Brightness settings via OSD. Screen image is low • Adjust the volume settings...
User Guide
Page 24
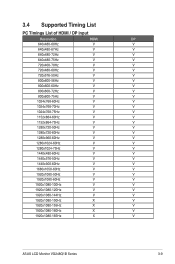
3.4 Supported Timing List PC Timings List of HDMI / DP input Resolution HDMI DP 640x480-60Hz V V 640x480-67Hz V V 640x480-72Hz V V 640x480-75Hz V V 720x400-70Hz V V 720x480-60Hz V V 720x576-50Hz V V 800x600-56Hz V V 800x600-60Hz V V 800x600-72Hz V V 800x600-75Hz V V...50Hz V V 1440x900-60Hz V V 1680x1050-60Hz V V 1920x1080-50Hz V V 1920x1080-60Hz V V 1920x1080-100Hz V V 1920x1080-120Hz V V 1920x1080-144Hz V V 1920x1080-150Hz X V 1920x1080-155Hz X V 1920x1080-160Hz X V 1920x1080-165Hz X V ASUS LCD Monitor VG248Q1B Series 3-9
3.4 Supported Timing List PC Timings List of HDMI / DP input Resolution HDMI DP 640x480-60Hz V V 640x480-67Hz V V 640x480-72Hz V V 640x480-75Hz V V 720x400-70Hz V V 720x480-60Hz V V 720x576-50Hz V V 800x600-56Hz V V 800x600-60Hz V V 800x600-72Hz V V 800x600-75Hz V V...50Hz V V 1440x900-60Hz V V 1680x1050-60Hz V V 1920x1080-50Hz V V 1920x1080-60Hz V V 1920x1080-100Hz V V 1920x1080-120Hz V V 1920x1080-144Hz V V 1920x1080-150Hz X V 1920x1080-155Hz X V 1920x1080-160Hz X V 1920x1080-165Hz X V ASUS LCD Monitor VG248Q1B Series 3-9


