User Manual
Page 4
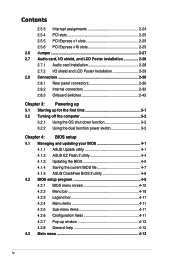
... setup 4.1 Managing and updating your BIOS 4-1 4.1.1 ASUS Update utility 4-1 4.1.2 ASUS EZ Flash 2 utility 4-4 4.1.3 Updating the BIOS 4-5 4.1.4 Saving the current BIOS file 4-7 4.1.5 ASUS CrashFree BIOS 2 utility 4-8 4.2 BIOS setup program 4-9 4.2.1 BIOS menu screen 4-10 4.2.2 Menu bar 4-10 4.2.3 Legend bar 4-11 4.2.4 Menu items 4-11 4.2.5 Sub-menu items 4-11 4.2.6 Configuration fields 4-11 4.2.7 Pop-up window 4-12 4.2.8 General help 4-12 4.3 Main...
... setup 4.1 Managing and updating your BIOS 4-1 4.1.1 ASUS Update utility 4-1 4.1.2 ASUS EZ Flash 2 utility 4-4 4.1.3 Updating the BIOS 4-5 4.1.4 Saving the current BIOS file 4-7 4.1.5 ASUS CrashFree BIOS 2 utility 4-8 4.2 BIOS setup program 4-9 4.2.1 BIOS menu screen 4-10 4.2.2 Menu bar 4-10 4.2.3 Legend bar 4-11 4.2.4 Menu items 4-11 4.2.5 Sub-menu items 4-11 4.2.6 Configuration fields 4-11 4.2.7 Pop-up window 4-12 4.2.8 General help 4-12 4.3 Main...

User Manual
Page 38
... (B) until it snaps into the CPU notch. The motherboard supports Intel® LGA775 processors with your thumb and forefinger to a 100º angle (A), then push the PnP cap from the load plate window to the Appendix for more information on these CPU features. 2-10 Chapter 2: Hardware information CPU notch Gold triangle mark The...
... (B) until it snaps into the CPU notch. The motherboard supports Intel® LGA775 processors with your thumb and forefinger to a 100º angle (A), then push the PnP cap from the load plate window to the Appendix for more information on these CPU features. 2-10 Chapter 2: Hardware information CPU notch Gold triangle mark The...
User Manual
Page 62
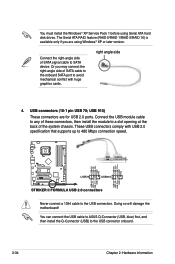
...+ GND NC STRIKER II FORMULA ® USB78 USB910 USB+5V USB_P9USB_P9+ GND USB+5V USB_P7USB_P7+ GND STRIKER II FORMULA USB 2.0 connectors Never connect a 1394 cable to 480 Mbps connection speed. Doing so will damage the motherboard! The Serial ATA RAID feature (RAID 0/RAID 1/RAID 5/RAID 10) is available only... the USB connectors. right angle side 4. You can connect the USB cable to ASUS Q-Connector (USB, blue) first, and then install the Q-Connector (USB) to SATA device. USB connectors (10-1 pin USB 78; USB 910) These connectors are using Serial ATA hard disk ...
...+ GND NC STRIKER II FORMULA ® USB78 USB910 USB+5V USB_P9USB_P9+ GND USB+5V USB_P7USB_P7+ GND STRIKER II FORMULA USB 2.0 connectors Never connect a 1394 cable to 480 Mbps connection speed. Doing so will damage the motherboard! The Serial ATA RAID feature (RAID 0/RAID 1/RAID 5/RAID 10) is available only... the USB connectors. right angle side 4. You can connect the USB cable to ASUS Q-Connector (USB, blue) first, and then install the Q-Connector (USB) to SATA device. USB connectors (10-1 pin USB 78; USB 910) These connectors are using Serial ATA hard disk ...

User Manual
Page 136
After flashing the BIOS, restart the computer to load the new boot logo. 10. When the logo images appear on the right window pane, select an image to your desired size by clicking on the Ratio box. 9. 7. When the screen returns to the ASUS Update utility, flash the original BIOS to display the new boot logo during POST. 5-10 Chapter 5: Software support Adjust the boot image to enlarge by selecting a value on it. 8.
After flashing the BIOS, restart the computer to load the new boot logo. 10. When the logo images appear on the right window pane, select an image to your desired size by clicking on the Ratio box. 9. 7. When the screen returns to the ASUS Update utility, flash the original BIOS to display the new boot logo during POST. 5-10 Chapter 5: Software support Adjust the boot image to enlarge by selecting a value on it. 8.
User Manual
Page 159
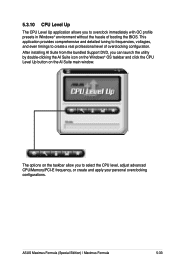
The options on the AI Suite main window. This application provides comprehensive and detailed tuning to frequencies, voltagies, and even timings to create a real professional level of booting the BIOS. After installing AI ... click the CPU Level Up button on the taskbar allow you to overclock immediately with OC profile presets in WIndows® environment without the hassle of overclocking configuration. ASUS Maximus Formula (Special Edition) / Maximus Formula 5-33 5.3.10 CPU Level Up The CPU Level Up application allows you to select the CPU level, adjust advanced CPU...
The options on the AI Suite main window. This application provides comprehensive and detailed tuning to frequencies, voltagies, and even timings to create a real professional level of booting the BIOS. After installing AI ... click the CPU Level Up button on the taskbar allow you to overclock immediately with OC profile presets in WIndows® environment without the hassle of overclocking configuration. ASUS Maximus Formula (Special Edition) / Maximus Formula 5-33 5.3.10 CPU Level Up The CPU Level Up application allows you to select the CPU level, adjust advanced CPU...

User Manual
Page 184
... Power schemes section, click , then select any option except Home/Office Desktop or Always On. 9. Close the Display Properties window. item to open the Power Options Properties window. 8. Click the Power button on the desktop, then select Properties from the pop-up menu. 6. Click Apply, then ...click OK. 10. The screen displays and procedures may vary depending on the computer, then enter the BIOS Setup. 2. Turn on...
... Power schemes section, click , then select any option except Home/Office Desktop or Always On. 9. Close the Display Properties window. item to open the Power Options Properties window. 8. Click the Power button on the desktop, then select Properties from the pop-up menu. 6. Click Apply, then ...click OK. 10. The screen displays and procedures may vary depending on the computer, then enter the BIOS Setup. 2. Turn on...

