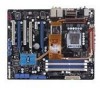
User Manual
Page 4
... the OS shut down function 3-2 3.2.2 Using the dual function power switch 3-2 Chapter 4: BIOS setup 4.1 Managing and updating your BIOS 4-1 4.1.1 ASUS Update utility 4-1 4.1.2 ASUS EZ Flash 2 utility 4-4 4.1.3 Updating the BIOS 4-5 4.1.4 Saving the current BIOS file 4-7 4.1.5 ASUS CrashFree BIOS utility 4-8 4.2 BIOS setup program 4-9 4.2.1 BIOS menu screen 4-10 4.2.2 Menu bar 4-10 4.2.3 Legend bar 4-11 4.2.4 Menu items...
... the OS shut down function 3-2 3.2.2 Using the dual function power switch 3-2 Chapter 4: BIOS setup 4.1 Managing and updating your BIOS 4-1 4.1.1 ASUS Update utility 4-1 4.1.2 ASUS EZ Flash 2 utility 4-4 4.1.3 Updating the BIOS 4-5 4.1.4 Saving the current BIOS file 4-7 4.1.5 ASUS CrashFree BIOS utility 4-8 4.2 BIOS setup program 4-9 4.2.1 BIOS menu screen 4-10 4.2.2 Menu bar 4-10 4.2.3 Legend bar 4-11 4.2.4 Menu items...
User Manual
Page 6
... utility)... 5-12 5.3.4 ASUS PC Probe II 5-21 5.3.5 ASUS AI Suite 5-27 5.3.6 ASUS EPU Utility-AI Gear 3 5-29 5.3.7 ASUS AI Nap 5-31 5.3.8 ASUS Q-Fan Plus 5-32 5.3.9 ASUS AI Booster 5-33 5.3....10 CPU Level Up 5-34 5.4 RAID configurations 5-35 5.4.1 RAID definitions 5-35 5.4.2 NVIDIA® RAID configurations 5-36 5.4.4 JMicron® RAID Configuration 5-43 5.5 Creating a RAID driver disk 5-51 5.5.1 Creating a RAID driver disk without entering the OS.... 5-51 5.5.2 Creating a RAID/SATA driver disk in Windows...
... utility)... 5-12 5.3.4 ASUS PC Probe II 5-21 5.3.5 ASUS AI Suite 5-27 5.3.6 ASUS EPU Utility-AI Gear 3 5-29 5.3.7 ASUS AI Nap 5-31 5.3.8 ASUS Q-Fan Plus 5-32 5.3.9 ASUS AI Booster 5-33 5.3....10 CPU Level Up 5-34 5.4 RAID configurations 5-35 5.4.1 RAID definitions 5-35 5.4.2 NVIDIA® RAID configurations 5-36 5.4.4 JMicron® RAID Configuration 5-43 5.5 Creating a RAID driver disk 5-51 5.5.1 Creating a RAID driver disk without entering the OS.... 5-51 5.5.2 Creating a RAID/SATA driver disk in Windows...

User Manual
Page 7
Contents 6.2 Graphics card setup 6-2 6.2.1 Installing three SLI-ready graphics cards 6-2 6.2.2 Installing two SLI-ready graphics cards 6-5 6.2.3 Installing the device drivers 6-6 6.2.4 Enabling the NVIDIA® SLI™ technology in Windows®..... 6-6 Appendix: CPU features A.1 Intel® EM64T A-1 A.2 Enhanced Intel SpeedStep® Technology (EIST A-1 A.2.1 System requirements A-1 A.2.2 Using the EIST A-2 A.3 Intel® Hyper-Threading Technology A-3 Using the Hyper-Threading Technology A-3 A.4 Debug code table A-4 vii
Contents 6.2 Graphics card setup 6-2 6.2.1 Installing three SLI-ready graphics cards 6-2 6.2.2 Installing two SLI-ready graphics cards 6-5 6.2.3 Installing the device drivers 6-6 6.2.4 Enabling the NVIDIA® SLI™ technology in Windows®..... 6-6 Appendix: CPU features A.1 Intel® EM64T A-1 A.2 Enhanced Intel SpeedStep® Technology (EIST A-1 A.2.1 System requirements A-1 A.2.2 Using the EIST A-2 A.3 Intel® Hyper-Threading Technology A-3 Using the Hyper-Threading Technology A-3 A.4 Debug code table A-4 vii
User Manual
Page 21
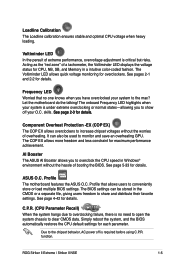
...2-1 and 2-2 for details. Frequency LED Worried that allows users to show off is critical but risky. Profile The motherboard features the ASUS O.C. C.P.R. (CPU Parameter Recall) When the system hangs due to overclocking failure, there is no one knows when ... speed in Windows® environment without the worries of extreme performance, overvoltage adjustment is required before using C.P.R. AI Booster The ASUS AI Booster allows you to conveniently store or load multiple BIOS settings. ASUS O.C. See page 5-33 for details. ROG Striker II Extreme / Striker II NSE 1-5
...2-1 and 2-2 for details. Frequency LED Worried that allows users to show off is critical but risky. Profile The motherboard features the ASUS O.C. C.P.R. (CPU Parameter Recall) When the system hangs due to overclocking failure, there is no one knows when ... speed in Windows® environment without the worries of extreme performance, overvoltage adjustment is required before using C.P.R. AI Booster The ASUS AI Booster allows you to conveniently store or load multiple BIOS settings. ASUS O.C. See page 5-33 for details. ROG Striker II Extreme / Striker II NSE 1-5
User Manual
Page 37
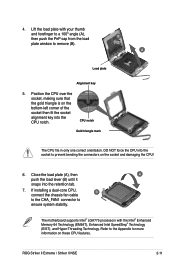
... snaps into the retention tab. 7. ROG Striker II Extreme / Striker II NSE 2-11 Refer to prevent bending the connectors on these CPU features. 4. B A Load plate Alignment key 5. The motherboard supports Intel® LGA775 processors with your thumb and forefinger to a 100º angle (A), then push the PnP cap from the load plate window to ensure system stability.
... snaps into the retention tab. 7. ROG Striker II Extreme / Striker II NSE 2-11 Refer to prevent bending the connectors on these CPU features. 4. B A Load plate Alignment key 5. The motherboard supports Intel® LGA775 processors with your thumb and forefinger to a 100º angle (A), then push the PnP cap from the load plate window to ensure system stability.
User Manual
Page 45
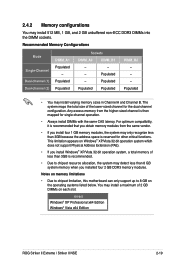
... operation. • Always install DIMMs with the same CAS latency. Notes on memory limitations • Due to chipset limitation, this motherboard can only support up to chipset resource allocation, the system may install 512 MB, 1 GB, and 2 GB unbuffered non‑...than 3GB because the address space is recommended. • Due to 8 GB on each slot. 64-bit Windows® XP Professional x64 Edition Windows® Vista x64 Edition ROG Striker II Extreme / Striker II NSE 2-19 Populated Populated Sockets DIMM_A2 DIMM_B1 - - - Populated • You may install a maximum of ...
... operation. • Always install DIMMs with the same CAS latency. Notes on memory limitations • Due to chipset limitation, this motherboard can only support up to chipset resource allocation, the system may install 512 MB, 1 GB, and 2 GB unbuffered non‑...than 3GB because the address space is recommended. • Due to 8 GB on each slot. 64-bit Windows® XP Professional x64 Edition Windows® Vista x64 Edition ROG Striker II Extreme / Striker II NSE 2-19 Populated Populated Sockets DIMM_A2 DIMM_B1 - - - Populated • You may install a maximum of ...
User Manual
Page 59
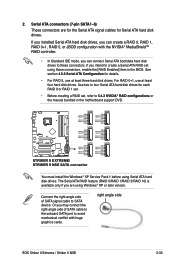
...] item in the motherboard support DVD. The Serial ATA RAID feature (RAID 0/RAID 1/RAID 5/RAID 10) is available only if you can create a RAID 0, RAID 1, RAID 0+1, RAID 5, or JBOD configuration with huge graphics cards. right angle side ROG Striker II Extreme / Striker II NSE 2-33 If... SATA1 GND RSATA_TXP1 RSATA_TXN1 GND RSATA_RXP1 RSATA_RXN1 GND SATA2 GND RSATA_TXP2 RSATA_TXN2 GND RSATA_RXP2 RSATA_RXN2 GND STRIKER II EXTREME/ STRIKER II NSE SATA connector You must install the Windows® XP Service Pack 1 before using these connectors. Serial ATA connectors (7-pin SATA1-6) These ...
...] item in the motherboard support DVD. The Serial ATA RAID feature (RAID 0/RAID 1/RAID 5/RAID 10) is available only if you can create a RAID 0, RAID 1, RAID 0+1, RAID 5, or JBOD configuration with huge graphics cards. right angle side ROG Striker II Extreme / Striker II NSE 2-33 If... SATA1 GND RSATA_TXP1 RSATA_TXN1 GND RSATA_RXP1 RSATA_RXN1 GND SATA2 GND RSATA_TXP2 RSATA_TXN2 GND RSATA_RXP2 RSATA_RXN2 GND STRIKER II EXTREME/ STRIKER II NSE SATA connector You must install the Windows® XP Service Pack 1 before using these connectors. Serial ATA connectors (7-pin SATA1-6) These ...

User Manual
Page 76
...the computer. 3. 3.2 Turning off the computer 3.2.1 Using the OS shut down function If you are using Windows® XP: 1. Click the Start button then select ShutDown. 2. If you are using Windows® Vista™: 1. Click the Turn Off button to soft-off mode, depending on the BIOS setting.... The power supply should turn off mode regardless of the BIOS setting. The power supply should turn off after Windows® shuts down. 3.2.2 Using the dual function power switch While the system is ON, pressing the power switch for less than four ...
...the computer. 3. 3.2 Turning off the computer 3.2.1 Using the OS shut down function If you are using Windows® XP: 1. Click the Start button then select ShutDown. 2. If you are using Windows® Vista™: 1. Click the Turn Off button to soft-off mode, depending on the BIOS setting.... The power supply should turn off mode regardless of the BIOS setting. The power supply should turn off after Windows® shuts down. 3.2.2 Using the dual function power switch While the system is ON, pressing the power switch for less than four ...
User Manual
Page 79
...ISP). ROG Striker II Extreme / Striker II NSE 4-1 Award BIOS Flash Utility (Updates the BIOS using a USB flash disk or the motherboard support DVD.) 3. 4.1 Managing and updating your system. ASUS EZ Flash 2 (Updates the BIOS in DOS using a bootable USB flash disk or a CD ROM.) 4. ASUS CrashFree BIOS (... is a utility that comes with the motherboard package. Click the Utilities tab, then click Install ASUS Update VX.XX.XX. 3. The ASUS Update utility is copied to restore the BIOS in Windows® environment. Copy the original motherboard BIOS using a floppy disk when the ...
...ISP). ROG Striker II Extreme / Striker II NSE 4-1 Award BIOS Flash Utility (Updates the BIOS using a USB flash disk or the motherboard support DVD.) 3. 4.1 Managing and updating your system. ASUS EZ Flash 2 (Updates the BIOS in DOS using a bootable USB flash disk or a CD ROM.) 4. ASUS CrashFree BIOS (... is a utility that comes with the motherboard package. Click the Utilities tab, then click Install ASUS Update VX.XX.XX. 3. The ASUS Update utility is copied to restore the BIOS in Windows® environment. Copy the original motherboard BIOS using a floppy disk when the ...

User Manual
Page 80
Updating the BIOS through the Internet To update the BIOS through the Internet: 1. Select the ASUS FTP site nearest Internet option from the 3. Click Next. 4-2 Chapter 4: BIOS setup Select Update BIOS from the drop‑down you update the BIOS using this utility. Launch the ASUS Update utility from the Windows® desktop by clicking Start > Programs > ASUS > ASUSUpdate > ASUSUpdate. The ASUS Update main window appears. 2. click Auto Select. Quit all Windows® applications before you to avoid network traffic, or menu, then click Next.
Updating the BIOS through the Internet To update the BIOS through the Internet: 1. Select the ASUS FTP site nearest Internet option from the 3. Click Next. 4-2 Chapter 4: BIOS setup Select Update BIOS from the drop‑down you update the BIOS using this utility. Launch the ASUS Update utility from the Windows® desktop by clicking Start > Programs > ASUS > ASUSUpdate > ASUSUpdate. The ASUS Update main window appears. 2. click Auto Select. Quit all Windows® applications before you to avoid network traffic, or menu, then click Next.

User Manual
Page 81
... ASUS Update main window appears. 2. Select Update BIOS from a file option from the drop‑down menu, then click Next. 3. Click Next. 5. Always update the utility to complete the update process. The ASUS Update utility is capable of updating itself through a BIOS file: 1. Follow the screen instructions to download. StrikerII StrikerII ROG Striker II Extreme / Striker II NSE...
... ASUS Update main window appears. 2. Select Update BIOS from a file option from the drop‑down menu, then click Next. 3. Click Next. 5. Always update the utility to complete the update process. The ASUS Update utility is capable of updating itself through a BIOS file: 1. Follow the screen instructions to download. StrikerII StrikerII ROG Striker II Extreme / Striker II NSE...

User Manual
Page 89
...bar allow you can change the value of a field, select it then press to display a list of the Setup screen is highlighted when selected. ROG Striker II Extreme / Striker II NSE 4-11 4.2.3 Legend bar At the bottom of options. Navigation Key Left or Right arrow Up or Down arrow Page Down or - (minus) Page... or returns to the main menu from a sub‑menu Selects the menu item to navigate through the values for the highlighted field Brings up window." For example, selecting Main shows the Main menu items. The other items (Advanced, Power, Boot, and Exit) on the menu bar have their...
...bar allow you can change the value of a field, select it then press to display a list of the Setup screen is highlighted when selected. ROG Striker II Extreme / Striker II NSE 4-11 4.2.3 Legend bar At the bottom of options. Navigation Key Left or Right arrow Up or Down arrow Page Down or - (minus) Page... or returns to the main menu from a sub‑menu Selects the menu item to navigate through the values for the highlighted field Brings up window." For example, selecting Main shows the Main menu items. The other items (Advanced, Power, Boot, and Exit) on the menu bar have their...
User Manual
Page 90
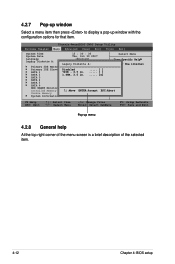
...→←: Select Menu -/+: Change Value Enter: Select SubMenu F5: Setup Defaults F10: Save and Exit Pop-up window with the configuration options for that item. 4.2.7 Pop-up window Select a menu item then press to display a pop-up menu 4.2.8 General help At the top right corner of the... menu screen is a brief description of the selected item. 4-12 Chapter 4: BIOS setup Phoenix-AwardBIOS CMOS Setup Utility Extreme Tweaker Main Advanced Power ...
...→←: Select Menu -/+: Change Value Enter: Select SubMenu F5: Setup Defaults F10: Save and Exit Pop-up window with the configuration options for that item. 4.2.7 Pop-up window Select a menu item then press to display a pop-up menu 4.2.8 General help At the top right corner of the... menu screen is a brief description of the selected item. 4-12 Chapter 4: BIOS setup Phoenix-AwardBIOS CMOS Setup Utility Extreme Tweaker Main Advanced Power ...

User Manual
Page 123
...with a message asking if you want to the Setup program. After selecting this option or if you press , a confirmation window appears. ROG Striker II Extreme / Striker II NSE 4-45 Press to the CMOS RAM. Select YES to load default values. If you made changes to the non-...default values for the BIOS items, and save or discard your changes to the BIOS items. Phoenix-AwardBIOS CMOS Setup Utility Extreme Tweaker �M�a�i�n A��d��v��a��n��c���e��d...
...with a message asking if you want to the Setup program. After selecting this option or if you press , a confirmation window appears. ROG Striker II Extreme / Striker II NSE 4-45 Press to the CMOS RAM. Select YES to load default values. If you made changes to the non-...default values for the BIOS items, and save or discard your changes to the BIOS items. Phoenix-AwardBIOS CMOS Setup Utility Extreme Tweaker �M�a�i�n A��d��v��a��n��c���e��d...

User Manual
Page 127
...ASUS website (www.asus.com) for updates. 5.2.1 Running the support DVD Place the support DVD to change at any time without notice. The DVD automatically displays the Drivers menu if Autorun is NOT enabled in your computer, browse the contents of your computer. Click an icon to display support DVD/motherboard... for reference only. ROG Striker II Extreme / Striker II NSE 5-1 Always install the latest OS version and corresponding updates to avail all motherboard features. 5.1 Installing an operating system This motherboard supports Windows® X��P�...
...ASUS website (www.asus.com) for updates. 5.2.1 Running the support DVD Place the support DVD to change at any time without notice. The DVD automatically displays the Drivers menu if Autorun is NOT enabled in your computer, browse the contents of your computer. Click an icon to display support DVD/motherboard... for reference only. ROG Striker II Extreme / Striker II NSE 5-1 Always install the latest OS version and corresponding updates to avail all motherboard features. 5.1 Installing an operating system This motherboard supports Windows® X��P�...

User Manual
Page 130
...graphics and sound. DirectX® improves the multimedia features of you computer so you to open, view, and print documents in Windows® environment. Anti-Virus Utility The anti-virus application scans, identifies, and removes computer viruses. Corel Snapfire Plus SE Installs the...Suite Installs the ASUS AI Suite. View the online help for updates. This utility requires an Internet connection either through a network or an Internet Service Provider (ISP). The Microsoft DirectX® 9.0c is a multimedia technology that allows you to update the motherboard BIOS in ...
...graphics and sound. DirectX® improves the multimedia features of you computer so you to open, view, and print documents in Windows® environment. Anti-Virus Utility The anti-virus application scans, identifies, and removes computer viruses. Corel Snapfire Plus SE Installs the...Suite Installs the ASUS AI Suite. View the online help for updates. This utility requires an Internet connection either through a network or an Internet Service Provider (ISP). The Microsoft DirectX® 9.0c is a multimedia technology that allows you to update the motherboard BIOS in ...

User Manual
Page 135
..., then click Next. The ASUS MyLogo window appears. 6. ROG Striker II Extreme / Striker II NSE 5-9 See section 4.1.3 Updating the BIOS. • Make sure that contains the image you customize the boot logo. Select Options from the ASUS website. Launch the ASUS Update utility. Refer to section "4.1.1 ASUS Update utility" for more information. 5.3.1 ASUS MyLogo3™ The ASUS MyLogo3™ utility lets you...
..., then click Next. The ASUS MyLogo window appears. 6. ROG Striker II Extreme / Striker II NSE 5-9 See section 4.1.3 Updating the BIOS. • Make sure that contains the image you customize the boot logo. Select Options from the ASUS website. Launch the ASUS Update utility. Refer to section "4.1.1 ASUS Update utility" for more information. 5.3.1 ASUS MyLogo3™ The ASUS MyLogo3™ utility lets you...

User Manual
Page 136
Adjust the boot image to enlarge by selecting a value on it. 8. When the screen returns to the ASUS Update utility, flash the original BIOS to display the new boot logo during POST. 5-10 Chapter 5: Software support 7. When the logo images appear on the right window pane, select an image to your desired size by clicking on the Ratio box. 9. After flashing the BIOS, restart the computer to load the new boot logo. 10.
Adjust the boot image to enlarge by selecting a value on it. 8. When the screen returns to the ASUS Update utility, flash the original BIOS to display the new boot logo during POST. 5-10 Chapter 5: Software support 7. When the logo images appear on the right window pane, select an image to your desired size by clicking on the Ratio box. 9. After flashing the BIOS, restart the computer to load the new boot logo. 10.

User Manual
Page 137
...™ To use the the Marvell® Virtual Cable Tester™ utility: 1. ROG Striker II Extreme / Striker II NSE 5-11 VCT is detected on the Virtual Cable Tester™ main window is disabled if no problem is a cable diagnostic utility that reports LAN cable faults and shorts... using the Time Domain Reflectometry (TDR) technology. Click Virtual Cable Tester from the Windows® desktop by clicking Start > All Programs > Marvell > Virtual Cable Tester. 2. The VCT feature reduces networking and support costs through...
...™ To use the the Marvell® Virtual Cable Tester™ utility: 1. ROG Striker II Extreme / Striker II NSE 5-11 VCT is detected on the Virtual Cable Tester™ main window is disabled if no problem is a cable diagnostic utility that reports LAN cable faults and shorts... using the Time Domain Reflectometry (TDR) technology. Click Virtual Cable Tester from the Windows® desktop by clicking Start > All Programs > Marvell > Virtual Cable Tester. 2. The VCT feature reduces networking and support costs through...

User Manual
Page 139
...SoundMAX BlackHawk (AI Audio 2) If you more multi- AI Audio 2, with the new SoundMAX® BlackHawk by Sonic Focus, brings you are using Windows Vista™ operating system, from the taskbar, double-click on the SoundMAX® BlackHawk icon to activate digital signal processing. media enjoyment. Fidelity ... output quasi-original when reverting the compressed audio streams back to a multi-channel one with stereo speakers or headphones. ROG Striker II Extreme / Striker II NSE 5-13 Enabling AI Audio 2 Click the power button to display the SoundMAX® control panel. A.
...SoundMAX BlackHawk (AI Audio 2) If you more multi- AI Audio 2, with the new SoundMAX® BlackHawk by Sonic Focus, brings you are using Windows Vista™ operating system, from the taskbar, double-click on the SoundMAX® BlackHawk icon to activate digital signal processing. media enjoyment. Fidelity ... output quasi-original when reverting the compressed audio streams back to a multi-channel one with stereo speakers or headphones. ROG Striker II Extreme / Striker II NSE 5-13 Enabling AI Audio 2 Click the power button to display the SoundMAX® control panel. A.


