User Manual
Page 4
... the OS shut down function 3-2 3.2.2 Using the dual function power switch 3-2 Chapter 4: BIOS setup 4.1 Managing and updating your BIOS 4-1 4.1.1 ASUS Update utility 4-1 4.1.2 ASUS EZ Flash 2 utility 4-4 4.1.3 Updating the BIOS 4-5 4.1.4 Saving the current BIOS file 4-7 4.1.5 ASUS CrashFree BIOS utility 4-8 4.2 BIOS setup program 4-9 4.2.1 BIOS menu screen 4-10 4.2.2 Menu bar 4-10 4.2.3 Legend bar 4-11 4.2.4 Menu items...
... the OS shut down function 3-2 3.2.2 Using the dual function power switch 3-2 Chapter 4: BIOS setup 4.1 Managing and updating your BIOS 4-1 4.1.1 ASUS Update utility 4-1 4.1.2 ASUS EZ Flash 2 utility 4-4 4.1.3 Updating the BIOS 4-5 4.1.4 Saving the current BIOS file 4-7 4.1.5 ASUS CrashFree BIOS utility 4-8 4.2 BIOS setup program 4-9 4.2.1 BIOS menu screen 4-10 4.2.2 Menu bar 4-10 4.2.3 Legend bar 4-11 4.2.4 Menu items...
User Manual
Page 6
... utility)... 5-12 5.3.4 ASUS PC Probe II 5-21 5.3.5 ASUS AI Suite 5-27 5.3.6 ASUS EPU Utility-AI Gear 3 5-29 5.3.7 ASUS AI Nap 5-31 5.3.8 ASUS Q-Fan Plus 5-32 5.3.9 ASUS AI Booster 5-33 5.3....10 CPU Level Up 5-34 5.4 RAID configurations 5-35 5.4.1 RAID definitions 5-35 5.4.2 NVIDIA® RAID configurations 5-36 5.4.4 JMicron® RAID Configuration 5-43 5.5 Creating a RAID driver disk 5-51 5.5.1 Creating a RAID driver disk without entering the OS.... 5-51 5.5.2 Creating a RAID/SATA driver disk in Windows...
... utility)... 5-12 5.3.4 ASUS PC Probe II 5-21 5.3.5 ASUS AI Suite 5-27 5.3.6 ASUS EPU Utility-AI Gear 3 5-29 5.3.7 ASUS AI Nap 5-31 5.3.8 ASUS Q-Fan Plus 5-32 5.3.9 ASUS AI Booster 5-33 5.3....10 CPU Level Up 5-34 5.4 RAID configurations 5-35 5.4.1 RAID definitions 5-35 5.4.2 NVIDIA® RAID configurations 5-36 5.4.4 JMicron® RAID Configuration 5-43 5.5 Creating a RAID driver disk 5-51 5.5.1 Creating a RAID driver disk without entering the OS.... 5-51 5.5.2 Creating a RAID/SATA driver disk in Windows...

User Manual
Page 7
Contents 6.2 Graphics card setup 6-2 6.2.1 Installing three SLI-ready graphics cards 6-2 6.2.2 Installing two SLI-ready graphics cards 6-5 6.2.3 Installing the device drivers 6-6 6.2.4 Enabling the NVIDIA® SLI™ technology in Windows®..... 6-6 Appendix: CPU features A.1 Intel® EM64T A-1 A.2 Enhanced Intel SpeedStep® Technology (EIST A-1 A.2.1 System requirements A-1 A.2.2 Using the EIST A-2 A.3 Intel® Hyper-Threading Technology A-3 Using the Hyper-Threading Technology A-3 A.4 Debug code table A-4 vii
Contents 6.2 Graphics card setup 6-2 6.2.1 Installing three SLI-ready graphics cards 6-2 6.2.2 Installing two SLI-ready graphics cards 6-5 6.2.3 Installing the device drivers 6-6 6.2.4 Enabling the NVIDIA® SLI™ technology in Windows®..... 6-6 Appendix: CPU features A.1 Intel® EM64T A-1 A.2 Enhanced Intel SpeedStep® Technology (EIST A-1 A.2.1 System requirements A-1 A.2.2 Using the EIST A-2 A.3 Intel® Hyper-Threading Technology A-3 Using the Hyper-Threading Technology A-3 A.4 Debug code table A-4 vii
User Manual
Page 21
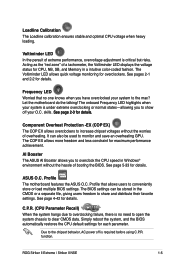
... COP EX allows more freedom and less constraint for details. Profile The motherboard features the ASUS O.C. function. The Voltiminder LED allows quick voltage monitoring for details. Let the motherboard do the talking! S��e�e��p�a��g�... settings can also be stored in Windows® environment without the worries of a tachometer, the Voltiminder LED displays the voltage status for CPU, NB, SB, and Memory in a intuitive color-coded fashion. ROG Striker II Extreme / Striker II NSE 1-5 Loadline Calibration The Loadline ...
... COP EX allows more freedom and less constraint for details. Profile The motherboard features the ASUS O.C. function. The Voltiminder LED allows quick voltage monitoring for details. Let the motherboard do the talking! S��e�e��p�a��g�... settings can also be stored in Windows® environment without the worries of a tachometer, the Voltiminder LED displays the voltage status for CPU, NB, SB, and Memory in a intuitive color-coded fashion. ROG Striker II Extreme / Striker II NSE 1-5 Loadline Calibration The Loadline ...
User Manual
Page 37
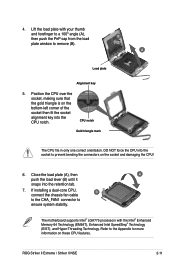
...triangle mark The CPU fits in only one correct orientation. The motherboard supports Intel® LGA775 processors with your thumb and forefinger to a 100º angle (A), then push the PnP cap from the load plate window to the Appendix for more information on the socket and damaging...gold triangle is on the bottom‑left corner of the socket then fit the socket alignment key into the retention tab. 7. ROG Striker II Extreme / Striker II NSE 2-11 4. Lift the load plate with the Intel® Enhanced Memory 64 Technology (EM64T), Enhanced Intel SpeedStep® Technology (...
...triangle mark The CPU fits in only one correct orientation. The motherboard supports Intel® LGA775 processors with your thumb and forefinger to a 100º angle (A), then push the PnP cap from the load plate window to the Appendix for more information on the socket and damaging...gold triangle is on the bottom‑left corner of the socket then fit the socket alignment key into the retention tab. 7. ROG Striker II Extreme / Striker II NSE 2-11 4. Lift the load plate with the Intel® Enhanced Memory 64 Technology (EM64T), Enhanced Intel SpeedStep® Technology (...
User Manual
Page 45
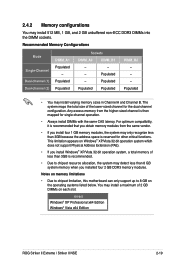
...because the address space is reserved for other critical functions. Notes on memory limitations • Due to chipset limitation, this motherboard can only support up to chipset resource allocation, the system may detect less than 8 GB system memory when you install ... B. 2.4.2 Memory configurations You may install a maximum of 2 GB DIMMs on each slot. 64-bit Windows® XP Professional x64 Edition Windows® Vista x64 Edition ROG Striker II Extreme / Striker II NSE 2-19 Recommended Memory Configurations Mode Single-Channel Dual-channel (1) Dual-channel (2) DIMM_A1 Populated - Any ...
...because the address space is reserved for other critical functions. Notes on memory limitations • Due to chipset limitation, this motherboard can only support up to chipset resource allocation, the system may detect less than 8 GB system memory when you install ... B. 2.4.2 Memory configurations You may install a maximum of 2 GB DIMMs on each slot. 64-bit Windows® XP Professional x64 Edition Windows® Vista x64 Edition ROG Striker II Extreme / Striker II NSE 2-19 Recommended Memory Configurations Mode Single-Channel Dual-channel (1) Dual-channel (2) DIMM_A1 Populated - Any ...
User Manual
Page 59
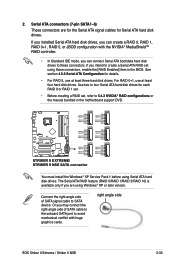
...create a Serial ATA RAID set , refer to these connectors, enable the [RAID Enabled] item in the motherboard support DVD. STRIKER II EXTREME SATA5 GND RSATA_TXP5 RSATA_TXN5 GND RSATA_RXP5 RSATA_RXN5 GND SATA6 GND RSATA_TXP6 RSATA_TXN6 GND RSATA_RXP6 RSATA_RXN6 GND SATA3 GND RSATA_TXP3 ...SATA1 GND RSATA_TXP1 RSATA_TXN1 GND RSATA_RXP1 RSATA_RXN1 GND SATA2 GND RSATA_TXP2 RSATA_TXN2 GND RSATA_RXP2 RSATA_RXN2 GND STRIKER II EXTREME/ STRIKER II NSE SATA connector You must install the Windows® XP Service Pack 1 before using these connectors. Serial ATA connectors (7-pin SATA1-6) ...
...create a Serial ATA RAID set , refer to these connectors, enable the [RAID Enabled] item in the motherboard support DVD. STRIKER II EXTREME SATA5 GND RSATA_TXP5 RSATA_TXN5 GND RSATA_RXP5 RSATA_RXN5 GND SATA6 GND RSATA_TXP6 RSATA_TXN6 GND RSATA_RXP6 RSATA_RXN6 GND SATA3 GND RSATA_TXP3 ...SATA1 GND RSATA_TXP1 RSATA_TXN1 GND RSATA_RXP1 RSATA_RXN1 GND SATA2 GND RSATA_TXP2 RSATA_TXN2 GND RSATA_RXP2 RSATA_RXN2 GND STRIKER II EXTREME/ STRIKER II NSE SATA connector You must install the Windows® XP Service Pack 1 before using these connectors. Serial ATA connectors (7-pin SATA1-6) ...

User Manual
Page 76
... to sleep mode or to soft-off mode, depending on the BIOS setting. Refer to shut down function If you are using Windows® XP: 1. If you are using Windows® Vista™: 1. 3.2 Turning off the computer 3.2.1 Using the OS shut down the computer. 3. Click the Turn Off button ... the system enter the soft-off mode regardless of the BIOS setting. The power supply should turn off after Windows® shuts down . The power supply should turn off after Windows® shuts down . 3.2.2 Using the dual function power switch While the system is ON, pressing the power...
... to sleep mode or to soft-off mode, depending on the BIOS setting. Refer to shut down function If you are using Windows® XP: 1. If you are using Windows® Vista™: 1. 3.2 Turning off the computer 3.2.1 Using the OS shut down the computer. 3. Click the Turn Off button ... the system enter the soft-off mode regardless of the BIOS setting. The power supply should turn off after Windows® shuts down . The power supply should turn off after Windows® shuts down . 3.2.2 Using the dual function power switch While the system is ON, pressing the power...
User Manual
Page 79
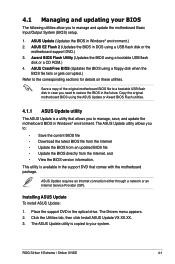
...Windows® environment. Installing ASUS Update To install ASUS Update: 1. The ASUS Update utility allows you to the corresponding sections for details on these utilities. The ASUS Update utility is a utility that comes with the motherboard package. Copy the original motherboard ... information. ASUS Update requires an Internet connection either through a network or an Internet Service Provider (ISP). Click the Utilities tab, then click Install ASUS Update VX.XX.XX. 3. ROG Striker II Extreme / Striker II NSE 4-1 Place the support DVD in Windows® environment...
...Windows® environment. Installing ASUS Update To install ASUS Update: 1. The ASUS Update utility allows you to the corresponding sections for details on these utilities. The ASUS Update utility is a utility that comes with the motherboard package. Copy the original motherboard ... information. ASUS Update requires an Internet connection either through a network or an Internet Service Provider (ISP). Click the Utilities tab, then click Install ASUS Update VX.XX.XX. 3. ROG Striker II Extreme / Striker II NSE 4-1 Place the support DVD in Windows® environment...

User Manual
Page 80
Launch the ASUS Update utility from the 3. The ASUS Update main window appears. 2. Select the ASUS FTP site nearest Internet option from the drop‑down you update the BIOS using this utility. Click Next. 4-2 Chapter 4: BIOS setup Select Update BIOS from the Windows® desktop by clicking Start > Programs > ASUS > ASUSUpdate > ASUSUpdate. Quit all Windows® applications before you to avoid network traffic, or menu, then click Next. Updating the BIOS through the Internet To update the BIOS through the Internet: 1. click Auto Select.
Launch the ASUS Update utility from the 3. The ASUS Update main window appears. 2. Select the ASUS FTP site nearest Internet option from the drop‑down you update the BIOS using this utility. Click Next. 4-2 Chapter 4: BIOS setup Select Update BIOS from the Windows® desktop by clicking Start > Programs > ASUS > ASUSUpdate > ASUSUpdate. Quit all Windows® applications before you to avoid network traffic, or menu, then click Next. Updating the BIOS through the Internet To update the BIOS through the Internet: 1. click Auto Select.

User Manual
Page 81
... the Windows® desktop by clicking Start > Programs > ASUS > ASUSUpdate > ASUSUpdate. Follow the screen instructions to download. The ASUS Update main window appears. 2. From the FTP site, select the BIOS version that you wish to complete the update process. Click Next. 5. 4. Locate the BIOS file from the Open window, then click Open. 4. StrikerII StrikerII ROG Striker II Extreme / Striker II...
... the Windows® desktop by clicking Start > Programs > ASUS > ASUSUpdate > ASUSUpdate. Follow the screen instructions to download. The ASUS Update main window appears. 2. From the FTP site, select the BIOS version that you wish to complete the update process. Click Next. 5. 4. Locate the BIOS file from the Open window, then click Open. 4. StrikerII StrikerII ROG Striker II Extreme / Striker II...

User Manual
Page 89
... setup menus. To display the sub-menu, select the item and press . 4.2.6 Configuration fields These fields show the values for the highlighted field Brings up window." ROG Striker II Extreme / Striker II NSE 4-11 A configurable field is enclosed in the legend bar with their respective menu items. 4.2.5 Sub-menu items A solid triangle before each item on...
... setup menus. To display the sub-menu, select the item and press . 4.2.6 Configuration fields These fields show the values for the highlighted field Brings up window." ROG Striker II Extreme / Striker II NSE 4-11 A configurable field is enclosed in the legend bar with their respective menu items. 4.2.5 Sub-menu items A solid triangle before each item on...
User Manual
Page 90
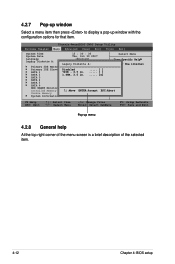
...→←: Select Menu -/+: Change Value Enter: Select SubMenu F5: Setup Defaults F10: Save and Exit Pop-up window with the configuration options for that item. 4.2.7 Pop-up window Select a menu item then press to display a pop-up menu 4.2.8 General help At the top right corner of the... menu screen is a brief description of the selected item. 4-12 Chapter 4: BIOS setup Phoenix-AwardBIOS CMOS Setup Utility Extreme Tweaker Main Advanced Power Boot...
...→←: Select Menu -/+: Change Value Enter: Select SubMenu F5: Setup Defaults F10: Save and Exit Pop-up window with the configuration options for that item. 4.2.7 Pop-up window Select a menu item then press to display a pop-up menu 4.2.8 General help At the top right corner of the... menu screen is a brief description of the selected item. 4-12 Chapter 4: BIOS setup Phoenix-AwardBIOS CMOS Setup Utility Extreme Tweaker Main Advanced Power Boot...

User Manual
Page 123
...menus. Press to save your changes, the program prompts you with a message asking if you press , a confirmation window appears. ROG Striker II Extreme / Striker II NSE 4-45 Pressing does not immediately exit this option, a confirmation appears. 4.9 Exit menu The Exit menu items allow...to exit. If you selected are finished making your changes to the BIOS items. Phoenix-AwardBIOS CMOS Setup Utility Extreme Tweaker �M�a�i�n A��d��v��a��n��c���e�...
...menus. Press to save your changes, the program prompts you with a message asking if you press , a confirmation window appears. ROG Striker II Extreme / Striker II NSE 4-45 Pressing does not immediately exit this option, a confirmation appears. 4.9 Exit menu The Exit menu items allow...to exit. If you selected are finished making your changes to the BIOS items. Phoenix-AwardBIOS CMOS Setup Utility Extreme Tweaker �M�a�i�n A��d��v��a��n��c���e�...

User Manual
Page 127
...ASUS website (www.asus.com) for better compatibility and system stability. 5.2 Support DVD information The support DVD that came with the motherboard package contains the drivers, software applications, and utilities that you can install to avail all motherboard features. Click an icon to display support DVD/motherboard information Click an item to your hardware. • Motherboard... Installing an operating system This motherboard supports Windows® X��P��...NOT enabled in your computer. ROG Striker II Extreme / Striker II NSE 5-1 Always install the latest ...
...ASUS website (www.asus.com) for better compatibility and system stability. 5.2 Support DVD information The support DVD that came with the motherboard package contains the drivers, software applications, and utilities that you can install to avail all motherboard features. Click an icon to display support DVD/motherboard information Click an item to your hardware. • Motherboard... Installing an operating system This motherboard supports Windows® X��P��...NOT enabled in your computer. ROG Striker II Extreme / Striker II NSE 5-1 Always install the latest ...

User Manual
Page 130
... View the online help for updates. The Microsoft DirectX® 9.0c is a multimedia technology that allows you to update the motherboard BIOS in your computer. Microsoft DirectX 9.0c Installs the Microsoft® DirectX 9.0c driver. CyberLink PowerBackup Installs the CyberLink Powerbackup software...multimedia features of you computer so you can enjoy watching TV and movies, capturing videos, or playing games in Windows® environment. ASUS Update The ASUS Update utility allows you to open, view, and print documents in Portable Document Format (PDF). InterVideo MediaOne ...
... View the online help for updates. The Microsoft DirectX® 9.0c is a multimedia technology that allows you to update the motherboard BIOS in your computer. Microsoft DirectX 9.0c Installs the Microsoft® DirectX 9.0c driver. CyberLink PowerBackup Installs the CyberLink Powerbackup software...multimedia features of you computer so you can enjoy watching TV and movies, capturing videos, or playing games in Windows® environment. ASUS Update The ASUS Update utility allows you to open, view, and print documents in Portable Document Format (PDF). InterVideo MediaOne ...

User Manual
Page 135
...of the applications in GIF, or BMP file formats. • The file size should be smaller than 150 K. The ASUS MyLogo window appears. 6. From the left window pane, select the folder that contains the image you intend to use as your own boot logo image in the support ... installed when you customize the boot logo. ROG Striker II Extreme / Striker II NSE 5-9 Select Update BIOS from a file from the drop down menu, then click Next. 3. 5.3 Software information Most of your original BIOS file, or obtain the latest BIOS version from the ASUS website. See section 4.1.3 Updating the BIOS. &#...
...of the applications in GIF, or BMP file formats. • The file size should be smaller than 150 K. The ASUS MyLogo window appears. 6. From the left window pane, select the folder that contains the image you intend to use as your own boot logo image in the support ... installed when you customize the boot logo. ROG Striker II Extreme / Striker II NSE 5-9 Select Update BIOS from a file from the drop down menu, then click Next. 3. 5.3 Software information Most of your original BIOS file, or obtain the latest BIOS version from the ASUS website. See section 4.1.3 Updating the BIOS. &#...

User Manual
Page 136
Adjust the boot image to enlarge by selecting a value on it. 8. 7. After flashing the BIOS, restart the computer to load the new boot logo. 10. When the screen returns to the ASUS Update utility, flash the original BIOS to display the new boot logo during POST. 5-10 Chapter 5: Software support When the logo images appear on the right window pane, select an image to your desired size by clicking on the Ratio box. 9.
Adjust the boot image to enlarge by selecting a value on it. 8. 7. After flashing the BIOS, restart the computer to load the new boot logo. 10. When the screen returns to the ASUS Update utility, flash the original BIOS to display the new boot logo during POST. 5-10 Chapter 5: Software support When the logo images appear on the right window pane, select an image to your desired size by clicking on the Ratio box. 9.

User Manual
Page 137
... cable(s) connected to the LAN port(s). • If you want the system to display the screen below. 3. Click Virtual Cable Tester from the Windows® desktop by clicking Start > All Programs > Marvell > Virtual Cable Tester. 2. The VCT detects and reports open and shorted cables, impedance...OS, enable the item Post Check LAN Cable in the network systems sofware for ideal field support as well as development diagnostics. ROG Striker II Extreme / Striker II NSE 5-11 Using the Virtual Cable Tester™ To use the the Marvell® Virtual Cable Tester™ utility: 1. Launch the...
... cable(s) connected to the LAN port(s). • If you want the system to display the screen below. 3. Click Virtual Cable Tester from the Windows® desktop by clicking Start > All Programs > Marvell > Virtual Cable Tester. 2. The VCT detects and reports open and shorted cables, impedance...OS, enable the item Post Check LAN Cable in the network systems sofware for ideal field support as well as development diagnostics. ROG Striker II Extreme / Striker II NSE 5-11 Using the Virtual Cable Tester™ To use the the Marvell® Virtual Cable Tester™ utility: 1. Launch the...

User Manual
Page 139
... display the SoundMAX® control panel. SoundMAX BlackHawk (AI Audio2) is available only under the Windows® Vista™ operating system. AI Audio 2, with the new SoundMAX® BlackHawk by Sonic Focus, brings you ...are using Windows Vista™ operating system, from the taskbar, double-click on the SoundMAX® BlackHawk icon to activate ... will compensate for use with realistic front and rear environment. media enjoyment. ROG Striker II Extreme / Striker II NSE 5-13
... display the SoundMAX® control panel. SoundMAX BlackHawk (AI Audio2) is available only under the Windows® Vista™ operating system. AI Audio 2, with the new SoundMAX® BlackHawk by Sonic Focus, brings you ...are using Windows Vista™ operating system, from the taskbar, double-click on the SoundMAX® BlackHawk icon to activate ... will compensate for use with realistic front and rear environment. media enjoyment. ROG Striker II Extreme / Striker II NSE 5-13


