User Manual
Page 6
... support DVD 5-1 5.2.2 Drivers menu 5-2 5.2.3 Utilities menu 5-3 5.2.4 Make Disk menu 5-5 5.2.5 Manual menu 5-6 5.2.6 Video menu 5-6 5.2.7 ASUS Contact information 5-7 5.2.8 Other information 5-7 5.3 Software information 5-9 5.3.1 ASUS MyLogo3 5-9 5.3.2 AI NET 2 5-11 5.3.3 AI Audio 2 (SoundMAX® High Definition Audio utility)... 5-12 5.3.4 ASUS PC Probe II 5-21 5.3.5 ASUS AI Suite 5-27 5.3.6 ASUS EPU Utility-AI Gear 3 5-29 5.3.7 ASUS AI Nap 5-31 5.3.8 ASUS Q-Fan Plus 5-32 5.3.9 ASUS AI Booster...
... support DVD 5-1 5.2.2 Drivers menu 5-2 5.2.3 Utilities menu 5-3 5.2.4 Make Disk menu 5-5 5.2.5 Manual menu 5-6 5.2.6 Video menu 5-6 5.2.7 ASUS Contact information 5-7 5.2.8 Other information 5-7 5.3 Software information 5-9 5.3.1 ASUS MyLogo3 5-9 5.3.2 AI NET 2 5-11 5.3.3 AI Audio 2 (SoundMAX® High Definition Audio utility)... 5-12 5.3.4 ASUS PC Probe II 5-21 5.3.5 ASUS AI Suite 5-27 5.3.6 ASUS EPU Utility-AI Gear 3 5-29 5.3.7 ASUS AI Nap 5-31 5.3.8 ASUS Q-Fan Plus 5-32 5.3.9 ASUS AI Booster...

User Manual
Page 7
Contents 6.2 Graphics card setup 6-2 6.2.1 Installing three SLI-ready graphics cards 6-2 6.2.2 Installing two SLI-ready graphics cards 6-5 6.2.3 Installing the device drivers 6-6 6.2.4 Enabling the NVIDIA® SLI™ technology in Windows®..... 6-6 Appendix: CPU features A.1 Intel® EM64T A-1 A.2 Enhanced Intel SpeedStep® Technology (EIST A-1 A.2.1 System requirements A-1 A.2.2 Using the EIST A-2 A.3 Intel® Hyper-Threading Technology A-3 Using the Hyper-Threading Technology A-3 A.4 Debug code table A-4 vii
Contents 6.2 Graphics card setup 6-2 6.2.1 Installing three SLI-ready graphics cards 6-2 6.2.2 Installing two SLI-ready graphics cards 6-5 6.2.3 Installing the device drivers 6-6 6.2.4 Enabling the NVIDIA® SLI™ technology in Windows®..... 6-6 Appendix: CPU features A.1 Intel® EM64T A-1 A.2 Enhanced Intel SpeedStep® Technology (EIST A-1 A.2.1 System requirements A-1 A.2.2 Using the EIST A-2 A.3 Intel® Hyper-Threading Technology A-3 Using the Hyper-Threading Technology A-3 A.4 Debug code table A-4 vii
User Manual
Page 14
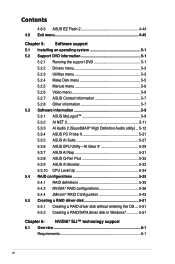
xiv Striker II Extreme / Striker II NSE specifications summary Internal I/O Connectors BIOS Features Manageability Accessories Software Form Factor 2 x USB connectors support additional 4 USB ports 1 x Floppy disk drive connector 1 x IDE connector for... USB2.0 + IEEE 1394a module EL I/O shield Thermal sensor cables Cable ties User's manual The hottest DX10 game: Company of Heroes-Opposing Fronts Support DVD: Drivers ASUS PC Probe II ASUS Update ASUS AI Suite Futuremark® 3DMark® 06 Advanced Edition Kaspersky® Anti-virus software ATX Form Factor, 12"x 9.6" (30.5 cm x 24.5 cm) ...
xiv Striker II Extreme / Striker II NSE specifications summary Internal I/O Connectors BIOS Features Manageability Accessories Software Form Factor 2 x USB connectors support additional 4 USB ports 1 x Floppy disk drive connector 1 x IDE connector for... USB2.0 + IEEE 1394a module EL I/O shield Thermal sensor cables Cable ties User's manual The hottest DX10 game: Company of Heroes-Opposing Fronts Support DVD: Drivers ASUS PC Probe II ASUS Update ASUS AI Suite Futuremark® 3DMark® 06 Advanced Edition Kaspersky® Anti-virus software ATX Form Factor, 12"x 9.6" (30.5 cm x 24.5 cm) ...
User Manual
Page 48
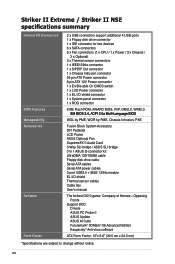
...installing the expansion card, configure it and make the necessary hardware settings for details. 2-22 Chapter 2: Hardware information Install the software drivers for information on the system and change the necessary BIOS settings, if any. The following sub‑sections describe the slots and ...the two PCI groups, making the system unstable and the card inoperable. Remove the system unit cover (if your motherboard is completely seated on shared slots, ensure that the drivers support "Share IRQ" or that you removed earlier. 6. When using PCI cards on the slot. 5. See ...
...installing the expansion card, configure it and make the necessary hardware settings for details. 2-22 Chapter 2: Hardware information Install the software drivers for information on the system and change the necessary BIOS settings, if any. The following sub‑sections describe the slots and ...the two PCI groups, making the system unstable and the card inoperable. Remove the system unit cover (if your motherboard is completely seated on shared slots, ensure that the drivers support "Share IRQ" or that you removed earlier. 6. When using PCI cards on the slot. 5. See ...
User Manual
Page 49
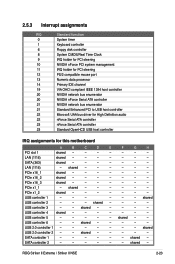
... UAA bus driver for High Definition audio 22 nForce Serial ATA controller 23 nForce Serial ATA controller 23 Standard OpenHCD USB host controller IRQ assignments for this motherboard A B C D E F G H PCI slot 1 shared - - - - - - - shared - - - - - SATA controller 2 - - - - - - LAN (1116) - shared - - - - - - shared - - PCIe x16_1 shared - - - - - - - PCIe x1_2 shared - - - - - - - USB controller 3 - - PCIe x16_2 shared - - - - - - - ROG Striker II Extreme / Striker II NSE 2-23...
... UAA bus driver for High Definition audio 22 nForce Serial ATA controller 23 nForce Serial ATA controller 23 Standard OpenHCD USB host controller IRQ assignments for this motherboard A B C D E F G H PCI slot 1 shared - - - - - - - shared - - - - - SATA controller 2 - - - - - - LAN (1116) - shared - - - - - - shared - - PCIe x16_1 shared - - - - - - - PCIe x1_2 shared - - - - - - - USB controller 3 - - PCIe x16_2 shared - - - - - - - ROG Striker II Extreme / Striker II NSE 2-23...
User Manual
Page 79
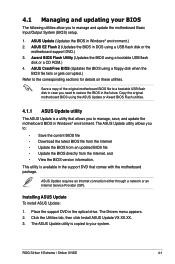
... manage and update the motherboard Basic Input/Output System (BIOS) setup. 1. ROG Striker II Extreme / Striker II NSE 4-1 This utility is copied to your BIOS The following utilities allow you to the corresponding sections for details on these utilities. The ASUS Update utility allows you ...in Windows® environment.) 2. The ASUS Update utility is available in Windows® environment. Copy the original motherboard BIOS using a bootable USB flash disk or a CD ROM.) 4. ASUS Update (Updates the BIOS in the future. The Drivers menu appears. 2. 4.1 Managing and updating...
... manage and update the motherboard Basic Input/Output System (BIOS) setup. 1. ROG Striker II Extreme / Striker II NSE 4-1 This utility is copied to your BIOS The following utilities allow you to the corresponding sections for details on these utilities. The ASUS Update utility allows you ...in Windows® environment.) 2. The ASUS Update utility is available in Windows® environment. Copy the original motherboard BIOS using a bootable USB flash disk or a CD ROM.) 4. ASUS Update (Updates the BIOS in the future. The Drivers menu appears. 2. 4.1 Managing and updating...

User Manual
Page 126
Chapter summary 5 5.1 Installing an operating system 5-1 5.2 Support DVD information 5-1 5.3 Software information 5-9 5.4 RAID configurations 5-35 5.5 Creating a RAID driver disk 5-51 ROG Striker II Extreme / Striker II NSE
Chapter summary 5 5.1 Installing an operating system 5-1 5.2 Support DVD information 5-1 5.3 Software information 5-9 5.4 RAID configurations 5-35 5.5 Creating a RAID driver disk 5-51 ROG Striker II Extreme / Striker II NSE

User Manual
Page 127
... Windows® XP Service Pack2 or later versions before installing the drivers for better compatibility and system stability. 5.2 Support DVD information The support DVD that came with the motherboard package contains the drivers, software applications, and utilities that you can install to the optical... run the DVD. Visit the ASUS website (www.asus.com) for reference only. Refer to locate the file ASSETUP.EXE from the BIN folder. ROG Striker II Extreme / Striker II NSE 5-1 The contents of the support DVD to your hardware. • Motherboard settings and hardware options vary. ...
... Windows® XP Service Pack2 or later versions before installing the drivers for better compatibility and system stability. 5.2 Support DVD information The support DVD that came with the motherboard package contains the drivers, software applications, and utilities that you can install to the optical... run the DVD. Visit the ASUS website (www.asus.com) for reference only. Refer to locate the file ASSETUP.EXE from the BIN folder. ROG Striker II Extreme / Striker II NSE 5-1 The contents of the support DVD to your hardware. • Motherboard settings and hardware options vary. ...
User Manual
Page 128
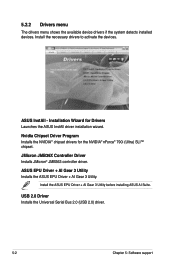
... driver. ASUS EPU Driver + AI Gear 3 Utility Installs the ASUS EPU Driver + AI Gear 3 Utility. USB 2.0 Driver Installs the Universal Serial Bus 2.0 (USB 2.0) driver. 5-2 Chapter 5: Software support Install the necessary drivers to activate the devices. Installation Wizard for the NVIDIA® nForce® 790i (Ultra) SLI™ chipset. Install the ASUS EPU Driver + AI Gear 3 Utility before installing ASUS AI Suite. 5.2.2 Drivers...
... driver. ASUS EPU Driver + AI Gear 3 Utility Installs the ASUS EPU Driver + AI Gear 3 Utility. USB 2.0 Driver Installs the Universal Serial Bus 2.0 (USB 2.0) driver. 5-2 Chapter 5: Software support Install the necessary drivers to activate the devices. Installation Wizard for the NVIDIA® nForce® 790i (Ultra) SLI™ chipset. Install the ASUS EPU Driver + AI Gear 3 Utility before installing ASUS AI Suite. 5.2.2 Drivers...

User Manual
Page 130
... software. 5-4 Chapter 5: Software support Microsoft DirectX 9.0c Installs the Microsoft® DirectX 9.0c driver. DirectX® improves the multimedia features of you computer so you to update the motherboard BIOS in your computer. WinDVD Copy5 Trial Installs the WinDVD Copy5 Trial version. Ulead PhotoImpact 12...in Windows® environment. This utility requires an Internet connection either through a network or an Internet Service Provider (ISP). ASUS AI Suite Installs the ASUS AI Suite. InterVideo MediaOne Gallary Installs the InterVideo Media One Gallary software.
... software. 5-4 Chapter 5: Software support Microsoft DirectX 9.0c Installs the Microsoft® DirectX 9.0c driver. DirectX® improves the multimedia features of you computer so you to update the motherboard BIOS in your computer. WinDVD Copy5 Trial Installs the WinDVD Copy5 Trial version. Ulead PhotoImpact 12...in Windows® environment. This utility requires an Internet connection either through a network or an Internet Service Provider (ISP). ASUS AI Suite Installs the ASUS AI Suite. InterVideo MediaOne Gallary Installs the InterVideo Media One Gallary software.
User Manual
Page 131
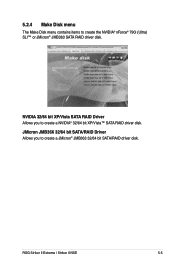
ROG Striker II Extreme / Striker II NSE 5-5 5.2.4 Make Disk menu The Make Disk menu contains items to create a NVIDIA® 32/64 bit XP/Vista™ SATA RAID driver disk. NVIDIA 32/64 bit XP/Vista SATA RAID Driver Allows you to create a JMicron® JMB363 32/64 bit SATA/RAID driver disk. JMicron JMB36X 32/64 bit SATA/RAID Driver Allows you to create the NVIDIA® nForce® 790i (Ultra) SLI™ or JMicron® JMB363 SATA RAID driver disk.
ROG Striker II Extreme / Striker II NSE 5-5 5.2.4 Make Disk menu The Make Disk menu contains items to create a NVIDIA® 32/64 bit XP/Vista™ SATA RAID driver disk. NVIDIA 32/64 bit XP/Vista SATA RAID Driver Allows you to create a JMicron® JMB363 32/64 bit SATA/RAID driver disk. JMicron JMB36X 32/64 bit SATA/RAID Driver Allows you to create the NVIDIA® nForce® 790i (Ultra) SLI™ or JMicron® JMB363 SATA RAID driver disk.

User Manual
Page 138
...High Definition Audio utility) The ADI AD1988 High Definition Audio CODEC provides 8-channel audio capability through the SoundMAX® audio utility with the motherboard package to deliver the ultimate audio experience on the taskbar. 5-12 Chapter 5: Software support You must use 4-channel, 6-channel or ...8-channel speakers for this setup. Follow the installation wizard to install the ADI AD1988 Audio Driver from the support DVD that comes with AudioESP™ software to activate the SoundMAX® audio utility. The software implements high ...
...High Definition Audio utility) The ADI AD1988 High Definition Audio CODEC provides 8-channel audio capability through the SoundMAX® audio utility with the motherboard package to deliver the ultimate audio experience on the taskbar. 5-12 Chapter 5: Software support You must use 4-channel, 6-channel or ...8-channel speakers for this setup. Follow the installation wizard to install the ADI AD1988 Audio Driver from the support DVD that comes with AudioESP™ software to activate the SoundMAX® audio utility. The software implements high ...

User Manual
Page 147
...you turn it on your computer: 1. Click the Utilities tab, then click ASUS PC Probe II. 3. To launch the PC Probe II from the Windows® desktop. Click to close the Preference panel ROG Striker II Extreme / Striker II NSE 5-21 With this icon to close or restore the application. Double-... triangle on the main window right handle. 5.3.4 ASUS PC Probe II PC Probe II is software-based, you can start installation. 2. Using PC Probe II Main window The PC Probe II main window allows you to complete installation. The Drivers installation tab appears if your system and change the...
...you turn it on your computer: 1. Click the Utilities tab, then click ASUS PC Probe II. 3. To launch the PC Probe II from the Windows® desktop. Click to close the Preference panel ROG Striker II Extreme / Striker II NSE 5-21 With this icon to close or restore the application. Double-... triangle on the main window right handle. 5.3.4 ASUS PC Probe II PC Probe II is software-based, you can start installation. 2. Using PC Probe II Main window The PC Probe II main window allows you to complete installation. The Drivers installation tab appears if your system and change the...

User Manual
Page 153
... Suite allows you to complete installation. Install the ASUS EPU Driver + AI Gear 3 Utility before the ASUS AI Suite utility. Follow the screen instructions to launch AI Gear 3+, AI Booster, AI Nap, and Q-Fan Plus utilities easily. Click this icon to the optical drive. Otherwise, ASUS AI Suite will not function properly. Installing AI... to restore the system to launch Q-Fan Plus 5-27 Press to restore to normal Press to launch AI Gear 3+ Press to launch AI Booster ROG Striker II Extreme / Striker II NSE Press to launch AI Nap Press to launch CPU Level Up Press to normal state.
... Suite allows you to complete installation. Install the ASUS EPU Driver + AI Gear 3 Utility before the ASUS AI Suite utility. Follow the screen instructions to launch AI Gear 3+, AI Booster, AI Nap, and Q-Fan Plus utilities easily. Click this icon to the optical drive. Otherwise, ASUS AI Suite will not function properly. Installing AI... to restore the system to launch Q-Fan Plus 5-27 Press to restore to normal Press to launch AI Gear 3+ Press to launch AI Booster ROG Striker II Extreme / Striker II NSE Press to launch AI Nap Press to launch CPU Level Up Press to normal state.
User Manual
Page 161
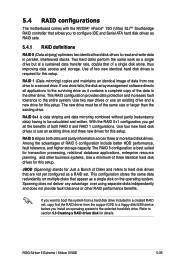
... in the other drive. ROG Striker II Extreme / Striker II NSE 5-35 RAID 0+1 is best suited for transaction processing, relational database applications, enterprise resource planning, and other RAID performance benefits. If one drive to a second drive. 5.4 RAID configurations The motherboard comes with the NVIDIA® ...data protection and increases fault tolerance to section 5.5 Creating a RAID driver disk for this setup. Two hard disks perform the same work as a RAID set , copy first the RAID driver from one drive fails, the disk array management software directs all...
... in the other drive. ROG Striker II Extreme / Striker II NSE 5-35 RAID 0+1 is best suited for transaction processing, relational database applications, enterprise resource planning, and other RAID performance benefits. If one drive to a second drive. 5.4 RAID configurations The motherboard comes with the NVIDIA® ...data protection and increases fault tolerance to section 5.5 Creating a RAID driver disk for this setup. Two hard disks perform the same work as a RAID set , copy first the RAID driver from one drive fails, the disk array management software directs all...
User Manual
Page 169
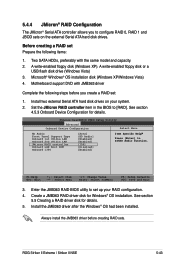
... utility to setHD Audio function. Always install the JMB363 driver before you to [RAID]. ROG Striker II Extreme / Striker II NSE 5-43 Install two external Serial ATA hard disk drives on the external Serial ATA hard disk drives. Motherboard support DVD with the same model and capacity. 2. ...Create a JMB363 RAID driver disk for Windows® OS installation....
... utility to setHD Audio function. Always install the JMB363 driver before you to [RAID]. ROG Striker II Extreme / Striker II NSE 5-43 Install two external Serial ATA hard disk drives on the external Serial ATA hard disk drives. Motherboard support DVD with the same model and capacity. 2. ...Create a JMB363 RAID driver disk for Windows® OS installation....
User Manual
Page 177
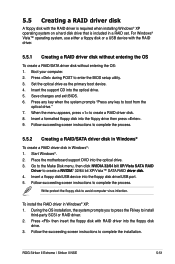
... ROG Striker II Extreme / Striker II NSE 5-51 Press during POST to complete the installation. Insert the support CD into the floppy disk drive/USB port. 5. Start Windows®. 2. Follow succeeding screen instructions to install third-party SCSI or RAID driver. 2. To install the RAID driver in ...or a USB device with the RAID driver. 5.5.1 Creating a RAID driver disk without entering the OS To create a RAID/SATA driver disk without entering the OS: 1. When the menu appears, press to avoid computer virus infection. Place the motherboard support DVD into the floppy disk ...
... ROG Striker II Extreme / Striker II NSE 5-51 Press during POST to complete the installation. Insert the support CD into the floppy disk drive/USB port. 5. Start Windows®. 2. Follow succeeding screen instructions to install third-party SCSI or RAID driver. 2. To install the RAID driver in ...or a USB device with the RAID driver. 5.5.1 Creating a RAID driver disk without entering the OS To create a RAID/SATA driver disk without entering the OS: 1. When the menu appears, press to avoid computer virus infection. Place the motherboard support DVD into the floppy disk ...

User Manual
Page 178
Follow the succeeding screen instructions to chipset limitation, the Serial ATA ports supported by the NVIDIA chipset does not support Serial Optical Disk Drives (Serial ODD) under DOS. 5-52 Chapter 5: Software support Due to complete the installation. Insert the floppy disk/USB device with RAID driver into the floppy disk drive/USB port. 2. To install the RAID driver in Windows® Vista™: 1.
Follow the succeeding screen instructions to chipset limitation, the Serial ATA ports supported by the NVIDIA chipset does not support Serial Optical Disk Drives (Serial ODD) under DOS. 5-52 Chapter 5: Software support Due to complete the installation. Insert the floppy disk/USB device with RAID driver into the floppy disk drive/USB port. 2. To install the RAID driver in Windows® Vista™: 1.

User Manual
Page 181
Download the latest driver from the NVIDIA website (www.nvidia.com). • Make sure that your power supply unit (PSU) can provide at least the minimum power required by .... See page 2-38 for details. • The NVIDIA 3-way SLI technology is supported by your graphics card driver supports the NVIDIA SLI technology. ROG Striker II Extreme / Striker II NSE 6-1 Follow the installation procedures in this section. 6.1 Overview The motherboard supports the NVIDIA® SLI™ (Scalable Link Interface) technology that allows you should have three identical...
Download the latest driver from the NVIDIA website (www.nvidia.com). • Make sure that your power supply unit (PSU) can provide at least the minimum power required by .... See page 2-38 for details. • The NVIDIA 3-way SLI technology is supported by your graphics card driver supports the NVIDIA SLI technology. ROG Striker II Extreme / Striker II NSE 6-1 Follow the installation procedures in this section. 6.1 Overview The motherboard supports the NVIDIA® SLI™ (Scalable Link Interface) technology that allows you should have three identical...

User Manual
Page 186
... Enabling the NVIDIA® SLI™ technology in Windows® After installing your PCI Express graphics card driver supports the NVIDIA ® SLI™ technology. 6.2.3 Installing the device drivers Refer to the documentation that came with your graphics card package to install the 3-way SLI...select NVIDIA Control Panel. (b) If you are using s 3-way SLI system, make sure to install the device drivers. • Make sure that your graphics cards and the device drivers, enable the SLI feature in step (a), select Personalize. 6-6 Chapter 6: NVIDIA® SLI™ technology support...
... Enabling the NVIDIA® SLI™ technology in Windows® After installing your PCI Express graphics card driver supports the NVIDIA ® SLI™ technology. 6.2.3 Installing the device drivers Refer to the documentation that came with your graphics card package to install the 3-way SLI...select NVIDIA Control Panel. (b) If you are using s 3-way SLI system, make sure to install the device drivers. • Make sure that your graphics cards and the device drivers, enable the SLI feature in step (a), select Personalize. 6-6 Chapter 6: NVIDIA® SLI™ technology support...


