User Manual
Page 6
...Definition Audio utility)... 5-12 5.3.4 ASUS PC Probe II 5-21 5.3.5 ASUS AI Suite 5-27 5.3.6 ASUS EPU Utility-AI Gear 3 5-29 5.3.7 ASUS AI Nap 5-31 5.3.8 ASUS Q-Fan Plus 5-32 5.3.9 ASUS AI Booster 5-33 5.3.10 ...CPU Level Up 5-34 5.4 RAID configurations 5-35 5.4.1 RAID definitions 5-35 5.4.2 NVIDIA® RAID configurations 5-36 5.4.4 JMicron® RAID Configuration 5-43 5.5 Creating a RAID driver disk 5-51 5.5.1 Creating a RAID driver disk without entering the OS.... 5-51 5.5.2 Creating a RAID/SATA driver disk in Windows 5-51 Chapter 6: NVIDIA® SLI...
...Definition Audio utility)... 5-12 5.3.4 ASUS PC Probe II 5-21 5.3.5 ASUS AI Suite 5-27 5.3.6 ASUS EPU Utility-AI Gear 3 5-29 5.3.7 ASUS AI Nap 5-31 5.3.8 ASUS Q-Fan Plus 5-32 5.3.9 ASUS AI Booster 5-33 5.3.10 ...CPU Level Up 5-34 5.4 RAID configurations 5-35 5.4.1 RAID definitions 5-35 5.4.2 NVIDIA® RAID configurations 5-36 5.4.4 JMicron® RAID Configuration 5-43 5.5 Creating a RAID driver disk 5-51 5.5.1 Creating a RAID driver disk without entering the OS.... 5-51 5.5.2 Creating a RAID/SATA driver disk in Windows 5-51 Chapter 6: NVIDIA® SLI...

User Manual
Page 7
Contents 6.2 Graphics card setup 6-2 6.2.1 Installing three SLI-ready graphics cards 6-2 6.2.2 Installing two SLI-ready graphics cards 6-5 6.2.3 Installing the device drivers 6-6 6.2.4 Enabling the NVIDIA® SLI™ technology in Windows®..... 6-6 Appendix: CPU features A.1 Intel® EM64T A-1 A.2 Enhanced Intel SpeedStep® Technology (EIST A-1 A.2.1 System requirements A-1 A.2.2 Using the EIST A-2 A.3 Intel® Hyper-Threading Technology A-3 Using the Hyper-Threading Technology A-3 A.4 Debug code table A-4 vii
Contents 6.2 Graphics card setup 6-2 6.2.1 Installing three SLI-ready graphics cards 6-2 6.2.2 Installing two SLI-ready graphics cards 6-5 6.2.3 Installing the device drivers 6-6 6.2.4 Enabling the NVIDIA® SLI™ technology in Windows®..... 6-6 Appendix: CPU features A.1 Intel® EM64T A-1 A.2 Enhanced Intel SpeedStep® Technology (EIST A-1 A.2.1 System requirements A-1 A.2.2 Using the EIST A-2 A.3 Intel® Hyper-Threading Technology A-3 Using the Hyper-Threading Technology A-3 A.4 Debug code table A-4 vii
User Manual
Page 10
... information you have been added by your dealer. ASUS websites The ASUS website provides updated information on the motherboard. • Chapter 3: Powering up This chapter describes the power up sequence and ways of the support DVD that comes with the motherboard package. • Chapter 6: NVIDIA® SLI™ technology support This chapter shows how to...
... information you have been added by your dealer. ASUS websites The ASUS website provides updated information on the motherboard. • Chapter 3: Powering up This chapter describes the power up sequence and ways of the support DVD that comes with the motherboard package. • Chapter 6: NVIDIA® SLI™ technology support This chapter shows how to...
User Manual
Page 12
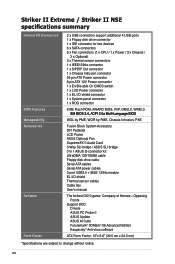
...;�c�e�s�s�o�rs� * Refer to www.asus.com for Intel® Core™2 Quad / Core™2 Extreme / Core™2 Duo / Pentium® Extreme / Pentium® D / Pentium® 4 processors Supports Intel®...�t�s�)�. 2 x PCIe 2.0 x16 slots (support �N�V�I�D�IA�® SLI™ technology; Striker II Extreme / S��t�r�ik��e�r�I��I�N��S�E� specifications summary CPU Chipset...
...;�c�e�s�s�o�rs� * Refer to www.asus.com for Intel® Core™2 Quad / Core™2 Extreme / Core™2 Duo / Pentium® Extreme / Pentium® D / Pentium® 4 processors Supports Intel®...�t�s�)�. 2 x PCIe 2.0 x16 slots (support �N�V�I�D�IA�® SLI™ technology; Striker II Extreme / S��t�r�ik��e�r�I��I�N��S�E� specifications summary CPU Chipset...
User Manual
Page 14
xiv Striker II Extreme / Striker II NSE specifications summary Internal I/O Connectors BIOS Features Manageability Accessories Software Form Factor 2 x USB connectors support additional 4 USB ports 1 x Floppy disk drive connector 1 x IDE connector for ...;I�O�S� WOL by PME, WOR by PME, Chassis Intrusion, PXE Fusion Block System Accessory DIY Pedestal LCD Poster ASUS Optional Fan SupremeFX II Audio Card 3-Way SLI bridge / ASUS SLI bridge 3 in 1 ASUS Q-connector kit UltraDMA 133/100/66 cable Floppy disk drive cable Serial ATA cables Serial ATA power cables 2-port USB2.0 + ...
xiv Striker II Extreme / Striker II NSE specifications summary Internal I/O Connectors BIOS Features Manageability Accessories Software Form Factor 2 x USB connectors support additional 4 USB ports 1 x Floppy disk drive connector 1 x IDE connector for ...;I�O�S� WOL by PME, WOR by PME, Chassis Intrusion, PXE Fusion Block System Accessory DIY Pedestal LCD Poster ASUS Optional Fan SupremeFX II Audio Card 3-Way SLI bridge / ASUS SLI bridge 3 in 1 ASUS Q-connector kit UltraDMA 133/100/66 cable Floppy disk drive cable Serial ATA cables Serial ATA power cables 2-port USB2.0 + ...
User Manual
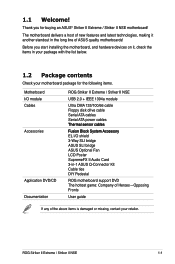
Page 17
...ASUS® Striker II Extreme / Striker II NSE motherboard! Thank you start installing the motherboard, and hardware devices on it another standout in -1 ASUS Q-Connector Kit Cable ties DIY Pedestal Application DVD/CD ROG motherboard support DVD The hottest game: Company of Heroes-Opposing Fronts Documentation User guide If any of ASUS quality motherboards! Before you for the following items. Motherboard ROG Striker II Extreme / Striker II...;or�y EL I/O shield 3-Way SLI bridge ASUS SLI bridge ASUS Optional Fan LCD Poster SupremeFX II Audio Card 3-in the long line of...
...ASUS® Striker II Extreme / Striker II NSE motherboard! Thank you start installing the motherboard, and hardware devices on it another standout in -1 ASUS Q-Connector Kit Cable ties DIY Pedestal Application DVD/CD ROG motherboard support DVD The hottest game: Company of Heroes-Opposing Fronts Documentation User guide If any of ASUS quality motherboards! Before you for the following items. Motherboard ROG Striker II Extreme / Striker II...;or�y EL I/O shield 3-Way SLI bridge ASUS SLI bridge ASUS Optional Fan LCD Poster SupremeFX II Audio Card 3-in the long line of...
User Manual
Page 18
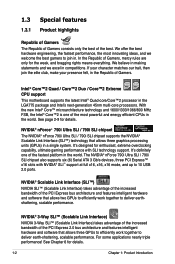
... Republic of Gamers, mercy rules are only for details. 1-2 Chapter 1: Product Introduction Intel® Core™2 Quad / Core™2 Duo / Core™2 Extreme CPU support This motherboard supports the latest Intel® Quad-core/Core™2 processor in the world. NVIDIA® nForce® 790i Ultra SLI / 790i SLI chipset The NVIDIA® nForce 790i Ultra SLI...
... Republic of Gamers, mercy rules are only for details. 1-2 Chapter 1: Product Introduction Intel® Core™2 Quad / Core™2 Duo / Core™2 Extreme CPU support This motherboard supports the latest Intel® Quad-core/Core™2 processor in the world. NVIDIA® nForce® 790i Ultra SLI / 790i SLI chipset The NVIDIA® nForce 790i Ultra SLI...
User Manual
Page 32
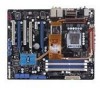
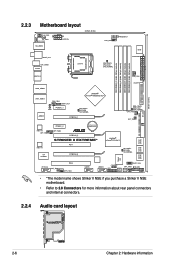
... Cell CMOS Power OPT_FAN2 PCIEX16_3 STRIKER II EXTREME* PCI1 VIA VT6308P PCIEX16_2 NVIDIA® nForce® 570 SLI™ SB_CRAZY SB_HIGH SB_NORMAL SATA3 SATA4 SATA5 SATA6 Super I/O IE1394_2 OPT_TEMP3 PCI2 OPT_FAN3 USB78 USB910 CHASSIS ADH CLRTC_SW CHA_FAN3 RESET HD_LED PANEL • *The model name shows Striker II NSE if you purchase a Striker II NSE motherboard. • Refer to 2.8 Connectors...
... Cell CMOS Power OPT_FAN2 PCIEX16_3 STRIKER II EXTREME* PCI1 VIA VT6308P PCIEX16_2 NVIDIA® nForce® 570 SLI™ SB_CRAZY SB_HIGH SB_NORMAL SATA3 SATA4 SATA5 SATA6 Super I/O IE1394_2 OPT_TEMP3 PCI2 OPT_FAN3 USB78 USB910 CHASSIS ADH CLRTC_SW CHA_FAN3 RESET HD_LED PANEL • *The model name shows Striker II NSE if you purchase a Striker II NSE motherboard. • Refer to 2.8 Connectors...

User Manual
Page 50
... PCI Express x 16 slot PCI slot PCI Express x16 slot 2-24 Chapter 2: Hardware information Refer to a PCIe x16 slot. 2.5.6 PCI Express x16 slots This motherboard supports three SLI™-ready Express x16 graphics cards that comply with the PCI Express specifications. 2.5.4 PCI slots The PCI slots support cards such as a LAN card...
... PCI Express x 16 slot PCI slot PCI Express x16 slot 2-24 Chapter 2: Hardware information Refer to a PCIe x16 slot. 2.5.6 PCI Express x16 slots This motherboard supports three SLI™-ready Express x16 graphics cards that comply with the PCI Express specifications. 2.5.4 PCI slots The PCI slots support cards such as a LAN card...

User Manual
Page 51
...install any other PCI Express device to the universal (white) PCI Express x16 slot. • Connect a rear chassis fan to the motherboard connector labeled CHA_FAN2 or OPT_FAN1/2/3 when using multiple graphics cards for details. See page 2-35 for details. • In single VGA... x16 graphics card to get better performance. • In SLI™ mode, use the PCIe 2.0 slots (blue slots) for PCI Express x16 graphics cards to get better performance. • We recommend that you provide sufficient power when running NVIDIA® SLI™ mode. ROG Striker II Extreme / Striker II NSE 2-25
...install any other PCI Express device to the universal (white) PCI Express x16 slot. • Connect a rear chassis fan to the motherboard connector labeled CHA_FAN2 or OPT_FAN1/2/3 when using multiple graphics cards for details. See page 2-35 for details. • In single VGA... x16 graphics card to get better performance. • In SLI™ mode, use the PCIe 2.0 slots (blue slots) for PCI Express x16 graphics cards to get better performance. • We recommend that you provide sufficient power when running NVIDIA® SLI™ mode. ROG Striker II Extreme / Striker II NSE 2-25

User Manual
Page 64
...of 400 W. • Do not forget to the Recommended Power Supply Wattage Calculator at http://support.asus.com/PowerSupplyCalculator/PSCalculator. otherwise, the system will not boot. • Use of a PSU with ... +12 Volts +5V Standby Power OK GND +5 Volts GND +5 Volts GND +3 Volts +3 Volts PIN 1 STRIKER II EXTREME/ STRIKER II NSE ATX power connectors GND +5 Volts +5 Volts +5 Volts -5 Volts GND GND GND PSON# GND -12 ...recommend that you want to ensure the system stability. • If you use 3-Way SLI™ configuration, visit the NVIDIA website (www.nvidia.com) for your system, refer ...
...of 400 W. • Do not forget to the Recommended Power Supply Wattage Calculator at http://support.asus.com/PowerSupplyCalculator/PSCalculator. otherwise, the system will not boot. • Use of a PSU with ... +12 Volts +5V Standby Power OK GND +5 Volts GND +5 Volts GND +3 Volts +3 Volts PIN 1 STRIKER II EXTREME/ STRIKER II NSE ATX power connectors GND +5 Volts +5 Volts +5 Volts -5 Volts GND GND GND PSON# GND -12 ...recommend that you want to ensure the system stability. • If you use 3-Way SLI™ configuration, visit the NVIDIA website (www.nvidia.com) for your system, refer ...
User Manual
Page 128
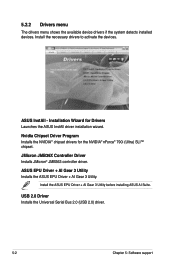
... Wizard for the NVIDIA® nForce® 790i (Ultra) SLI™ chipset. JMicron JMB36X Controller Driver Installs JMicron® JMB363 controller driver. ASUS EPU Driver + AI Gear 3 Utility Installs the ASUS EPU Driver + AI Gear 3 Utility. Install the necessary drivers to activate the devices. 5.2.2 Drivers menu The ... Bus 2.0 (USB 2.0) driver. 5-2 Chapter 5: Software support Nvidia Chipset Driver Program Installs the NVIDIA® chipset drivers for Drivers Launches the ASUS InstAll driver installation wizard. Install the ASUS EPU Driver + AI Gear 3 Utility before installing...
... Wizard for the NVIDIA® nForce® 790i (Ultra) SLI™ chipset. JMicron JMB36X Controller Driver Installs JMicron® JMB363 controller driver. ASUS EPU Driver + AI Gear 3 Utility Installs the ASUS EPU Driver + AI Gear 3 Utility. Install the necessary drivers to activate the devices. 5.2.2 Drivers menu The ... Bus 2.0 (USB 2.0) driver. 5-2 Chapter 5: Software support Nvidia Chipset Driver Program Installs the NVIDIA® chipset drivers for Drivers Launches the ASUS InstAll driver installation wizard. Install the ASUS EPU Driver + AI Gear 3 Utility before installing...
User Manual
Page 131
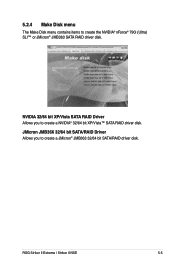
ROG Striker II Extreme / Striker II NSE 5-5 JMicron JMB36X 32/64 bit SATA/RAID Driver Allows you to create a NVIDIA® 32/64 bit XP/Vista™ SATA RAID driver disk. 5.2.4 Make Disk menu The Make Disk menu contains items to create a JMicron® JMB363 32/64 bit SATA/RAID driver disk. NVIDIA 32/64 bit XP/Vista SATA RAID Driver Allows you to create the NVIDIA® nForce® 790i (Ultra) SLI™ or JMicron® JMB363 SATA RAID driver disk.
ROG Striker II Extreme / Striker II NSE 5-5 JMicron JMB36X 32/64 bit SATA/RAID Driver Allows you to create a NVIDIA® 32/64 bit XP/Vista™ SATA RAID driver disk. 5.2.4 Make Disk menu The Make Disk menu contains items to create a JMicron® JMB363 32/64 bit SATA/RAID driver disk. NVIDIA 32/64 bit XP/Vista SATA RAID Driver Allows you to create the NVIDIA® nForce® 790i (Ultra) SLI™ or JMicron® JMB363 SATA RAID driver disk.
User Manual
Page 161
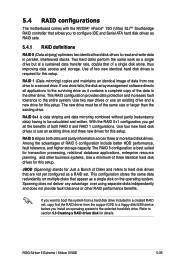
...Spanning) stands for this setup. If you want to boot the system from a hard disk drive included in a created RAID set . ROG Striker II Extreme / Striker II NSE 5-35 RAID 1 (Data mirroring) copies and maintains an identical image of data from the support DVD to a floppy disk/USB device ... configuration provides data protection and increases fault tolerance to the selected hard disk drive. 5.4 RAID configurations The motherboard comes with the NVIDIA® nForce® 790i (Ultra) SLI™ Southbridge RAID controller that allows you to configure IDE and Serial ATA hard disk drives as RAID...
...Spanning) stands for this setup. If you want to boot the system from a hard disk drive included in a created RAID set . ROG Striker II Extreme / Striker II NSE 5-35 RAID 1 (Data mirroring) copies and maintains an identical image of data from the support DVD to a floppy disk/USB device ... configuration provides data protection and increases fault tolerance to the selected hard disk drive. 5.4 RAID configurations The motherboard comes with the NVIDIA® nForce® 790i (Ultra) SLI™ Southbridge RAID controller that allows you to configure IDE and Serial ATA hard disk drives as RAID...

User Manual
Page 179
Chapter 6: NVIDIA S6LI™ This chapter tells how to install SLI‑ready PCI Express graphics cards. ® technology support
Chapter 6: NVIDIA S6LI™ This chapter tells how to install SLI‑ready PCI Express graphics cards. ® technology support

User Manual
Page 181
... three identical PCI Express™ x16 graphics cards. See page 2-38 for details. • The NVIDIA 3-way SLI technology is supported by your system. ROG Striker II Extreme / Striker II NSE 6-1 Follow the installation procedures in this section. 6.1 Overview The motherboard supports the NVIDIA® SLI™ (Scalable Link Interface) technology that allows you should have two identical...
... three identical PCI Express™ x16 graphics cards. See page 2-38 for details. • The NVIDIA 3-way SLI technology is supported by your system. ROG Striker II Extreme / Striker II NSE 6-1 Follow the installation procedures in this section. 6.1 Overview The motherboard supports the NVIDIA® SLI™ (Scalable Link Interface) technology that allows you should have two identical...

User Manual
Page 182
Different types of graphics cards will not work together properly. Each graphics card should have goldfingers for the 3-way SLI connector. Prepare three graphics cards. 6.2 Graphics card setup 6.2.1 Installing three SLI-ready graphics cards Install only identical SLI-ready graphics cards that are NVIDIA®-certified. Goldfingers 6-2 Chapter 6: NVIDIA® SLI™ technology support To install the graphics cards: 1.
Different types of graphics cards will not work together properly. Each graphics card should have goldfingers for the 3-way SLI connector. Prepare three graphics cards. 6.2 Graphics card setup 6.2.1 Installing three SLI-ready graphics cards Install only identical SLI-ready graphics cards that are NVIDIA®-certified. Goldfingers 6-2 Chapter 6: NVIDIA® SLI™ technology support To install the graphics cards: 1.

User Manual
Page 183
Make sure that the connector is firmly in place. 3-way SLI bridge connector ROG Striker II Extreme / Striker II NSE 6-3 Make sure that the cards are properly seated on each graphics card. 2. Align and firmly insert the 3-way SLI bridge connector to the goldfingers on the slots. 3. Insert the first graphics card into the PCIEX16_1 slot (blue), the second into the PCIEX16_3 slot (white), and the third into the PCIEX16_2 slot (blue).
Make sure that the connector is firmly in place. 3-way SLI bridge connector ROG Striker II Extreme / Striker II NSE 6-3 Make sure that the cards are properly seated on each graphics card. 2. Align and firmly insert the 3-way SLI bridge connector to the goldfingers on the slots. 3. Insert the first graphics card into the PCIEX16_1 slot (blue), the second into the PCIEX16_3 slot (white), and the third into the PCIEX16_2 slot (blue).

User Manual
Page 184
Connect a VGA or a DVI-I cable to the three graphics cards separately. 5. 4. Connect auxiliary power source from the power supply to the graphics card/s. We recommend that you install an additional chassis fan for better thermal environment. 6-4 Chapter 6: NVIDIA® SLI™ technology support
Connect a VGA or a DVI-I cable to the three graphics cards separately. 5. 4. Connect auxiliary power source from the power supply to the graphics card/s. We recommend that you install an additional chassis fan for better thermal environment. 6-4 Chapter 6: NVIDIA® SLI™ technology support

User Manual
Page 185
ROG Striker II Extreme / Striker II NSE 6-5 6.2.2 Installing two SLI-ready graphics cards 1. Align and insert the SLI connector to he two graphics cards separately. 4. Make sure that the cards are properly seated on each graphics card. Insert one graphics card into the ...
ROG Striker II Extreme / Striker II NSE 6-5 6.2.2 Installing two SLI-ready graphics cards 1. Align and insert the SLI connector to he two graphics cards separately. 4. Make sure that the cards are properly seated on each graphics card. Insert one graphics card into the ...


