Asus ST558 Support and Manuals
Get Help and Manuals for this Asus item
Popular Asus ST558 Manual Pages
Series User Guide - Page 4
... OSD (On-Screen Display) menu 35 OSD menu overview 35 Operations in the OSD menu 37 Picture menu 38 Sound menu 39 Screen menu 40 Setting menu 42
Product information 44 Specifications 44 Dimensions 46 Remote control codes 47 Supported input signal resolution 48 Supported PAP input signal combination 50
Troubleshooting 51
Series User Guide - Page 10
... in danger and injuries.
• Refer the installation to fall or malfunction.
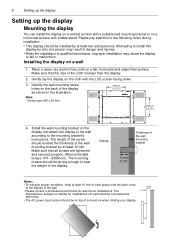
Please pay attention to the mounting bracket's instructions. Make sure that all screws are tightened and ...for wall mount installations. Install the wall mounting bracket on the back of the display.
8
Setting up the display
Setting up the display
Mounting the display
You can install the display on ...
Series User Guide - Page 11
...the display is turned off . Off when the main power is in Power Save High
mode. - Parts of the display and their functions
9
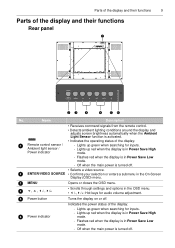
Parts of the display and their functions
Rear panel
1
23
4
4
56
No. Lights up green ... menu.
3 MENU
Opens or closes the OSD menu.
4
• Scrolls through settings and options in Power Save Low mode.
- Flashes red when the display is in the OSD menu.
Series User Guide - Page 14
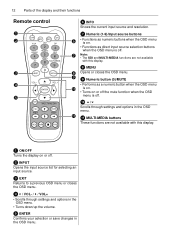
12 Parts of the display and their functions
Remote control
1 2
3 4 5
6 INFO Shows the current input source and resolution.
7 Numeric (1-9)/Input source buttons...menu 10 is on.
• Turns on or off the mute function when the OSD menu is off.
10 /
Scrolls through settings and options in the OSD menu.
11 11 MULTI-MEDIA buttons These functions are not available with this display.
1 ON/OFF Turns...
Series User Guide - Page 25

... 100-240V AC power only. • The power cord and outlet illustrated may differ from the ones used in this display. There are no user serviceable parts in your region. • Only use an appropriate power cord for use extension cords or multiple outlet power boards. • There are
dangerous voltages inside...
Series User Guide - Page 26
To completely cut off
power supply, set the power switch to prevent unwanted or accidental operations. Locking/unlocking the controls
You can lock/unlock the control panel to the off position or ...
Series User Guide - Page 27
...ENTER button on these settings. - Contact your LAN switch or router.
2. Go to Setting > Network Settings and perform either of the display has to be configured manually), select Manual > Execute and ...the IP Address, Subnet Mask, Default Gateway, Primary DNS, and Secondary DNS settings and enter them accordingly using the numeric buttons on the remote control. Network connection...
Series User Guide - Page 31
...administrator and enter them in the corresponding fields under Email
Setting. 2. You can also click the E-Mail Test button to
set the display to complete setup.
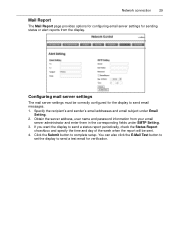
Click the Submit button to send a test email ... Obtain the server address, user name and password information from the display. Configuring mail server settings
The mail server settings must be correctly configured for verification.
Series User Guide - Page 32
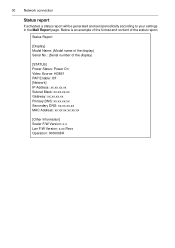
Status Report
[Display] Model Name: (Model name of the display) Serial No.: (Serial number of the status report. 30 Network connection
Status report
If activated, a status report will be generated and sent periodically according to your settings in the Mail Report page. Below is an example of the format and content of the display...
Series User Guide - Page 35

For more information about how to configure network settings, please refer to "Connecting the display to a local area network" on page 25. Network connection 33
Network
Provides options for manually setting the display's IP address or obtaining an IP address automatically from a DHCP server.
Series User Guide - Page 36
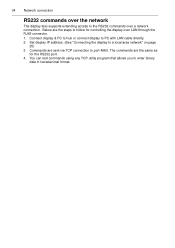
... the steps to PC with LAN cable directly. 2. Set display IP address. (See "Connecting the display to port 4660. Commands are sent via TCP connection to a local area network" on page
25) 3. 34 Network connection
RS232 commands over the network
The display also supports extending access to enter binary
data in hexadecimal...
Series User Guide - Page 42
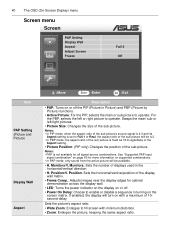
...Setting (Picture and Picture)
Display Wall
Aspect
:Move
Enter :Enter
Exit :Exit
Description
• PAP: Turns on the screen matrix. For the PBP, selects the left /right pictures.
• Picture Size: Changes the size of the sub picture. Position/V.
See "Supported... in the horizontal/vertical direction.
• H. Monitors: Sets the number of displays used in Picture) and PBP (...
Series User Guide - Page 45
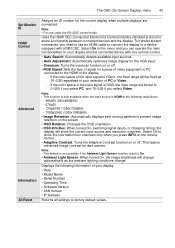
..., and 16~235 if you can operate the main functionalities on your display.
• Date • Model Name • Serial Number • Operating Time • Software Version • LAN Version • IP Address
Returns all settings to show the current input source and resolution onscreen. If the color space of PC or...
Series User Guide - Page 47
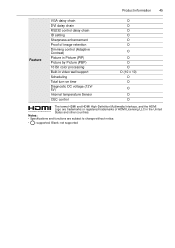
... DVI daisy chain RS232 control daisy chain ID setting Sharpness enhancement Proof of HDMI Licensing LLC in video wall support Scheduling Total turn-on time Diagnostic DC voltage ... the HDMI Logo are subject to change without notice.
• : supported, Blank: not supported Notes: • Specifications and functions are trademarks or registered trademarks of image retention Dimming control (...
Series User Guide - Page 53

... on ? Refer to "Supported input signal resolution" on page 48 to manually adjust the image. Refer to "Supported input signal resolution" on page 48 to select a supported resolution and try again..... • Have you chosen an unsupported output resolution on the computer? Troubleshooting 51
Troubleshooting
Problem
Solution
No picture
No sound
The computer input image looks strange The control ...
Asus ST558 Reviews
We have not received any reviews for Asus yet.