
User Guide
Page 2
... General Public License ("GPL"), under the Lesser General Public License Version ("LGPL") and/or other Free Open Source Software Licenses. ASUS PROVIDES THIS MANUAL "AS IS" WITHOUT WARRANTY OF ANY KIND, EITHER EXPRESS OR IMPLIED, INCLUDING BUT NOT LIMITED TO THE IMPLIED WARRANTIES OR CONDITIONS..., transmitted, transcribed, stored in a retrieval system, or translated into any language in this manual may or may be much obliged if you encounter any means, except documentation kept by ASUS; Products and corporate names appearing in any form or by the applicable law. ii or ...
... General Public License ("GPL"), under the Lesser General Public License Version ("LGPL") and/or other Free Open Source Software Licenses. ASUS PROVIDES THIS MANUAL "AS IS" WITHOUT WARRANTY OF ANY KIND, EITHER EXPRESS OR IMPLIED, INCLUDING BUT NOT LIMITED TO THE IMPLIED WARRANTIES OR CONDITIONS..., transmitted, transcribed, stored in a retrieval system, or translated into any language in this manual may or may be much obliged if you encounter any means, except documentation kept by ASUS; Products and corporate names appearing in any form or by the applicable law. ii or ...
User Guide
Page 5
... support 4.1 Installing an operating system 4-1 4.2 Support DVD information 4-1 4.2.1 Running the support DVD 4-1 4.2.2 Obtaining the software manuals 4-3 4.3 Software information 4-4 4.4 AI Suite 3...4-4 4.4.1 Ai Charger 4-11 4.4.2 EZ Update 4-12 4.4.3 USB BIOS Flashback 4-14 4.4.4 Push Notice 4-16 4.4.5 USB 3.1 Boost 4-19 4.4.6 System Information 4-20 4.4.7 USB Charger 4-22 4.4.8 Version 4-23 4.5 Turbo LAN 4-24 4.6 Audio configurations 4-25 Chapter 5: RAID support 5.1 RAID...
... support 4.1 Installing an operating system 4-1 4.2 Support DVD information 4-1 4.2.1 Running the support DVD 4-1 4.2.2 Obtaining the software manuals 4-3 4.3 Software information 4-4 4.4 AI Suite 3...4-4 4.4.1 Ai Charger 4-11 4.4.2 EZ Update 4-12 4.4.3 USB BIOS Flashback 4-14 4.4.4 Push Notice 4-16 4.4.5 USB 3.1 Boost 4-19 4.4.6 System Information 4-20 4.4.7 USB Charger 4-22 4.4.8 Version 4-23 4.5 Turbo LAN 4-24 4.6 Audio configurations 4-25 Chapter 5: RAID support 5.1 RAID...
User Guide
Page 6
... from connectors, slots, sockets and circuitry. • Avoid dust, humidity, and temperature extremes. These devices could interrupt the grounding circuit. • Ensure that all the manuals that the power cables for the devices are unplugged before the signal cables are not damaged. Do not place the product in your area. Operation...
... from connectors, slots, sockets and circuitry. • Avoid dust, humidity, and temperature extremes. These devices could interrupt the grounding circuit. • Ensure that all the manuals that the power cables for the devices are unplugged before the signal cables are not damaged. Do not place the product in your area. Operation...
User Guide
Page 8
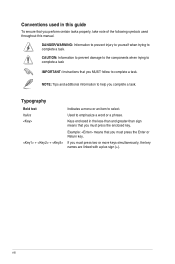
... to emphasize a word or a phrase. Used to select. DANGER/WARNING: Information to prevent injury to yourself when trying to complete a task. Conventions used throughout this manual. viii
... to emphasize a word or a phrase. Used to select. DANGER/WARNING: Information to prevent injury to yourself when trying to complete a task. Conventions used throughout this manual. viii
User Guide
Page 12
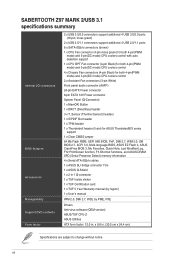
... Inside sticker 1 x TUF Certification card 1 x TUF 5 Year Warranty manual (by region) 1 x User's manual WfM 2.0, DMI 2.7, WOL by PME, PXE Drivers Anti-virus software (OEM version) ASUS/TUF CPU-Z ASUS Utilities ATX form factor: 12.0 in . (30.5 cm x 24.4 cm) Specifications are subject to change without notice. SABERTOOTH Z97 MARK 2/USB 3.1 specifications summary Internal I/O connectors BIOS features Accessories Manageability...
... Inside sticker 1 x TUF Certification card 1 x TUF 5 Year Warranty manual (by region) 1 x User's manual WfM 2.0, DMI 2.7, WOL by PME, PXE Drivers Anti-virus software (OEM version) ASUS/TUF CPU-Z ASUS Utilities ATX form factor: 12.0 in . (30.5 cm x 24.4 cm) Specifications are subject to change without notice. SABERTOOTH Z97 MARK 2/USB 3.1 specifications summary Internal I/O connectors BIOS features Accessories Manageability...
User Guide
Page 13
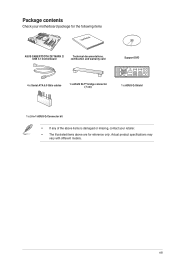
Package contents Check your motherboard package for the following items User Manual ASUS SABERTOOTH Z97 MARK 2/ USB 3.1 motherboard Technical documentations, certification and warranty card Support DVD 4 x Serial ATA 6.0 Gb/s cables 1 x ASUS SLI™ bridge connector (7 cm) 1 x ASUS Q-Shield 1 x 2-in-1 ASUS Q-Connector kit • If any of the above items is damaged or missing, contact your retailer. • The illustrated items above are for reference only. xiii Actual product specifications may vary with different models.
Package contents Check your motherboard package for the following items User Manual ASUS SABERTOOTH Z97 MARK 2/ USB 3.1 motherboard Technical documentations, certification and warranty card Support DVD 4 x Serial ATA 6.0 Gb/s cables 1 x ASUS SLI™ bridge connector (7 cm) 1 x ASUS Q-Shield 1 x 2-in-1 ASUS Q-Connector kit • If any of the above items is damaged or missing, contact your retailer. • The illustrated items above are for reference only. xiii Actual product specifications may vary with different models.
User Guide
Page 16
... COOL" Thermal Solutions Thermal Radar 2 Thermal Radar 2 uses multiple sensors to the designated SSD, it provides your existing USB devices, and you are adjusting settings manually or using the automatic one-click organization. This means less time waiting for caching function. Saving your computer to a ...CPU and VGA zone cooling status, and promotes extended system longevity, power saving solution, and noise reduction. that monitoring of Green ASUS eco-friendly computing, reduces load and wait time, eliminates unnecessary hard drive spin thus lowering power usage, and uses an installed ...
... COOL" Thermal Solutions Thermal Radar 2 Thermal Radar 2 uses multiple sensors to the designated SSD, it provides your existing USB devices, and you are adjusting settings manually or using the automatic one-click organization. This means less time waiting for caching function. Saving your computer to a ...CPU and VGA zone cooling status, and promotes extended system longevity, power saving solution, and noise reduction. that monitoring of Green ASUS eco-friendly computing, reduces load and wait time, eliminates unnecessary hard drive spin thus lowering power usage, and uses an installed ...
User Guide
Page 26
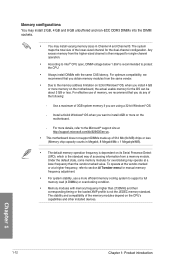
...‑ECC DDR3 DIMMs into the DIMM sockets. • You may operate at a higher frequency, refer to section Ai Tweaker menu for manual memory frequency adjustment. • For system stability, use of the memory modules depend on the motherboard, the actual usable memory for the dual... way of the following: - For optimum compatibility, we recommend that you obtain memory modules from a memory module. To operate at the vendor-marked or at a lower frequency than 2133MHz and their corresponding timing or the loaded XMP profile is not the JEDEC memory standard. For effective use...
...‑ECC DDR3 DIMMs into the DIMM sockets. • You may operate at a higher frequency, refer to section Ai Tweaker menu for manual memory frequency adjustment. • For system stability, use of the memory modules depend on the motherboard, the actual usable memory for the dual... way of the following: - For optimum compatibility, we recommend that you obtain memory modules from a memory module. To operate at the vendor-marked or at a lower frequency than 2133MHz and their corresponding timing or the loaded XMP profile is not the JEDEC memory standard. For effective use...
User Guide
Page 40
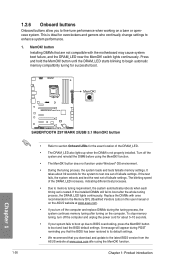
... system loads and tests failsafe memory settings. button Installing DIMMs that you download and update to the latest BIOS version from the ASUS website at www.asus.com. • If you turn off the system and reinstall the DIMM before using the MemOK! To stop memory tuning, ...• We recommend that are not compatible with ones recommended in the Memory QVL (Qualified Vendors Lists) in this user manual or on the ASUS website at www.asus.com after the whole tuning process, the DRAM_LED lights continuously. 1.2.6 Onboard buttons Onboard buttons allow you to fine-tune performance ...
... system loads and tests failsafe memory settings. button Installing DIMMs that you download and update to the latest BIOS version from the ASUS website at www.asus.com. • If you turn off the system and reinstall the DIMM before using the MemOK! To stop memory tuning, ...• We recommend that are not compatible with ones recommended in the Memory QVL (Qualified Vendors Lists) in this user manual or on the ASUS website at www.asus.com after the whole tuning process, the DRAM_LED lights continuously. 1.2.6 Onboard buttons Onboard buttons allow you to fine-tune performance ...
User Guide
Page 44
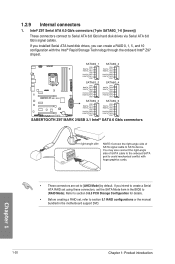
...; Z97 Serial ATA 6.0 Gb/s connectors (7-pin SATA6G_1-6 [brown]) These connectors connect to [AHCI Mode] by default. If you installed Serial ATA hard disk drives, you intend to create a Serial ATA RAID set using these connectors, set , refer to section 5.1 RAID configurations or the manual bundled...you can create a RAID 0, 1, 5, and 10 configuration with the Intel® Rapid Storage Technology through the onboard Intel® Z97 chipset. 1.2.9 Internal connectors 1. Chapter 1 • These connectors are set to Serial ATA 6.0 Gb/s hard disk drives via Serial ATA 6.0 Gb/s signal ...
...; Z97 Serial ATA 6.0 Gb/s connectors (7-pin SATA6G_1-6 [brown]) These connectors connect to [AHCI Mode] by default. If you installed Serial ATA hard disk drives, you intend to create a Serial ATA RAID set using these connectors, set , refer to section 5.1 RAID configurations or the manual bundled...you can create a RAID 0, 1, 5, and 10 configuration with the Intel® Rapid Storage Technology through the onboard Intel® Z97 chipset. 1.2.9 Internal connectors 1. Chapter 1 • These connectors are set to Serial ATA 6.0 Gb/s hard disk drives via Serial ATA 6.0 Gb/s signal ...
User Guide
Page 70
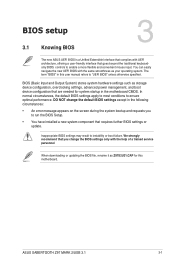
... that you to run the BIOS Setup. • You have installed a new system component that are needed for this user manual refers to ensure optimal performance. You can easily navigate the new UEFI BIOS with the same smoothness as Z97S2U31.CAP for system ... file, rename it as your operating system. Inappropriate BIOS settings may result to enable a more flexible and convenient mouse input. Chapter 3 ASUS SABERTOOTH Z97 MARK 2/USB 3.1 3-1 DO NOT change the BIOS settings only with UEFI architecture, offering a user-friendly interface that goes beyond the traditional keyboardonly BIOS ...
... that you to run the BIOS Setup. • You have installed a new system component that are needed for this user manual refers to ensure optimal performance. You can easily navigate the new UEFI BIOS with the same smoothness as Z97S2U31.CAP for system ... file, rename it as your operating system. Inappropriate BIOS settings may result to enable a more flexible and convenient mouse input. Chapter 3 ASUS SABERTOOTH Z97 MARK 2/USB 3.1 3-1 DO NOT change the BIOS settings only with UEFI architecture, offering a user-friendly interface that goes beyond the traditional keyboardonly BIOS ...
User Guide
Page 72
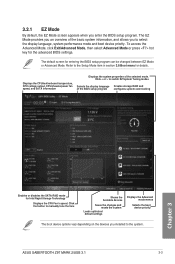
... RAID mode for entering the BIOS setup program can be changed between EZ Mode or Advanced Mode. Click the button to manually tune the fans Shows the bootable devices Saves the changes and resets the system Loads optimized default settings Displays the Advanced mode...default, the EZ Mode screen appears when you installed to the system. The EZ Mode provides you an overview of the selected mode. ASUS SABERTOOTH Z97 MARK 2/USB 3.1 3-3 Refer to select the display language, system performance mode and boot device priority. Displays the CPU/motherboard temperature, CPU voltage output...
... RAID mode for entering the BIOS setup program can be changed between EZ Mode or Advanced Mode. Click the button to manually tune the fans Shows the bootable devices Saves the changes and resets the system Loads optimized default settings Displays the Advanced mode...default, the EZ Mode screen appears when you installed to the system. The EZ Mode provides you an overview of the selected mode. ASUS SABERTOOTH Z97 MARK 2/USB 3.1 3-3 Refer to select the display language, system performance mode and boot device priority. Displays the CPU/motherboard temperature, CPU voltage output...
User Guide
Page 74
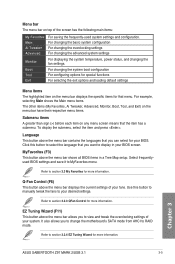
Boot Tool Exit For changing the system boot configuration For configuring options for your BIOS. Click this button to manually tweak the fans to display in a Tree Map setup. MyFavorites (F3) This button above the menu bar contains the ...more information. Refer to section 3.2.4 EZ Tuning Wizard for more information. Refer to section 3.2.3 QFan Control for that the item has a submenu. Chapter 3 ASUS SABERTOOTH Z97 MARK 2/USB 3.1 3-5 Refer to MyFavorites menu. For example, selecting Main shows the Main menu items. The other items (My Favorites, Ai Tweaker, Advanced, Monitor, ...
Boot Tool Exit For changing the system boot configuration For configuring options for your BIOS. Click this button to manually tweak the fans to display in a Tree Map setup. MyFavorites (F3) This button above the menu bar contains the ...more information. Refer to section 3.2.4 EZ Tuning Wizard for more information. Refer to section 3.2.3 QFan Control for that the item has a submenu. Chapter 3 ASUS SABERTOOTH Z97 MARK 2/USB 3.1 3-5 Refer to MyFavorites menu. For example, selecting Main shows the Main menu items. The other items (My Favorites, Ai Tweaker, Advanced, Monitor, ...

User Guide
Page 76
Click to select a fan to be configured Click to activate PWM Mode Click to activate DC Mode Chapter 3 Select a profile to apply to your fans Click to apply the fan setting Click to undo the changes Click to go back to main menu Select to set a fan profile or manually configure the operating speed of your fans ASUS SABERTOOTH Z97 MARK 2/USB 3.1 3-7 3.2.3 Q-Fan Control The Q-Fan Control allows you to manually configure your CPU and chassis fans.
Click to select a fan to be configured Click to activate PWM Mode Click to activate DC Mode Chapter 3 Select a profile to apply to your fans Click to apply the fan setting Click to undo the changes Click to go back to main menu Select to set a fan profile or manually configure the operating speed of your fans ASUS SABERTOOTH Z97 MARK 2/USB 3.1 3-7 3.2.3 Q-Fan Control The Q-Fan Control allows you to manually configure your CPU and chassis fans.

User Guide
Page 77
Speed points Click or tap to view its current status. 2. Select the fan that you want to configure and to manually configure your fans To configure your fans' operating speed. Click and drag the speed points to manually configure your fans: 1. Configuring fans manually Select Manual from the list of profiles to adjust the fans' operating speed. 3. Click Apply to save the changes then click Exit (ESC). 3-8 Chapter 3: BIOS setup Chapter 3
Speed points Click or tap to view its current status. 2. Select the fan that you want to configure and to manually configure your fans To configure your fans' operating speed. Click and drag the speed points to manually configure your fans: 1. Configuring fans manually Select Manual from the list of profiles to adjust the fans' operating speed. 3. Click Apply to save the changes then click Exit (ESC). 3-8 Chapter 3: BIOS setup Chapter 3
User Guide
Page 84
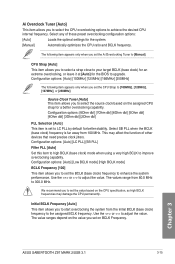
...from the initial BCLK (base clock) frequency to the assigned BCLK frequency. Chapter 3 ASUS SABERTOOTH Z97 MARK 2/USB 3.1 3-15 This may damage the CPU permanently. We recommend you set the Ai Overclocking Tuner to [Manual]. Configuration options: [Auto] [100MHz] [125MHz] [166MHz] [250MHz] The following ...frequencies may affect the function of these preset overclocking configuration options: [Auto] Loads the optimal settings for the system. [Manual] Automatically optimizes the CPU ratio and BCLK frequency. Source Clock Tuner [Auto] This item allows you to select the ...
...from the initial BCLK (base clock) frequency to the assigned BCLK frequency. Chapter 3 ASUS SABERTOOTH Z97 MARK 2/USB 3.1 3-15 This may damage the CPU permanently. We recommend you set the Ai Overclocking Tuner to [Manual]. Configuration options: [Auto] [100MHz] [125MHz] [166MHz] [250MHz] The following ...frequencies may affect the function of these preset overclocking configuration options: [Auto] Loads the optimal settings for the system. [Manual] Automatically optimizes the CPU ratio and BCLK frequency. Source Clock Tuner [Auto] This item allows you to select the ...
User Guide
Page 85
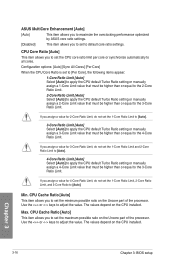
... Ratio Limit and 2-Core Ratio Limit to [Auto]. 4-Core Ratio Limit [Auto] Select [Auto] to apply the CPU default Turbo Ratio setting or manually assign a 4-Core Limit value that must be higher than or equal to the 4-Core Ratio Limit. Max. If you assign a value for 3-Core...Limit. 2-Core Ratio Limit [Auto] Select [Auto] to apply the CPU default Turbo Ratio setting or manually assign a 2-Core Limit value that must be higher than or equal to default core ratio settings. ASUS MultiCore Enhancement [Auto] [Auto] This item allows you to maximize the oveclocking performance optimized by...
... Ratio Limit and 2-Core Ratio Limit to [Auto]. 4-Core Ratio Limit [Auto] Select [Auto] to apply the CPU default Turbo Ratio setting or manually assign a 4-Core Limit value that must be higher than or equal to the 4-Core Ratio Limit. Max. If you assign a value for 3-Core...Limit. 2-Core Ratio Limit [Auto] Select [Auto] to apply the CPU default Turbo Ratio setting or manually assign a 2-Core Limit value that must be higher than or equal to default core ratio settings. ASUS MultiCore Enhancement [Auto] [Auto] This item allows you to maximize the oveclocking performance optimized by...

User Guide
Page 86
... value depends on the system loading. [Manual] This option allows you to set the memory operating frequency. Configuration options: [Keep Current Settings] [Ratio First] [BCLK First] Ensure that you to enable the internal PLL Overvoltage for K-SKU CPUs to 100:100. Configuration options: [Disabled] [Enabled] Chapter 3 ASUS SABERTOOTH Z97 MARK 2/USB 3.1 3-17 Enable this item to...
... value depends on the system loading. [Manual] This option allows you to set the memory operating frequency. Configuration options: [Keep Current Settings] [Ratio First] [BCLK First] Ensure that you to enable the internal PLL Overvoltage for K-SKU CPUs to 100:100. Configuration options: [Disabled] [Enabled] Chapter 3 ASUS SABERTOOTH Z97 MARK 2/USB 3.1 3-17 Enable this item to...
User Guide
Page 90
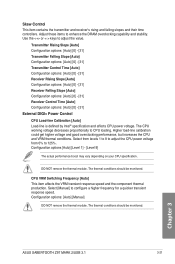
... should be monitored. The CPU working voltage decreases proportionally to configure a higher frequency for a quicker transient response speed. Configuration options: [Auto] [Manual] DO NOT remove the thermal module. Chapter 3 ASUS SABERTOOTH Z97 MARK 2/USB 3.1 3-21 The thermal conditions should be monitored. CPU VRM Switching Frequency [Auto] This item affects the VRM transient response speed and the...
... should be monitored. The CPU working voltage decreases proportionally to configure a higher frequency for a quicker transient response speed. Configuration options: [Auto] [Manual] DO NOT remove the thermal module. Chapter 3 ASUS SABERTOOTH Z97 MARK 2/USB 3.1 3-21 The thermal conditions should be monitored. CPU VRM Switching Frequency [Auto] This item affects the VRM transient response speed and the...
User Guide
Page 91
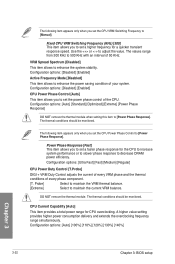
... of every phase component. [T. Configuration options: [Disabled] [Enabled] CPU Power Phase Control [Auto] This item allows you to set the CPU VRM Switching Frequency to [Manual]. Configuration options: [Ultra Fast] [Fast] [Medium] [Regular] CPU Power Duty Control [T.Probe] DIGI + VRM Duty Control adjusts the current of every VRM phase and the...
... of every phase component. [T. Configuration options: [Disabled] [Enabled] CPU Power Phase Control [Auto] This item allows you to set the CPU VRM Switching Frequency to [Manual]. Configuration options: [Ultra Fast] [Fast] [Medium] [Regular] CPU Power Duty Control [T.Probe] DIGI + VRM Duty Control adjusts the current of every VRM phase and the...


