
Users Manual
Page 3
... 1: Hardware Setup Getting to know your Notebook PC 16 Top View...16 Bottom View...23 Right View...25 Left View...29 Chapter 2: Using your Notebook PC Getting started...32 Charge your Notebook PC 32 Lift to open the display panel 34 Press the power button 34 Using the touchpad 35 Using the NumberPad (on selected models 42 Using the keyboard...43 HotKeys...43 Function keys...44 Windows keys...44 Using the numeric keypad 45 Notebook PC E-Manual 3
... 1: Hardware Setup Getting to know your Notebook PC 16 Top View...16 Bottom View...23 Right View...25 Left View...29 Chapter 2: Using your Notebook PC Getting started...32 Charge your Notebook PC 32 Lift to open the display panel 34 Press the power button 34 Using the touchpad 35 Using the NumberPad (on selected models 42 Using the keyboard...43 HotKeys...43 Function keys...44 Windows keys...44 Using the numeric keypad 45 Notebook PC E-Manual 3

Users Manual
Page 4
......57 Action Center...59 MyASUS Splendid...61 Other keyboard shortcuts 63 Connecting to wireless networks 65 Wi-Fi...65 Bluetooth...66 Airplane mode...67 Turning your Notebook PC off 68 Putting your Notebook PC to sleep 69 Chapter 4: Power-On Self-Test (POST) The Power-On Self-Test (POST 72 Using POST to access BIOS and Troubleshoot 72 BIOS...72 Accessing BIOS...72 Recovering your system 73 Performing a recovery option 74 4 Notebook PC E-Manual
......57 Action Center...59 MyASUS Splendid...61 Other keyboard shortcuts 63 Connecting to wireless networks 65 Wi-Fi...65 Bluetooth...66 Airplane mode...67 Turning your Notebook PC off 68 Putting your Notebook PC to sleep 69 Chapter 4: Power-On Self-Test (POST) The Power-On Self-Test (POST 72 Using POST to access BIOS and Troubleshoot 72 BIOS...72 Accessing BIOS...72 Recovering your system 73 Performing a recovery option 74 4 Notebook PC E-Manual

Users Manual
Page 5
Tips and FAQs Useful tips for your Notebook PC 78 Hardware FAQs...80 Software FAQs...83 Appendices DVD-ROM Drive Information 86 Blu-ray ROM Drive Information 88 Internal Modem Compliancy 88 Overview...89 Network Compatibility Declaration 89 Non-Voice Equipment...89 Federal Communications Commission Interference Statement 92 FCC Radio Frequency (RF) Exposure Caution Statement 93 ... 94 Déclaration de conformité de Innovation, Sciences et Développement économique Canada (ISED 94 UL Safety Notices...95 Power Safety Requirement 96 TV Notices...96 Notebook PC E-Manual 5
Tips and FAQs Useful tips for your Notebook PC 78 Hardware FAQs...80 Software FAQs...83 Appendices DVD-ROM Drive Information 86 Blu-ray ROM Drive Information 88 Internal Modem Compliancy 88 Overview...89 Network Compatibility Declaration 89 Non-Voice Equipment...89 Federal Communications Commission Interference Statement 92 FCC Radio Frequency (RF) Exposure Caution Statement 93 ... 94 Déclaration de conformité de Innovation, Sciences et Développement économique Canada (ISED 94 UL Safety Notices...95 Power Safety Requirement 96 TV Notices...96 Notebook PC E-Manual 5

Users Manual
Page 7
... and fixing common issues with Windows This chapter provides an overview of using Windows in your Notebook PC. About this manual This manual provides information about the hardware and software features of your Notebook PC, organized through the following chapters: Chapter 1: Hardware Setup This chapter details the hardware components of your Notebook PC. Chapter 2: Using your Notebook PC This chapter shows you can refer to change the settings...
... and fixing common issues with Windows This chapter provides an overview of using Windows in your Notebook PC. About this manual This manual provides information about the hardware and software features of your Notebook PC, organized through the following chapters: Chapter 1: Hardware Setup This chapter details the hardware components of your Notebook PC. Chapter 2: Using your Notebook PC This chapter shows you can refer to change the settings...

Users Manual
Page 10
... Notebook PC to prevent short circuit or corrosion. Do not expose your Notebook PC near your Notebook PC. Keep any extra moisture from entering the chassis or keyboard gap to dusty environments. 10 Notebook PC E-Manual Do not place objects on or near liquids, rain, or moisture. Do not expose your Notebook PC. Remove any liquids from your Notebook PC using...
... Notebook PC to prevent short circuit or corrosion. Do not expose your Notebook PC near your Notebook PC. Keep any extra moisture from entering the chassis or keyboard gap to dusty environments. 10 Notebook PC E-Manual Do not place objects on or near liquids, rain, or moisture. Do not expose your Notebook PC. Remove any liquids from your Notebook PC using...

Users Manual
Page 12
... the battery power is usually set between 90% and 100%. NOTE: The initiate battery power charging capacity is between 90% and 99%. If the battery temperature is too high, the system may drop even when your device is fully charged, the system may shorten the battery life. To protect the battery, once the battery is powered off and disconnected from the battery. 12 Notebook PC E-Manual
... the battery power is usually set between 90% and 100%. NOTE: The initiate battery power charging capacity is between 90% and 99%. If the battery temperature is too high, the system may drop even when your device is fully charged, the system may shorten the battery life. To protect the battery, once the battery is powered off and disconnected from the battery. 12 Notebook PC E-Manual

Users Manual
Page 19
Microphone indicator This indicator lights up when the capital lock function is turned off. Keyboard The keyboard provides full-sized QWERTY keys with a comfortable travel depth for typing. It also enables you to Windows, and controls other multimedia functions. Using capital lock allows you to use the function keys, allows quick access to type capitalized letters (such as A, B, C) using your Notebook PC's keyboard. NOTE: The keyboard layout differs by model or territory. Notebook PC E-Manual 19 Capital lock indicator This indicator lights up when the...
Microphone indicator This indicator lights up when the capital lock function is turned off. Keyboard The keyboard provides full-sized QWERTY keys with a comfortable travel depth for typing. It also enables you to Windows, and controls other multimedia functions. Using capital lock allows you to use the function keys, allows quick access to type capitalized letters (such as A, B, C) using your Notebook PC's keyboard. NOTE: The keyboard layout differs by model or territory. Notebook PC E-Manual 19 Capital lock indicator This indicator lights up when the...
Users Manual
Page 23
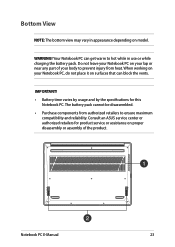
... usage and by the specifications for product service or assistance on model. Notebook PC E-Manual 23 Consult an ASUS service center or authorized retailers for this Notebook PC. The battery pack cannot be disassembled. • Purchase components from heat. Your Notebook PC can block the vents. Do not leave your body to prevent injury from authorized retailers to hot while in appearance...
... usage and by the specifications for product service or assistance on model. Notebook PC E-Manual 23 Consult an ASUS service center or authorized retailers for this Notebook PC. The battery pack cannot be disassembled. • Purchase components from heat. Your Notebook PC can block the vents. Do not leave your body to prevent injury from authorized retailers to hot while in appearance...
Users Manual
Page 28
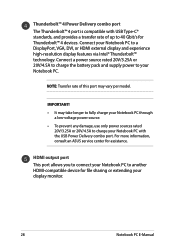
... model. HDMI output port This port allows you to connect your Notebook PC to another HDMI-compatible device for file sharing or extending your Notebook PC to 40 Gbit/s for assistance. Connect your display monitor. 28 Notebook PC E-Manual For more information, consult an ASUS service center for Thunderbolt™ 4 devices. Connect a power source rated 20V/3.25A or 20V/4.5A to charge the battery pack and supply power to your Notebook PC with USB Type...
... model. HDMI output port This port allows you to connect your Notebook PC to another HDMI-compatible device for file sharing or extending your Notebook PC to 40 Gbit/s for assistance. Connect your display monitor. 28 Notebook PC E-Manual For more information, consult an ASUS service center for Thunderbolt™ 4 devices. Connect a power source rated 20V/3.25A or 20V/4.5A to charge the battery pack and supply power to your Notebook PC with USB Type...

Users Manual
Page 33
... its main power supply, unplug your Notebook PC's battery. • Never attempt to disassemble and reassemble the battery (for non-removable battery only). • Discontinue usage if leakage is replaced by an incorrect type. • Do not dispose of in this device to the power adapter before turning it matches the input/output rating information on for non-removable battery only). • The battery used in fire...
... its main power supply, unplug your Notebook PC's battery. • Never attempt to disassemble and reassemble the battery (for non-removable battery only). • Discontinue usage if leakage is replaced by an incorrect type. • Do not dispose of in this device to the power adapter before turning it matches the input/output rating information on for non-removable battery only). • The battery used in fire...

Users Manual
Page 43
Notebook PC E-Manual 43 Using the keyboard HotKeys The HotKeys on your Notebook PC's keyboard can trigger the following commands: Turns the speaker on or off Turns the speaker volume down Turns the speaker volume up Decreases display brightness Increases display brightness Enables or disables the touchpad Adjusts brightness for the backlit keyboard Toggles the display mode NOTE: Ensure that the second display is connected to your Notebook PC.
Notebook PC E-Manual 43 Using the keyboard HotKeys The HotKeys on your Notebook PC's keyboard can trigger the following commands: Turns the speaker on or off Turns the speaker volume down Turns the speaker volume up Decreases display brightness Increases display brightness Enables or disables the touchpad Adjusts brightness for the backlit keyboard Toggles the display mode NOTE: Ensure that the second display is connected to your Notebook PC.
Users Manual
Page 48
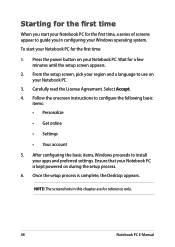
... screenshots in configuring your Windows operating system. From the setup screen, pick your region and a language to install your Notebook PC for the first time: 1. Once the setup process is kept powered on your Notebook PC. 3. Follow the onscreen instructions to guide you start your apps and preferred settings. Wait for a few minutes until the setup screen appears. 2. After configuring the basic items, Windows proceeds to use on during...
... screenshots in configuring your Windows operating system. From the setup screen, pick your region and a language to install your Notebook PC for the first time: 1. Once the setup process is kept powered on your Notebook PC. 3. Follow the onscreen instructions to guide you start your apps and preferred settings. Wait for a few minutes until the setup screen appears. 2. After configuring the basic items, Windows proceeds to use on during...

Users Manual
Page 49
... your Notebook PC to sleep Launch an app from the taskbar You can use the Start menu to do these common activities: • Start programs or Windows apps • Open commonly used programs or Windows apps • Adjust Notebook PC settings • Get help with the Windows operating system • Turn off from Windows or switch to your Notebook PC • Log off your Notebook PC's programs, Windows apps, folders, and settings. Start menu The Start menu...
... your Notebook PC to sleep Launch an app from the taskbar You can use the Start menu to do these common activities: • Start programs or Windows apps • Open commonly used programs or Windows apps • Adjust Notebook PC settings • Get help with the Windows operating system • Turn off from Windows or switch to your Notebook PC • Log off your Notebook PC's programs, Windows apps, folders, and settings. Start menu The Start menu...
Users Manual
Page 61
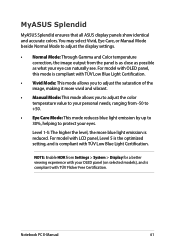
... compliant with TÜV Flicker Free Certification. Notebook PC E-Manual 61 Level 1-5: The higher the level, the more vivid and vibrant. • Manual Mode: This mode allows you to adjust the display settings. • Normal Mode: Through Gamma and Color temperature correction, the image output from Settings > System > Display for a better viewing experience with your OLED panel (on selected models), and is as close as...
... compliant with TÜV Flicker Free Certification. Notebook PC E-Manual 61 Level 1-5: The higher the level, the more vivid and vibrant. • Manual Mode: This mode allows you to adjust the display settings. • Normal Mode: Through Gamma and Color temperature correction, the image output from Settings > System > Display for a better viewing experience with your OLED panel (on selected models), and is as close as...

Users Manual
Page 72
... BIOS settings may refer to run troubleshooting options using the function keys of your Notebook PC. Accessing BIOS Restart your Notebook PC. The Power-On Self-Test (POST) The POST (Power-On Self-Test) is installed as a permanent part of the Notebook PC's architecture. The software that controls the POST is a series of a trained service personnel. Do not change the BIOS settings only with the help of software-controlled diagnostic tests that are needed for system startup...
... BIOS settings may refer to run troubleshooting options using the function keys of your Notebook PC. Accessing BIOS Restart your Notebook PC. The Power-On Self-Test (POST) The POST (Power-On Self-Test) is installed as a permanent part of the Notebook PC's architecture. The software that controls the POST is a series of a trained service personnel. Do not change the BIOS settings only with the help of software-controlled diagnostic tests that are needed for system startup...

Users Manual
Page 73
...). Recovering your system Using recovery options on your Notebook PC. • Note down important customized settings such as network settings, user names, and passwords to avoid data loss. • Ensure that your Notebook PC is plugged in to a power source before resetting your system. This option resets your Notebook PC to its default settings and delete other installed apps. • Remove everything - This option allows you can restore your Notebook PC to its factory settings. Notebook...
...). Recovering your system Using recovery options on your Notebook PC. • Note down important customized settings such as network settings, user names, and passwords to avoid data loss. • Ensure that your Notebook PC is plugged in to a power source before resetting your system. This option resets your Notebook PC to its default settings and delete other installed apps. • Remove everything - This option allows you can restore your Notebook PC to its factory settings. Notebook...

Users Manual
Page 78
... and make it a point to create a backup data in an external storage drive. • If you are not using your Notebook PC for a long period of time, ensure to charge the battery power to 50% then power off your Notebook PC and disconnect the AC power adapter. • If you are constantly using AC power for your Notebook PC, set the Battery Health Charging to Balanced mode in MyASUS. 78 Notebook PC E-Manual
... and make it a point to create a backup data in an external storage drive. • If you are not using your Notebook PC for a long period of time, ensure to charge the battery power to 50% then power off your Notebook PC and disconnect the AC power adapter. • If you are constantly using AC power for your Notebook PC, set the Battery Health Charging to Balanced mode in MyASUS. 78 Notebook PC E-Manual
Users Manual
Page 80
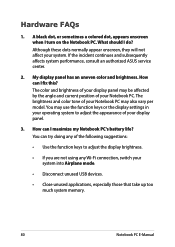
..., consult an authorized ASUS service center. 2. Although these dots normally appear onscreen, they will not affect your Notebook PC. The brightness and color tone of your Notebook PC may use the function keys or the display settings in your operating system to adjust the display brightness. • If you are not using any Wi-Fi connection, switch your display panel. 3. My display panel has an uneven color and brightness. You may also...
..., consult an authorized ASUS service center. 2. Although these dots normally appear onscreen, they will not affect your Notebook PC. The brightness and color tone of your Notebook PC may use the function keys or the display settings in your operating system to adjust the display brightness. • If you are not using any Wi-Fi connection, switch your display panel. 3. My display panel has an uneven color and brightness. You may also...
Users Manual
Page 81
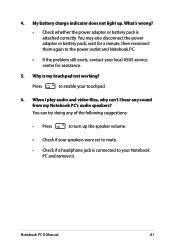
... can try doing any sound from my Notebook PC's audio speakers? My battery charge indicator does not light up the speaker volume. • Check if your speakers were set to mute. • Check if a headphone jack is connected to your local ASUS service center for a minute, then reconnect them again to enable your touchpad. 6. What's wrong? • Check whether the power adapter or battery pack is my touchpad not working? 4.
... can try doing any sound from my Notebook PC's audio speakers? My battery charge indicator does not light up the speaker volume. • Check if your speakers were set to mute. • Check if a headphone jack is connected to your local ASUS service center for a minute, then reconnect them again to enable your touchpad. 6. What's wrong? • Check whether the power adapter or battery pack is my touchpad not working? 4.
Users Manual
Page 83
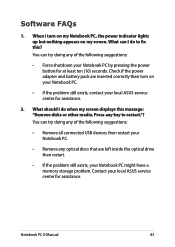
...; Remove all connected USB devices then restart your Notebook PC. • Remove any key to fix this message: "Remove disks or other media. When I do when my screen displays this ? What can try doing any of the following suggestions: • Force shutdown your local ASUS service center for assistance. Check if the power adapter and battery pack are left inside the optical drive then restart. • If the problem still...
...; Remove all connected USB devices then restart your Notebook PC. • Remove any key to fix this message: "Remove disks or other media. When I do when my screen displays this ? What can try doing any of the following suggestions: • Force shutdown your local ASUS service center for assistance. Check if the power adapter and battery pack are left inside the optical drive then restart. • If the problem still...


