
users manual in English
Page 3
... Wireless connection 12 2 Getting started 14 2.1 Logging into the Web GUI 14 2.2 Quick Internet Setup (QIS) with Auto-detection 15 2.3 Connecting to your wireless network 19 3 Configuring the General settings 20 3.1 Using the Network Map 20 3.1.1 Setting up the wireless security settings 21 3.1.2 Managing your network clients 22 3.1.3 Monitoring your USB device 23 3.2 Creating a Guest Network 26 3.3 AiProtection 28 3.3.1 Network Protection 29 3.3.2 Setting up Parental Controls 33 3.4 Using the Traffic Manager 36 3.4.1 Managing QoS (Quality of Service) Bandwidth...
... Wireless connection 12 2 Getting started 14 2.1 Logging into the Web GUI 14 2.2 Quick Internet Setup (QIS) with Auto-detection 15 2.3 Connecting to your wireless network 19 3 Configuring the General settings 20 3.1 Using the Network Map 20 3.1.1 Setting up the wireless security settings 21 3.1.2 Managing your network clients 22 3.1.3 Monitoring your USB device 23 3.2 Creating a Guest Network 26 3.3 AiProtection 28 3.3.1 Network Protection 29 3.3.2 Setting up Parental Controls 33 3.4 Using the Traffic Manager 36 3.4.1 Managing QoS (Quality of Service) Bandwidth...
users manual in English
Page 5
... of contents 4.5.4 Network Services Filter 84 4.6 Administration 86 4.6.1 Operation Mode 86 4.6.2 System 87 4.6.3 Firmware Upgrade 88 4.6.4 Restore/Save/Upload Setting 88 4.7 System Log 89 5 Utilities 90 5.1 Device Discovery 90 5.2 Firmware Restoration 91 5.3 Setting up your printer server 92 5.3.1 ASUS EZ Printer Sharing 92 5.3.2 Using LPR to Share Printer 96 5.4 Download Master 101 5.4.1 Configuring Bit Torrent download settings 102 5.4.2 NZB settings 103 6 Troubleshooting 104 6.1 Basic Troubleshooting 104 6.2 Frequently Asked Questions (FAQs 107 Appendices...
... of contents 4.5.4 Network Services Filter 84 4.6 Administration 86 4.6.1 Operation Mode 86 4.6.2 System 87 4.6.3 Firmware Upgrade 88 4.6.4 Restore/Save/Upload Setting 88 4.7 System Log 89 5 Utilities 90 5.1 Device Discovery 90 5.2 Firmware Restoration 91 5.3 Setting up your printer server 92 5.3.1 ASUS EZ Printer Sharing 92 5.3.2 Using LPR to Share Printer 96 5.4 Download Master 101 5.4.1 Configuring Bit Torrent download settings 102 5.4.2 NZB settings 103 6 Troubleshooting 104 6.1 Basic Troubleshooting 104 6.2 Frequently Asked Questions (FAQs 107 Appendices...
users manual in English
Page 6
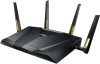
... services such as repair or replacement. 6 1 Getting to handle 300,000 sessions; SMB server, UPnP AV server, and FTP server for purchasing an ASUS RT-AX88U Wireless Router! a capability to know your wireless router 1.1 Welcome! The ultra-thin and stylish RT-AX88U features a 2.4GHz and 5GHz dual bands for technical inquiries and support. Refer to 70% power-saving solution. 1.2 Package contents RT-AX88U Wireless Router Power adapter Network cable (RJ-45) Quick Start Guide NOTES: • If any of this user manual...
... services such as repair or replacement. 6 1 Getting to handle 300,000 sessions; SMB server, UPnP AV server, and FTP server for purchasing an ASUS RT-AX88U Wireless Router! a capability to know your wireless router 1.1 Welcome! The ultra-thin and stylish RT-AX88U features a 2.4GHz and 5GHz dual bands for technical inquiries and support. Refer to 70% power-saving solution. 1.2 Package contents RT-AX88U Wireless Router Power adapter Network cable (RJ-45) Quick Start Guide NOTES: • If any of this user manual...

users manual in English
Page 8
.... LED On/Off button This button turns on or off the LED indicators. LAN 1 ~ 8 ports Connect network cables into this port and connect your package. WPS button This button launches the WPS Wizard. Reset button This button resets or restores the system to power on /off the stystem. WAN (Internet) port Connect a network cable into these ports to a power source. Power button Press this button to its factory default settings. USB 3.0 LED (back) Off: No power or no physical connection with a USB device. On: Has physical connection with a USB device.
.... LED On/Off button This button turns on or off the LED indicators. LAN 1 ~ 8 ports Connect network cables into this port and connect your package. WPS button This button launches the WPS Wizard. Reset button This button resets or restores the system to power on /off the stystem. WAN (Internet) port Connect a network cable into these ports to a power source. Power button Press this button to its factory default settings. USB 3.0 LED (back) Off: No power or no physical connection with a USB device. On: Has physical connection with a USB device.
users manual in English
Page 10
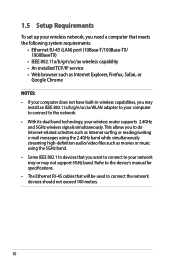
... have built-in wireless capabilities, you want to connect to your wireless router supports 2.4GHz and 5GHz wireless signals simultaneously. Refer to the device's manual for specifications. • The Ethernet RJ-45 cables that you may install an IEEE 802.11a/b/g/n/ac/ax WLAN adapter to your computer to connect to connect the network devices should not exceed 100 meters. 10 This allows you to do Internet-related activities...
... have built-in wireless capabilities, you want to connect to your wireless router supports 2.4GHz and 5GHz wireless signals simultaneously. Refer to the device's manual for specifications. • The Ethernet RJ-45 cables that you may install an IEEE 802.11a/b/g/n/ac/ax WLAN adapter to your computer to connect to connect the network devices should not exceed 100 meters. 10 This allows you to do Internet-related activities...

users manual in English
Page 12
...is blinking. 3 Using another network cable, connect your modem to your wireless router's AC adapter to the DC-IN port and plug it to your wireless router's WAN port. 12 To set up your wireless router via wireless connection: 1. Insert your wireless router's WAN port. 4. Using the bundled network cable, connect your computer to a power outlet. 2. Insert your modem's AC adapter to the DC-IN port and plug it to a power outlet. 2 Using the bundled network cable, connect your modem to a power outlet. 1.6.2 Wireless connection 3.0 WAN a Modem Power Wall Power Outlet LINE LAN RESET...
...is blinking. 3 Using another network cable, connect your modem to your wireless router's AC adapter to the DC-IN port and plug it to your wireless router's WAN port. 12 To set up your wireless router via wireless connection: 1. Insert your wireless router's WAN port. 4. Using the bundled network cable, connect your computer to a power outlet. 2. Insert your modem's AC adapter to the DC-IN port and plug it to a power outlet. 2 Using the bundled network cable, connect your modem to a power outlet. 1.6.2 Wireless connection 3.0 WAN a Modem Power Wall Power Outlet LINE LAN RESET...

users manual in English
Page 14
To log into the Web GUI Your ASUS Wireless Router comes with different firmware versions. 2 Getting started 2.1 Logging into the web GUI: 1. On your ASUS Wireless Router. You can now use the Web GUI to the Quick Internet Setup (QIS) page automatically. 14 On the login page, key in the default user name (admin) and password (admin). 3. Top command buttons QIS Information banner Navigation panel right column middle column NOTE: If you are logging into the Web GUI for the first time, you...
To log into the Web GUI Your ASUS Wireless Router comes with different firmware versions. 2 Getting started 2.1 Logging into the web GUI: 1. On your ASUS Wireless Router. You can now use the Web GUI to the Quick Internet Setup (QIS) page automatically. 14 On the login page, key in the default user name (admin) and password (admin). 3. Top command buttons QIS Information banner Navigation panel right column middle column NOTE: If you are logging into the Web GUI for the first time, you...

users manual in English
Page 15
... factory default settings. The wireless router's login username and password allows you in and connect to section 4.6.2 System. • The wireless router's login username and password is admin. Log into your wireless router's settings. The 2.4GHz/5GHz network name (SSID) and security key allows Wi-Fi devices to log in quickly setting up your 2.4GHz/5GHz network. 15 2.2 Quick Internet Setup (QIS) with auto-detection: 1. NOTES: • By default, the login username and password for the first time, press the Reset button on changing your wireless router's login username...
... factory default settings. The wireless router's login username and password allows you in and connect to section 4.6.2 System. • The wireless router's login username and password is admin. Log into your wireless router's settings. The 2.4GHz/5GHz network name (SSID) and security key allows Wi-Fi devices to log in quickly setting up your 2.4GHz/5GHz network. 15 2.2 Quick Internet Setup (QIS) with auto-detection: 1. NOTES: • By default, the login username and password for the first time, press the Reset button on changing your wireless router's login username...
users manual in English
Page 17
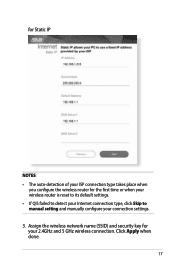
Assign the wireless network name (SSID) and security key for the first time or when your wireless router is reset to its default settings. • If QIS failed to detect your Internet connection type, click Skip to manual setting and manually configure your 2.4GHz and 5 GHz wireless connection. for Static IP NOTES: • The auto-detection of your ISP connection type takes place when you configure the wireless router for your connection settings. 3. Click Apply when done. 17
Assign the wireless network name (SSID) and security key for the first time or when your wireless router is reset to its default settings. • If QIS failed to detect your Internet connection type, click Skip to manual setting and manually configure your 2.4GHz and 5 GHz wireless connection. for Static IP NOTES: • The auto-detection of your ISP connection type takes place when you configure the wireless router for your connection settings. 3. Click Apply when done. 17

users manual in English
Page 23
Refer to the Plug-n-Share Disk Support List at http://event.asus.com/networks/disksupport. 23 NOTE: To use this feature, you to share files and printer with clients in your wireless router. Ensure that the USB storage device is formatted and partitioned properly. 3.1.3 Monitoring your USB device The ASUS Wireless Router provides a USB port for connecting a USB device or a USB printer to allow you need to plug a USB storage device, such as a USB hard disk or a USB flash drive, to the USB 3.0 port on the rear panel of your network.
Refer to the Plug-n-Share Disk Support List at http://event.asus.com/networks/disksupport. 23 NOTE: To use this feature, you to share files and printer with clients in your wireless router. Ensure that the USB storage device is formatted and partitioned properly. 3.1.3 Monitoring your USB device The ASUS Wireless Router provides a USB port for connecting a USB device or a USB printer to allow you need to plug a USB storage device, such as a USB hard disk or a USB flash drive, to the USB 3.0 port on the rear panel of your network.

users manual in English
Page 71
... each network client is saved in a NAT table and is used to provide Internet access to get the DNS IP address from your router. Once connected to the network, devices can be specified by some ISPs. Unlike Port forwarding, which involves manually configuring port settings, UPnP automatically configures the router to accept incoming connections and direct requests to a specific PC on the Internet that translates Internet names to provide a host name for remote configuration and data transfer. A DNS is...
... each network client is saved in a NAT table and is used to provide Internet access to get the DNS IP address from your router. Once connected to the network, devices can be specified by some ISPs. Unlike Port forwarding, which involves manually configuring port settings, UPnP automatically configures the router to accept incoming connections and direct requests to a specific PC on the Internet that translates Internet names to provide a host name for remote configuration and data transfer. A DNS is...

users manual in English
Page 76
... example, port 80 is disabled and you want to work correctly. • FTP Server Port: Avoid assigning the port range 20:21 for your http server/web server would fail. A specific port can only be in conflict with the router's web user interface. • A network makes use of service you set up Port Forwarding for port 100 for your WAN setup, then your FTP server as Port Range (300:350), individual ports (566,789) or Mix (1015:1024,3021). Configure the following settings...
... example, port 80 is disabled and you want to work correctly. • FTP Server Port: Avoid assigning the port range 20:21 for your http server/web server would fail. A specific port can only be in conflict with the router's web user interface. • A network makes use of service you set up Port Forwarding for port 100 for your WAN setup, then your FTP server as Port Range (300:350), individual ports (566,789) or Mix (1015:1024,3021). Configure the following settings...

users manual in English
Page 77
... as "Internet client"). To check if Port Forwarding has been configured successfully: • Ensure that would normally require manually forwarding the same ports to access the server. Unlike port forwarding, which requires a static LAN IP address, port triggering allows dynamic port forwarding using the router. Predetermined port ranges are opened only when an application is more secure than port forwarding since the incoming ports are unsure, select BOTH. If port forwarding has been successful, you are not open all the time. If...
... as "Internet client"). To check if Port Forwarding has been configured successfully: • Ensure that would normally require manually forwarding the same ports to access the server. Unlike port forwarding, which requires a static LAN IP address, port triggering allows dynamic port forwarding using the router. Predetermined port ranges are opened only when an application is more secure than port forwarding since the incoming ports are unsure, select BOTH. If port forwarding has been successful, you are not open all the time. If...

users manual in English
Page 82
... to protect your network from DoS (Denial of Service) attacks though this issue, clear the DNS cache before setting up basic Firewall settings: 1. You can specify keywords or web addresses to prevent access to Advanced Settings > Firewall > General tab. 2. NOTE: The URL Filter is enabled by default. 4.5.1 General To set up the URL Filter. 82 On the Logged packets type, select Dropped, Accepted, or Both. 5. 4.5 Firewall The wireless router can serve as...
... to protect your network from DoS (Denial of Service) attacks though this issue, clear the DNS cache before setting up basic Firewall settings: 1. You can specify keywords or web addresses to prevent access to Advanced Settings > Firewall > General tab. 2. NOTE: The URL Filter is enabled by default. 4.5.1 General To set up the URL Filter. 82 On the Logged packets type, select Dropped, Accepted, or Both. 5. 4.5 Firewall The wireless router can serve as...

users manual in English
Page 87
... allow devices outside the network to access the wireless router GUI settings. Click No to disable Telnet. • Authentication Method: You can select HTTP, HTTPS, or both protocols to secure router access. • Enable Web Access from WAN: Select Yes to allow specific IP: Click Yes if you want to specify the IP addresses of devices that are allowed access to the wireless router GUI settings from WAN. • Client List: Enter the WAN IP addresses of networking devices allowed...
... allow devices outside the network to access the wireless router GUI settings. Click No to disable Telnet. • Authentication Method: You can select HTTP, HTTPS, or both protocols to secure router access. • Enable Web Access from WAN: Select Yes to allow specific IP: Click Yes if you want to specify the IP addresses of devices that are allowed access to the wireless router GUI settings from WAN. • Client List: Enter the WAN IP addresses of networking devices allowed...

users manual in English
Page 92
... web interface. Set a static IP on a working ASUS Wireless Router. This allows your network clients to your TCP/IP settings: IP address: 192.168.1.x Subnet mask: 255.255.255.0 4. Specify a firmware file, then click Upload. Normal firmware upgrades must be used on your computer and use the following to set up your wireless router's USB port and set up the print server. Refer to Chapter 4: Configuring the Advanced Settings for more details. 5.3 Setting up your computer's desktop, click Start...
... web interface. Set a static IP on a working ASUS Wireless Router. This allows your network clients to your TCP/IP settings: IP address: 192.168.1.x Subnet mask: 255.255.255.0 4. Specify a firmware file, then click Upload. Normal firmware upgrades must be used on your computer and use the following to set up your wireless router's USB port and set up the print server. Refer to Chapter 4: Configuring the Advanced Settings for more details. 5.3 Setting up your computer's desktop, click Start...
users manual in English
Page 94
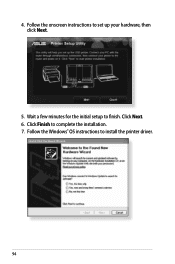
Click Next. 6. Follow the Windows® OS instructions to finish. Wait a few minutes for the initial setup to install the printer driver. 94 Click Finish to set up your hardware, then click Next. 5. 4. Follow the onscreen instructions to complete the installation. 7.
Click Next. 6. Follow the Windows® OS instructions to finish. Wait a few minutes for the initial setup to install the printer driver. 94 Click Finish to set up your hardware, then click Next. 5. 4. Follow the onscreen instructions to complete the installation. 7.
users manual in English
Page 99
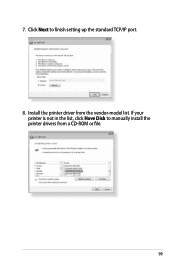
Click Next to manually install the printer drivers from the vendor-model list. If your printer is not in the list, click Have Disk to finish setting up the standard TCP/IP port. 8. 7. Install the printer driver from a CD-ROM or file. 99
Click Next to manually install the printer drivers from the vendor-model list. If your printer is not in the list, click Have Disk to finish setting up the standard TCP/IP port. 8. 7. Install the printer driver from a CD-ROM or file. 99
users manual in English
Page 104
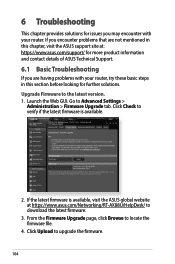
... more product information and contact details of ASUS Technical Support. 6.1 Basic Troubleshooting If you may encounter with your router. From the Firmware Upgrade page, click Browse to Advanced Settings > Administration > Firmware Upgrade tab. If you encounter problems that are having problems with your router, try these basic steps in this chapter, visit the ASUS support site at https://www.asus.com/Networking/RT-AX88U/HelpDesk/ to download the latest...
... more product information and contact details of ASUS Technical Support. 6.1 Basic Troubleshooting If you may encounter with your router. From the Firmware Upgrade page, click Browse to Advanced Settings > Administration > Firmware Upgrade tab. If you encounter problems that are having problems with your router, try these basic steps in this chapter, visit the ASUS support site at https://www.asus.com/Networking/RT-AX88U/HelpDesk/ to download the latest...

users manual in English
Page 111
... "admin". If the WAN LED on the ADSL modem and the wireless router. You forgot the SSID (network name) or network password • Setup a new SSID and encryption key via a wired connection (Ethernet cable). • If there is still no Internet access, try to Administration > Restore/Save/Upload Setting, and click Restore. The default login account and password are the factory default settings: User Name: admin Password: admin Enable DHCP: Yes (if WAN cable is not ON, check if all cables are plugged properly. Launch the web...
... "admin". If the WAN LED on the ADSL modem and the wireless router. You forgot the SSID (network name) or network password • Setup a new SSID and encryption key via a wired connection (Ethernet cable). • If there is still no Internet access, try to Administration > Restore/Save/Upload Setting, and click Restore. The default login account and password are the factory default settings: User Name: admin Password: admin Enable DHCP: Yes (if WAN cable is not ON, check if all cables are plugged properly. Launch the web...


