
User Guide
Page 2
... iv Care & Cleaning viii 1.1 Welcome 1-2 1.2 Package contents 1-2 1.3 Assembling the monitor 1-3 1.4 Connect cables 1-4 1.4.1 Rear of the LCD monitor 1-4 1.5 Monitor introduction 1-5 1.5.1 Using the Controls button 1-5 2.1 Adjusting the monitor 2-1 2.2 Outline dimension 2-2 2.3 Detaching the arm/stand (for VESA wall mount 2-3 3.1 OSD (On-Screen Display) menu 3-1 3.1.1 How to infringe. PIP/PBP Setting 3-6 3.2 Specifications 3-10 3.3 Troubleshooting (FAQ 3-11 3.4 Supported Timing List 3-12 Copyright © 2020 ASUSTeK COMPUTER INC. or (2) the serial number of the product...
... iv Care & Cleaning viii 1.1 Welcome 1-2 1.2 Package contents 1-2 1.3 Assembling the monitor 1-3 1.4 Connect cables 1-4 1.4.1 Rear of the LCD monitor 1-4 1.5 Monitor introduction 1-5 1.5.1 Using the Controls button 1-5 2.1 Adjusting the monitor 2-1 2.2 Outline dimension 2-2 2.3 Detaching the arm/stand (for VESA wall mount 2-3 3.1 OSD (On-Screen Display) menu 3-1 3.1.1 How to infringe. PIP/PBP Setting 3-6 3.2 Specifications 3-10 3.3 Troubleshooting (FAQ 3-11 3.4 Supported Timing List 3-12 Copyright © 2020 ASUSTeK COMPUTER INC. or (2) the serial number of the product...

User Guide
Page 3
... cables for compliance could void the user's authority to which can radiate radio frequency energy and, if not installed and used in a particular installation. This equipment generates, uses and can be determined by turning the equipment off and on, the user is encouraged to try to correct the interference by the party responsible for connection of the monitor to the graphics card...
... cables for compliance could void the user's authority to which can radiate radio frequency energy and, if not installed and used in a particular installation. This equipment generates, uses and can be determined by turning the equipment off and on, the user is encouraged to try to correct the interference by the party responsible for connection of the monitor to the graphics card...
User Guide
Page 4
...fix it will protect the monitor from digital apparatus set out in any damage, contact your retailer. • Before using the product, make sure all cables are correctly connected and the power cables are not sure of the type of power supply to your home, consult your dealer or local power company. • Use the appropriate power plug... near or over a radiator or heat source unless proper ventilation is broken, do not try to open the monitor cabinet. Place the monitor on the label. Canadian Department of Communications Statement This digital apparatus does not exceed the Class B ...
...fix it will protect the monitor from digital apparatus set out in any damage, contact your retailer. • Before using the product, make sure all cables are correctly connected and the power cables are not sure of the type of power supply to your home, consult your dealer or local power company. • Use the appropriate power plug... near or over a radiator or heat source unless proper ventilation is broken, do not try to open the monitor cabinet. Place the monitor on the label. Canadian Department of Communications Statement This digital apparatus does not exceed the Class B ...
User Guide
Page 5
... plug from the mains. • Please use ADP-180MB F of DELTA adapter. • Please confirm the distribution system in building installation shall provide the circuit breaker rated 120/240V, 20A (maximum). • If provided with the installation instructions. Do not disable the power cord grounding pin, for example, by the manufacturer of the product set. Stability Hazard. WARNING Usage of the supporting...
... plug from the mains. • Please use ADP-180MB F of DELTA adapter. • Please confirm the distribution system in building installation shall provide the circuit breaker rated 120/240V, 20A (maximum). • If provided with the installation instructions. Do not disable the power cord grounding pin, for example, by the manufacturer of the product set. Stability Hazard. WARNING Usage of the supporting...
User Guide
Page 8
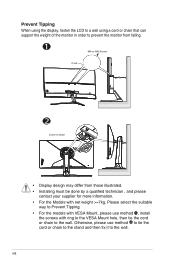
.... • For the models with VESA Mount, please use method to tie the cord or chain to the stand and then fix it to the wall. viii Prevent Tipping When using the display, fasten the LCD to a wall using a cord or chain that can support the weight of the monitor in order to prevent the monitor from falling. 1 M4 or M6 Screw Cord 2 Cord or chain • Display design may differ...
.... • For the models with VESA Mount, please use method to tie the cord or chain to the stand and then fix it to the wall. viii Prevent Tipping When using the display, fasten the LCD to a wall using a cord or chain that can support the weight of the monitor in order to prevent the monitor from falling. 1 M4 or M6 Screw Cord 2 Cord or chain • Display design may differ...
User Guide
Page 9
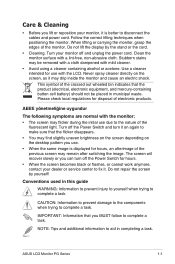
... brightness on the screen depending on the desktop pattern you use. • When the same image is better to fix it may drip inside the monitor and cause an electric shock. Turn your monitor off the Power Switch and turn off the Power Switch for hours. • When the screen becomes black or flashes, or cannot work anymore, contact your dealer or service center to disconnect the cables and power cord. Clean...
... brightness on the screen depending on the desktop pattern you use. • When the same image is better to fix it may drip inside the monitor and cause an electric shock. Turn your monitor off the Power Switch and turn off the Power Switch for hours. • When the screen becomes black or flashes, or cannot work anymore, contact your dealer or service center to disconnect the cables and power cord. Clean...

User Guide
Page 11
..., and brighter display, plus a host of the above items is damaged or missing, contact your retailer immediately. ASUS LCD Monitor PG Series 1-3 With these features, you can enjoy the convenience and delightful visual experience that enhance your viewing experience. 1.1 Welcome Thank you for the following items: LCD Monitor Monitor Base Quick Start Guide Warranty Card 1x Power Cord 1x HDMI 2.1 Cable 1x DP Cable 1x Power Adapter 1x USB 3.0 Cable ROG Sticker Thanks Card VESA kits...
..., and brighter display, plus a host of the above items is damaged or missing, contact your retailer immediately. ASUS LCD Monitor PG Series 1-3 With these features, you can enjoy the convenience and delightful visual experience that enhance your viewing experience. 1.1 Welcome Thank you for the following items: LCD Monitor Monitor Base Quick Start Guide Warranty Card 1x Power Cord 1x HDMI 2.1 Cable 1x DP Cable 1x Power Adapter 1x USB 3.0 Cable ROG Sticker Thanks Card VESA kits...

User Guide
Page 14
1.5 Monitor introduction 1.5.1 Using the Controls button Use the control button on the back of games. Status Description White ON Amber Standby mode OFF OFF 2. Power Button: • Press this button to turn the monitor on the monitor when monitor is power off . GameVisual: • Press this key to turn on /off . 3. Press this hotkey to adjust the monitor settings. 6 6 5 5 4 4 3 3 2 2 1 1. GamePlus: • GamePlus: The GamePlus Function provides a toolkit and creates a better gaming environment...
1.5 Monitor introduction 1.5.1 Using the Controls button Use the control button on the back of games. Status Description White ON Amber Standby mode OFF OFF 2. Power Button: • Press this button to turn the monitor on the monitor when monitor is power off . GameVisual: • Press this key to turn on /off . 3. Press this hotkey to adjust the monitor settings. 6 6 5 5 4 4 3 3 2 2 1 1. GamePlus: • GamePlus: The GamePlus Function provides a toolkit and creates a better gaming environment...

User Guide
Page 18
... arm/stand 1. Detach the stand (arm and base) from the monitor. 2 2 1 1 M4*0.7 • Use only the UL Listed Wall Mount Bracket with minimum weight/load 28.8 kg (Screw size: M4 x 10 mm). Disconnect power and signal cables. Remove the covers on its EPS packaging. ASUS LCD Monitor PG Series 3-1 2.3 Detaching the arm/stand (for VESA wall mount. Remove the four (4) screws securing the arm to the rear of this monitor is specially designed for VESA wall mount) •...
... arm/stand 1. Detach the stand (arm and base) from the monitor. 2 2 1 1 M4*0.7 • Use only the UL Listed Wall Mount Bracket with minimum weight/load 28.8 kg (Screw size: M4 x 10 mm). Disconnect power and signal cables. Remove the covers on its EPS packaging. ASUS LCD Monitor PG Series 3-1 2.3 Detaching the arm/stand (for VESA wall mount. Remove the four (4) screws securing the arm to the rear of this monitor is specially designed for VESA wall mount) •...
User Guide
Page 19
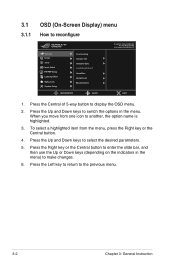
... to return to reconfigure Gaming Image Color Input Select PIP/PBP Setup Lighting Effect MyFavorite System Setup Overclocking Variable OD Adaptive-Sync ELMB/ELMB SYNC GamePlus GameVisual Shadow Boost MOVE/ENTER BACK DisplayPort 3840x2160@144Hz Scenery Mode Aura Off ROG Swift PG32UQR HDR OFF EXIT 1. Press the Up and Down keys to switch the options in the menu) to display the OSD menu. 2. When you move from the...
... to return to reconfigure Gaming Image Color Input Select PIP/PBP Setup Lighting Effect MyFavorite System Setup Overclocking Variable OD Adaptive-Sync ELMB/ELMB SYNC GamePlus GameVisual Shadow Boost MOVE/ENTER BACK DisplayPort 3840x2160@144Hz Scenery Mode Aura Off ROG Swift PG32UQR HDR OFF EXIT 1. Press the Up and Down keys to switch the options in the menu) to display the OSD menu. 2. When you move from the...
User Guide
Page 20
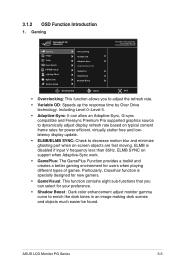
... is disabled if input V frequency less than 85Hz. Gaming DisplayPort 3840x2160@144Hz Scenery Mode Aura Off ROG Swift PG32UQR HDR OFF Gaming Image Color Input Select PIP/PBP Setup Lighting Effect MyFavorite System Setup Overclocking Variable OD Adaptive-Sync ELMB/ELMB SYNC GamePlus GameVisual Shadow Boost MOVE/ENTER BACK EXIT • Overclocking: This function allows you can allow an Adaptive-Sync, G-sync compatible and Freesync Premium Pro supported graphics source to adjust the refresh rate...
... is disabled if input V frequency less than 85Hz. Gaming DisplayPort 3840x2160@144Hz Scenery Mode Aura Off ROG Swift PG32UQR HDR OFF Gaming Image Color Input Select PIP/PBP Setup Lighting Effect MyFavorite System Setup Overclocking Variable OD Adaptive-Sync ELMB/ELMB SYNC GamePlus GameVisual Shadow Boost MOVE/ENTER BACK EXIT • Overclocking: This function allows you can allow an Adaptive-Sync, G-sync compatible and Freesync Premium Pro supported graphics source to adjust the refresh rate...
User Guide
Page 22
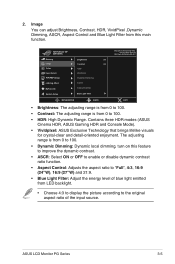
... blue light emitted from LED backlight. • Choose 4:3 to display the picture according to the original aspect ratio of the input source. Gaming Image Color Input Select PIP/PBP Setup Lighting Effect MyFavorite System Setup Brightness 90 Contrast 80 HDR Vivldplxel Dynamic Dimming ASCR Aspect Control Blue Light Filter MOVE/ENTER BACK DisplayPort 3840x2160@144Hz Scenery Mode Aura Off ROG Swift PG32UQR HDR OFF EXIT • Brightness: The adjusting range is from 0 to 100. • Contrast: The adjusting range...
... blue light emitted from LED backlight. • Choose 4:3 to display the picture according to the original aspect ratio of the input source. Gaming Image Color Input Select PIP/PBP Setup Lighting Effect MyFavorite System Setup Brightness 90 Contrast 80 HDR Vivldplxel Dynamic Dimming ASCR Aspect Control Blue Light Filter MOVE/ENTER BACK DisplayPort 3840x2160@144Hz Scenery Mode Aura Off ROG Swift PG32UQR HDR OFF EXIT • Brightness: The adjusting range is from 0 to 100. • Contrast: The adjusting range...

User Guide
Page 23
... Move your eyes, users should take short breaks (at least 5 mins) after around 1 hour of Racing Mode will be automatically imported. • Between Level 1 to reduces eye strain. Blue light filter to reduce 70% (max.) harmful blue light to eye strain and ...8226; High energy blue light may lead to avoiding CVS (Computer Vision Syndrome). 3-6 Chapter 3: General Instruction The Brightness function is compliance with TUV Low Blue Light Certification. It is not userconfigurable. • When Blue Light Filter is activated,the default settings of continuous working for long hours. ...
... Move your eyes, users should take short breaks (at least 5 mins) after around 1 hour of Racing Mode will be automatically imported. • Between Level 1 to reduces eye strain. Blue light filter to reduce 70% (max.) harmful blue light to eye strain and ...8226; High energy blue light may lead to avoiding CVS (Computer Vision Syndrome). 3-6 Chapter 3: General Instruction The Brightness function is compliance with TUV Low Blue Light Certification. It is not userconfigurable. • When Blue Light Filter is activated,the default settings of continuous working for long hours. ...
User Guide
Page 24
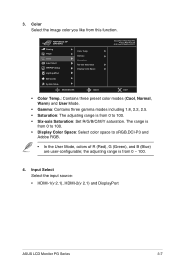
Input Select Select the input source: • HDMI-1(v 2.1), HDMI-2(v 2.1) and DisplayPort ASUS LCD Monitor PG Series 3-7 Color Select the image color you like from 0 to sRGB,DCI-P3 and Adobe RGB. • In the User Mode, colors of R (Red), G (Green), and B (Blue) are user-configurable; Gamma Saturation Six-axis Saturation Display Color Space MyFavorite System Setup MOVE/ENTER BACK DisplayPort 3840x2160@144Hz Scenery Mode Aura Off ROG Swift PG32UQR HDR OFF EXIT • Color Temp.: Contains three preset color modes (Cool...
Input Select Select the input source: • HDMI-1(v 2.1), HDMI-2(v 2.1) and DisplayPort ASUS LCD Monitor PG Series 3-7 Color Select the image color you like from 0 to sRGB,DCI-P3 and Adobe RGB. • In the User Mode, colors of R (Red), G (Green), and B (Blue) are user-configurable; Gamma Saturation Six-axis Saturation Display Color Space MyFavorite System Setup MOVE/ENTER BACK DisplayPort 3840x2160@144Hz Scenery Mode Aura Off ROG Swift PG32UQR HDR OFF EXIT • Color Temp.: Contains three preset color modes (Cool...

User Guide
Page 25
...-window(s) connected from any video source. PIP/PBP Setup The PIP/PBP Setting allows you to "Small", "Middle", or "Large". • To turn on PIP/PBP function will disable FreeSync Premium Pro/FreeSync, Dynamic Dimming and HDR function. 6. Lighting Effect 3-8 Chapter 3: General Instruction Gaming Image Color Input Select PIP/PBP Setup Lighting Effect HDMI-1(v 2.1) HDMI-2(v 2.1) DisplayPort MyFavorite System Setup MOVE/ENTER BACK DisplayPort 3840x2160@144Hz Scenery Mode Aura Off ROG Swift PG32UQR...
...-window(s) connected from any video source. PIP/PBP Setup The PIP/PBP Setting allows you to "Small", "Middle", or "Large". • To turn on PIP/PBP function will disable FreeSync Premium Pro/FreeSync, Dynamic Dimming and HDR function. 6. Lighting Effect 3-8 Chapter 3: General Instruction Gaming Image Color Input Select PIP/PBP Setup Lighting Effect HDMI-1(v 2.1) HDMI-2(v 2.1) DisplayPort MyFavorite System Setup MOVE/ENTER BACK DisplayPort 3840x2160@144Hz Scenery Mode Aura Off ROG Swift PG32UQR...
User Guide
Page 26
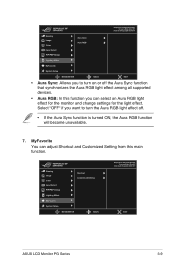
... Image Color Input Select PIP/PBP Setup Shortcut Customised Setting Lighting Effect MyFavorite System Setup MOVE/ENTER BACK DisplayPort 3840x2160@144Hz Scenery Mode Aura Off ROG Swift PG32UQR HDR OFF EXIT ASUS LCD Monitor PG Series 3-9 MyFavorite You can adjust Shortcut and Customized Setting from this function you want to turn the Aura RGB light effect off the Aura Sync function that synchronizes the Aura RGB light effect among all supported devices. • Aura RGB...
... Image Color Input Select PIP/PBP Setup Shortcut Customised Setting Lighting Effect MyFavorite System Setup MOVE/ENTER BACK DisplayPort 3840x2160@144Hz Scenery Mode Aura Off ROG Swift PG32UQR HDR OFF EXIT ASUS LCD Monitor PG Series 3-9 MyFavorite You can adjust Shortcut and Customized Setting from this function you want to turn the Aura RGB light effect off the Aura Sync function that synchronizes the Aura RGB light effect among all supported devices. • Aura RGB...
User Guide
Page 27
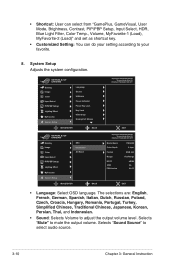
... Off ROG Swift PG32UQR HDR OFF Model Name Color Depth Format Range EOTF VRR FW Version PG32UQ 8 bps RGB 444 Full Range sRGB No Vo.11 EXIT • Language: Select OSD language. System Setup Adjusts the system configuration. Selects "Mute" to select audio source. 3-10 Chapter 3: General Instruction Selects "Sound Source" to mute the output volume. • Shortcut: User can select from "GamePlus, GameVisual, User Mode, Brightness, Contrast, PIP/PBP Setup, Input Select, HDR, Blue Light Filter, Color Temp., Volume...
... Off ROG Swift PG32UQR HDR OFF Model Name Color Depth Format Range EOTF VRR FW Version PG32UQ 8 bps RGB 444 Full Range sRGB No Vo.11 EXIT • Language: Select OSD language. System Setup Adjusts the system configuration. Selects "Mute" to select audio source. 3-10 Chapter 3: General Instruction Selects "Sound Source" to mute the output volume. • Shortcut: User can select from "GamePlus, GameVisual, User Mode, Brightness, Contrast, PIP/PBP Setup, Input Select, HDR, Blue Light Filter, Color Temp., Volume...
User Guide
Page 28
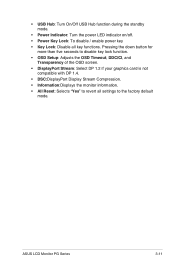
ASUS LCD Monitor PG Series 3-11 • USB Hub: Turn On/Off USB Hub function during the standby mode. • Power Indicator: Turn the power LED indicator on/off. • Power Key Lock: To disable / enable power key • Key Lock: Disable all settings to revert all key functions. Pressing the down button for more than five seconds to disable key lock function. • OSD Setup: Adjusts the OSD Timeout, DDC/CI, and Transparency of the OSD screen. •...
ASUS LCD Monitor PG Series 3-11 • USB Hub: Turn On/Off USB Hub function during the standby mode. • Power Indicator: Turn the power LED indicator on/off. • Power Key Lock: To disable / enable power key • Key Lock: Disable all settings to revert all key functions. Pressing the down button for more than five seconds to disable key lock function. • OSD Setup: Adjusts the OSD Timeout, DDC/CI, and Transparency of the OSD screen. •...

User Guide
Page 29
... audio/ USB/ Card reader connection) Black < 0.5W < 0.4W -5° ~ +20° 728.18 x 551.83 x 292.56 mm 728.18 x 428.52 x 87.12 mm 812 x 238 x 626 mm 9.8 kg 14.8 kg Adapter 19.5Vdc, 9.23A 0°C ~ 40°C 3-12 Chapter 3: General Instruction Dimension with stand (WxHxD) Phys. Resolution Brightness (Typ.) Intrinsic Contrast Ratio (Typ.) Viewing Angle (CR>10) Display Colors Response Time Sound from HDMI HDMI input...
... audio/ USB/ Card reader connection) Black < 0.5W < 0.4W -5° ~ +20° 728.18 x 551.83 x 292.56 mm 728.18 x 428.52 x 87.12 mm 812 x 238 x 626 mm 9.8 kg 14.8 kg Adapter 19.5Vdc, 9.23A 0°C ~ 40°C 3-12 Chapter 3: General Instruction Dimension with stand (WxHxD) Phys. Resolution Brightness (Typ.) Intrinsic Contrast Ratio (Typ.) Viewing Angle (CR>10) Display Colors Response Time Sound from HDMI HDMI input...
User Guide
Page 30
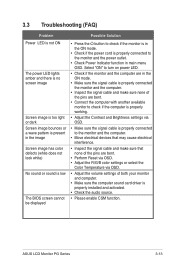
... image Screen image has color defects (white does not look white) No sound or sound is low The BIOS screen cannot be displayed • Press the button to check if the monitor is properly installed and activated. • Check the audio source. • Please enable CSM function. Select "ON" to turn on power LED. • Check if the monitor and the computer are in the ON mode. • Make sure the signal cable is properly connected the monitor...
... image Screen image has color defects (white does not look white) No sound or sound is low The BIOS screen cannot be displayed • Press the button to check if the monitor is properly installed and activated. • Check the audio source. • Please enable CSM function. Select "ON" to turn on power LED. • Check if the monitor and the computer are in the ON mode. • Make sure the signal cable is properly connected the monitor...


