
Users Manual English
Page 3
... information...v About this guide...vi ROG STRIX X570-E GAMING specifications summary viii Package contents...xii Installation tools and components xiii Chapter 1: Product Introduction 1.1 Motherboard overview 1-1 1.1.1 Before you proceed 1-1 1.1.2 Motherboard layout 1-2 1.1.3 Central Processing Unit (CPU 1-4 1.1.4 System memory 1-4 1.1.5 Expansion slots 1-6 1.1.6 Onboard LEDs 1-8 1.1.7 Headers 1-10 1.1.8 Internal connectors 1-13 Chapter 2: Basic Installation 2.1 Building your PC system 2-1 2.1.1 Motherboard installation 2-1 2.1.2 CPU installation 2-3 2.1.3 CPU...
... information...v About this guide...vi ROG STRIX X570-E GAMING specifications summary viii Package contents...xii Installation tools and components xiii Chapter 1: Product Introduction 1.1 Motherboard overview 1-1 1.1.1 Before you proceed 1-1 1.1.2 Motherboard layout 1-2 1.1.3 Central Processing Unit (CPU 1-4 1.1.4 System memory 1-4 1.1.5 Expansion slots 1-6 1.1.6 Onboard LEDs 1-8 1.1.7 Headers 1-10 1.1.8 Internal connectors 1-13 Chapter 2: Basic Installation 2.1 Building your PC system 2-1 2.1.1 Motherboard installation 2-1 2.1.2 CPU installation 2-3 2.1.3 CPU...

Users Manual English
Page 12
... BIOS 3.2, ACPI 6.2 WOL, PXE Overwolf ASUS Utilities WinRAR Anti-virus software (OEM version) Windows® 10 64-bit ATX Form Factor, 12"x 9.6" (30.5 cm x 24.4 cm) Specifications are subject to change without notice. xii Package contents Check your motherboard package for the following items. Motherboard Cables Accessories Application DVD Documentation ROG STRIX X570-E GAMING 1 x 4-in-1 SATA 6Gb/s Cable...
... BIOS 3.2, ACPI 6.2 WOL, PXE Overwolf ASUS Utilities WinRAR Anti-virus software (OEM version) Windows® 10 64-bit ATX Form Factor, 12"x 9.6" (30.5 cm x 24.4 cm) Specifications are subject to change without notice. xii Package contents Check your motherboard package for the following items. Motherboard Cables Accessories Application DVD Documentation ROG STRIX X570-E GAMING 1 x 4-in-1 SATA 6Gb/s Cable...
Users Manual English
Page 15
...• Hold components by the edges to the motherboard, peripherals, or components. ASUS ROG STRIX X570-E GAMING 1-1 Chapter 1 Chapter 1: Product Introduction Product Introduction 1 1.1 Motherboard overview 1.1.1 Before you proceed Take note of the following precautions before you install motherboard components or change any component. • Before ... Before you install or remove any component, ensure that the ATX power supply is switched off or the power cord is detached from the wall socket before touching any motherboard settings. • Unplug the power cord from the power ...
...• Hold components by the edges to the motherboard, peripherals, or components. ASUS ROG STRIX X570-E GAMING 1-1 Chapter 1 Chapter 1: Product Introduction Product Introduction 1 1.1 Motherboard overview 1.1.1 Before you proceed Take note of the following precautions before you install motherboard components or change any component. • Before ... Before you install or remove any component, ensure that the ATX power supply is switched off or the power cord is detached from the wall socket before touching any motherboard settings. • Unplug the power cord from the power ...
Users Manual English
Page 25
...to the motherboard, peripherals, or components. • Actual lighting and color will only light up , check if the RGB LED extension cable and the RGB LED strip is connected in the correct orientation, and the 12V connector is detached from the power supply. ASUS ROG STRIX X570-E GAMING 1-11... Before you install or remove any component, ensure that the ATX power supply is switched off or the power cord is aligned with a maximum power rating of ...
...to the motherboard, peripherals, or components. • Actual lighting and color will only light up , check if the RGB LED extension cable and the RGB LED strip is connected in the correct orientation, and the 12V connector is detached from the power supply. ASUS ROG STRIX X570-E GAMING 1-11... Before you install or remove any component, ensure that the ATX power supply is switched off or the power cord is aligned with a maximum power rating of ...

Users Manual English
Page 26
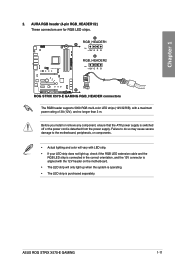
...addressable RGB LED strip is connected in the correct orientation, and the 5V connector is aligned with the 5V header on the motherboard. • The addressable RGB LED strip will only light up under the operating system. • The addressable RGB LED ...or remove any component, ensure that the ATX power supply is switched off or the power cord is purchased separately. 1-12 Chapter 1: Product Introduction Chapter 1 3. STRIX X570-e GAMING ADD_GEN2_1 Ground Data +5V PIN 1 ADD_GEN2_2 PIN 1 +5V Data Ground ROG STRIX X570-E GAMING ADD_HEADER headers The addressable RGB header supports ...
...addressable RGB LED strip is connected in the correct orientation, and the 5V connector is aligned with the 5V header on the motherboard. • The addressable RGB LED strip will only light up under the operating system. • The addressable RGB LED ...or remove any component, ensure that the ATX power supply is switched off or the power cord is purchased separately. 1-12 Chapter 1: Product Introduction Chapter 1 3. STRIX X570-e GAMING ADD_GEN2_1 Ground Data +5V PIN 1 ADD_GEN2_2 PIN 1 +5V Data Ground ROG STRIX X570-E GAMING ADD_HEADER headers The addressable RGB header supports ...

Users Manual English
Page 33
The power supply plugs are for ATX power supply plugs. Find the proper orientation and push down firmly until the connectors completely fit. ASUS ROG STRIX X570-E GAMING 1-19 Chapter 1 9. The system may become unstable or may overheat under heavy usage. • Ensure to connect the 8-pin ...GND GND GND GND +5 Volts PSON# GND GND +3 Volts -12 Volts +3 Volts +3 Volts PIN 1 ROG STRIX X570-E GAMING power connectors • DO NOT connect the 4-pin power plug only, the motherboard may not boot up if the power is inadequate. • If you use a PSU with more high-...
The power supply plugs are for ATX power supply plugs. Find the proper orientation and push down firmly until the connectors completely fit. ASUS ROG STRIX X570-E GAMING 1-19 Chapter 1 9. The system may become unstable or may overheat under heavy usage. • Ensure to connect the 8-pin ...GND GND GND GND +5 Volts PSON# GND GND +3 Volts -12 Volts +3 Volts +3 Volts PIN 1 ROG STRIX X570-E GAMING power connectors • DO NOT connect the 4-pin power plug only, the motherboard may not boot up if the power is inadequate. • If you use a PSU with more high-...

Users Manual English
Page 44
2.1.5 ATX power connection A B OR AND Chapter 2 • DO NOT connect the 4-pin power plug only, the motherboard may overheat under heavy usage. • Ensure to connect the 8-pin power plug, or connect both the 8-pin and 4-pin power plugs. 2.1.6 SATA device connection 3 4 5 6 3 4 5 6 2-8 OR Chapter 2: Basic Installation
2.1.5 ATX power connection A B OR AND Chapter 2 • DO NOT connect the 4-pin power plug only, the motherboard may overheat under heavy usage. • Ensure to connect the 8-pin power plug, or connect both the 8-pin and 4-pin power plugs. 2.1.6 SATA device connection 3 4 5 6 3 4 5 6 2-8 OR Chapter 2: Basic Installation


