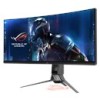
PG35V Series User Guide
Page 3
... 1.3.1 Front view 1-2 1.3.2 Back view 1-3 1.3.3 GamePlus function 1-5 1.3.4 Using the sound hotkey 1-6 1.3.5 G-SYNC HDR 1-6 Chapter 2: Setup 2.1 Assembling the monitor arm/base 2-1 2.2 Cable management 2-3 2.3 Adjusting the monitor 2-4 2.4 Detaching the arm (for VESA wall mount 2-5 2.5 Connecting the cables 2-6 2.6 Turning on the monitor 2-6 Chapter 3: General instructions 3.1 OSD (On-Screen Display) menu 3-1 3.1.1 How to reconfigure 3-1 3.1.2 OSD function introduction 3-1 3.2 Aura 3-8 3.3 Specifications summary 3-9 3.4 Outline dimensions 3-11 3.5 Troubleshooting (FAQ...
... 1.3.1 Front view 1-2 1.3.2 Back view 1-3 1.3.3 GamePlus function 1-5 1.3.4 Using the sound hotkey 1-6 1.3.5 G-SYNC HDR 1-6 Chapter 2: Setup 2.1 Assembling the monitor arm/base 2-1 2.2 Cable management 2-3 2.3 Adjusting the monitor 2-4 2.4 Detaching the arm (for VESA wall mount 2-5 2.5 Connecting the cables 2-6 2.6 Turning on the monitor 2-6 Chapter 3: General instructions 3.1 OSD (On-Screen Display) menu 3-1 3.1.1 How to reconfigure 3-1 3.1.2 OSD function introduction 3-1 3.2 Aura 3-8 3.3 Specifications summary 3-9 3.4 Outline dimensions 3-11 3.5 Troubleshooting (FAQ...

PG35V Series User Guide
Page 4
... for help. Operation is subject to provide reasonable protection against harmful interference in a particular installation. This equipment generates, uses and can be determined by turning the equipment off and on a circuit different from digital apparatus set out in accordance with the instructions, may cause harmful interference to which can radiate radio frequency energy and, if not installed and used in...
... for help. Operation is subject to provide reasonable protection against harmful interference in a particular installation. This equipment generates, uses and can be determined by turning the equipment off and on a circuit different from digital apparatus set out in accordance with the instructions, may cause harmful interference to which can radiate radio frequency energy and, if not installed and used in...
PG35V Series User Guide
Page 5
... power source indicated on the monitor cabinet. • To ensure satisfactory operation, use the monitor only with UL listed computers which complies with your retailer. • Adjustment of time. This will not be placed in any kind into the slots on the label. Safety information • Before setting up the monitor, carefully read all cables are correctly connected and the power cables...
... power source indicated on the monitor cabinet. • To ensure satisfactory operation, use the monitor only with UL listed computers which complies with your retailer. • Adjustment of time. This will not be placed in any kind into the slots on the label. Safety information • Before setting up the monitor, carefully read all cables are correctly connected and the power cables...

PG35V Series User Guide
Page 6
... screen may remain after switching the image. The screen will recover slowly or you MUST follow to complete a task. vi AEEE yönetmeliğine uygundur Care & Cleaning • Before you use. • When the same image is better to disconnect the cables and power cord. Turn off and unplug the power cord. Do not lift the display by yourself! Clean the monitor surface with the monitor...
... screen may remain after switching the image. The screen will recover slowly or you MUST follow to complete a task. vi AEEE yönetmeliğine uygundur Care & Cleaning • Before you use. • When the same image is better to disconnect the cables and power cord. Turn off and unplug the power cord. Do not lift the display by yourself! Clean the monitor surface with the monitor...

PG35V Series User Guide
Page 9
... Check your package for the following items: LCD monitor Monitor base Quick start guide Warranty card Power adapter Power cord DP cable HDMI cable USB cable LED projection cover and changeable films Input/Output port cover Wall mount screws Color Calibration Testing Report ROG welcome card If any of features that the monitor brings to turn on the light on . If you want to turn it on the rear cover and stand. ASUS PG35V Series LCD Monitor 1-1 Select "ON" when you see the message "AURA & LIGHT IN MOTION" appears if you disable...
... Check your package for the following items: LCD monitor Monitor base Quick start guide Warranty card Power adapter Power cord DP cable HDMI cable USB cable LED projection cover and changeable films Input/Output port cover Wall mount screws Color Calibration Testing Report ROG welcome card If any of features that the monitor brings to turn on the light on . If you want to turn it on the rear cover and stand. ASUS PG35V Series LCD Monitor 1-1 Select "ON" when you see the message "AURA & LIGHT IN MOTION" appears if you disable...

PG35V Series User Guide
Page 11
.... ASUS PG35V Series LCD Monitor 1-3 This port is for connection with an HDMI compatible device. 3. This port is for connection with a USB upstream cable. Kensington lock slot. 9. DisplayPort. Ambient light sensor. 1.3.2 Back view 13 11 12 13 4 5 678 9 1. This port connects the power cord. 2. USB 3.0 upstream port. USB 3.0 downstream ports. AURA RGB/AURA Sync (controlled by AURA software). These ports are for a DisplayPort compatible device. 4. This port is connected. 8. • Turns on the OSD menu when the monitor enters standby mode or displays the...
.... ASUS PG35V Series LCD Monitor 1-3 This port is for connection with an HDMI compatible device. 3. This port is for connection with a USB upstream cable. Kensington lock slot. 9. DisplayPort. Ambient light sensor. 1.3.2 Back view 13 11 12 13 4 5 678 9 1. This port connects the power cord. 2. USB 3.0 upstream port. USB 3.0 downstream ports. AURA RGB/AURA Sync (controlled by AURA software). These ports are for a DisplayPort compatible device. 4. This port is connected. 8. • Turns on the OSD menu when the monitor enters standby mode or displays the...

PG35V Series User Guide
Page 13
...Practice Mode) Timer FPS FPS Counter Display Alignment NEXT BACK/EXIT NEXT BACK/EXIT NEXT BACK/EXIT ASUS PG35V Series LCD Monitor 1-5 The crosshair overlay with 6 different crosshair options lets you choose the one that best suits the game you know how smooth the game is running. GamePlus Main Menu ... can keep track of games. Display Alignment displays alignment lines on the left to line up /down to navigate through the settings. There's also an onscreen timer you can position on 4 sides of the screen, serving as an easy and handy tool for users when ...
...Practice Mode) Timer FPS FPS Counter Display Alignment NEXT BACK/EXIT NEXT BACK/EXIT NEXT BACK/EXIT ASUS PG35V Series LCD Monitor 1-5 The crosshair overlay with 6 different crosshair options lets you choose the one that best suits the game you know how smooth the game is running. GamePlus Main Menu ... can keep track of games. Display Alignment displays alignment lines on the left to line up /down to navigate through the settings. There's also an onscreen timer you can position on 4 sides of the screen, serving as an easy and handy tool for users when ...
PG35V Series User Guide
Page 14
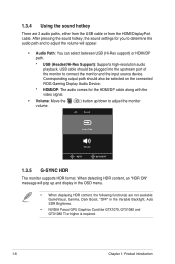
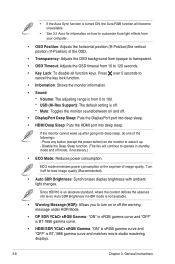
... USB cable or from the HDMI/DisplayPort cable. When detecting HDR content, an "HDR ON" message will appear. • Audio Path: You can select between USB (Hi-Res support) or HDMI/DP path. * USB (Headset/Hi-Res Support): Supports high-resolution audio playback. After pressing the sound hotkey, the sound settings for the HDMI/DP cable along with the video signal. • Volume: Move the volume. ( ) button up and display in the Variable Backlight, Auto SDR Brightness...
... USB cable or from the HDMI/DisplayPort cable. When detecting HDR content, an "HDR ON" message will appear. • Audio Path: You can select between USB (Hi-Res support) or HDMI/DP path. * USB (Headset/Hi-Res Support): Supports high-resolution audio playback. After pressing the sound hotkey, the sound settings for the HDMI/DP cable along with the video signal. • Volume: Move the volume. ( ) button up and display in the Variable Backlight, Auto SDR Brightness...

PG35V Series User Guide
Page 19
... remove the covers on the back of the monitor face down on a table. 2. Fasten the wall mount screws. 1 2 3 4 5 We recommend that you cover the table surface with minimum weight/load 22.7kg (Screw size: M4 x 10 mm) ASUS PG35V Series LCD Monitor 2-5 Use a screwdriver to the monitor. • The VESA wall mount kit (100 x 100 mm) is specially designed for VESA wall mount. Have the front of the monitor and remove the arm/base...
... remove the covers on the back of the monitor face down on a table. 2. Fasten the wall mount screws. 1 2 3 4 5 We recommend that you cover the table surface with minimum weight/load 22.7kg (Screw size: M4 x 10 mm) ASUS PG35V Series LCD Monitor 2-5 Use a screwdriver to the monitor. • The VESA wall mount kit (100 x 100 mm) is specially designed for VESA wall mount. Have the front of the monitor and remove the arm/base...

PG35V Series User Guide
Page 20
... power button. 2.5 Connecting the cables Connect the cables as the following instructions: • To connect the power cord: a. Connect the power adapter securely to show that the monitor is installed with plug type to the monitor's earphone jack. • To use the earphone: connect the end with the lastest Windows 7/Windows 8.1/ Windows 10 operating system. b. See page 1-3 for the location of the DisplayPort/HDMI cable to your computer's USB 3.0 port. The power indicator lights up in white to the monitor...
... power button. 2.5 Connecting the cables Connect the cables as the following instructions: • To connect the power cord: a. Connect the power adapter securely to show that the monitor is installed with plug type to the monitor's earphone jack. • To use the earphone: connect the end with the lastest Windows 7/Windows 8.1/ Windows 10 operating system. b. See page 1-3 for the location of the DisplayPort/HDMI cable to your computer's USB 3.0 port. The power indicator lights up in white to the monitor...

PG35V Series User Guide
Page 21
... OSD menu, press the button or move the ( ) button right to activate it . 3. Normal Mode HDR Off DisplayPort Racing Mode 3440x1440@60 Hz Aura Off ROG Swift PG35V Over Clocking Blue Light Filter GameVisual Color Image Input Select System Setup Max Refresh Rate 200 Hz MOVE/ENTER BACK EXIT ASUS PG35V Series LCD Monitor 3-1 Move the function. ( ) button up/down again to navigate through the sub-menu functions. 3.1 OSD (On-Screen Display) menu 3.1.1 How to change the settings...
... OSD menu, press the button or move the ( ) button right to activate it . 3. Normal Mode HDR Off DisplayPort Racing Mode 3440x1440@60 Hz Aura Off ROG Swift PG35V Over Clocking Blue Light Filter GameVisual Color Image Input Select System Setup Max Refresh Rate 200 Hz MOVE/ENTER BACK EXIT ASUS PG35V Series LCD Monitor 3-1 Move the function. ( ) button up/down again to navigate through the sub-menu functions. 3.1 OSD (On-Screen Display) menu 3.1.1 How to change the settings...
PG35V Series User Guide
Page 22
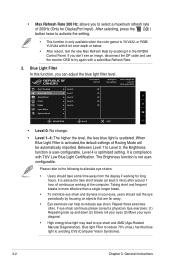
... use the monitor OSD to try again with TUV Low Blue Light Certification. Normal Mode HDR Off DisplayPort Racing Mode 3440x1440@60 Hz Aura Off ROG Swift PG35V Over Clocking Blue Light Filter GameVisual Color Image Input Select System Setup Level 0 Level 1 Level 2 Level 3 Level 4 MOVE/ENTER BACK EXIT • Level 0: No change. • Level 1~4: The higher the level, the less blue light is not userconfigurable. It is optimized setting...
... use the monitor OSD to try again with TUV Low Blue Light Certification. Normal Mode HDR Off DisplayPort Racing Mode 3440x1440@60 Hz Aura Off ROG Swift PG35V Over Clocking Blue Light Filter GameVisual Color Image Input Select System Setup Level 0 Level 1 Level 2 Level 3 Level 4 MOVE/ENTER BACK EXIT • Level 0: No change. • Level 1~4: The higher the level, the less blue light is not userconfigurable. It is optimized setting...
PG35V Series User Guide
Page 23
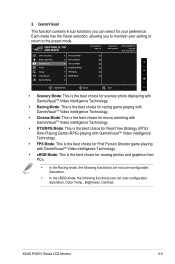
... is the best choice for your setting or return to the preset mode. Each mode has the Reset selection, allowing you can select for viewing photos and graphics from PCs. • In the Racing mode, the following function(s) are not user-configurable: Saturation. • In the sRGB mode, the following function(s) are not user-configurable: Saturation, Color Temp., Brightness, Contrast. 3. ASUS PG35V Series LCD Monitor 3-3 GameVisual This...
... is the best choice for your setting or return to the preset mode. Each mode has the Reset selection, allowing you can select for viewing photos and graphics from PCs. • In the Racing mode, the following function(s) are not user-configurable: Saturation. • In the sRGB mode, the following function(s) are not user-configurable: Saturation, Color Temp., Brightness, Contrast. 3. ASUS PG35V Series LCD Monitor 3-3 GameVisual This...
PG35V Series User Guide
Page 24
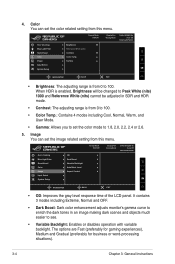
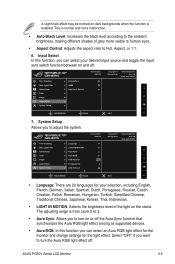
...). 3-4 Chapter 3: General Instructions Over Clocking Blue Light Filter GameVisual Color Image Input Select System Setup OD Dark Boost Variable Backlight Auto Black Level Aspect Control Normal Mode HDR Off DisplayPort Racing Mode 3440x1440@60 Hz Aura Off ROG Swift PG35V MOVE/ENTER BACK EXIT • OD: Improves the gray level response time of the LCD panel. Image You can set the color mode to see. • Variable Backlight: Enables or disables operation with...
...). 3-4 Chapter 3: General Instructions Over Clocking Blue Light Filter GameVisual Color Image Input Select System Setup OD Dark Boost Variable Backlight Auto Black Level Aspect Control Normal Mode HDR Off DisplayPort Racing Mode 3440x1440@60 Hz Aura Off ROG Swift PG35V MOVE/ENTER BACK EXIT • OD: Improves the gray level response time of the LCD panel. Image You can set the color mode to see. • Variable Backlight: Enables or disables operation with...
PG35V Series User Guide
Page 25
... Aura RGB light effect for the monitor and change settings for your desired input source and toggle the input auto switch function between on dark backgrounds when the function is enabled. System Setup Allows you to adjust the system. Over Clocking Blue Light Filter GameVisual Color Image Input Select System Setup DisplayPort HDMI Input Auto Switch Normal Mode HDR Off DisplayPort Racing Mode 3440x1440@60 Hz Aura Off ROG Swift PG35V MOVE/ENTER BACK 7. The adjusting range is...
... Aura RGB light effect for the monitor and change settings for your desired input source and toggle the input auto switch function between on dark backgrounds when the function is enabled. System Setup Allows you to adjust the system. Over Clocking Blue Light Filter GameVisual Color Image Input Select System Setup DisplayPort HDMI Input Auto Switch Normal Mode HDR Off DisplayPort Racing Mode 3440x1440@60 Hz Aura Off ROG Swift PG35V MOVE/ENTER BACK 7. The adjusting range is...
PG35V Series User Guide
Page 26
... or off for information on how to 100. * USB (Hi-Res Support): The default setting is BT.1886 gamma curve and matches movie studio mastering displays. 3-6 Chapter 3: General Instructions Disable the Deep Sleep function. (The fan will become unavailable. • See 3.2 Aura for best image quality (Recommended). • Auto SDR Brightness: Synchronizes display brightness with ambient light changes. Since HDR10 is an absolute standard, where the content...
... or off for information on how to 100. * USB (Hi-Res Support): The default setting is BT.1886 gamma curve and matches movie studio mastering displays. 3-6 Chapter 3: General Instructions Disable the Deep Sleep function. (The fan will become unavailable. • See 3.2 Aura for best image quality (Recommended). • Auto SDR Brightness: Synchronizes display brightness with ambient light changes. Since HDR10 is an absolute standard, where the content...
PG35V Series User Guide
Page 28
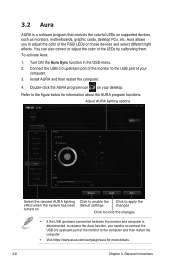
...: 1. Connect the USB 3.0 upstream port of the monitor to the USB port of the LEDs by calibrating them. Double-click the AURA program icon on Click to enable the Click to apply the default settings changes Click to undo the changes • If the USB upstream connection between the monitor and computer is a software program that controls the colorful LEDs on these devices and select different light effects. Adjust AURA lighting options...
...: 1. Connect the USB 3.0 upstream port of the monitor to the USB port of the LEDs by calibrating them. Double-click the AURA program icon on Click to enable the Click to apply the default settings changes Click to undo the changes • If the USB upstream connection between the monitor and computer is a software program that controls the colorful LEDs on these devices and select different light effects. Adjust AURA lighting options...
PG35V Series User Guide
Page 29
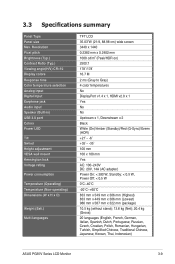
Resolution Pixel pitch Brightness (Typ.) Contrast Ratio (Typ.) Viewing angle(H/V) CR>10 Display colors Response time Color temperature selection Analog input Digital input Earphone jack Audio input Speaker (Built-in) USB 3.0 port Colors Power LED Tilt Swivel Height adjustment VESA wall mount Kensington lock Voltage rating Power consumption Temperature (Operating) Temperature (Non-operating) Dimensions (W x H x D) Weight (Esti.) Multi-languages TFT LCD 35.03"W (21:9, 88.98 cm) wide screen 3440 x 1440 0.2382 mm x 0.2402 mm 1000 cd/m2 (Peak/HDR on) 2500:1 178˚/178˚...
Resolution Pixel pitch Brightness (Typ.) Contrast Ratio (Typ.) Viewing angle(H/V) CR>10 Display colors Response time Color temperature selection Analog input Digital input Earphone jack Audio input Speaker (Built-in) USB 3.0 port Colors Power LED Tilt Swivel Height adjustment VESA wall mount Kensington lock Voltage rating Power consumption Temperature (Operating) Temperature (Non-operating) Dimensions (W x H x D) Weight (Esti.) Multi-languages TFT LCD 35.03"W (21:9, 88.98 cm) wide screen 3440 x 1440 0.2382 mm x 0.2402 mm 1000 cd/m2 (Peak/HDR on) 2500:1 178˚/178˚...

PG35V Series User Guide
Page 30
Accessories Compliance and Standards DP cable, HDMI cable, USB cable, power adapter, power cord, quick start guide, warranty card, LED projection cover and changeable films, input/output port cover, wall mount screws, color calibration testing report, ROG welcome card UL/cUL, CB, CE, ErP, FCC, CCC, BSMI, CU, C-Tick, VCCI, PSE, CEL, J-MOSS, RoHS, WEEE, Windows 7 & 8.1& 10 WHQL, KCC, E-STANDBY, TUV-Flicker Free, TUV Low Blue Light, UkrSEPRO, RCM *Specifications are subject to change without notice. 3-10 Chapter 3: General Instructions
Accessories Compliance and Standards DP cable, HDMI cable, USB cable, power adapter, power cord, quick start guide, warranty card, LED projection cover and changeable films, input/output port cover, wall mount screws, color calibration testing report, ROG welcome card UL/cUL, CB, CE, ErP, FCC, CCC, BSMI, CU, C-Tick, VCCI, PSE, CEL, J-MOSS, RoHS, WEEE, Windows 7 & 8.1& 10 WHQL, KCC, E-STANDBY, TUV-Flicker Free, TUV Low Blue Light, UkrSEPRO, RCM *Specifications are subject to change without notice. 3-10 Chapter 3: General Instructions
PG35V Series User Guide
Page 32
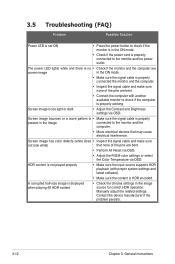
... • Make sure the input source supports HDR playback (with another available monitor to check if the computer is too light or dark • Adjust the Contrast and Brightness settings via OSD. Contact the device manufacturer if the problem persists. 3-12 Chapter 3: General Instructions Screen image is properly working. The power LED lights white and there is properly connected the monitor and the computer. • Inspect the signal cable and make sure not look white) that may...
... • Make sure the input source supports HDR playback (with another available monitor to check if the computer is too light or dark • Adjust the Contrast and Brightness settings via OSD. Contact the device manufacturer if the problem persists. 3-12 Chapter 3: General Instructions Screen image is properly working. The power LED lights white and there is properly connected the monitor and the computer. • Inspect the signal cable and make sure not look white) that may...


