
STRIX B350-F GAMING Users ManualEnglish
Page 2
... into any problems in it from http://www.asus.com/support/download or (2) for which is dependent on the preferred carrier and the location where you . All Rights Reserved. or (2) the serial number of shipment with you want to have it shipped to, by the purchaser for backup purposes, without the express written permission of Certain Software This...
... into any problems in it from http://www.asus.com/support/download or (2) for which is dependent on the preferred carrier and the location where you . All Rights Reserved. or (2) the serial number of shipment with you want to have it shipped to, by the purchaser for backup purposes, without the express written permission of Certain Software This...

STRIX B350-F GAMING Users ManualEnglish
Page 4
... AMD fTPM Configuration 3-13 3.6.2 CPU Configuration 3-13 3.6.3 SATA Configuration 3-14 3.6.4 Onboard Devices Configuration 3-15 3.6.5 APM Configuration 3-16 3.6.6 Network Stack Configuration 3-16 3.6.7 HDD/SSD SMART Information 3-16 3.6.8 USB Configuration 3-16 3.7 Monitor menu 3-17 3.8 Boot menu...3-17 3.9 Tool menu...3-19 3.9.1 ASUS EZ Flash 3 Utility 3-19 3.9.2 Secure Erase 3-19 3.9.3 ASUS Overclocking Profile 3-20 3.9.4 ASUS SPD Information 3-20 3.9.5 Graphics Card Information 3-20 3.10 Exit menu...3-21 3.11 Updating BIOS 3-21 3.11.1 EZ Update 3-21 3.11.2 ASUS EZ Flash...
... AMD fTPM Configuration 3-13 3.6.2 CPU Configuration 3-13 3.6.3 SATA Configuration 3-14 3.6.4 Onboard Devices Configuration 3-15 3.6.5 APM Configuration 3-16 3.6.6 Network Stack Configuration 3-16 3.6.7 HDD/SSD SMART Information 3-16 3.6.8 USB Configuration 3-16 3.7 Monitor menu 3-17 3.8 Boot menu...3-17 3.9 Tool menu...3-19 3.9.1 ASUS EZ Flash 3 Utility 3-19 3.9.2 Secure Erase 3-19 3.9.3 ASUS Overclocking Profile 3-20 3.9.4 ASUS SPD Information 3-20 3.9.5 Graphics Card Information 3-20 3.10 Exit menu...3-21 3.11 Updating BIOS 3-21 3.11.1 EZ Update 3-21 3.11.2 ASUS EZ Flash...
STRIX B350-F GAMING Users ManualEnglish
Page 9
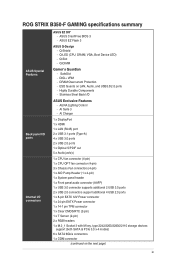
Q-LED (CPU, DRAM, VGA, Boot Device LED) - ESD Guards on the next page) ix AI Suite 3 - Q-Slot - DIGI+ VRM - ROG STRIX B350-F GAMING specifications summary ASUS EZ DIY - ASUS EZ Flash 3 ASUS Q-Design - Q-DIMM ASUS Special Features Gamer's Guardian - DRAM Overcurrent Protection - AURA Lighting Control - AI Charger 1 x DisplayPort 1 x HDMI 1 x LAN (RJ45) port 2 x USB 3.1 ports (Type-A) 4 x USB 3.0 ports 2 x USB 2.0 ports 1 x Optical S/PDIF out 5 x Audio jack(s) 1 x CPU fan connector (4-pin) 1 x CPU OPT fan connector (4-pin) 3 x Chassis Fan connectors (4-pin) 1 x AIO Pump...
Q-LED (CPU, DRAM, VGA, Boot Device LED) - ESD Guards on the next page) ix AI Suite 3 - Q-Slot - DIGI+ VRM - ROG STRIX B350-F GAMING specifications summary ASUS EZ DIY - ASUS EZ Flash 3 ASUS Q-Design - Q-DIMM ASUS Special Features Gamer's Guardian - DRAM Overcurrent Protection - AURA Lighting Control - AI Charger 1 x DisplayPort 1 x HDMI 1 x LAN (RJ45) port 2 x USB 3.1 ports (Type-A) 4 x USB 3.0 ports 2 x USB 2.0 ports 1 x Optical S/PDIF out 5 x Audio jack(s) 1 x CPU fan connector (4-pin) 1 x CPU OPT fan connector (4-pin) 3 x Chassis Fan connectors (4-pin) 1 x AIO Pump...

STRIX B350-F GAMING Users ManualEnglish
Page 13
...note of the following precautions before you install motherboard components or change any component. • Before handling components, use a grounded wrist strap or touch a safely grounded object or a metal object, such as the power supply case, to avoid damaging them . •... that came with the component. • Before you install or remove any component, ensure that the ATX power supply is switched off or the power cord is detached from the wall socket before touching any motherboard settings. • Unplug the power cord from the power supply. ASUS ROG STRIX B350-F GAMING 1-1
...note of the following precautions before you install motherboard components or change any component. • Before handling components, use a grounded wrist strap or touch a safely grounded object or a metal object, such as the power supply case, to avoid damaging them . •... that came with the component. • Before you install or remove any component, ensure that the ATX power supply is switched off or the power cord is detached from the wall socket before touching any motherboard settings. • Unplug the power cord from the power supply. ASUS ROG STRIX B350-F GAMING 1-1

STRIX B350-F GAMING Users ManualEnglish
Page 21
... system passwords. Turn OFF the computer and unplug the power cord. 2. Plug the power cord and turn ON the computer. 4. strix b350-F GAMING CLRTC PIN 1 ROG STRIX B350-F GAMING Clear RTC RAM To erase the RTC RAM: 1. Hold down the key during the boot process and enter BIOS setup to short the two pins. 3. ASUS ROG STRIX B350-F GAMING 1-9 If the steps above do not help, remove the onboard battery and short the two pins again to clear the CMOS RTC RAM data of the system setup information...
... system passwords. Turn OFF the computer and unplug the power cord. 2. Plug the power cord and turn ON the computer. 4. strix b350-F GAMING CLRTC PIN 1 ROG STRIX B350-F GAMING Clear RTC RAM To erase the RTC RAM: 1. Hold down the key during the boot process and enter BIOS setup to short the two pins. 3. ASUS ROG STRIX B350-F GAMING 1-9 If the steps above do not help, remove the onboard battery and short the two pins again to clear the CMOS RTC RAM data of the system setup information...

STRIX B350-F GAMING Users ManualEnglish
Page 23
ATX power connectors (24-pin EATXPWR, 8-pin EATX12V) These connectors are designed to install additional devices. The system may become unstable or may not boot up if the power is inadequate. ASUS ROG STRIX B350-F GAMING 1-11 The power supply plugs are for ATX power supply plugs. Chapter 1 1.1.7 Internal connectors 1. Find the proper orientation and push down firmly until the connectors completely fit. strix b350-F GAMING A A EATX12V B EATXPWR +12V DC +12V DC +12V DC +12V DC +3 Volts GND +12...
ATX power connectors (24-pin EATXPWR, 8-pin EATX12V) These connectors are designed to install additional devices. The system may become unstable or may not boot up if the power is inadequate. ASUS ROG STRIX B350-F GAMING 1-11 The power supply plugs are for ATX power supply plugs. Chapter 1 1.1.7 Internal connectors 1. Find the proper orientation and push down firmly until the connectors completely fit. strix b350-F GAMING A A EATX12V B EATXPWR +12V DC +12V DC +12V DC +12V DC +3 Volts GND +12...
STRIX B350-F GAMING Users ManualEnglish
Page 25
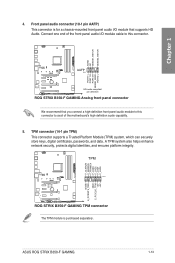
... +3V +3V ROG STRIX B350-F GAMING TPM connector The TPM module is for a chassis-mounted front panel audio I /O module cable to avail of the front panel audio I /O module that you connect a high-definition front panel audio module to this connector to this connector. TPM connector (14-1 pin TPM) This connector supports a Trusted Platform Module (TPM) system, which can securely store keys, digital certificates, passwords, and data. ASUS ROG STRIX B350-F GAMING 1-13 Connect one end of the motherboard's high-definition audio capability. 5.
... +3V +3V ROG STRIX B350-F GAMING TPM connector The TPM module is for a chassis-mounted front panel audio I /O module cable to avail of the front panel audio I /O module that you connect a high-definition front panel audio module to this connector to this connector. TPM connector (14-1 pin TPM) This connector supports a Trusted Platform Module (TPM) system, which can securely store keys, digital certificates, passwords, and data. ASUS ROG STRIX B350-F GAMING 1-13 Connect one end of the motherboard's high-definition audio capability. 5.

STRIX B350-F GAMING Users ManualEnglish
Page 28
... on the device or the motherboard's component to install M.2 SSD modules. Chapter 1 strix b350-F GAMING T_SENSOR GND PIN 1 SENSOR IN ROG STRIX B350-F GAMING T_SENSOR connector 10. Thermal sensor connector (2-pin T_SENSOR) This connector is purchased separately. 1-16 Chapter 1: Product Introduction M.2 (Socket 3) This socket allows you to detect its temperature. 9. strix b350-F GAMING M.2(SOCKET3) 22110 2280 2260 2242 ROG STRIX B350-F GAMING M.2(SOCKET3) • For AMD Ryzen™ Processors,the M.2(SOCKET3) supports PCIe 3.0 x 4 and SATA mode M key design and type 2242...
... on the device or the motherboard's component to install M.2 SSD modules. Chapter 1 strix b350-F GAMING T_SENSOR GND PIN 1 SENSOR IN ROG STRIX B350-F GAMING T_SENSOR connector 10. Thermal sensor connector (2-pin T_SENSOR) This connector is purchased separately. 1-16 Chapter 1: Product Introduction M.2 (Socket 3) This socket allows you to detect its temperature. 9. strix b350-F GAMING M.2(SOCKET3) 22110 2280 2260 2242 ROG STRIX B350-F GAMING M.2(SOCKET3) • For AMD Ryzen™ Processors,the M.2(SOCKET3) supports PCIe 3.0 x 4 and SATA mode M key design and type 2242...
STRIX B350-F GAMING Users ManualEnglish
Page 29
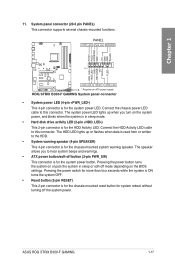
... button (2-pin PWR_SW) This connector is for the system power button. The speaker allows you turn on the BIOS settings. RESET +PWR_LED- * Requires an ATX power supply ROG STRIX B350-F GAMING System panel connector • System power LED (4-pin +PWR_LED-) This 4-pin connector is in sleep or soft-off the system power. PANEL +PWR_LED- PWR_SW SPEAKER PLED+ PLEDPWRBTN# GND +5V GND GND Speaker HDD_LED+ HDD_LED- Connect the chassis power LED cable to this connector. Connect the HDD Activity LED cable to this connector. ASUS ROG STRIX B350-F GAMING 1-17 strix b350-F GAMING PIN...
... button (2-pin PWR_SW) This connector is for the system power button. The speaker allows you turn on the BIOS settings. RESET +PWR_LED- * Requires an ATX power supply ROG STRIX B350-F GAMING System panel connector • System power LED (4-pin +PWR_LED-) This 4-pin connector is in sleep or soft-off the system power. PANEL +PWR_LED- PWR_SW SPEAKER PLED+ PLEDPWRBTN# GND +5V GND GND Speaker HDD_LED+ HDD_LED- Connect the chassis power LED cable to this connector. Connect the HDD Activity LED cable to this connector. ASUS ROG STRIX B350-F GAMING 1-17 strix b350-F GAMING PIN...
STRIX B350-F GAMING Users ManualEnglish
Page 33
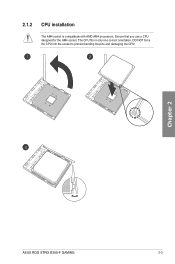
Ensure that you use a CPU designed for the AM4 socket. Chapter 2 ASUS ROG STRIX B350-F GAMING 2-3 2.1.2 CPU installation The AM4 socket is compatibale with AMD AM4 processors. DO NOT force the CPU into the socket to prevent bending the pins and damaging the CPU! The CPU fits in only one correct orientation.
Ensure that you use a CPU designed for the AM4 socket. Chapter 2 ASUS ROG STRIX B350-F GAMING 2-3 2.1.2 CPU installation The AM4 socket is compatibale with AMD AM4 processors. DO NOT force the CPU into the socket to prevent bending the pins and damaging the CPU! The CPU fits in only one correct orientation.
STRIX B350-F GAMING Users ManualEnglish
Page 45
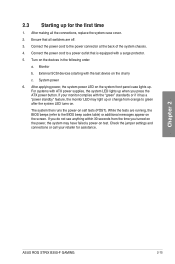
... for assistance. Check the jumper settings and connections or call your monitor complies with a surge protector. 5. After making all switches are running, the BIOS beeps (refer to green after the system LED turns on the chain) c. Connect the power cord to the power connector at the back of the system chassis. 4. Turn on test. System power 6. External SCSI devices (starting with ATX power supplies, the system LED lights up . Chapter 2 ASUS ROG STRIX B350-F GAMING 2-15 Ensure that...
... for assistance. Check the jumper settings and connections or call your monitor complies with a surge protector. 5. After making all switches are running, the BIOS beeps (refer to green after the system LED turns on the chain) c. Connect the power cord to the power connector at the back of the system chassis. 4. Turn on test. System power 6. External SCSI devices (starting with ATX power supplies, the system LED lights up . Chapter 2 ASUS ROG STRIX B350-F GAMING 2-15 Ensure that...
STRIX B350-F GAMING Users ManualEnglish
Page 47
... updating the BIOS file, rename it as RSB350FG.CAP for system startup in this motherboard. BIOS (Basic Input and Output System) stores system hardware settings such as storage device configuration, overclocking settings, advanced power management, and boot device configuration that are needed for this user manual refers to run the BIOS Setup. • You have installed a new system component that you change the BIOS settings only with the help of a trained service personnel. Chapter 3 ASUS ROG STRIX B350-F GAMING...
... updating the BIOS file, rename it as RSB350FG.CAP for system startup in this motherboard. BIOS (Basic Input and Output System) stores system hardware settings such as storage device configuration, overclocking settings, advanced power management, and boot device configuration that are needed for this user manual refers to run the BIOS Setup. • You have installed a new system component that you change the BIOS settings only with the help of a trained service personnel. Chapter 3 ASUS ROG STRIX B350-F GAMING...

STRIX B350-F GAMING Users ManualEnglish
Page 49
... Control(F6) EZ Tuning Wizard(F11) Hot Keys Chapter 3 Submenu items General help Configuration fields Pop-up Menu Last modified settings Go back to the Setup Mode item in section Boot menu for entering the BIOS setup program can be changed. The default screen for details. 3.2.1 Advanced Mode By default, the Advanced Mode screen appears when you enter the BIOS setup program. Refer to EZ Mode Search on the FAQ Displays the CPU temperature, CPU, and memory voltage output ASUS ROG STRIX B350-F GAMING...
... Control(F6) EZ Tuning Wizard(F11) Hot Keys Chapter 3 Submenu items General help Configuration fields Pop-up Menu Last modified settings Go back to the Setup Mode item in section Boot menu for entering the BIOS setup program can be changed. The default screen for details. 3.2.1 Advanced Mode By default, the Advanced Mode screen appears when you enter the BIOS setup program. Refer to EZ Mode Search on the FAQ Displays the CPU temperature, CPU, and memory voltage output ASUS ROG STRIX B350-F GAMING...

STRIX B350-F GAMING Users ManualEnglish
Page 51
... the screen. You cannot select an item that you can also scan the following QR code: Hot keys This button above the menu bar contains the navigation keys for the BIOS setup program. Last Modified button This button shows the items that is user-configurable, you last modified and saved in the menu and change the value of a field, select it to display a list of options. Chapter 3 ASUS ROG STRIX B350-F GAMING 3-5 Configuration...
... the screen. You cannot select an item that you can also scan the following QR code: Hot keys This button above the menu bar contains the navigation keys for the BIOS setup program. Last Modified button This button shows the items that is user-configurable, you last modified and saved in the menu and change the value of a field, select it to display a list of options. Chapter 3 ASUS ROG STRIX B350-F GAMING 3-5 Configuration...

STRIX B350-F GAMING Users ManualEnglish
Page 60
... SATA devices. Set to [RAID] when you want to enable advanced Serial ATA features that shows a warning message during POST (Power-on random workloads by allowing the drive to use the AHCI (Advanced Host Controller Interface). SMT Mode This item allows you to the corresponding SATA port. Configuration options: [Automatic mode] [Two core per processor] [Four core per processor] [Six core per processor] 3.6.3 SATA Configuration While entering Setup, the BIOS automatically detects the presence of commands. SMART Self Test S.M.A.R.T. (Self-Monitoring...
... SATA devices. Set to [RAID] when you want to enable advanced Serial ATA features that shows a warning message during POST (Power-on random workloads by allowing the drive to use the AHCI (Advanced Host Controller Interface). SMT Mode This item allows you to the corresponding SATA port. Configuration options: [Automatic mode] [Two core per processor] [Four core per processor] [Six core per processor] 3.6.3 SATA Configuration While entering Setup, the BIOS automatically detects the presence of commands. SMART Self Test S.M.A.R.T. (Self-Monitoring...

STRIX B350-F GAMING Users ManualEnglish
Page 61
... use the Azalia High Definition Audio Controller Configuration options: [Disabled] [Enabled] PCIEX16_3 4X-2X Switch This item allows you to chagre USB devices even when the system is enabled. [Off] The LEDs and RGB header(s) will light up in Power State S5 This item allows you to set the serial port configuration. Serial Port Allows you to enable/disable SATA Hot Plug Support. Hot Plug These items allow you to enable or disable the serial port (COM).Configuration options: [On] [Off] Chapter 3 ASUS ROG STRIX B350-F GAMING 3-15 In Sleep...
... use the Azalia High Definition Audio Controller Configuration options: [Disabled] [Enabled] PCIEX16_3 4X-2X Switch This item allows you to chagre USB devices even when the system is enabled. [Off] The LEDs and RGB header(s) will light up in Power State S5 This item allows you to set the serial port configuration. Serial Port Allows you to enable/disable SATA Hot Plug Support. Hot Plug These items allow you to enable or disable the serial port (COM).Configuration options: [On] [Off] Chapter 3 ASUS ROG STRIX B350-F GAMING 3-15 In Sleep...

STRIX B350-F GAMING Users ManualEnglish
Page 62
... 3: BIOS Setup When set to [Enabled], all other installed PCIe LAN cards. The USB Devices item shows the auto-detected values. If no USB device is detected, the item shows None. Power On By RTC This item allows you can set the days, hours, minutes, or seconds to schedule an RTC alarm date. Configuration options: [Disabled] [Enabled] 3.6.6 Network Stack Configuration The items in this menu allow you to select the Serial Port base address. Change Settings...
... 3: BIOS Setup When set to [Enabled], all other installed PCIe LAN cards. The USB Devices item shows the auto-detected values. If no USB device is detected, the item shows None. Power On By RTC This item allows you can set the days, hours, minutes, or seconds to schedule an RTC alarm date. Configuration options: [Disabled] [Enabled] 3.6.6 Network Stack Configuration The items in this menu allow you to select the Serial Port base address. Change Settings...

STRIX B350-F GAMING Users ManualEnglish
Page 64
... PCI-E expansion devices that you want to launch. Chapter 3 3-18 Chapter 3: BIOS Setup Configuration options: [Ignore] [Legacy only] [UEFI driver first] Boot from unauthorized access and malwares during system startup, press when the ASUS Logo appears. For better compatibility, enable the CSM to fully support the non-UEFI driver add-on devices. The following four items appear when you set Launch CSM to fully support the Windows® Security Update and Security Boot. Boot Device Control [UEFI...
... PCI-E expansion devices that you want to launch. Chapter 3 3-18 Chapter 3: BIOS Setup Configuration options: [Ignore] [Legacy only] [UEFI driver first] Boot from unauthorized access and malwares during system startup, press when the ASUS Logo appears. For better compatibility, enable the CSM to fully support the non-UEFI driver add-on devices. The following four items appear when you set Launch CSM to fully support the Windows® Security Update and Security Boot. Boot Device Control [UEFI...

STRIX B350-F GAMING Users ManualEnglish
Page 70
... a USB flash drive. You can cause system boot failure! Insert the motherboard support DVD to the optical drive, or the USB flash drive containing the BIOS file to recover the BIOS setting. The system requires you press to load default BIOS values. To ensure system compatibility and stability, we recommend that you to enter BIOS Setup to the USB port. 3. Recovering the BIOS To recover the BIOS: 1. The utility automatically checks the devices for the BIOS file. Chapter 3 3-24 Chapter 3: BIOS Setup Turn on...
... a USB flash drive. You can cause system boot failure! Insert the motherboard support DVD to the optical drive, or the USB flash drive containing the BIOS file to recover the BIOS setting. The system requires you press to load default BIOS values. To ensure system compatibility and stability, we recommend that you to enter BIOS Setup to the USB port. 3. Recovering the BIOS To recover the BIOS: 1. The utility automatically checks the devices for the BIOS file. Chapter 3 3-24 Chapter 3: BIOS Setup Turn on...

STRIX B350-F GAMING Users ManualEnglish
Page 72
... install the SATA hard disks for the corresponding OS version. Connect the SATA signal cables. 3. For optimal performance, install identical drives of the device you to load the UEFI driver for Windows® OS: 1. To set up a Windows® UEFI operating system under RAID mode, ensure to select the installation media containing the RAID driver. 2. Click the name of the same model and capacity when creating a disk array. 4.1.2 Installing Serial ATA hard disks The motherboard supports Serial ATA hard disk drives. Install the SATA hard disks into the USB port, and...
... install the SATA hard disks for the corresponding OS version. Connect the SATA signal cables. 3. For optimal performance, install identical drives of the device you to load the UEFI driver for Windows® OS: 1. To set up a Windows® UEFI operating system under RAID mode, ensure to select the installation media containing the RAID driver. 2. Click the name of the same model and capacity when creating a disk array. 4.1.2 Installing Serial ATA hard disks The motherboard supports Serial ATA hard disk drives. Install the SATA hard disks into the USB port, and...


