User Guide
Page 2
...only for which is distributed without any means, except documentation kept by sending a request to the extent permitted by ASUS; If however you encounter any problems in this manual may or may obtain it for a period of three years after our last shipment of the product, either (1)..., transmitted, transcribed, stored in a retrieval system, or translated into any language in writing by the applicable law. to infringe. ii ASUS PROVIDES THIS MANUAL "AS IS" WITHOUT WARRANTY OF ANY KIND, EITHER EXPRESS OR IMPLIED, INCLUDING BUT NOT LIMITED TO THE IMPLIED WARRANTIES OR CONDITIONS OF ...
...only for which is distributed without any means, except documentation kept by sending a request to the extent permitted by ASUS; If however you encounter any problems in this manual may or may obtain it for a period of three years after our last shipment of the product, either (1)..., transmitted, transcribed, stored in a retrieval system, or translated into any language in writing by the applicable law. to infringe. ii ASUS PROVIDES THIS MANUAL "AS IS" WITHOUT WARRANTY OF ANY KIND, EITHER EXPRESS OR IMPLIED, INCLUDING BUT NOT LIMITED TO THE IMPLIED WARRANTIES OR CONDITIONS OF ...
User Guide
Page 5
.... These devices could interrupt the grounding circuit. • Ensure that your power supply is broken, do not try to fix it , carefully read all the manuals that came with the product, contact a qualified service technician or your dealer immediately. • To avoid short circuits, keep paper clips, screws, and staples away...
.... These devices could interrupt the grounding circuit. • Ensure that your power supply is broken, do not try to fix it , carefully read all the manuals that came with the product, contact a qualified service technician or your dealer immediately. • To avoid short circuits, keep paper clips, screws, and staples away...
User Guide
Page 7
... keys simultaneously, the key names are linked with a plus sign (+). If you perform certain tasks properly, take note of the following symbols used throughout this manual.
... keys simultaneously, the key names are linked with a plus sign (+). If you perform certain tasks properly, take note of the following symbols used throughout this manual.
User Guide
Page 49
...Basic Input and Output System) stores system hardware settings such as B250IG.CAP for system startup in the motherboard CMOS. Chapter 3 ASUS STRIX B250I GAMING 3-1 Inappropriate BIOS settings may result to ensure optimal performance. When downloading or updating the BIOS file, rename it as storage device...configuration that you change the default BIOS settings except in this motherboard. We strongly recommend that are needed for this user manual refers to "UEFI BIOS" unless otherwise specified. In normal circumstances, the default BIOS settings apply to most conditions to ...
...Basic Input and Output System) stores system hardware settings such as B250IG.CAP for system startup in the motherboard CMOS. Chapter 3 ASUS STRIX B250I GAMING 3-1 Inappropriate BIOS settings may result to ensure optimal performance. When downloading or updating the BIOS file, rename it as storage device...configuration that you change the default BIOS settings except in this motherboard. We strongly recommend that are needed for this user manual refers to "UEFI BIOS" unless otherwise specified. In normal circumstances, the default BIOS settings apply to most conditions to ...
User Guide
Page 50
Select the Load Optimized Defaults item under two modes: EZ Mode and Advanced Mode. Please visit ASUS website for reference purposes only, and may not exactly match what you see on your screen. • Ensure that a USB mouse is connected to your ... enter BIOS Setup after changing any BIOS setting, load the default settings to the default value. Do this section are for the detailed BIOS content manual. 3.2 BIOS setup program Use the BIOS Setup to enter BIOS Setup using the BIOS Setup program.
Select the Load Optimized Defaults item under two modes: EZ Mode and Advanced Mode. Please visit ASUS website for reference purposes only, and may not exactly match what you see on your screen. • Ensure that a USB mouse is connected to your ... enter BIOS Setup after changing any BIOS setting, load the default settings to the default value. Do this section are for the detailed BIOS content manual. 3.2 BIOS setup program Use the BIOS Setup to enter BIOS Setup using the BIOS Setup program.
User Guide
Page 51
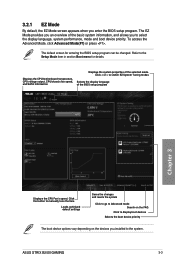
.... The EZ Mode provides you to select the display language, system performance, mode and boot device priority. ASUS STRIX B250I GAMING 3-3 To access the Advanced Mode, click Advanced Mode(F7) or press . Click the button to manually tune the fans Loads optimized default settings Saves the changes and resets the system Click to go to...
.... The EZ Mode provides you to select the display language, system performance, mode and boot device priority. ASUS STRIX B250I GAMING 3-3 To access the Advanced Mode, click Advanced Mode(F7) or press . Click the button to manually tune the fans Loads optimized default settings Saves the changes and resets the system Click to go to...
User Guide
Page 53
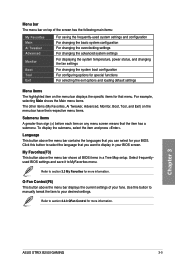
... loading default settings Menu items The highlighted item on any menu screen means that the item has a submenu. Click this button to manually tweak the fans to MyFavorites menu. Chapter 3 ASUS STRIX B250I GAMING 3-5 Refer to select the language that menu. My Favorites(F3) This button above the menu bar contains the languages that you...
... loading default settings Menu items The highlighted item on any menu screen means that the item has a submenu. Click this button to manually tweak the fans to MyFavorites menu. Chapter 3 ASUS STRIX B250I GAMING 3-5 Refer to select the language that menu. My Favorites(F3) This button above the menu bar contains the languages that you...
User Guide
Page 55
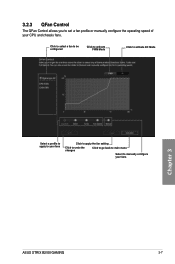
Click to select a fan to be configured Click to activate PWM Mode Click to activate DC Mode Select a profile to apply to your fans Click to apply the fan setting Click to undo the changes Click to go back to main menu Select to set a fan profile or manually configure the operating speed of your fans Chapter 3 ASUS STRIX B250I GAMING 3-7 3.2.3 QFan Control The QFan Control allows you to manually configure your CPU and chassis fans.
Click to select a fan to be configured Click to activate PWM Mode Click to activate DC Mode Select a profile to apply to your fans Click to apply the fan setting Click to undo the changes Click to go back to main menu Select to set a fan profile or manually configure the operating speed of your fans Chapter 3 ASUS STRIX B250I GAMING 3-7 3.2.3 QFan Control The QFan Control allows you to manually configure your CPU and chassis fans.
User Guide
Page 56
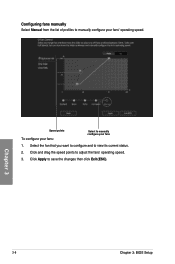
Configuring fans manually Select Manual from the list of profiles to manually configure your fans 1. Chapter 3 Speed points To configure your fans: Select to adjust the fans' operating speed. 3. Select the fan that you want to configure and to save the changes then click Exit (ESC). 3-8 Chapter 3: BIOS Setup Click Apply to view its current status. 2. Click and drag the speed points to manually configure your fans' operating speed.
Configuring fans manually Select Manual from the list of profiles to manually configure your fans 1. Chapter 3 Speed points To configure your fans: Select to adjust the fans' operating speed. 3. Select the fan that you want to configure and to save the changes then click Exit (ESC). 3-8 Chapter 3: BIOS Setup Click Apply to view its current status. 2. Click and drag the speed points to manually configure your fans' operating speed.
User Guide
Page 64
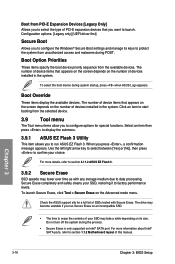
... the contents of your SSD may lower over time as with Secure Erase. Secure Erase completely and safely cleans your choice. Check the ASUS support site for special functions. The number of device items that appears on the screen depends on the number of SSDs tested with any...section 1.1.2 Motherboard layout of devices installed in the system. For more details, refer to section 3.11.2 ASUS EZ Flash 3. 3.9.2 Secure Erase SSD speeds may take a while depending on the number of this manual. Use the left/right arrow key to select between [Yes] or [No], then press to confirm your...
... the contents of your SSD may lower over time as with Secure Erase. Secure Erase completely and safely cleans your choice. Check the ASUS support site for special functions. The number of device items that appears on the screen depends on the number of SSDs tested with any...section 1.1.2 Motherboard layout of devices installed in the system. For more details, refer to section 3.11.2 ASUS EZ Flash 3. 3.9.2 Secure Erase SSD speeds may take a while depending on the number of this manual. Use the left/right arrow key to select between [Yes] or [No], then press to confirm your...
User Guide
Page 66
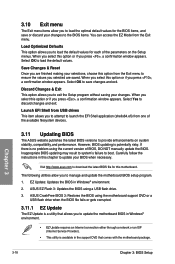
.... Load Optimized Defaults This option allows you to attempt to launch the EFI Shell application (shellx64.efi) from one of BIOS, DO NOT manually update the BIOS. Select Yes to download the latest BIOS file for the BIOS items, and save changes and exit. When you select this... follow the instructions in Windows® environment. 2. Chapter 3 3-18 Chapter 3: BIOS Setup Save Changes & Reset Once you are saved. Visit http://www.asus.com to discard changes and exit. 3.10 Exit menu The Exit menu items allow you to exit the Setup program without saving your changes. Select...
.... Load Optimized Defaults This option allows you to attempt to launch the EFI Shell application (shellx64.efi) from one of BIOS, DO NOT manually update the BIOS. Select Yes to download the latest BIOS file for the BIOS items, and save changes and exit. When you select this... follow the instructions in Windows® environment. 2. Chapter 3 3-18 Chapter 3: BIOS Setup Save Changes & Reset Once you are saved. Visit http://www.asus.com to discard changes and exit. 3.10 Exit menu The Exit menu items allow you to exit the Setup program without saving your changes. Select...


