
User Guide
Page 1
Motherboard STRIX B250I GAMING
Motherboard STRIX B250I GAMING
User Guide
Page 3
... information...v About this guide...vi STRIX B250I GAMING specifications summary viii Package contents...xii Installation tools and components xiii Chapter 1: Product Introduction 1.1 Motherboard overview 1-1 1.1.1 Before you proceed 1-1 1.1.2 Motherboard layout 1-2 1.1.3 Central Processing Unit (CPU 1-4 1.1.4 System memory 1-5 1.1.5 Expansion slots 1-7 1.1.6 Headers 1-8 1.1.7 Onboard LEDs 1-10 1.1.8 Internal connectors 1-11 Chapter 2: Basic Installation 2.1 Building your PC system 2-1 2.1.1 Motherboard installation 2-1 2.1.2 CPU installation 2-3 2.1.3 CPU...
... information...v About this guide...vi STRIX B250I GAMING specifications summary viii Package contents...xii Installation tools and components xiii Chapter 1: Product Introduction 1.1 Motherboard overview 1-1 1.1.1 Before you proceed 1-1 1.1.2 Motherboard layout 1-2 1.1.3 Central Processing Unit (CPU 1-4 1.1.4 System memory 1-5 1.1.5 Expansion slots 1-7 1.1.6 Headers 1-8 1.1.7 Onboard LEDs 1-10 1.1.8 Internal connectors 1-11 Chapter 2: Basic Installation 2.1 Building your PC system 2-1 2.1.1 Motherboard installation 2-1 2.1.2 CPU installation 2-3 2.1.3 CPU...
User Guide
Page 5
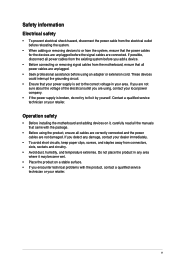
...Contact a qualified service technician or your dealer immediately. • To avoid short circuits, keep paper clips, screws, and staples away from the motherboard, ensure that the power cables for the devices are unplugged before the signal cables are connected. If you add a device. • Before connecting...8226; Avoid dust, humidity, and temperature extremes. Do not place the product in your retailer. Operation safety • Before installing the motherboard and adding devices on it, carefully read all the manuals that your power supply is broken, do not try to fix it may ...
...Contact a qualified service technician or your dealer immediately. • To avoid short circuits, keep paper clips, screws, and staples away from the motherboard, ensure that the power cables for the devices are unplugged before the signal cables are connected. If you add a device. • Before connecting...8226; Avoid dust, humidity, and temperature extremes. Do not place the product in your retailer. Operation safety • Before installing the motherboard and adding devices on it, carefully read all the manuals that your power supply is broken, do not try to fix it may ...
User Guide
Page 6
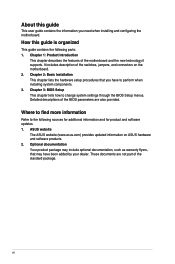
... added by your dealer. Where to find more information Refer to change system settings through the BIOS Setup menus. vi ASUS website The ASUS website (www.asus.com) provides updated information on the motherboard. 2. It includes description of the standard package. These documents are also provided. Chapter 1: Product Introduction This chapter describes the features...
... added by your dealer. Where to find more information Refer to change system settings through the BIOS Setup menus. vi ASUS website The ASUS website (www.asus.com) provides updated information on the motherboard. 2. It includes description of the standard package. These documents are also provided. Chapter 1: Product Introduction This chapter describes the features...

User Guide
Page 9
... up to Windows® 7 limitations, 32-bit playback is unavailable for front and rear headphone outputs - Sonic Radar III - STRIX B250I GAMING specifications summary Storage Audio LAN ROG Exclusive Features Intel® B250 Chipset and Intel® Rapid Storage Technology 15 support - 4 x SATA 6Gb/s ports - 1... layer (PHY) Anti-surge LANGuard ROG GameFirst IV* * ROG GameFirst Technology is only supported when using Intel® OptaneTM memory modules, ensure that you have updated your motherboard drivers and BIOS to the latest version from ASUS support website. Intel® I219-V...
... up to Windows® 7 limitations, 32-bit playback is unavailable for front and rear headphone outputs - Sonic Radar III - STRIX B250I GAMING specifications summary Storage Audio LAN ROG Exclusive Features Intel® B250 Chipset and Intel® Rapid Storage Technology 15 support - 4 x SATA 6Gb/s ports - 1... layer (PHY) Anti-surge LANGuard ROG GameFirst IV* * ROG GameFirst Technology is only supported when using Intel® OptaneTM memory modules, ensure that you have updated your motherboard drivers and BIOS to the latest version from ASUS support website. Intel® I219-V...
User Guide
Page 12
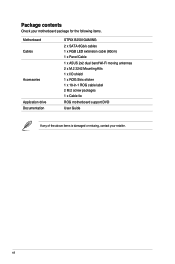
xii Package contents Check your motherboard package for the following items. Motherboard Cables Accessories Application drive Documentation STRIX B250I GAMING 2 x SATA 6Gb/s cables 1 x RGB LED extension cable (80cm) 1 x Panel Cable 1 x ASUS 2x2 dual band Wi-Fi moving antennas 2 x M.2 2242 Mounting Kits 1 x I/O shield 1 x ROG Strix sticker 1 x 10-in-1 ROG cable label 2 M.2 screw packages 1 x Cable tie ROG motherboard support DVD User Guide If any of the above items is damaged or missing, contact your retailer.
xii Package contents Check your motherboard package for the following items. Motherboard Cables Accessories Application drive Documentation STRIX B250I GAMING 2 x SATA 6Gb/s cables 1 x RGB LED extension cable (80cm) 1 x Panel Cable 1 x ASUS 2x2 dual band Wi-Fi moving antennas 2 x M.2 2242 Mounting Kits 1 x I/O shield 1 x ROG Strix sticker 1 x 10-in-1 ROG cable label 2 M.2 screw packages 1 x Cable tie ROG motherboard support DVD User Guide If any of the above items is damaged or missing, contact your retailer.
User Guide
Page 13
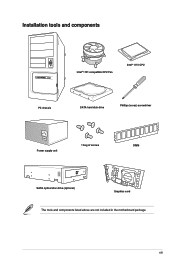
Installation tools and components Intel® 1151 compatible CPU Fan Intel® 1151 CPU PC chassis SATA hard disk drive Phillips (cross) screwdriver Power supply unit 1 bag of screws DIMM SATA optical disc drive (optional) Graphics card The tools and components listed above are not included in the motherboard package. xiii
Installation tools and components Intel® 1151 compatible CPU Fan Intel® 1151 CPU PC chassis SATA hard disk drive Phillips (cross) screwdriver Power supply unit 1 bag of screws DIMM SATA optical disc drive (optional) Graphics card The tools and components listed above are not included in the motherboard package. xiii
User Guide
Page 15
... 1 1.1 Motherboard overview 1.1.1 Before you proceed Take note of the following precautions before you install motherboard components or change any motherboard settings. • Unplug the power cord from the wall socket before touching any component, ensure that the ATX power supply is switched off or the power cord is detached from the power supply. ASUS STRIX B250I GAMING 1-1
... 1 1.1 Motherboard overview 1.1.1 Before you proceed Take note of the following precautions before you install motherboard components or change any motherboard settings. • Unplug the power cord from the wall socket before touching any component, ensure that the ATX power supply is switched off or the power cord is detached from the power supply. ASUS STRIX B250I GAMING 1-1
User Guide
Page 17
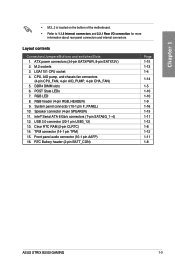
... header (2-pin BATT_CON) Page 1-15 1-13 1-4 1-14 1-5 1-10 1-10 1-9 1-16 1-15 1-11 1-12 1-8 1-12 1-11 1-8 ASUS STRIX B250I GAMING 1-3 RGB header (4-pin RGB_HEADER) 9. TPM connector (14-1 pin TPM) 15. Chapter 1 • M.2_2 is located on the bottom of the motherboard. • Refer to 1.1.8 Internal connectors and 2.2.1 Rear I/O connection for more information about rear panel connectors...
... header (2-pin BATT_CON) Page 1-15 1-13 1-4 1-14 1-5 1-10 1-10 1-9 1-16 1-15 1-11 1-12 1-8 1-12 1-11 1-8 ASUS STRIX B250I GAMING 1-3 RGB header (4-pin RGB_HEADER) 9. TPM connector (14-1 pin TPM) 15. Chapter 1 • M.2_2 is located on the bottom of the motherboard. • Refer to 1.1.8 Internal connectors and 2.2.1 Rear I/O connection for more information about rear panel connectors...
User Guide
Page 18
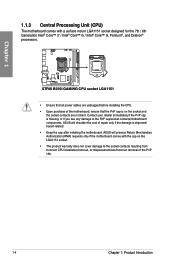
...cap on the socket and the socket contacts are unplugged before installing the CPU. • Upon purchase of the motherboard, ensure that all power cables are not bent. STRIX B250I GAMING CPU socket LGA1151 • Ensure that the PnP cap is on the LGA1151 socket. • The product ... only if the damage is missing, or if you see any damage to the PnP cap/socket contacts/motherboard components. ASUS will process Return Merchandise Authorization (RMA) requests only if the motherboard comes with a surface mount LGA1151 socket designed for the 7th / 6th Generation Intel® Core™...
...cap on the socket and the socket contacts are unplugged before installing the CPU. • Upon purchase of the motherboard, ensure that all power cables are not bent. STRIX B250I GAMING CPU socket LGA1151 • Ensure that the PnP cap is on the LGA1151 socket. • The product ... only if the damage is missing, or if you see any damage to the PnP cap/socket contacts/motherboard components. ASUS will process Return Merchandise Authorization (RMA) requests only if the motherboard comes with a surface mount LGA1151 socket designed for the 7th / 6th Generation Intel® Core™...

User Guide
Page 19
DIMM_A1 DIMM_B1 Chapter 1 1.1.4 System memory The motherboard comes with two DDR4 (Double Data Rate 4) Dual Inline Memory Modules (DIMM) slots. STRIX B250I GAMING 288-pin DDR4 DIMM sockets Recommended memory configurations ASUS STRIX B250I GAMING 1-5 DO NOT install a DDR, DDR2, or DDR3 memory module to the DDR4 slot. A DDR4 module is notched differently from a DDR, DDR2, or DDR3 module.
DIMM_A1 DIMM_B1 Chapter 1 1.1.4 System memory The motherboard comes with two DDR4 (Double Data Rate 4) Dual Inline Memory Modules (DIMM) slots. STRIX B250I GAMING 288-pin DDR4 DIMM sockets Recommended memory configurations ASUS STRIX B250I GAMING 1-5 DO NOT install a DDR, DDR2, or DDR3 memory module to the DDR4 slot. A DDR4 module is notched differently from a DDR, DDR2, or DDR3 module.

User Guide
Page 20
...frequency than the vendor-marked value. • For system stability, use of memory, we recommend that you install 4GB or more on the motherboard, the actual usable memory for single-channel operation. • Due to the physical characteristics of accessing information from the same vendor. Under ...the CPU's capabilities and other installed devices. • Always install the DIMMS with the vendor to get the correct memory modules. • ASUS exclusively provides hyper DIMM support function. • Hyper DIMM support is then mapped for the OS can be about 3GB or less. Load ...
...frequency than the vendor-marked value. • For system stability, use of memory, we recommend that you install 4GB or more on the motherboard, the actual usable memory for single-channel operation. • Due to the physical characteristics of accessing information from the same vendor. Under ...the CPU's capabilities and other installed devices. • Always install the DIMMS with the vendor to get the correct memory modules. • ASUS exclusively provides hyper DIMM support function. • Hyper DIMM support is then mapped for the OS can be about 3GB or less. Load ...
User Guide
Page 21
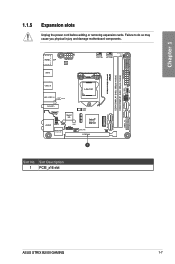
Chapter 1 1.1.5 Expansion slots Unplug the power cord before adding or removing expansion cards. Failure to do so may cause you physical injury and damage motherboard components. Slot Description 1 PCIE_x16 slot ASUS STRIX B250I GAMING 1-7 HDMI DP USB78 EATX12V DIGI +VRM CPU_FAN AIO_PUMP BOOT_DEVICE_LED VGA_LED DRAM_LED CPU_LED RGBLED EATXPWR SATA6G_2 SATA6G_1 SPEAKER F_PANEL RGB_HEADER DDR4 DIMM_B1 (64bit...
Chapter 1 1.1.5 Expansion slots Unplug the power cord before adding or removing expansion cards. Failure to do so may cause you physical injury and damage motherboard components. Slot Description 1 PCIE_x16 slot ASUS STRIX B250I GAMING 1-7 HDMI DP USB78 EATX12V DIGI +VRM CPU_FAN AIO_PUMP BOOT_DEVICE_LED VGA_LED DRAM_LED CPU_LED RGBLED EATXPWR SATA6G_2 SATA6G_1 SPEAKER F_PANEL RGB_HEADER DDR4 DIMM_B1 (64bit...

User Guide
Page 23
...) This header is detached from the power supply. RGB_HEADER B R G +12V PIN 1 STRIX B250I GAMING RGB HEADER The RGB header supports 5050 RGB multi-color LED strips (12V/G/R/B), with the 12V header on the motherboard. • The LED strip will vary with LED strip. • If your LED strip... does not light up when the system is aligned with a maximum power rating of 2A (12V), and no longer than 2 m. ASUS STRIX B250I GAMING 1-9 Chapter 1 3.
...) This header is detached from the power supply. RGB_HEADER B R G +12V PIN 1 STRIX B250I GAMING RGB HEADER The RGB header supports 5050 RGB multi-color LED strips (12V/G/R/B), with the 12V header on the motherboard. • The LED strip will vary with LED strip. • If your LED strip... does not light up when the system is aligned with a maximum power rating of 2A (12V), and no longer than 2 m. ASUS STRIX B250I GAMING 1-9 Chapter 1 3.
User Guide
Page 25
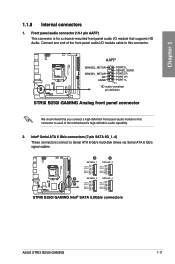
...174; Serial ATA 6 Gb/s connectors (7-pin SATA 6G_1~4) These connectors connect to this connector to avail of the motherboard's high-definition audio capability. 2. Chapter 1 1.1.8 Internal connectors 1. Connect one end of the front panel audio I ... GND A SATA6G_2 SATA6G_4 GND GND B RSATA_TXP2 RSATA_TXN2 RSATA_TXP4 RSATA_TXN4 GND GND RSATA_RXN2 RSATA_RXN4 RSATA_RXP2 RSATA_RXP4 GND GND STRIX B250I GAMING Intel® SATA 6.0Gb/s connectors ASUS STRIX B250I GAMING 1-11 Front panel audio connector (10-1 pin AAFP) This connector is for a chassis-mounted front panel ...
...174; Serial ATA 6 Gb/s connectors (7-pin SATA 6G_1~4) These connectors connect to this connector to avail of the motherboard's high-definition audio capability. 2. Chapter 1 1.1.8 Internal connectors 1. Connect one end of the front panel audio I ... GND A SATA6G_2 SATA6G_4 GND GND B RSATA_TXP2 RSATA_TXN2 RSATA_TXP4 RSATA_TXN4 GND GND RSATA_RXN2 RSATA_RXN4 RSATA_RXP2 RSATA_RXP4 GND GND STRIX B250I GAMING Intel® SATA 6.0Gb/s connectors ASUS STRIX B250I GAMING 1-11 Front panel audio connector (10-1 pin AAFP) This connector is for a chassis-mounted front panel ...
User Guide
Page 28
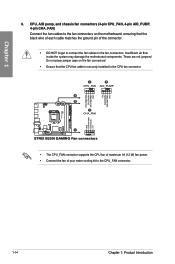
... PWM CPU FAN IN CPU FAN PWR GND +5V CHA FAN IN CHA FAN PWR GND A B C CHA_FAN GND CHA FAN PWR CHA FAN IN +5V C STRIX B250I GAMING Fan connectors • The CPU_FAN connector supports the CPU fan of maximum 1A (12 W) fan power. • Connect the fan of the connector. • DO... cable matches the ground pin of your water cooling kit to the CPU_FAN connector. 1-14 Chapter 1: Product Introduction Do not place jumper caps on the motherboard, ensuring that the CPU fan cable is securely installed to the CPU fan connector. Insufficient air flow inside the system may damage the...
... PWM CPU FAN IN CPU FAN PWR GND +5V CHA FAN IN CHA FAN PWR GND A B C CHA_FAN GND CHA FAN PWR CHA FAN IN +5V C STRIX B250I GAMING Fan connectors • The CPU_FAN connector supports the CPU fan of maximum 1A (12 W) fan power. • Connect the fan of the connector. • DO... cable matches the ground pin of your water cooling kit to the CPU_FAN connector. 1-14 Chapter 1: Product Introduction Do not place jumper caps on the motherboard, ensuring that the CPU fan cable is securely installed to the CPU fan connector. Insufficient air flow inside the system may damage the...

User Guide
Page 31
Chapter 2 ASUS STRIX B250I GAMING 2-1 The motherboard layout may vary with models, but the installation steps are for all models. 2.1.1 Motherboard installation 1. Install the ASUS Q-Shield to the chassis' rear I /O panel. 2. Chapter 2: Basic Installation Basic Installation 2.1 Building your PC system 2 The diagrams in this section are the same for reference only. Place the motherboard into the chassis, ensuring that its rear I/O ports are aligned to the chassis rear I /O panel.
Chapter 2 ASUS STRIX B250I GAMING 2-1 The motherboard layout may vary with models, but the installation steps are for all models. 2.1.1 Motherboard installation 1. Install the ASUS Q-Shield to the chassis' rear I /O panel. 2. Chapter 2: Basic Installation Basic Installation 2.1 Building your PC system 2 The diagrams in this section are the same for reference only. Place the motherboard into the chassis, ensuring that its rear I/O ports are aligned to the chassis rear I /O panel.
User Guide
Page 32
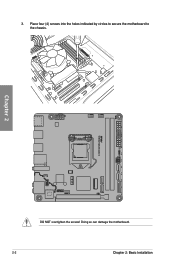
Chapter 2 DO NOT overtighten the screws! Doing so can damage the motherboard. 2-2 Chapter 2: Basic Installation Place four (4) screws into the holes indicated by circles to secure the motherboard to the chassis. 3.
Chapter 2 DO NOT overtighten the screws! Doing so can damage the motherboard. 2-2 Chapter 2: Basic Installation Place four (4) screws into the holes indicated by circles to secure the motherboard to the chassis. 3.
User Guide
Page 42
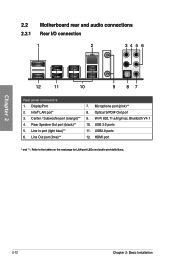
... for LAN port LEDs and audio port definitions. DisplayPort 2. Rear Speaker Out port (black)** 5. Chapter 2 2-12 Chapter 2: Basic Installation Microphone port (pink)** 8. USB2.0 ports 12. 2.2 Motherboard rear and audio connections 2.2.1 Rear I/O connection 1 2 345 6 12 11 10 9 87 Rear panel connectors 1. Line Out port (lime)** 7. Intel® LAN port* 3. USB 3.0 ports 11...
... for LAN port LEDs and audio port definitions. DisplayPort 2. Rear Speaker Out port (black)** 5. Chapter 2 2-12 Chapter 2: Basic Installation Microphone port (pink)** 8. USB2.0 ports 12. 2.2 Motherboard rear and audio connections 2.2.1 Rear I/O connection 1 2 345 6 12 11 10 9 87 Rear panel connectors 1. Line Out port (lime)** 7. Intel® LAN port* 3. USB 3.0 ports 11...
User Guide
Page 49
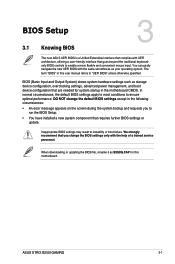
...user manual refers to "UEFI BIOS" unless otherwise specified. Chapter 3: BIOS Setup BIOS Setup 3.1 Knowing BIOS 3 The new ASUS UEFI BIOS is a Unified Extensible Interface that complies with UEFI architecture, offering a user-friendly interface that goes beyond the ...instability or boot failure. The term "BIOS" in the motherboard CMOS. BIOS (Basic Input and Output System) stores system hardware settings such as B250IG.CAP for system startup in this motherboard. Chapter 3 ASUS STRIX B250I GAMING 3-1 Inappropriate BIOS settings may result to enable a more flexible...
...user manual refers to "UEFI BIOS" unless otherwise specified. Chapter 3: BIOS Setup BIOS Setup 3.1 Knowing BIOS 3 The new ASUS UEFI BIOS is a Unified Extensible Interface that complies with UEFI architecture, offering a user-friendly interface that goes beyond the ...instability or boot failure. The term "BIOS" in the motherboard CMOS. BIOS (Basic Input and Output System) stores system hardware settings such as B250IG.CAP for system startup in this motherboard. Chapter 3 ASUS STRIX B250I GAMING 3-1 Inappropriate BIOS settings may result to enable a more flexible...


