User Guide
Page 3
Contents Safety information...vi About this guide...vii ROG MAXIMUS X CODE specifications summary ix Package contents...xv Installation tools and components xvi Chapter 1: Product Introduction 1.1 Motherboard ... connection 2-7 2.1.6 SATA device connection 2-7 2.1.7 Front I/O connector 2-8 2.1.8 Expansion card installation 2-9 2.1.9 M.2 installation 2-10 2.1.10 Wi-Fi antenna installation 2-11 2.2 BIOS update utility 2-12 2.3 Motherboard rear and audio connections 2-13 2.3.1 Rear I/O connection 2-13 2.3.2 Audio I/O connections 2-15 2.4 Starting up for the first time 2-17...
Contents Safety information...vi About this guide...vii ROG MAXIMUS X CODE specifications summary ix Package contents...xv Installation tools and components xvi Chapter 1: Product Introduction 1.1 Motherboard ... connection 2-7 2.1.6 SATA device connection 2-7 2.1.7 Front I/O connector 2-8 2.1.8 Expansion card installation 2-9 2.1.9 M.2 installation 2-10 2.1.10 Wi-Fi antenna installation 2-11 2.2 BIOS update utility 2-12 2.3 Motherboard rear and audio connections 2-13 2.3.1 Rear I/O connection 2-13 2.3.2 Audio I/O connections 2-15 2.4 Starting up for the first time 2-17...
User Guide
Page 4
... SMART Information 3-19 3.6.12 USB Configuration 3-20 3.7 Monitor menu 3-20 3.8 Boot menu 3-20 3.9 Tool menu 3-22 3.9.1 ASUS EZ Flash 3 Utility 3-22 3.9.2 Secure Erase 3-22 3.9.3 ASUS Overclocking Profile 3-24 3.9.4 ASUS SPD Information 3-24 3.9.5 Graphics Card Information 3-24 3.10 Exit menu 3-25 3.11 Updating BIOS 3-26 3.11.1 EZ Update 3-26 3.11.2 ASUS EZ Flash 3 3-27 3.11.3 ASUS CrashFree BIOS 3 3-29 iv
... SMART Information 3-19 3.6.12 USB Configuration 3-20 3.7 Monitor menu 3-20 3.8 Boot menu 3-20 3.9 Tool menu 3-22 3.9.1 ASUS EZ Flash 3 Utility 3-22 3.9.2 Secure Erase 3-22 3.9.3 ASUS Overclocking Profile 3-24 3.9.4 ASUS SPD Information 3-24 3.9.5 Graphics Card Information 3-24 3.10 Exit menu 3-25 3.11 Updating BIOS 3-26 3.11.1 EZ Update 3-26 3.11.2 ASUS EZ Flash 3 3-27 3.11.3 ASUS CrashFree BIOS 3 3-29 iv
User Guide
Page 7
... package may have to perform when installing system components. • Chapter 3: BIOS Setup This chapter tells how to the following parts: • Chapter 1: Product Introduction This chapter describes the features of the standard package. ASUS website The ASUS website (www.asus.com) provides updated information on the motherboard. • Chapter 2: Basic Installation This chapter lists...
... package may have to perform when installing system components. • Chapter 3: BIOS Setup This chapter tells how to the following parts: • Chapter 1: Product Introduction This chapter describes the features of the standard package. ASUS website The ASUS website (www.asus.com) provides updated information on the motherboard. • Chapter 2: Basic Installation This chapter lists...
User Guide
Page 10
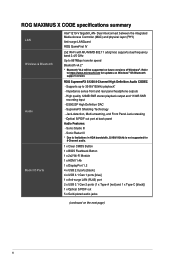
... on future versions of Windows®. SupremeFX Shielding Technology - Sonic Studio III - ROG SupremeFX S1220 8-Channel High Definition Audio CODEC - ES9023P High Definition DAC - ROG MAXIMUS X CODE specifications summary LAN Wireless & Bluetooth Audio Back I/O Ports Intel® I219-V Gigabit...playback* - Refer to limitations in HDA bandwidth, 32-Bit/192kHz is not supported for updates on the next page) x Sonic Radar III * Due to https://www.microsoft.com for 8-Channel audio. 1 x Clear CMOS Button 1 x BIOS Flashback Button 1 x 2x2 Wi-Fi Module 1 x HDMI 1.4b 1 x DisplayPort...
... on future versions of Windows®. SupremeFX Shielding Technology - Sonic Studio III - ROG SupremeFX S1220 8-Channel High Definition Audio CODEC - ES9023P High Definition DAC - ROG MAXIMUS X CODE specifications summary LAN Wireless & Bluetooth Audio Back I/O Ports Intel® I219-V Gigabit...playback* - Refer to limitations in HDA bandwidth, 32-Bit/192kHz is not supported for updates on the next page) x Sonic Radar III * Due to https://www.microsoft.com for 8-Channel audio. 1 x Clear CMOS Button 1 x BIOS Flashback Button 1 x 2x2 Wi-Fi Module 1 x HDMI 1.4b 1 x DisplayPort...
User Guide
Page 26
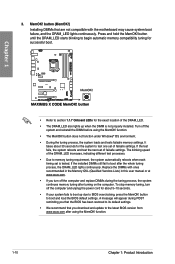
... POST reminding you that the BIOS has been restored to its default settings. • We recommend that are not compatible with ones recommended in the Memory QVL (Qualified Vendors Lists) in this user manual or at www.asus.com. • If you download and update to test one set of... DRAM_LED also lights up due to boot after using the MemOK! button to section 1.1.7 Onboard LEDs for the system to the latest BIOS version from www.asus.com after the whole tuning process, the DRAM_LED lights continuously. Replace the DIMMs with the motherboard may cause system boot failure, and ...
... POST reminding you that the BIOS has been restored to its default settings. • We recommend that are not compatible with ones recommended in the Memory QVL (Qualified Vendors Lists) in this user manual or at www.asus.com. • If you download and update to test one set of... DRAM_LED also lights up due to boot after using the MemOK! button to section 1.1.7 Onboard LEDs for the system to the latest BIOS version from www.asus.com after the whole tuning process, the DRAM_LED lights continuously. Replace the DIMMs with the motherboard may cause system boot failure, and ...
User Guide
Page 54
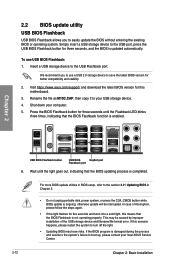
... better compatibility and stability. 2. Chapter 2 USB BIOS Flashback button USB BIOS KeyBot port Flashback port 6. For more BIOS update utilities in BIOS setup, refer to boot up, please contact your USB storage device. 4. If this scenario happens, please restart the system to the USB Flashback port. Visit https://www.asus.com/support/ and download the latest...
... better compatibility and stability. 2. Chapter 2 USB BIOS Flashback button USB BIOS KeyBot port Flashback port 6. For more BIOS update utilities in BIOS setup, refer to boot up, please contact your USB storage device. 4. If this scenario happens, please restart the system to the USB Flashback port. Visit https://www.asus.com/support/ and download the latest...
User Guide
Page 55
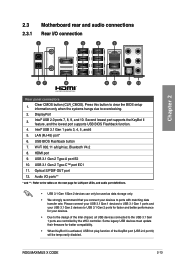
Intel® USB 2.0 ports 7, 8, 9, and 10. USB BIOS Flashback button 7. USB 3.1 Gen 2 Type-C™ port EC1 11. ROG MAXIMUS X CODE 2-13 DisplayPort 3. LAN (RJ-45) port* 6. USB 3.1 Gen 2 Type-A port E2 10. 2.3 Motherboard rear and audio connections 2.3.1 Rear I /O ports** .... Second lowest port supports the KeyBot II feature, and the lowest port supports USB BIOS Flashback function. 4. Audio I /O connection Chapter 2 Rear panel connectors 1. Some legacy USB devices must update their firmware for better compatibility. • When KeyBot II is activated, USB hot ...
Intel® USB 2.0 ports 7, 8, 9, and 10. USB BIOS Flashback button 7. USB 3.1 Gen 2 Type-C™ port EC1 11. ROG MAXIMUS X CODE 2-13 DisplayPort 3. LAN (RJ-45) port* 6. USB 3.1 Gen 2 Type-A port E2 10. 2.3 Motherboard rear and audio connections 2.3.1 Rear I /O ports** .... Second lowest port supports the KeyBot II feature, and the lowest port supports USB BIOS Flashback function. 4. Audio I /O connection Chapter 2 Rear panel connectors 1. Some legacy USB devices must update their firmware for better compatibility. • When KeyBot II is activated, USB hot ...
User Guide
Page 61
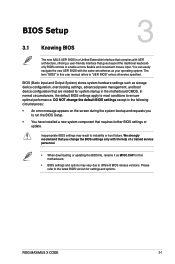
...; When downloading or updating the BIOS file, rename it as M10C.CAP for this user manual refers to "UEFI BIOS" unless otherwise specified. Chapter 3 ROG MAXIMUS X CODE 3-1 You can easily navigate the new UEFI BIOS with the same smoothness...BIOS settings or update. Inappropriate BIOS settings may vary due to different BIOS release versions. Please refer to the latest BIOS version for settings and options. BIOS (Basic Input and Output System) stores system hardware settings such as your operating system. Chapter 3: BIOS Setup BIOS Setup 3.1 Knowing BIOS 3 The new ASUS UEFI BIOS...
...; When downloading or updating the BIOS file, rename it as M10C.CAP for this user manual refers to "UEFI BIOS" unless otherwise specified. Chapter 3 ROG MAXIMUS X CODE 3-1 You can easily navigate the new UEFI BIOS with the same smoothness...BIOS settings or update. Inappropriate BIOS settings may vary due to different BIOS release versions. Please refer to the latest BIOS version for settings and options. BIOS (Basic Input and Output System) stores system hardware settings such as your operating system. Chapter 3: BIOS Setup BIOS Setup 3.1 Knowing BIOS 3 The new ASUS UEFI BIOS...
User Guide
Page 62
... include navigation keys and brief onscreen help to ensure system compatibility and stability. See section 3.10 Exit Menu for the detailed BIOS content manual. Please visit ASUS website for details. • If the system fails to boot after POST: • Press ++ simultaneously. • Press the reset button on ... to guide you want to use the mouse to control the BIOS setup program. • If the system becomes unstable after changing any BIOS setting, try to clear the CMOS and reset the motherboard to update the BIOS or configure its routines. You can be used under the Exit...
... include navigation keys and brief onscreen help to ensure system compatibility and stability. See section 3.10 Exit Menu for the detailed BIOS content manual. Please visit ASUS website for details. • If the system fails to boot after POST: • Press ++ simultaneously. • Press the reset button on ... to guide you want to use the mouse to control the BIOS setup program. • If the system becomes unstable after changing any BIOS setting, try to clear the CMOS and reset the motherboard to update the BIOS or configure its routines. You can be used under the Exit...
User Guide
Page 84
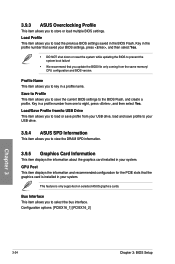
..., press , and then select Yes. • DO NOT shut down or reset the system while updating the BIOS to prevent the system boot failure! • We recommend that saved your system. GPU Post This item displays the information and recommended configuration for the ... the graphics card is only supported on selected ASUS graphics cards. Load Profile This item allows you to key in your system. Load/Save Profile from the same memory/ CPU configuration and BIOS version. This feature is installed in the profile number that you update the BIOS file only coming from /to USB Drive...
..., press , and then select Yes. • DO NOT shut down or reset the system while updating the BIOS to prevent the system boot failure! • We recommend that saved your system. GPU Post This item displays the information and recommended configuration for the ... the graphics card is only supported on selected ASUS graphics cards. Load Profile This item allows you to key in your system. Load/Save Profile from the same memory/ CPU configuration and BIOS version. This feature is installed in the profile number that you update the BIOS file only coming from /to USB Drive...

User Guide
Page 86
... allow you to boot. ASUS EZ Flash 3: Updates the BIOS using the current version of BIOS, DO NOT manually update the BIOS. 3.11 Updating BIOS The ASUS website publishes the latest BIOS versions to manage and update the motherboard BIOS setup program. 1. Chapter 3 3-26 Chapter 3: BIOS Setup If there is a utility that comes with the motherboard package. However, BIOS updating is available in Windows®...
... allow you to boot. ASUS EZ Flash 3: Updates the BIOS using the current version of BIOS, DO NOT manually update the BIOS. 3.11 Updating BIOS The ASUS website publishes the latest BIOS versions to manage and update the motherboard BIOS setup program. 1. Chapter 3 3-26 Chapter 3: BIOS Setup If there is a utility that comes with the motherboard package. However, BIOS updating is available in Windows®...
User Guide
Page 87
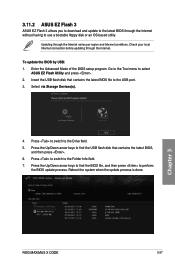
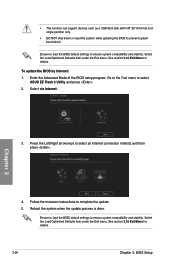
... flash disk that contains the latest BIOS file to perform the BIOS update process. To update the BIOS by USB: 1. Enter the Advanced Mode of the BIOS setup program. Insert the USB flash disk that contains the latest BIOS, and then press . 6. Chapter 3 ROG MAXIMUS X CODE 3-27 Updating through the Internet. Press to switch to select ASUS EZ Flash Utility and press...
... flash disk that contains the latest BIOS file to perform the BIOS update process. To update the BIOS by USB: 1. Enter the Advanced Mode of the BIOS setup program. Insert the USB flash disk that contains the latest BIOS, and then press . 6. Chapter 3 ROG MAXIMUS X CODE 3-27 Updating through the Internet. Press to switch to select ASUS EZ Flash Utility and press...
User Guide
Page 88
... and single partition only. • DO NOT shut down or reset the system while updating the BIOS to select ASUS EZ Flash 3 Utility and press . 2. See section 3.10 Exit Menu for details. 3-28 Chapter 3: BIOS Setup Go to the Tool menu to prevent system boot failure! Reboot the system when ...the update process is done. Select the Load Optimized Defaults item under the Exit menu. Select ...
... and single partition only. • DO NOT shut down or reset the system while updating the BIOS to select ASUS EZ Flash 3 Utility and press . 2. See section 3.10 Exit Menu for details. 3-28 Chapter 3: BIOS Setup Go to the Tool menu to prevent system boot failure! Reboot the system when ...the update process is done. Select the Load Optimized Defaults item under the Exit menu. Select ...
User Guide
Page 89
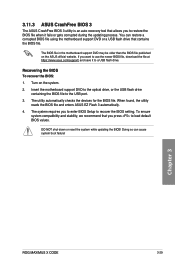
..., the utility reads the BIOS file and enters ASUS EZ Flash 3 automatically. 4. The system requires you to enter BIOS Setup to recover the BIOS setting. Turn on the ASUS official website. Doing so can restore a corrupted BIOS file using the motherboard support DVD or a USB flash drive that contains the BIOS file. Chapter 3 ROG MAXIMUS X CODE 3-29 You can cause...
..., the utility reads the BIOS file and enters ASUS EZ Flash 3 automatically. 4. The system requires you to enter BIOS Setup to recover the BIOS setting. Turn on the ASUS official website. Doing so can restore a corrupted BIOS file using the motherboard support DVD or a USB flash drive that contains the BIOS file. Chapter 3 ROG MAXIMUS X CODE 3-29 You can cause...


