
User Guide
Page 3
Contents Safety information vii About this guide viii RAMPAGE V EXTREME specifications summary OC Panel specifications summary xv Package contents xvi Installation tools and components xvii Chapter 1: Product Introduction 1.1 Special features 1-1 1.1.1 Product highlights 1-1 1.1.2 ROG Unique Gaming Features 1-2 1.1.3 ROG exclusive features 1-3 1.1.4 ASUS special features 1-5 1.1.5 ROG rich-bundled software 1-6 1.2 Motherboard overview 1-7 1.2.1 Before you proceed 1-7 1.2.2 Motherboard layout 1-8 1.2.3 Central...
Contents Safety information vii About this guide viii RAMPAGE V EXTREME specifications summary OC Panel specifications summary xv Package contents xvi Installation tools and components xvii Chapter 1: Product Introduction 1.1 Special features 1-1 1.1.1 Product highlights 1-1 1.1.2 ROG Unique Gaming Features 1-2 1.1.3 ROG exclusive features 1-3 1.1.4 ASUS special features 1-5 1.1.5 ROG rich-bundled software 1-6 1.2 Motherboard overview 1-7 1.2.1 Before you proceed 1-7 1.2.2 Motherboard layout 1-8 1.2.3 Central...
User Guide
Page 65
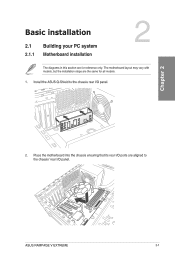
The motherboard layout may vary with N models, but the installation steps are aligned to the chassis rear I /O ports are the same for reference only. tosogsosoossso9, c oo 8 a CD 2. Place the motherboard into the chassis ensuring that its rear I /O panel. Basic installation 2.1 2.1.1 Building your PC system Motherboard installation The diagrams in this section are for all models. +CaT, 1. a 10 U o k7a0o0g700,o0,og,,00,00g40no0olLi60oOo000i0. ASUS RAMPAGE V EXTREME 2-1 Install the ASUS Q-Shield to the chassis' rear I/O panel.
The motherboard layout may vary with N models, but the installation steps are aligned to the chassis rear I /O ports are the same for reference only. tosogsosoossso9, c oo 8 a CD 2. Place the motherboard into the chassis ensuring that its rear I /O panel. Basic installation 2.1 2.1.1 Building your PC system Motherboard installation The diagrams in this section are for all models. +CaT, 1. a 10 U o k7a0o0g700,o0,og,,00,00g40no0olLi60oOo000i0. ASUS RAMPAGE V EXTREME 2-1 Install the ASUS Q-Shield to the chassis' rear I/O panel.
User Guide
Page 95
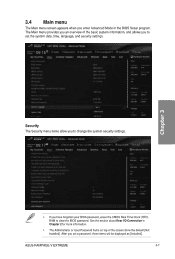
...settings. Advanced Monitte Boot Tool Exit LII-lardivare Monitor CPU 15001. Advanced Mole Z61.711 09:170 My Favorites Maio Extreme Tweaker Owo-aO [loser:pee. is ...power on top of the basic system information, and allows you enter ...the section about Rear I .10/Carverftern) 5,P0fan Cammard) El runlax111Panatil1i My Fawkes Main Extreme Tweaker Advanced Monitor Boot Tool 01011ntormation Ed05 version Build Date 100(41 Verson IMOGT. After you set the system date, time, language, and security settings. ='".. 1JEFl BIOS Utility - ASUS RAMPAGE V EXTREME 3-7
...settings. Advanced Monitte Boot Tool Exit LII-lardivare Monitor CPU 15001. Advanced Mole Z61.711 09:170 My Favorites Maio Extreme Tweaker Owo-aO [loser:pee. is ...power on top of the basic system information, and allows you enter ...the section about Rear I .10/Carverftern) 5,P0fan Cammard) El runlax111Panatil1i My Fawkes Main Extreme Tweaker Advanced Monitor Boot Tool 01011ntormation Ed05 version Build Date 100(41 Verson IMOGT. After you set the system date, time, language, and security settings. ='".. 1JEFl BIOS Utility - ASUS RAMPAGE V EXTREME 3-7

