
User Manual
Page 7
...ASUS AI Suite 4-21 4.3.4 ASUS Fan Xpert 4-23 4.3.5 CPU Level Up 4-24 4.3.6 TurboV EVO 4-24 4.3.7 ROG Connect 4-26 4.4 RAID configurations 4-28 4.4.1 RAID definitions 4-28 4.4.2 Installing Serial ATA hard disks 4-29 4.4.3 Setting the RAID item in BIOS 4-29 4.4.4 Intel® Matrix Storage Manager option ROM utility......... 4-29 4.5 Creating a RAID driver... disk 4-33 4.5.1 Creating a RAID driver disk without entering the OS.... 4-33 4.5.2 Creating a RAID driver disk in Windows 4-33 4.5.3 Installing the RAID driver during Windows® OS installation 4-34...
...ASUS AI Suite 4-21 4.3.4 ASUS Fan Xpert 4-23 4.3.5 CPU Level Up 4-24 4.3.6 TurboV EVO 4-24 4.3.7 ROG Connect 4-26 4.4 RAID configurations 4-28 4.4.1 RAID definitions 4-28 4.4.2 Installing Serial ATA hard disks 4-29 4.4.3 Setting the RAID item in BIOS 4-29 4.4.4 Intel® Matrix Storage Manager option ROM utility......... 4-29 4.5 Creating a RAID driver... disk 4-33 4.5.1 Creating a RAID driver disk without entering the OS.... 4-33 4.5.2 Creating a RAID driver disk in Windows 4-33 4.5.3 Installing the RAID driver during Windows® OS installation 4-34...

User Manual
Page 87
... Input/Output System (BIOS) setup. 1. Installing ASUS Update To install ASUS Update: 1. The Drivers menu appears. 2. ROG Rampage III Extreme 3-1 3.1 Managing and updating your BIOS The following utilities allow you to your system. The ASUS Update utility is available in the support DVD that allows you to restore the BIOS in Windows® environment. Save a copy of the...
... Input/Output System (BIOS) setup. 1. Installing ASUS Update To install ASUS Update: 1. The Drivers menu appears. 2. ROG Rampage III Extreme 3-1 3.1 Managing and updating your BIOS The following utilities allow you to your system. The ASUS Update utility is available in the support DVD that allows you to restore the BIOS in Windows® environment. Save a copy of the...
User Manual
Page 137
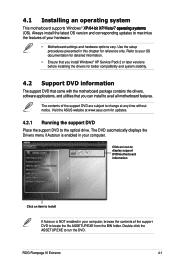
...the setup procedures presented in �g��s�y��s�te��m�s� (OS). Visit the ASUS website at any time without notice. Click an icon to display support DVD/motherboard information Click an item to install If ...drivers, software applications, and utilities that you install Windows® XP Service Pack 2 or later versions before installing the drivers for updates. 4.2.1 Running the support DVD Place the support DVD to locate the file ASSETUP.EXE from the BIN folder. Refer to run the DVD. ROG Rampage III Extreme...
...the setup procedures presented in �g��s�y��s�te��m�s� (OS). Visit the ASUS website at any time without notice. Click an icon to display support DVD/motherboard information Click an item to install If ...drivers, software applications, and utilities that you install Windows® XP Service Pack 2 or later versions before installing the drivers for updates. 4.2.1 Running the support DVD Place the support DVD to locate the file ASSETUP.EXE from the BIN folder. Refer to run the DVD. ROG Rampage III Extreme...

User Manual
Page 145
...software is correctly installed, you through the installation. Double-click on the icon to install the Realtek® Audio Driver from the support CD/DVD that came with the motherboard package. Realtek HD Audio Manager for all audio ports, ...; (Universal Audio Jack) technology for Windows® Vista™ Configuration option tabs Set default Minimize device button button Exit button Device advanced settings Connector settings Control settings window Analog and digital connector status Information button ROG Rampage III Extreme 4-9 The software provides Jack-Sensing function...
...software is correctly installed, you through the installation. Double-click on the icon to install the Realtek® Audio Driver from the support CD/DVD that came with the motherboard package. Realtek HD Audio Manager for all audio ports, ...; (Universal Audio Jack) technology for Windows® Vista™ Configuration option tabs Set default Minimize device button button Exit button Device advanced settings Connector settings Control settings window Analog and digital connector status Information button ROG Rampage III Extreme 4-9 The software provides Jack-Sensing function...

User Manual
Page 146
In the Windows Vista™ environment, Realtek HD Audio Manager automatically detects devices connected to effect the Digital Output settings and exit. 4-10 Chapter 4: Software support Click OK ... Information button ( ) to show further settings for the playback and recording device. Connector settings Click the Connector Settings button ( ) to display information about the audio driver version, DirectX version, audio controller, audio codec, and language setting. The Configuration options shown in this section are for options on your audio settings. Digital...
In the Windows Vista™ environment, Realtek HD Audio Manager automatically detects devices connected to effect the Digital Output settings and exit. 4-10 Chapter 4: Software support Click OK ... Information button ( ) to show further settings for the playback and recording device. Connector settings Click the Connector Settings button ( ) to display information about the audio driver version, DirectX version, audio controller, audio codec, and language setting. The Configuration options shown in this section are for options on your audio settings. Digital...

User Manual
Page 148
Click the shortcut buttons or the drop- down menus for Windows XP Configuration options Control settings window Exit button Minimize button Information button Information Click the information button ( ) to your audio settings. Realtek HD ...Audio Manager for options on changing the acoustic environment, adjust the equalizer, or set the sound effect options 1. Sound Effect To set the karaoke to display information about the audio driver...
Click the shortcut buttons or the drop- down menus for Windows XP Configuration options Control settings window Exit button Minimize button Information button Information Click the information button ( ) to your audio settings. Realtek HD ...Audio Manager for options on changing the acoustic environment, adjust the equalizer, or set the sound effect options 1. Sound Effect To set the karaoke to display information about the audio driver...

User Manual
Page 151
The Drivers installation tab appears if your computer: 1. Follow the screen instructions to the optical drive. To launch the PC Probe II from the Windows® desktop. The PC Probe II main window appears. After launching the application, the PC Probe II icon appears in your computer, browse the... voltages, among others. Installing PC Probe II To install PC Probe II on the main window right handle. Click to close the Preference panel ROG Rampage III Extreme 4-15 Click the Utilities tab, then click ASUS PC Probe II. 3. Because PC Probe II is software-based, you to locate the ...
The Drivers installation tab appears if your computer: 1. Follow the screen instructions to the optical drive. To launch the PC Probe II from the Windows® desktop. The PC Probe II main window appears. After launching the application, the PC Probe II icon appears in your computer, browse the... voltages, among others. Installing PC Probe II To install PC Probe II on the main window right handle. Click to close the Preference panel ROG Rampage III Extreme 4-15 Click the Utilities tab, then click ASUS PC Probe II. 3. Because PC Probe II is software-based, you to locate the ...

User Manual
Page 157
... Suite right after installation or anytime from the Windows® desktop, click Start > All Programs > ASUS > AI Suite > AI Suite v1.xx.xx. Click this icon to launch several ASUS utilities easily. To launch AI Suite from the Windows® desktop. Using AI Suite Click each... Fan Xpert 4-21 Click to restore to normal Click to launch TurboV Click to launch CPU Level Up ROG Rampage III Extreme Click to complete installation. The Drivers installation tab appears if your computer: 1. After launching the application, the AI Suite icon appears in the Windows® notification area.
... Suite right after installation or anytime from the Windows® desktop, click Start > All Programs > ASUS > AI Suite > AI Suite v1.xx.xx. Click this icon to launch several ASUS utilities easily. To launch AI Suite from the Windows® desktop. Using AI Suite Click each... Fan Xpert 4-21 Click to restore to normal Click to launch TurboV Click to launch CPU Level Up ROG Rampage III Extreme Click to complete installation. The Drivers installation tab appears if your computer: 1. After launching the application, the AI Suite icon appears in the Windows® notification area.

User Manual
Page 164
...set as a data disk only. • If you want to install a Windows® operating system to a hard disk drive included in a RAID set, you have to create a RAID driver disk and load the RAID driver during OS installation. The Serial ATA RAID feature is available only if you ...disk drives or use an existing drive and a new drive for details. 4.4.1 RAID definitions RAID 0 (Data striping) optimizes two identical hard disk drives to Windows® XP / Vista / 7 limitation, a RAID array with the Intel® P55 chipset that of RAID 5 configuration include better HDD performance, fault ...
...set as a data disk only. • If you want to install a Windows® operating system to a hard disk drive included in a RAID set, you have to create a RAID driver disk and load the RAID driver during OS installation. The Serial ATA RAID feature is available only if you ...disk drives or use an existing drive and a new drive for details. 4.4.1 RAID definitions RAID 0 (Data striping) optimizes two identical hard disk drives to Windows® XP / Vista / 7 limitation, a RAID array with the Intel® P55 chipset that of RAID 5 configuration include better HDD performance, fault ...

User Manual
Page 169
... drive and insert a floppy disk. 3. Insert the support DVD into the optical drive. 4. To work around this OS limitation, refer to Windows® XP limitation. ROG Rampage III Extreme 4-33 Follow the succeeding screen instructions to create an Intel® RAID driver disk. 5. Go to the Make Disk menu, and then click Intel AHCI/RAID...
... drive and insert a floppy disk. 3. Insert the support DVD into the optical drive. 4. To work around this OS limitation, refer to Windows® XP limitation. ROG Rampage III Extreme 4-33 Follow the succeeding screen instructions to create an Intel® RAID driver disk. 5. Go to the Make Disk menu, and then click Intel AHCI/RAID...

User Manual
Page 170
... floppy disk drive Due to install, ensure that you install the RAID driver from a floppy disk during Windows® OS installation To install the RAID driver for Windows® Vista or later OS 1. Right-click My Computer on the Windows® desktop or start menu, and then select Manage from the popup... 3. Using another computer, plug the USB floppy disk drive, and insert the floppy disk containing the RAID driver. 2. When prompted to select the SCSI adapter to OS limitation, Windows® XP may not recognize the USB floppy disk drive when you select Intel(R) ICH8R/ICH9R/ICH10R/DO/...
... floppy disk drive Due to install, ensure that you install the RAID driver from a floppy disk during Windows® OS installation To install the RAID driver for Windows® Vista or later OS 1. Right-click My Computer on the Windows® desktop or start menu, and then select Manage from the popup... 3. Using another computer, plug the USB floppy disk drive, and insert the floppy disk containing the RAID driver. 2. When prompted to select the SCSI adapter to OS limitation, Windows® XP may not recognize the USB floppy disk drive when you select Intel(R) ICH8R/ICH9R/ICH10R/DO/...

User Manual
Page 171
Browse the contents of the RAID driver disk to open the file. ROG Rampage III Extreme 4-35 Use Notepad to locate the file txtsetup.oem. 6. Double-click the file. A window appears, allowing you to select the program for opening the oem file. 7. Click Details tab. 4. The Vendor ID (VID) and Product ID (PID) are displayed. 5.
Browse the contents of the RAID driver disk to open the file. ROG Rampage III Extreme 4-35 Use Notepad to locate the file txtsetup.oem. 6. Double-click the file. A window appears, allowing you to select the program for opening the oem file. 7. Click Details tab. 4. The Vendor ID (VID) and Product ID (PID) are displayed. 5.

User Manual
Page 175
Close all existing graphics card drivers before installing ATI CrossFireX graphics cards to install multi-graphics processing units (GPU) graphics cards. Select your system. ROG Rampage III Extreme 5-1 5.1 ATI® CrossFireX™ technology The motherboard supports the ATI® CrossFireX™ technology...PSU) can provide at http://game.amd.com for details. • We recommend that your graphics card driver supports the ATI CrossFireX technology. For Windows Vista, select Uninstall. 5. See page 2-46 for the latest certified graphics card and the supported 3D ...
Close all existing graphics card drivers before installing ATI CrossFireX graphics cards to install multi-graphics processing units (GPU) graphics cards. Select your system. ROG Rampage III Extreme 5-1 5.1 ATI® CrossFireX™ technology The motherboard supports the ATI® CrossFireX™ technology...PSU) can provide at http://game.amd.com for details. • We recommend that your graphics card driver supports the ATI CrossFireX technology. For Windows Vista, select Uninstall. 5. See page 2-46 for the latest certified graphics card and the supported 3D ...

User Manual
Page 177
...; technology After installing your PCI Express graphics card driver supports the ATI® CrossFireX™ technology. ROG Rampage III Extreme 5-3 Ensure that came with your graphics card package to install the device drivers. You can also right-click the ATI icon in Windows environment. 5.1.4 Installing the device drivers Refer to the documentation that your graphics cards and...
...; technology After installing your PCI Express graphics card driver supports the ATI® CrossFireX™ technology. ROG Rampage III Extreme 5-3 Ensure that came with your graphics card package to install the device drivers. You can also right-click the ATI icon in Windows environment. 5.1.4 Installing the device drivers Refer to the documentation that your graphics cards and...

User Manual
Page 180
...and select NVIDIA Control Panel. The NVIDIA Control Panel window appears (See Step B5). 5-6 Chapter 5: Multiple GPU technology support 4. Connect a VGA or a DVI cable to the documentation that came with your graphics cards and the device drivers, enable the SLI feature in place. 5. Launching the...click on each graphics card. Ensure that your PCI Express graphics card driver supports the NVIDIA® SLI™ technology. A. Ensure that the connector is firmly in NVIDIA® Control Panel under the Windows® Vista™ operating system. Align and firmly insert the SLI...
...and select NVIDIA Control Panel. The NVIDIA Control Panel window appears (See Step B5). 5-6 Chapter 5: Multiple GPU technology support 4. Connect a VGA or a DVI cable to the documentation that came with your graphics cards and the device drivers, enable the SLI feature in place. 5. Launching the...click on each graphics card. Ensure that your PCI Express graphics card driver supports the NVIDIA® SLI™ technology. A. Ensure that the connector is firmly in NVIDIA® Control Panel under the Windows® Vista™ operating system. Align and firmly insert the SLI...


