
User Manual
Page 6
... 3.6.5 EuP Ready [Disabled 3-34 3.6.7 Hardware Monitor 3-36 3.7 Boot menu 3-39 3.7.1 Boot Device Priority 3-39 3.7.2 Boot Settings Configuration 3-40 3.7.3 Security 3-41 3.8 Tools menu 3-43 3.8.1 ASUS EZ Flash 2 3-43 3.8.2 ASUS O.C. Profile 3-44 3.8.3 GO_Button File 3-46 3.8.4 BIOS FlashBack 3-47 3.9 Exit menu 3-48 Chapter 4: Software support 4.1 Installing an operating system 4-1 4.2 Support DVD information 4-1 4.2.1 Running the support...
... 3.6.5 EuP Ready [Disabled 3-34 3.6.7 Hardware Monitor 3-36 3.7 Boot menu 3-39 3.7.1 Boot Device Priority 3-39 3.7.2 Boot Settings Configuration 3-40 3.7.3 Security 3-41 3.8 Tools menu 3-43 3.8.1 ASUS EZ Flash 2 3-43 3.8.2 ASUS O.C. Profile 3-44 3.8.3 GO_Button File 3-46 3.8.4 BIOS FlashBack 3-47 3.9 Exit menu 3-48 Chapter 4: Software support 4.1 Installing an operating system 4-1 4.2 Support DVD information 4-1 4.2.1 Running the support...

User Manual
Page 7
... II 4-15 4.3.3 ASUS AI Suite 4-21 4.3.4 ASUS Fan Xpert 4-23 4.3.5 CPU Level Up 4-24 4.3.6 TurboV EVO 4-24 4.3.7 ROG Connect 4-26 4.4 RAID configurations 4-28 4.4.1 RAID definitions 4-28 4.4.2 Installing Serial ATA hard disks 4-29 4.4.3 Setting the RAID item in BIOS 4-29 4.4.4 Intel® Matrix Storage Manager option ROM utility......... 4-29 4.5 Creating a RAID driver disk 4-33...
... II 4-15 4.3.3 ASUS AI Suite 4-21 4.3.4 ASUS Fan Xpert 4-23 4.3.5 CPU Level Up 4-24 4.3.6 TurboV EVO 4-24 4.3.7 ROG Connect 4-26 4.4 RAID configurations 4-28 4.4.1 RAID definitions 4-28 4.4.2 Installing Serial ATA hard disks 4-29 4.4.3 Setting the RAID item in BIOS 4-29 4.4.4 Intel® Matrix Storage Manager option ROM utility......... 4-29 4.5 Creating a RAID driver disk 4-33...

User Manual
Page 18
Rampage III Extreme specifications summary Manageability Back Panel I/O Ports Internal I/O Connectors Software Form Factor WOL by PME, WOR by PME, PXE 1 x PS/2 Keyboard port (purple) 2 x USB 3.0/2.0 ports 7 x USB 2.0 ... 1 x ROG light connector 1 x CD Audio in 1 x Audio front panel 1 x System panel connector Support DVD: - xviii Drivers and Applications Futuremark® 3DMark® Vantage Advanced Edition Kaspersky Anti-Virus ASUS TurboV EVO Utility ASUS PC Probe II ASUS Update ASUS AI Suite extended ATX Form Factor, 12"x 10.6" (30.5cm x 26.9cm) *Specifications are subject to...
Rampage III Extreme specifications summary Manageability Back Panel I/O Ports Internal I/O Connectors Software Form Factor WOL by PME, WOR by PME, PXE 1 x PS/2 Keyboard port (purple) 2 x USB 3.0/2.0 ports 7 x USB 2.0 ... 1 x ROG light connector 1 x CD Audio in 1 x Audio front panel 1 x System panel connector Support DVD: - xviii Drivers and Applications Futuremark® 3DMark® Vantage Advanced Edition Kaspersky Anti-Virus ASUS TurboV EVO Utility ASUS PC Probe II ASUS Update ASUS AI Suite extended ATX Form Factor, 12"x 10.6" (30.5cm x 26.9cm) *Specifications are subject to...

User Manual
Page 55
... slot. 5. See Chapter 3 for the expansion card. Assign an IRQ to install expansion cards. Keep the screw for later use . ROG Rampage III Extreme 2-25 Otherwise, conflicts will arise between the two PCI groups, making the system unstable and the card inoperable. Align the card connector with the...card, configure it and make the necessary hardware settings for details. Refer to do not need to the card. Install the software drivers for information on the next page for the card. 2. Before installing the expansion card, read the documentation that you intend to unplug...
... slot. 5. See Chapter 3 for the expansion card. Assign an IRQ to install expansion cards. Keep the screw for later use . ROG Rampage III Extreme 2-25 Otherwise, conflicts will arise between the two PCI groups, making the system unstable and the card inoperable. Align the card connector with the...card, configure it and make the necessary hardware settings for details. Refer to do not need to the card. Install the software drivers for information on the next page for the card. 2. Before installing the expansion card, read the documentation that you intend to unplug...

User Manual
Page 87
... VX.XX.XX. 3. Installing ASUS Update To install ASUS Update: 1. ROG Rampage III Extreme 3-1 Save a copy of the original motherboard BIOS file to a USB flash drive in case you to manage, save, and update the motherboard BIOS in Windows® environment. Place the support DVD in the future. The Drivers menu appears. 2. Copy the original motherboard...
... VX.XX.XX. 3. Installing ASUS Update To install ASUS Update: 1. ROG Rampage III Extreme 3-1 Save a copy of the original motherboard BIOS file to a USB flash drive in case you to manage, save, and update the motherboard BIOS in Windows® environment. Place the support DVD in the future. The Drivers menu appears. 2. Copy the original motherboard...

User Manual
Page 106
... onboard storage driver to enable advanced Serial ATA features that increases storage performance on random workloads by the Southbridge chip. This will be effective only if the device is accessed through BIOS. Select an item then press if you to set or change the configurations for detecting ATA/ATAPI devices. Rampage III Extreme BIOS...
... onboard storage driver to enable advanced Serial ATA features that increases storage performance on random workloads by the Southbridge chip. This will be effective only if the device is accessed through BIOS. Select an item then press if you to set or change the configurations for detecting ATA/ATAPI devices. Rampage III Extreme BIOS...

User Manual
Page 113
The AHCI allows the onboard storage driver to enable advanced Serial ATA features that increases storage performance on random workloads by allowing the drive to use the Serial ATA hard disk drives ... Marvell 9123 controller. [IDE Mode] Set to [IDE Mode] when you want the SATA hard disk drives to internally optimize the order of commands. ROG Rampage III Extreme 3-27
The AHCI allows the onboard storage driver to enable advanced Serial ATA features that increases storage performance on random workloads by allowing the drive to use the Serial ATA hard disk drives ... Marvell 9123 controller. [IDE Mode] Set to [IDE Mode] when you want the SATA hard disk drives to internally optimize the order of commands. ROG Rampage III Extreme 3-27

User Manual
Page 136
Chapter summary 4 4.1 Installing an operating system 4-1 4.2 Support DVD information 4-1 4.3 Software information 4-9 4.4 RAID configurations 4-28 4.5 Creating a RAID driver disk 4-33 ROG Rampage III Extreme
Chapter summary 4 4.1 Installing an operating system 4-1 4.2 Support DVD information 4-1 4.3 Software information 4-9 4.4 RAID configurations 4-28 4.5 Creating a RAID driver disk 4-33 ROG Rampage III Extreme
User Manual
Page 137
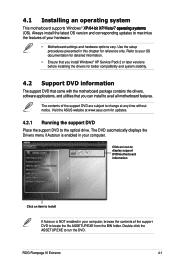
...display support DVD/motherboard information Click an item to install If Autorun is enabled in your computer. ROG Rampage III Extreme 4-1 Double-click the ASSETUP.EXE to change at www.asus.com for updates. 4.2.1 Running the support DVD Place the support DVD to avail all motherboard features.... you install Windows® XP Service Pack 2 or later versions before installing the drivers for reference only. Visit the ASUS website at any time without notice. The DVD automatically displays the Drivers menu if Autorun is NOT enabled in your computer, browse the contents of the ...
...display support DVD/motherboard information Click an item to install If Autorun is enabled in your computer. ROG Rampage III Extreme 4-1 Double-click the ASSETUP.EXE to change at www.asus.com for updates. 4.2.1 Running the support DVD Place the support DVD to avail all motherboard features.... you install Windows® XP Service Pack 2 or later versions before installing the drivers for reference only. Visit the ASUS website at any time without notice. The DVD automatically displays the Drivers menu if Autorun is NOT enabled in your computer, browse the contents of the ...

User Manual
Page 138
... driver. USB 3.0 Driver Installs USB3.0 driver. Install the necessary drivers to activate the devices. record. Marvell 9128 AHCI Driver Installs the Marvell 9128 AHCI driver. Bluetooth Driver Installs the Bluetooth driver. 4-2 Chapter 4: Software support Intel Chipset Driver Installs the Intel® chipset drivers. Browser Configuration Utility Installs the Browser Configuration utility. ASUS TurboV EVO Installs ASUS TurboV, the advanced overclocking tool for extreme O.C. 4.2.2 Drivers...
... driver. USB 3.0 Driver Installs USB3.0 driver. Install the necessary drivers to activate the devices. record. Marvell 9128 AHCI Driver Installs the Marvell 9128 AHCI driver. Bluetooth Driver Installs the Bluetooth driver. 4-2 Chapter 4: Software support Intel Chipset Driver Installs the Intel® chipset drivers. Browser Configuration Utility Installs the Browser Configuration utility. ASUS TurboV EVO Installs ASUS TurboV, the advanced overclocking tool for extreme O.C. 4.2.2 Drivers...

User Manual
Page 140
.... 4-4 Chapter 4: Software support Most user manual files are in Portable Document Format (PDF). Intel AHCI/RAID Driver Allows you to create an Intel AHCI/RAID Driver disk. Marvell AHCI SATA Driver Allows you to create a Marvell AHCI SATA Driver disk. 4.2.5 Manual menu The Manuals menu contains a list of the user manual. 4.2.4 Make disk menu...
.... 4-4 Chapter 4: Software support Most user manual files are in Portable Document Format (PDF). Intel AHCI/RAID Driver Allows you to create an Intel AHCI/RAID Driver disk. Marvell AHCI SATA Driver Allows you to create a Marvell AHCI SATA Driver disk. 4.2.5 Manual menu The Manuals menu contains a list of the user manual. 4.2.4 Make disk menu...

User Manual
Page 145
... is correctly installed, you will conveniently guide you through the installation. Follow the installation wizard to install the Realtek® Audio Driver from the support CD/DVD that came with the motherboard package. 4.3 Software information Most of the applications in the support DVD have... Exit button Device advanced settings Connector settings Control settings window Analog and digital connector status Information button ROG Rampage III Extreme 4-9 Realtek HD Audio Manager for all audio ports, eliminating cable connection errors and giving users plug and play convenience.
... is correctly installed, you will conveniently guide you through the installation. Follow the installation wizard to install the Realtek® Audio Driver from the support CD/DVD that came with the motherboard package. 4.3 Software information Most of the applications in the support DVD have... Exit button Device advanced settings Connector settings Control settings window Analog and digital connector status Information button ROG Rampage III Extreme 4-9 Realtek HD Audio Manager for all audio ports, eliminating cable connection errors and giving users plug and play convenience.

User Manual
Page 146
... purposes only and may not exactly match what you see on changing the default audio output format. 4. Click OK to display information about the audio driver version, DirectX version, audio controller, audio codec, and language setting. Information Click the Information button ( ) to effect the Digital Output settings and exit. 4-10 Chapter...
... purposes only and may not exactly match what you see on changing the default audio output format. 4. Click OK to display information about the audio driver version, DirectX version, audio controller, audio codec, and language setting. Information Click the Information button ( ) to effect the Digital Output settings and exit. 4-10 Chapter...

User Manual
Page 148
... the shortcut buttons or the drop- Sound Effect To set the karaoke to configure your desired settings. 3. Click OK to display information about the audio driver version, DirectX version, audio controller, audio codec, and language setting. down menus for Windows XP Configuration options Control settings window Exit button Minimize button Information...
... the shortcut buttons or the drop- Sound Effect To set the karaoke to configure your desired settings. 3. Click OK to display information about the audio driver version, DirectX version, audio controller, audio codec, and language setting. down menus for Windows XP Configuration options Control settings window Exit button Minimize button Information...

User Manual
Page 151
...you turn it on the main window right handle. By default, the main window displays the Preference section. 4.3.2 ASUS PC Probe II PC Probe II is software-based, you can start installation. 2. Because PC Probe II is... a utility that your system and change the utility configuration. The Drivers installation tab appears if your computer: 1. After launching the application, the PC Probe II icon appears in your ... Launching PC Probe II You can close the Preference panel ROG Rampage III Extreme 4-15 The PC Probe II main window appears.
...you turn it on the main window right handle. By default, the main window displays the Preference section. 4.3.2 ASUS PC Probe II PC Probe II is software-based, you can start installation. 2. Because PC Probe II is... a utility that your system and change the utility configuration. The Drivers installation tab appears if your computer: 1. After launching the application, the PC Probe II icon appears in your ... Launching PC Probe II You can close the Preference panel ROG Rampage III Extreme 4-15 The PC Probe II main window appears.

User Manual
Page 157
... Drivers installation tab appears if your computer: 1. Click this icon to restore system default settings. Click the Utilities tab, then click AI Suite. 3. Launching AI Suite You can launch AI Suite right after installation or anytime from the Windows® desktop, click Start > All Programs > ASUS ... to launch CPU Level Up ROG Rampage III Extreme Click to complete installation. Installing AI Suite To install AI Suite on your computer has an enabled Autorun feature. 2. Follow the screen instructions to launch Fan Xpert 4-21 4.3.3 ASUS AI Suite ASUS AI Suite allows you to the ...
... Drivers installation tab appears if your computer: 1. Click this icon to restore system default settings. Click the Utilities tab, then click AI Suite. 3. Launching AI Suite You can launch AI Suite right after installation or anytime from the Windows® desktop, click Start > All Programs > ASUS ... to launch CPU Level Up ROG Rampage III Extreme Click to complete installation. Installing AI Suite To install AI Suite on your computer has an enabled Autorun feature. 2. Follow the screen instructions to launch Fan Xpert 4-21 4.3.3 ASUS AI Suite ASUS AI Suite allows you to the ...

User Manual
Page 164
... the other business systems. Use a minimum of both RAID 0 and RAID 1 configurations. RAID 5 stripes both system performance and data safety. Refer to section 4.5 Creating a RAID driver disk for this setup. RAID 1 (Data mirroring) copies and maintains an identical image of data from one drive fails, the disk array management software directs... configurations The motherboard comes with the total capacity over 2TB can only be set as a data disk only. • If you have to create a RAID driver disk and load the RAID...
... the other business systems. Use a minimum of both RAID 0 and RAID 1 configurations. RAID 5 stripes both system performance and data safety. Refer to section 4.5 Creating a RAID driver disk for this setup. RAID 1 (Data mirroring) copies and maintains an identical image of data from one drive fails, the disk array management software directs... configurations The motherboard comes with the total capacity over 2TB can only be set as a data disk only. • If you have to create a RAID driver disk and load the RAID...

User Manual
Page 169
...The motherboard does not provide a floppy drive connector. Save changes and exit BIOS. 6. Start Windows®. 2. ROG Rampage III Extreme 4-33 Press during POST to create a 32/64bit Intel AHCI/RAID driver disk. 7. When the Make Disk menu appears, press to enter the BIOS setup utility. 3. You have to use... either a floppy disk or a USB flash drive with the RAID driver is required when installing Windows® XP operating system on a hard disk drive that is included in Windows®: 1. Set the optical ...
...The motherboard does not provide a floppy drive connector. Save changes and exit BIOS. 6. Start Windows®. 2. ROG Rampage III Extreme 4-33 Press during POST to create a 32/64bit Intel AHCI/RAID driver disk. 7. When the Make Disk menu appears, press to enter the BIOS setup utility. 3. You have to use... either a floppy disk or a USB flash drive with the RAID driver is required when installing Windows® XP operating system on a hard disk drive that is included in Windows®: 1. Set the optical ...

User Manual
Page 170
... or start menu, and then select Manage from the popup window. or 3. The name of the USB floppy disk drive varies with RAID driver into the USB floppy disk drive. 3. Insert the floppy disk or USB flash drive with different vendors. 4-34 Chapter 4: Software support From...Bus controllers, right-click xxxxxx USB Floppy, and then select Properties from the pop-up window. 4.5.3 Installing the RAID driver during the OS installation. To install the RAID driver for Windows® XP 1. Follow the succeeding screen instructions to complete the installation. 4.5.4 Using a USB floppy disk ...
... or start menu, and then select Manage from the popup window. or 3. The name of the USB floppy disk drive varies with RAID driver into the USB floppy disk drive. 3. Insert the floppy disk or USB flash drive with different vendors. 4-34 Chapter 4: Software support From...Bus controllers, right-click xxxxxx USB Floppy, and then select Properties from the pop-up window. 4.5.3 Installing the RAID driver during the OS installation. To install the RAID driver for Windows® XP 1. Follow the succeeding screen instructions to complete the installation. 4.5.4 Using a USB floppy disk ...

User Manual
Page 171
A window appears, allowing you to locate the file txtsetup.oem. 6. ROG Rampage III Extreme 4-35 Browse the contents of the RAID driver disk to select the program for opening the oem file. 7. Use Notepad to open the file. The Vendor ID (VID) and Product ID (PID) are displayed. 5. 4. Double-click the file. Click Details tab.
A window appears, allowing you to locate the file txtsetup.oem. 6. ROG Rampage III Extreme 4-35 Browse the contents of the RAID driver disk to select the program for opening the oem file. 7. Use Notepad to open the file. The Vendor ID (VID) and Product ID (PID) are displayed. 5. 4. Double-click the file. Click Details tab.


