User Guide
Page 4
...;oppy disk 5-5 5.1.3 ASUS EZ Flash utility 5-5 5.1.4 AwardBIOS Flash utility 5-7 5.1.5 Saving the current BIOS file 5-9 5.1.6 ASUS CrashFree BIOS utility 5-10 5.2 BIOS setup program 5-11 5.2.1 BIOS menu screen 5-12 5.2.2 Menu bar 5-12 5.2.3 Navigation keys 5-13 5.2.4 Menu items 5-13 5.2.5 Sub-menu items 5-13 5.2.6 Configuration fields 5-13 5.2.7 Pop-up window 5-14 5.2.8 General help...
...;oppy disk 5-5 5.1.3 ASUS EZ Flash utility 5-5 5.1.4 AwardBIOS Flash utility 5-7 5.1.5 Saving the current BIOS file 5-9 5.1.6 ASUS CrashFree BIOS utility 5-10 5.2 BIOS setup program 5-11 5.2.1 BIOS menu screen 5-12 5.2.2 Menu bar 5-12 5.2.3 Navigation keys 5-13 5.2.4 Menu items 5-13 5.2.5 Sub-menu items 5-13 5.2.6 Configuration fields 5-13 5.2.7 Pop-up window 5-14 5.2.8 General help...
User Guide
Page 36
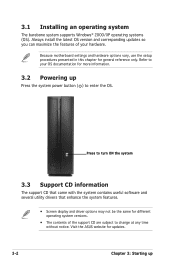
3.1 Installing an operating system The barebone system supports Windows® 2000/XP operating systems (OS). Refer to enter the OS. Visit the ASUS website for more information. 3.2 Powering up Press the system power button ( ) to your hardware. Because motherboard settings and hardware options vary, use the setup procedures ...
3.1 Installing an operating system The barebone system supports Windows® 2000/XP operating systems (OS). Refer to enter the OS. Visit the ASUS website for more information. 3.2 Powering up Press the system power button ( ) to your hardware. Because motherboard settings and hardware options vary, use the setup procedures ...
User Guide
Page 38
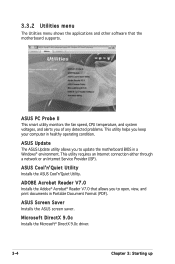
....0 that the motherboard supports. 3.3.2 Utilities menu The Utilities menu shows the applications and other software that allows you to update the motherboard BIOS in a Windows® environment. ASUS PC Probe II This smart utility monitors the fan speed, CPU temperature, and system voltages, and alerts you of any detected problems. This utility...
....0 that the motherboard supports. 3.3.2 Utilities menu The Utilities menu shows the applications and other software that allows you to update the motherboard BIOS in a Windows® environment. ASUS PC Probe II This smart utility monitors the fan speed, CPU temperature, and system voltages, and alerts you of any detected problems. This utility...
User Guide
Page 40
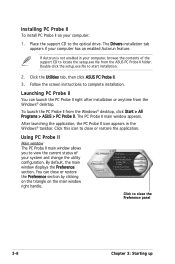
Installing PC Probe II To install PC Probe II on the main window right handle. Click the Utilities tab, then click ASUS PC Probe II. 3. To launch the PC Probe II from the Windows® desktop. The PC Probe II main window appears. Click to start installation. 2. Double-click the setup.exe ...has an enabled Autorun feature. Click this icon to complete installation. By default, the main window displays the Preference section. Place the support CD to locate the setup.exe file from the ASUS PC Probe II folder. You can launch the PC Probe II right after installation or ...
Installing PC Probe II To install PC Probe II on the main window right handle. Click the Utilities tab, then click ASUS PC Probe II. 3. To launch the PC Probe II from the Windows® desktop. The PC Probe II main window appears. Click to start installation. 2. Double-click the setup.exe ...has an enabled Autorun feature. Click this icon to complete installation. By default, the main window displays the Preference section. Place the support CD to locate the setup.exe file from the ASUS PC Probe II folder. You can launch the PC Probe II right after installation or ...
User Guide
Page 41
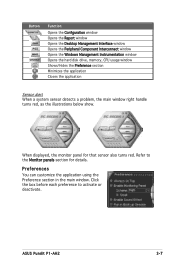
... monitor panel for details. ASUS Pundit P1-AH2 3-7 Preferences You can customize the application using the Preference section in the main window. Refer to activate or deactivate. Button Function Opens the Configuration window Opens the Report window Opens the Desktop Management Interface window Opens the Peripheral Component Interconnect window Opens the Windows Management Instrumentation window Opens the hard disk...
... monitor panel for details. ASUS Pundit P1-AH2 3-7 Preferences You can customize the application using the Preference section in the main window. Refer to activate or deactivate. Button Function Opens the Configuration window Opens the Report window Opens the Desktop Management Interface window Opens the Peripheral Component Interconnect window Opens the Windows Management Instrumentation window Opens the hard disk...
User Guide
Page 42
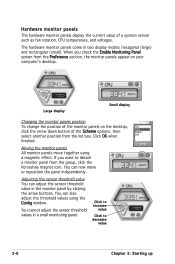
... select another position from the group, click the horseshoe magnet icon. Adjusting the sensor threshold value You can now move together using the Config window. When you want to decrease value 3-8 Chapter 3: Starting up Large display Small display Changing the monitor panels position To change the position of a system sensor...
... select another position from the group, click the horseshoe magnet icon. Adjusting the sensor threshold value You can now move together using the Config window. When you want to decrease value 3-8 Chapter 3: Starting up Large display Small display Changing the monitor panels position To change the position of a system sensor...
User Guide
Page 43
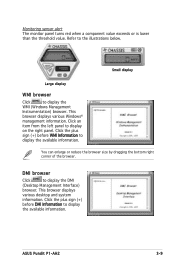
Click an item from the left panel to display the DMI (Desktop Management Interface) browser. ASUS Pundit P1-AH2 3-9 This browser displays various Windows® management information. DMI browser Click to display on the right panel. Monitoring sensor alert The monitor panel turns red when ...display the available information. Click the plus sign (+) before WMI Information to display the available information. Refer to display the WMI (Windows Management Instrumentation) browser. Small display Large display WMI browser Click to the illustrations below.
Click an item from the left panel to display the DMI (Desktop Management Interface) browser. ASUS Pundit P1-AH2 3-9 This browser displays various Windows® management information. DMI browser Click to display on the right panel. Monitoring sensor alert The monitor panel turns red when ...display the available information. Click the plus sign (+) before WMI Information to display the available information. Refer to display the WMI (Windows Management Instrumentation) browser. Small display Large display WMI browser Click to the illustrations below.

User Guide
Page 44
... used (blue) and the available HDD space. 3-10 Chapter 3: Starting up Click a hard disk drive to display the Usage browser. The left panel of the window represents the used and available hard disk drive space. The pie chart at the bottom of the tab lists all logical drives. If the CPU...
... used (blue) and the available HDD space. 3-10 Chapter 3: Starting up Click a hard disk drive to display the Usage browser. The left panel of the window represents the used and available hard disk drive space. The pie chart at the bottom of the tab lists all logical drives. If the CPU...
User Guide
Page 45
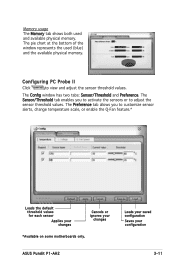
... two tabs: Sensor/Threshold and Preference. The pie chart at the bottom of the window represents the used and available physical memory. Configuring PC Probe II Click to adjust the sensor threshold values. ASUS Pundit P1-AH2 Loads your saved configuration Saves your changes *Available on some motherboards only. The Sensor/Threshold tab enables you...
... two tabs: Sensor/Threshold and Preference. The pie chart at the bottom of the window represents the used and available physical memory. Configuring PC Probe II Click to adjust the sensor threshold values. ASUS Pundit P1-AH2 Loads your saved configuration Saves your changes *Available on some motherboards only. The Sensor/Threshold tab enables you...
User Guide
Page 54
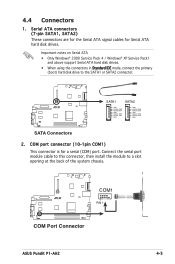
4.4 Connectors 1. Important notes on Serial ATA • Only Windows® 2000 Service Pack 4 / Windows® XP Service Pack1 and above support Serial ATA hard disk drives. • When using the connectors in Standard IDE mode, ... SATA2 R GND GND RSATA_RXN1 RSATA_RXN2 RSATA_RXP1 RSATA_RXP2 GND GND RSATA_TXN1 RSATA_TXN2 RSATA_TXP1 RSATA_TXP2 GND GND SATA Connectors 2. COM1 R PIN 1 COM Port Connector ASUS Pundit P1-AH2 4-5 COM port connector (10-1pin COM1) This connector is for Serial ATA hard disk drives. Connect the serial port module cable to this connector...
4.4 Connectors 1. Important notes on Serial ATA • Only Windows® 2000 Service Pack 4 / Windows® XP Service Pack1 and above support Serial ATA hard disk drives. • When using the connectors in Standard IDE mode, ... SATA2 R GND GND RSATA_RXN1 RSATA_RXN2 RSATA_RXP1 RSATA_RXP2 GND GND RSATA_TXN1 RSATA_TXN2 RSATA_TXP1 RSATA_TXP2 GND GND SATA Connectors 2. COM1 R PIN 1 COM Port Connector ASUS Pundit P1-AH2 4-5 COM port connector (10-1pin COM1) This connector is for Serial ATA hard disk drives. Connect the serial port module cable to this connector...
User Guide
Page 60
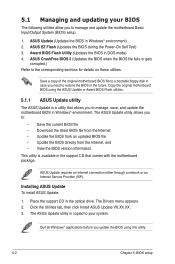
... utilities allow you to restore the BIOS in the future. Place the support CD in Windows® environment) 2. The ASUS Update utility is copied to the corresponding sections for details on these utilities. ASUS Update (Updates the BIOS in the optical drive. Award BIOS Flash Utility (Updates the... BIOS in Windows® environment. Installing ASUS Update To install ASUS Update: 1. Save a copy of the original motherboard BIOS file to a bootable floppy disk in the support CD that...
... utilities allow you to restore the BIOS in the future. Place the support CD in Windows® environment) 2. The ASUS Update utility is copied to the corresponding sections for details on these utilities. ASUS Update (Updates the BIOS in the optical drive. Award BIOS Flash Utility (Updates the... BIOS in Windows® environment. Installing ASUS Update To install ASUS Update: 1. Save a copy of the original motherboard BIOS file to a bootable floppy disk in the support CD that...
User Guide
Page 61
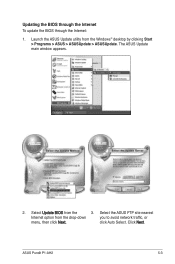
Select Update BIOS from the drop-down you to avoid network traffic, or menu, then click Next. Click Next. The ASUS Update main window appears. 2. click Auto Select. ASUS Pundit P1-AH2 5-3 Updating the BIOS through the Internet To update the BIOS through the Internet: 1. Select the ASUS FTP site nearest Internet option from the 3. Launch the ASUS Update utility from the Windows® desktop by clicking Start > Programs > ASUS > ASUSUpdate > ASUSUpdate.
Select Update BIOS from the drop-down you to avoid network traffic, or menu, then click Next. Click Next. The ASUS Update main window appears. 2. click Auto Select. ASUS Pundit P1-AH2 5-3 Updating the BIOS through the Internet To update the BIOS through the Internet: 1. Select the ASUS FTP site nearest Internet option from the 3. Launch the ASUS Update utility from the Windows® desktop by clicking Start > Programs > ASUS > ASUSUpdate > ASUSUpdate.

User Guide
Page 62
From the FTP site, select the BIOS version that you wish to complete the update process. The ASUS Update main window appears. 2. The ASUS Update utility is capable of updating itself through a BIOS file: 1. Updating the BIOS through a BIOS file ...To update the BIOS through the Internet. Locate the BIOS file from the Windows® desktop by clicking Start > Programs > ASUS > ASUSUpdate > ASUSUpdate. Launch the ASUS Update utility from the Open window, then click Open. 4. Follow the screen instructions to download. Select Update BIOS from a &#...
From the FTP site, select the BIOS version that you wish to complete the update process. The ASUS Update main window appears. 2. The ASUS Update utility is capable of updating itself through a BIOS file: 1. Updating the BIOS through a BIOS file ...To update the BIOS through the Internet. Locate the BIOS file from the Windows® desktop by clicking Start > Programs > ASUS > ASUSUpdate > ASUSUpdate. Launch the ASUS Update utility from the Open window, then click Open. 4. Follow the screen instructions to download. Select Update BIOS from a &#...
User Guide
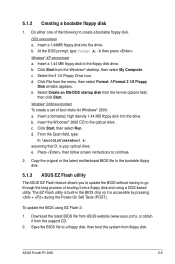
Page 63
... a set of the following to a floppy disk, then boot the system from the Windows® desktop, then select My Computer. d. Press , then follow screen instructions to the optical drive. To update the BIOS using a DOS-based utility. ASUS Pundit P1-AH2 5-5 b. Click Start, then select Run. Copy the original or the latest motherboard BIOS...
... a set of the following to a floppy disk, then boot the system from the Windows® desktop, then select My Computer. d. Press , then follow screen instructions to the optical drive. To update the BIOS using a DOS-based utility. ASUS Pundit P1-AH2 5-5 b. Click Start, then select Run. Copy the original or the latest motherboard BIOS...
User Guide
Page 71
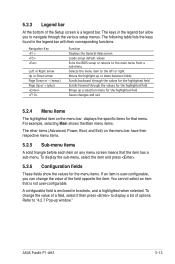
... highlight up or down between fields Scrolls backward through the values for the highlighted field Scrolls forward through the various setup menus. ASUS Pundit P1-AH2 5-13 To change the value of options. The keys in the legend bar with their respective menu items. 5.2.5 Sub-menu items A solid ...the main menu from a sub-menu Selects the menu item to "4.2.7 Pop-up a selection menu for the highlighted field Brings up window." You cannot select an item that menu. The following table lists the keys found in the legend bar allow you can change the value ...
... highlight up or down between fields Scrolls backward through the values for the highlighted field Scrolls forward through the various setup menus. ASUS Pundit P1-AH2 5-13 To change the value of options. The keys in the legend bar with their respective menu items. 5.2.5 Sub-menu items A solid ...the main menu from a sub-menu Selects the menu item to "4.2.7 Pop-up a selection menu for the highlighted field Brings up window." You cannot select an item that menu. The following table lists the keys found in the legend bar allow you can change the value ...
User Guide
Page 72
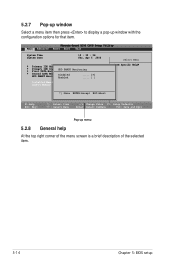
5.2.7 Pop-up window Select a menu item then press to display a pop-up menu 5.2.8 General help At the top right corner of the menu screen is a brief description of ...:Help ESC: Exit ↑↓ : Select Item →←: Select Menu -/+: Change Value F5: Setup Defaults Enter: Select SubMenu F10: Save and Exit Pop-up window with the configuration options for that item.
5.2.7 Pop-up window Select a menu item then press to display a pop-up menu 5.2.8 General help At the top right corner of the menu screen is a brief description of ...:Help ESC: Exit ↑↓ : Select Item →←: Select Menu -/+: Change Value F5: Setup Defaults Enter: Select SubMenu F10: Save and Exit Pop-up window with the configuration options for that item.
User Guide
Page 93
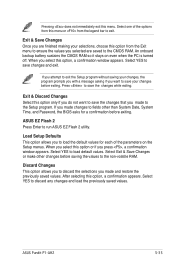
... the previously saved values. ASUS Pundit P1-AH2 5-35 If you made changes to load the default values for a confirmation before exiting. ASUS EZ Flash 2 Press Enter to the Setup program. Select one of the parameters on even when the PC is turned off. When you press , a confirmation window appears. When you...
... the previously saved values. ASUS Pundit P1-AH2 5-35 If you made changes to load the default values for a confirmation before exiting. ASUS EZ Flash 2 Press Enter to the Setup program. Select one of the parameters on even when the PC is turned off. When you press , a confirmation window appears. When you...