User Guide
Page 8
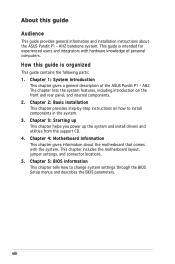
... introduction This chapter gives a general description of personal computers. Chapter 4: Motherboard information This chapter gives information about the ASUS Pundit P1 - This guide is organized This guide contains the following parts: 1. Chapter 5: BIOS information This chapter tells how ... jumper settings, and connector locations. 5. AH2 barebone system. How this guide Audience This guide provides general information and installation instructions about the motherboard that comes with hardware knowledge of the ASUS Pundit P1 - Chapter 2: Basic installation This chapter ...
... introduction This chapter gives a general description of personal computers. Chapter 4: Motherboard information This chapter gives information about the ASUS Pundit P1 - This guide is organized This guide contains the following parts: 1. Chapter 5: BIOS information This chapter tells how ... jumper settings, and connector locations. 5. AH2 barebone system. How this guide Audience This guide provides general information and installation instructions about the motherboard that comes with hardware knowledge of the ASUS Pundit P1 - Chapter 2: Basic installation This chapter ...
User Guide
Page 10
...; 3-in-1 storage card reader • PCI riser card • 250W power supply unit 2. Quick installation Guide x AH2 system package for the following items. If any of the items is damaged or missing, contact your Pundit P1 - ASUS Pundit P1 - Item description 1. Cable • Power cable and plug • Serial ATA power cable and signal cable •...
...; 3-in-1 storage card reader • PCI riser card • 250W power supply unit 2. Quick installation Guide x AH2 system package for the following items. If any of the items is damaged or missing, contact your Pundit P1 - ASUS Pundit P1 - Item description 1. Cable • Power cable and plug • Serial ATA power cable and signal cable •...
User Guide
Page 11
ASUS Pundit P1-AH2 The chapter lists the system features including introduction on the front and rear panel, and internal components. System introduction Chapter 1 This chapter gives a general description of the ASUS Pundit P1-AH2.
ASUS Pundit P1-AH2 The chapter lists the system features including introduction on the front and rear panel, and internal components. System introduction Chapter 1 This chapter gives a general description of the ASUS Pundit P1-AH2.
User Guide
Page 12
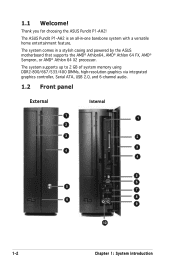
.... 1.2 Front panel External Internal 1 1 2 3 2 3 4 4 5 6 5 7 6 8 9 10 1-2 Chapter 1: System introduction Thank you for choosing the ASUS Pundit P1-AH2! The system comes in -one barebone system with a versatile home entertainment feature. The ASUS Pundit P1-AH2 is an all-in a stylish casing and powered by the ASUS motherboard that supports the AMD® Athlon64, AMD® Athlon 64 FX, AMD®...
.... 1.2 Front panel External Internal 1 1 2 3 2 3 4 4 5 6 5 7 6 8 9 10 1-2 Chapter 1: System introduction Thank you for choosing the ASUS Pundit P1-AH2! The system comes in -one barebone system with a versatile home entertainment feature. The ASUS Pundit P1-AH2 is an all-in a stylish casing and powered by the ASUS motherboard that supports the AMD® Athlon64, AMD® Athlon 64 FX, AMD®...
User Guide
Page 13
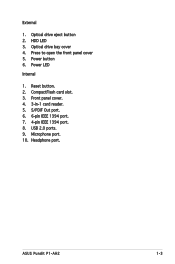
HDD LED 3. Power LED Internal 1. CompactFlash card slot. 3. Microphone port. 10. External 1. Optical drive eject button 2. Power button 6. S/PDIF Out port. 6. 6-pin IEEE 1394 port. 7. 4-pin IEEE 1394 port. 8. Reset button. 2. Headphone port. Optical drive bay cover 4. Press to open the front panel cover 5. USB 2.0 ports. 9. ASUS Pundit P1-AH2 1-3 Front panel cover. 4. 3-in-1 card reader. 5.
HDD LED 3. Power LED Internal 1. CompactFlash card slot. 3. Microphone port. 10. External 1. Optical drive eject button 2. Power button 6. S/PDIF Out port. 6. 6-pin IEEE 1394 port. 7. 4-pin IEEE 1394 port. 8. Reset button. 2. Headphone port. Optical drive bay cover 4. Press to open the front panel cover 5. USB 2.0 ports. 9. ASUS Pundit P1-AH2 1-3 Front panel cover. 4. 3-in-1 card reader. 5.
User Guide
Page 15
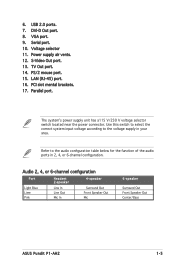
... Blue Lime Pink Headset 2-s p e a k e r Line In Line Out Mic In 4-speaker Surround Out Front Speaker Out Mic 6-speaker Surround Out Front Speaker Out Center/Bass ASUS Pundit P1-AH2 1-5 The systemʼs power supply unit has a115 V/230 V voltage selector switch located near the power connector. PS/2 mouse port. 15. VGA port. 9. Serial port...
... Blue Lime Pink Headset 2-s p e a k e r Line In Line Out Mic In 4-speaker Surround Out Front Speaker Out Mic 6-speaker Surround Out Front Speaker Out Center/Bass ASUS Pundit P1-AH2 1-5 The systemʼs power supply unit has a115 V/230 V voltage selector switch located near the power connector. PS/2 mouse port. 15. VGA port. 9. Serial port...
User Guide
Page 19
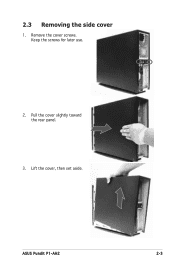
Lift the cover, then set aside. ASUS Pundit P1-AH2 2-3 Keep the screws for later use. 2. Pull the cover slightly toward the rear panel. 3. Remove the cover screws. 2.3 Removing the side cover 1.
Lift the cover, then set aside. ASUS Pundit P1-AH2 2-3 Keep the screws for later use. 2. Pull the cover slightly toward the rear panel. 3. Remove the cover screws. 2.3 Removing the side cover 1.
User Guide
Page 21
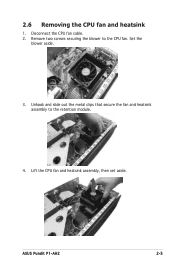
Set the blower aside. 3. 2.6 Removing the CPU fan and heatsink 1. Unhook and slide out the metal clips that secure the fan and heatsink assembly to the CPU fan. Lift the CPU fan and heatsink assembly, then set aside. Remove two screws securing the blower to the retention module. 4. ASUS Pundit P1-AH2 2-5 Disconnect the CPU fan cable. 2.
Set the blower aside. 3. 2.6 Removing the CPU fan and heatsink 1. Unhook and slide out the metal clips that secure the fan and heatsink assembly to the CPU fan. Lift the CPU fan and heatsink assembly, then set aside. Remove two screws securing the blower to the retention module. 4. ASUS Pundit P1-AH2 2-5 Disconnect the CPU fan cable. 2.
User Guide
Page 23
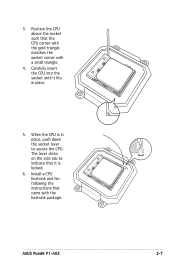
Carefully insert the CPU into the socket until it is in place, push down the socket lever to indicate that it fits in place. 5. ASUS Pundit P1-AH2 2-7 The lever clicks on the side tab to secure the CPU. When the CPU is locked. 6. Install a CPU heatsink and fan following the instructions that the CPU corner with the gold triangle matches the socket corner with the heatsink package. 3. Position the CPU above the socket such that came with a small triangle. 4.
Carefully insert the CPU into the socket until it is in place, push down the socket lever to indicate that it fits in place. 5. ASUS Pundit P1-AH2 2-7 The lever clicks on the side tab to secure the CPU. When the CPU is locked. 6. Install a CPU heatsink and fan following the instructions that the CPU corner with the gold triangle matches the socket corner with the heatsink package. 3. Position the CPU above the socket such that came with a small triangle. 4.
User Guide
Page 25
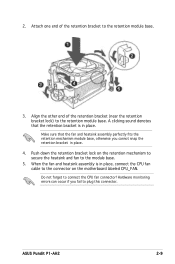
ASUS Pundit P1-AH2 2-9 Align the other end of the retention bracket to plug this connector. When the fan and heatsink assembly is in place. Push down the retention ...
ASUS Pundit P1-AH2 2-9 Align the other end of the retention bracket to plug this connector. When the fan and heatsink assembly is in place. Push down the retention ...
User Guide
Page 27
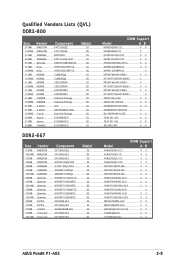
... V V M378T3354CZ0-CE6 V V M378T6553CZ0-CE6 V V M378T2953CZ0-CE6 V V HYS64T32000HU-3S-A V V HYS64T64000HU-3S-A V V HYS64T128020HU-3S-A V V HYS64T32000HU-3S-B V HYS64T64000HU-3S-B V V HYS64T128020HU-3S-B V V EBE25UC8ABFA-6E-E V V EBE51UD8AEFA-6E-E V V M20AD5Q3H3163J1C52 V V TS64MLQ64V6J V V TS128MLQ64V6J V V ASUS Pundit P1-AH2 2-9
... V V M378T3354CZ0-CE6 V V M378T6553CZ0-CE6 V V M378T2953CZ0-CE6 V V HYS64T32000HU-3S-A V V HYS64T64000HU-3S-A V V HYS64T128020HU-3S-A V V HYS64T32000HU-3S-B V HYS64T64000HU-3S-B V V HYS64T128020HU-3S-B V V EBE25UC8ABFA-6E-E V V EBE51UD8AEFA-6E-E V V M20AD5Q3H3163J1C52 V V TS64MLQ64V6J V V TS128MLQ64V6J V V ASUS Pundit P1-AH2 2-9
User Guide
Page 29
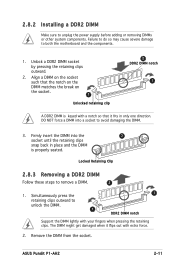
... notch Support the DIMM lightly with extra force. 2. DO NOT force a DIMM into the 3 socket until the retaining clips snap back in only one direction. ASUS Pundit P1-AH2 2-11 Align a DIMM on the socket such that the notch on the DIMM matches the break on the socket. 1 Unlocked retaining clip 2 DDR2 DIMM notch...
... notch Support the DIMM lightly with extra force. 2. DO NOT force a DIMM into the 3 socket until the retaining clips snap back in only one direction. ASUS Pundit P1-AH2 2-11 Align a DIMM on the socket such that the notch on the DIMM matches the break on the socket. 1 Unlocked retaining clip 2 DDR2 DIMM notch...
User Guide
Page 31
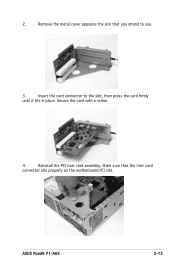
Reinstall the PCI riser card assembly. Insert the card connector to use. 3. ASUS Pundit P1-AH2 2-13 Make sure that you intend to the slot, then press the card firmly until it fits in place. Secure the card with a screw. 4. Remove the metal cover opposite the slot that the riser card connector sits properly on the motherboard PCI slot. 2.
Reinstall the PCI riser card assembly. Insert the card connector to use. 3. ASUS Pundit P1-AH2 2-13 Make sure that you intend to the slot, then press the card firmly until it fits in place. Secure the card with a screw. 4. Remove the metal cover opposite the slot that the riser card connector sits properly on the motherboard PCI slot. 2.
User Guide
Page 33
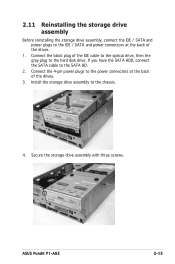
... the black plug of the IDE cable to the optical drive, then the gray plug to the power connectors at the back of the drives. 3. ASUS Pundit P1-AH2 2-15 Connect the 4-pin power plugs to the hard disk drive. Secure the storage drive assembly with three screws.
... the black plug of the IDE cable to the optical drive, then the gray plug to the power connectors at the back of the drives. 3. ASUS Pundit P1-AH2 2-15 Connect the 4-pin power plugs to the hard disk drive. Secure the storage drive assembly with three screws.
User Guide
Page 35
Chapter 3 This chapter helps you power up ASUS Pundit P1-AH2 Starting up the system and install drivers and utilities from the support CD.
Chapter 3 This chapter helps you power up ASUS Pundit P1-AH2 Starting up the system and install drivers and utilities from the support CD.
User Guide
Page 37
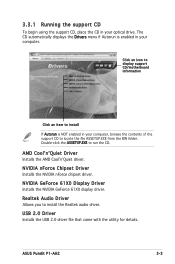
... optical drive. AMD CoolʼnʼQuiet Driver Installs the AMD CoolʼnʼQuiet driver. Realtek Audio Driver Allows you to run the CD. ASUS Pundit P1-AH2 3-3 Click an icon to display support CD/motherboard information Click an item to locate the file ASSETUP.EXE from the BIN folder. 3.3.1 Running the...
... optical drive. AMD CoolʼnʼQuiet Driver Installs the AMD CoolʼnʼQuiet driver. Realtek Audio Driver Allows you to run the CD. ASUS Pundit P1-AH2 3-3 Click an icon to display support CD/motherboard information Click an item to locate the file ASSETUP.EXE from the BIN folder. 3.3.1 Running the...
User Guide
Page 39
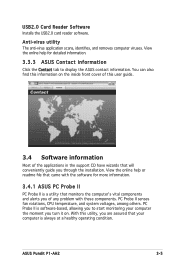
... information Click the Contact tab to start monitoring your computer is software-based, allowing you to display the ASUS contact information. With this information on . ASUS Pundit P1-AH2 3-5 USB2.0 Card Reader Software Installs the USB2.0 card reader software. PC Probe II is always at a healthy operating condition. View the online help for more ...
... information Click the Contact tab to start monitoring your computer is software-based, allowing you to display the ASUS contact information. With this information on . ASUS Pundit P1-AH2 3-5 USB2.0 Card Reader Software Installs the USB2.0 card reader software. PC Probe II is always at a healthy operating condition. View the online help for more ...
User Guide
Page 41
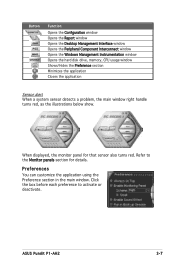
Click the box before each preference to the Monitor panels section for that sensor also turns red. ASUS Pundit P1-AH2 3-7 When displayed, the monitor panel for details. Preferences You can customize the application using the Preference section in the main window. Refer to activate or ...
Click the box before each preference to the Monitor panels section for that sensor also turns red. ASUS Pundit P1-AH2 3-7 When displayed, the monitor panel for details. Preferences You can customize the application using the Preference section in the main window. Refer to activate or ...
User Guide
Page 43
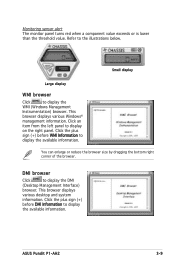
Click an item from the left panel to display the available information. Click the plus sign (+) before DMI Information to display on the right panel. ASUS Pundit P1-AH2 3-9 Refer to display the DMI (Desktop Management Interface) browser. This browser displays various Windows® management information. Monitoring sensor alert The monitor panel turns red ...
Click an item from the left panel to display the available information. Click the plus sign (+) before DMI Information to display on the right panel. ASUS Pundit P1-AH2 3-9 Refer to display the DMI (Desktop Management Interface) browser. This browser displays various Windows® management information. Monitoring sensor alert The monitor panel turns red ...
User Guide
Page 45
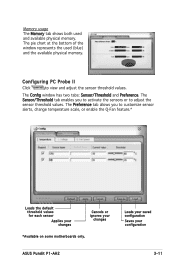
... you to activate the sensors or to view and adjust the sensor threshold values. Configuring PC Probe II Click to adjust the sensor threshold values. ASUS Pundit P1-AH2 Loads your saved configuration Saves your changes *Available on some motherboards only. Memory usage The Memory tab shows both used (blue) and the available physical...
... you to activate the sensors or to view and adjust the sensor threshold values. Configuring PC Probe II Click to adjust the sensor threshold values. ASUS Pundit P1-AH2 Loads your saved configuration Saves your changes *Available on some motherboards only. Memory usage The Memory tab shows both used (blue) and the available physical...

