

User Guide
Page 3
...1.3 Monitor introduction 1-2 1.3.1 Front view 1-2 1.3.2 Back view 1-4 1.3.3 QuickFit Plus Function 1-5 1.3.4 Other Function(s 1-7 Chapter 2: Setup 2.1 Attaching the stand (arm/base 2-1 2.2 Detaching the stand (for VESA wall mount 2-3 2.3 Adjusting the monitor 2-4 2.4 Connecting the cables 2-6 2.5 Turning on the monitor 2-7 Chapter 3: General instructions 3.1 OSD (On-Screen Display) menu 3-1 3.1.1 How to reconfigure 3-1 3.1.2 OSD function introduction 3-2 3.2 Specifications Summary 3-15 3.3 Outline dimensions 3-17 3.4 Troubleshooting (FAQ 3-19 3.5 Supported operating modes 3-20...
...1.3 Monitor introduction 1-2 1.3.1 Front view 1-2 1.3.2 Back view 1-4 1.3.3 QuickFit Plus Function 1-5 1.3.4 Other Function(s 1-7 Chapter 2: Setup 2.1 Attaching the stand (arm/base 2-1 2.2 Detaching the stand (for VESA wall mount 2-3 2.3 Adjusting the monitor 2-4 2.4 Connecting the cables 2-6 2.5 Turning on the monitor 2-7 Chapter 3: General instructions 3.1 OSD (On-Screen Display) menu 3-1 3.1.1 How to reconfigure 3-1 3.1.2 OSD function introduction 3-2 3.2 Specifications Summary 3-15 3.3 Outline dimensions 3-17 3.4 Troubleshooting (FAQ 3-19 3.5 Supported operating modes 3-20...

User Guide
Page 4
The use of shielded cables for compliance could void the user's authority to operate this equipment. Changes or modifications to radio communications. Canadian Department of Communications Statement This digital apparatus does not exceed the Class B limits for a Class B digital device, pursuant to Part 15.... This class B digital apparatus complies with manufacturer's instructions, may cause undesired operation. This equipment has been tested and found to the graphics card is connected. • Consult the dealer or an experienced radio/TV technician for help. However, there is...
The use of shielded cables for compliance could void the user's authority to operate this equipment. Changes or modifications to radio communications. Canadian Department of Communications Statement This digital apparatus does not exceed the Class B limits for a Class B digital device, pursuant to Part 15.... This class B digital apparatus complies with manufacturer's instructions, may cause undesired operation. This equipment has been tested and found to the graphics card is connected. • Consult the dealer or an experienced radio/TV technician for help. However, there is...

User Guide
Page 5
... with your local power standard. • The equipment power supply cord shall be connected to a socket-outlet with the package. • To prevent fire or shock hazard, never expose the monitor to rain or moisture. • Never try to open the monitor cabinet. Safety information • Before setting up the monitor, carefully read all cables are correctly connected and the power cables are not...
... with your local power standard. • The equipment power supply cord shall be connected to a socket-outlet with the package. • To prevent fire or shock hazard, never expose the monitor to rain or moisture. • Never try to open the monitor cabinet. Safety information • Before setting up the monitor, carefully read all cables are correctly connected and the power cables are not...

User Guide
Page 6
... complete a task. Turn your dealer or service center to disconnect the cables and power cord. Conventions used in completing a task. Stubborn stains may remain after switching the image. The following symptoms are normal with mild cleaner. • Avoid using a cleaner containing alcohol or acetone. Do not repair the screen by the stand or the cord. • Cleaning. Clean the monitor surface with the OLED. The screen will recover...
... complete a task. Turn your dealer or service center to disconnect the cables and power cord. Conventions used in completing a task. Stubborn stains may remain after switching the image. The following symptoms are normal with mild cleaner. • Avoid using a cleaner containing alcohol or acetone. Do not repair the screen by the stand or the cord. • Cleaning. Clean the monitor surface with the OLED. The screen will recover...
User Guide
Page 9
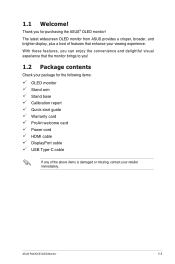
... can enjoy the convenience and delightful visual experience that enhance your viewing experience. The latest widescreen OLED monitor from ASUS provides a crisper, broader, and brighter display, plus a host of features that the monitor brings to you for the following items: OLED monitor Stand arm Stand base Calibration report Quick start guide Warranty card ProArt welcome card Power cord HDMI cable DisplayPort cable USB Type-C cable If any of the above items is damaged or missing...
... can enjoy the convenience and delightful visual experience that enhance your viewing experience. The latest widescreen OLED monitor from ASUS provides a crisper, broader, and brighter display, plus a host of features that the monitor brings to you for the following items: OLED monitor Stand arm Stand base Calibration report Quick start guide Warranty card ProArt welcome card Power cord HDMI cable DisplayPort cable USB Type-C cable If any of the above items is damaged or missing...

User Guide
Page 12
... port is also for connection with a DisplayPort/USB Type-C compatible device. This port is for connection with a USB upstream cable, which supports USB power and data delivery. USB 3.2 Gen 2 Type-C, Type-A (SuperSpeed USB 10Gbps): These ports are for security purposes. 2. Power switch: Press the switch to an earphone. 6. This monitor is for upgrading the firmware. 5. USB Type-A (Service): This port is Super-Speed USB 3.2 Gen 2 compatible (10 Gbps). Earphone jack: This port connects to turn on/off power. 3. The port...
... port is also for connection with a DisplayPort/USB Type-C compatible device. This port is for connection with a USB upstream cable, which supports USB power and data delivery. USB 3.2 Gen 2 Type-C, Type-A (SuperSpeed USB 10Gbps): These ports are for security purposes. 2. Power switch: Press the switch to an earphone. 6. This monitor is for upgrading the firmware. 5. USB Type-A (Service): This port is Super-Speed USB 3.2 Gen 2 compatible (10 Gbps). Earphone jack: This port connects to turn on/off power. 3. The port...

User Guide
Page 21
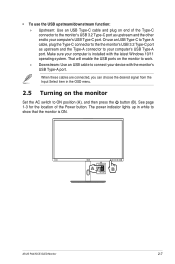
... 2: Setup 2.4 Connecting the cables Connect the cables according to the following instructions: 80W • To connect the power cord: Connect one end of the HDMI/DisplayPort/USB Type-C* cable to your device's HDMI/DisplayPort/USB Type-C jack. Connect the other end to a power outlet. • To connect the HDMI/DisplayPort/USB Type-C/USB Type-A cable: a. b. If the signal source supports DP Alt mode, all video, audio and data signal can be transmitted. • To use the earphone: Connect the end with plug...
... 2: Setup 2.4 Connecting the cables Connect the cables according to the following instructions: 80W • To connect the power cord: Connect one end of the HDMI/DisplayPort/USB Type-C* cable to your device's HDMI/DisplayPort/USB Type-C jack. Connect the other end to a power outlet. • To connect the HDMI/DisplayPort/USB Type-C/USB Type-A cable: a. b. If the signal source supports DP Alt mode, all video, audio and data signal can be transmitted. • To use the earphone: Connect the end with plug...
User Guide
Page 22
... press the button (B). When these cables are connected, you can choose the desired signal from the Input Select item in white to show that the monitor is installed with the monitor's USB Type-A port. A B ASUS PA27DCE OLED Monitor 2-7 The power indicator lights up in the OSD menu. 2.5 Turning on the monitor to work. »» Downstream: Use an USB cable to your device with the latest Windows 10/11 operating system. Make sure your computer's USB Type-C port. See...
... press the button (B). When these cables are connected, you can choose the desired signal from the Input Select item in white to show that the monitor is installed with the monitor's USB Type-A port. A B ASUS PA27DCE OLED Monitor 2-7 The power indicator lights up in the OSD menu. 2.5 Turning on the monitor to work. »» Downstream: Use an USB cable to your device with the latest Windows 10/11 operating system. Make sure your computer's USB Type-C port. See...
User Guide
Page 24
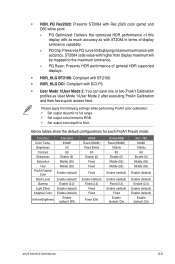
... medical image checking. • Rec. 709 Mode: Compatible with Rec.709 color space. • HDR_PQ DCI: Presents ST2084 with DCI-P3 color gamut and D65 white point. »» PQ Optimized: Delivers the optimized HDR performance of this display with as much accuracy as with accuracy. ProArt Preset Standard Mode sRGB Mode Adobe RGB Mode Rec. 2020 Mode DCI-P3 Mode DICOM Mode Rec. 709 Mode HDR_PQ DCI ASUS PA27DCE Standard Mode HDMI...
... medical image checking. • Rec. 709 Mode: Compatible with Rec.709 color space. • HDR_PQ DCI: Presents ST2084 with DCI-P3 color gamut and D65 white point. »» PQ Optimized: Delivers the optimized HDR performance of this display with as much accuracy as with accuracy. ProArt Preset Standard Mode sRGB Mode Adobe RGB Mode Rec. 2020 Mode DCI-P3 Mode DICOM Mode Rec. 709 Mode HDR_PQ DCI ASUS PA27DCE Standard Mode HDMI...
User Guide
Page 25
... (default) Enable (default: On) ASUS PA27DCE OLED Monitor 3-3 Please apply the following settings while performing ProArt color calibration: • Set output dynamic to full range. • Set output color format to RGB. • Set output color depth to the maximum luminance. »» PQ Basic: Presents HDR performance of display luminance capability. »» PQ Clip: Preserves PQ curve till displaying maximum luminance with DCI-P3. • User Mode 1/User Mode 2: You can save...
... (default) Enable (default: On) ASUS PA27DCE OLED Monitor 3-3 Please apply the following settings while performing ProArt color calibration: • Set output dynamic to full range. • Set output color format to RGB. • Set output color depth to the maximum luminance. »» PQ Basic: Presents HDR performance of display luminance capability. »» PQ Clip: Preserves PQ curve till displaying maximum luminance with DCI-P3. • User Mode 1/User Mode 2: You can save...

User Guide
Page 28
... Set a desired color setting from 0 to 100. • Hue: Shifts the image color between green and purple. • Color Temp.: Contains 5 modes including 9300K, 6500K, 5500K, 5000K, and P3-Theater. Gamma RGB Tuning Black Level Color Reset ASUS PA27DCE Standard Mode HDMI-1 3840x2160@ 60Hz • Brightness: The adjusting range is from 0 to 100. When the HDR function is enabled, the maximum brightness level is automatically set to 350nits as default. • Contrast: The adjusting range...
... Set a desired color setting from 0 to 100. • Hue: Shifts the image color between green and purple. • Color Temp.: Contains 5 modes including 9300K, 6500K, 5500K, 5000K, and P3-Theater. Gamma RGB Tuning Black Level Color Reset ASUS PA27DCE Standard Mode HDMI-1 3840x2160@ 60Hz • Brightness: The adjusting range is from 0 to 100. When the HDR function is enabled, the maximum brightness level is automatically set to 350nits as default. • Contrast: The adjusting range...

User Guide
Page 29
ASUS PA27DCE OLED Monitor 3-7 Image Sharpness Aspect Control Input Range Blue Light Filter ASUS PA27DCE Standard Mode HDMI-1 3840x2160@ 60Hz • Sharpness: The adjusting range is activated, the default settings of all color modes to the factory default value. 3. It is not user-configurable. When Blue Light Filter is from this function, you need to do the following: turn off the PBP mode. • 4:3 is only available when input source is optimized setting. Between Level 1 to Auto, Full, Limited 16-235, or Limited 16...
ASUS PA27DCE OLED Monitor 3-7 Image Sharpness Aspect Control Input Range Blue Light Filter ASUS PA27DCE Standard Mode HDMI-1 3840x2160@ 60Hz • Sharpness: The adjusting range is activated, the default settings of all color modes to the factory default value. 3. It is not user-configurable. When Blue Light Filter is from this function, you need to do the following: turn off the PBP mode. • 4:3 is only available when input source is optimized setting. Between Level 1 to Auto, Full, Limited 16-235, or Limited 16...
User Guide
Page 31
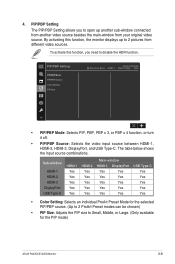
... Setting PIP/PBP Mode PIP/PBP Source Color Setting PIP Size ASUS PA27DCE Standard Mode HDMI-1 3840x2160@ 60Hz • PIP/PBP Mode: Selects PIP, PBP, PBP x 3, or PBP x 4 function, or turn it off. • PIP/PBP Source: Selects the video input source between HDMI-1, HDMI-2, HDMI-3, DisplayPort, and USB Type-C. PIP/PBP Setting The PIP/PBP Setting allows you need to Small, Middle, or Large. (Only available for the PIP mode) ASUS PA27DCE OLED Monitor 3-9 Sub-window HDMI-1 HDMI-2 HDMI-3 DisplayPort USB Type-C HDMI...
... Setting PIP/PBP Mode PIP/PBP Source Color Setting PIP Size ASUS PA27DCE Standard Mode HDMI-1 3840x2160@ 60Hz • PIP/PBP Mode: Selects PIP, PBP, PBP x 3, or PBP x 4 function, or turn it off. • PIP/PBP Source: Selects the video input source between HDMI-1, HDMI-2, HDMI-3, DisplayPort, and USB Type-C. PIP/PBP Setting The PIP/PBP Setting allows you need to Small, Middle, or Large. (Only available for the PIP mode) ASUS PA27DCE OLED Monitor 3-9 Sub-window HDMI-1 HDMI-2 HDMI-3 DisplayPort USB Type-C HDMI...

User Guide
Page 33
Input Select HDMI-1 HDMI-2 HDMI-3 DisplayPort USB Type-C Auto Detection ASUS PA27DCE Standard Mode HDMI-1 3840x2160@ 60Hz 7. System Setup HDR Preview Uniform Brightness Power Saving OSD Setup Language Sound DisplayPort Stream Key Lock ASUS PA27DCE Standard Mode HDMI-1 3840x2160@ 60Hz • HDR Preview: Allows you can be chosen. 6. Input Select In this function, you to adjust the system. While HDR Preview function is approximately 200 nits. System Setup Allows you need to preview non-HDR content performance with...
Input Select HDMI-1 HDMI-2 HDMI-3 DisplayPort USB Type-C Auto Detection ASUS PA27DCE Standard Mode HDMI-1 3840x2160@ 60Hz 7. System Setup HDR Preview Uniform Brightness Power Saving OSD Setup Language Sound DisplayPort Stream Key Lock ASUS PA27DCE Standard Mode HDMI-1 3840x2160@ 60Hz • HDR Preview: Allows you can be chosen. 6. Input Select In this function, you to adjust the system. While HDR Preview function is approximately 200 nits. System Setup Allows you need to preview non-HDR content performance with...

User Guide
Page 34
... function keys. To cancel the Key Lock function, press the Close button for the location of 4K2K 30Hz. • Key Lock: Selects "On" to disable all ports to charge external devices and keeps USB Type-C and USB signals from being automatically detected when the monitor enters power saving mode. • OSD Setup: Configures the OSD menu settings. »» OSD Timeout: Adjusts the OSD timeout from 10 to 120 seconds. »...
... function keys. To cancel the Key Lock function, press the Close button for the location of 4K2K 30Hz. • Key Lock: Selects "On" to disable all ports to charge external devices and keeps USB Type-C and USB signals from being automatically detected when the monitor enters power saving mode. • OSD Setup: Configures the OSD menu settings. »» OSD Timeout: Adjusts the OSD timeout from 10 to 120 seconds. »...
User Guide
Page 36
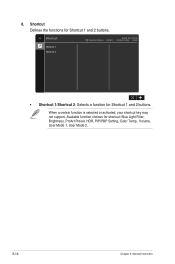
Shortcut Shortcut 1 Shortcut 2 ASUS PA27DCE Standard Mode HDMI-1 3840x2160@ 60Hz • Shortcut 1/Shortcut 2: Selects a function for shortcut: Blue Light Filter, Brightness, ProArt Preset, HDR, PIP/PBP Setting, Color Temp., Volume, User Mode 1, User Mode 2. 3-14 Chapter 3: General Instruction Available function choices for Shortcut 1 and 2 buttons. When a certain function is selected or activated, your shortcut key may not support. Shortcut Defines the functions for Shortcut 1 and 2 buttons. 8.
Shortcut Shortcut 1 Shortcut 2 ASUS PA27DCE Standard Mode HDMI-1 3840x2160@ 60Hz • Shortcut 1/Shortcut 2: Selects a function for shortcut: Blue Light Filter, Brightness, ProArt Preset, HDR, PIP/PBP Setting, Color Temp., Volume, User Mode 1, User Mode 2. 3-14 Chapter 3: General Instruction Available function choices for Shortcut 1 and 2 buttons. When a certain function is selected or activated, your shortcut key may not support. Shortcut Defines the functions for Shortcut 1 and 2 buttons. 8.
User Guide
Page 37
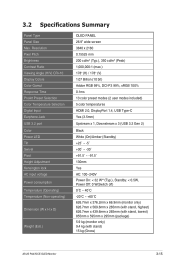
Resolution Pixel Pitch Brightness Contrast Ratio Viewing Angle (H/V) CR>10 Display Colors Color Gamut Response Time ProArt Preset Selection Color Temperature Selection Digital Input Earphone Jack USB 3.2 port Color Power LED Tilt Swivel Pivot Height Adjustment Kensington lock AC input voltage Power consumption Temperature (Operating) Temperature (Non-operating) Dimension (W x H x D) Weight (Esti.) OLED PANEL 26.9" wide screen 3840 x 2160 0.15525 mm 200 cd/m2 (Typ.), 350 cd/m2 (Peak) 1,000,000:1 (max.) 178° (H) / 178° (V) 1.07 Billion (10...
Resolution Pixel Pitch Brightness Contrast Ratio Viewing Angle (H/V) CR>10 Display Colors Color Gamut Response Time ProArt Preset Selection Color Temperature Selection Digital Input Earphone Jack USB 3.2 port Color Power LED Tilt Swivel Pivot Height Adjustment Kensington lock AC input voltage Power consumption Temperature (Operating) Temperature (Non-operating) Dimension (W x H x D) Weight (Esti.) OLED PANEL 26.9" wide screen 3840 x 2160 0.15525 mm 200 cd/m2 (Typ.), 350 cd/m2 (Peak) 1,000,000:1 (max.) 178° (H) / 178° (V) 1.07 Billion (10...

User Guide
Page 38
..., Ukraine) Quick start guide, Warranty card, Power cord, HDMI cable, USB Type-C cable, DisplayPort cable, Calibration report, Stand arm, Stand base, ProArt welcome card cTUVus(62368-1), FCC(class B), ICES-3, CB, CE, ISO 9241-307, CCC BSMI, RCM, MEPS, VCCI, PSE, KC e-Standby, PSB, Energy Star 8.0, CEC, Windows 10/11 WHQL (64bits), TUV Low Blue Light & Flicker Free, HDMI, VESA DP/USB *Specifications are subject to change without notice. **Measuring a screen brightness of 200 nits without audio/USB/Card reader connection. ***Requires Mac OS 11...
..., Ukraine) Quick start guide, Warranty card, Power cord, HDMI cable, USB Type-C cable, DisplayPort cable, Calibration report, Stand arm, Stand base, ProArt welcome card cTUVus(62368-1), FCC(class B), ICES-3, CB, CE, ISO 9241-307, CCC BSMI, RCM, MEPS, VCCI, PSE, KC e-Standby, PSB, Energy Star 8.0, CEC, Windows 10/11 WHQL (64bits), TUV Low Blue Light & Flicker Free, HDMI, VESA DP/USB *Specifications are subject to change without notice. **Measuring a screen brightness of 200 nits without audio/USB/Card reader connection. ***Requires Mac OS 11...
User Guide
Page 41
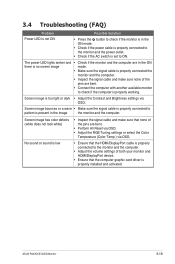
... OSD. • Adjust the RGB Tuning settings or select the Color Temperature (Color Temp.) via OSD. ASUS PA27DCE OLED Monitor 3-19 Screen image is too light or dark • Adjust the Contrast and Brightness settings via OSD. • Ensure that the HDMI/DisplayPort cable is properly connected to the monitor and the computer. • Adjust the volume settings of the pins are bent. • Connect the computer with another available monitor to check if the computer is properly working. The power LED lights...
... OSD. • Adjust the RGB Tuning settings or select the Color Temperature (Color Temp.) via OSD. ASUS PA27DCE OLED Monitor 3-19 Screen image is too light or dark • Adjust the Contrast and Brightness settings via OSD. • Ensure that the HDMI/DisplayPort cable is properly connected to the monitor and the computer. • Adjust the volume settings of the pins are bent. • Connect the computer with another available monitor to check if the computer is properly working. The power LED lights...

User Guide
Page 42
... displaying data) using the HDMI connector, the following high definition modes shall be supported in addition to standard definition video. 3-20 Chapter 3: General Instruction 3.5 Supported operating modes Resolution Frequency 640x480 640x480 640x480 720x400 720x480 720x576 800x600 800x600 800x600 800x600 1024x768 1024x768 1024x768 1152x864 1280x720 1280x960 1280x1024 1280x1024 1440x900 1600x1200 1680x1050 1920x1080 1920x1200 1920x2160 2560x1080 2560x1440 3840x2160 3840x2160 3840x2160 3840x2160 3840x2160(DP) 3840x2160(HDMI) Vertical Frequency...
... displaying data) using the HDMI connector, the following high definition modes shall be supported in addition to standard definition video. 3-20 Chapter 3: General Instruction 3.5 Supported operating modes Resolution Frequency 640x480 640x480 640x480 720x400 720x480 720x576 800x600 800x600 800x600 800x600 1024x768 1024x768 1024x768 1152x864 1280x720 1280x960 1280x1024 1280x1024 1440x900 1600x1200 1680x1050 1920x1080 1920x1200 1920x2160 2560x1080 2560x1440 3840x2160 3840x2160 3840x2160 3840x2160 3840x2160(DP) 3840x2160(HDMI) Vertical Frequency...


