
User Manual
Page 3
Table of contents Notices iv Safety information v Care and Cleaning vi Package contents viii Chapter 1: Product introduction 1.1 Welcome 1-2 1.2 Features 1-2 1.3 Monitor introduction 1-3 Chapter 2: Setup 2.1 Unfolding the monitor 2-2 2.2 Connecting the cables 2-2 2.3 Turning on the monitor 2-4 2.4 Adjusting the tilt 2-5 2.5 Detaching the stand (for VESA wall mount 2-6 Chapter 3: General Instruction 3.1 OSD (On-Screen Display) menu 3-2 3.1.1 Configuring the OSD...
Table of contents Notices iv Safety information v Care and Cleaning vi Package contents viii Chapter 1: Product introduction 1.1 Welcome 1-2 1.2 Features 1-2 1.3 Monitor introduction 1-3 Chapter 2: Setup 2.1 Unfolding the monitor 2-2 2.2 Connecting the cables 2-2 2.3 Turning on the monitor 2-4 2.4 Adjusting the tilt 2-5 2.5 Detaching the stand (for VESA wall mount 2-6 Chapter 3: General Instruction 3.1 OSD (On-Screen Display) menu 3-2 3.1.1 Configuring the OSD...
User Manual
Page 6
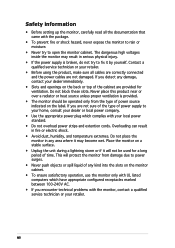
.... Overloading can result in serious physical injury. • If the power supply is provided. • The monitor should be used for ventilation. Place the monitor on the label. Never place this product near or over a radiator or heat source unless proper ventilation is broken...Use the appropriate power plug which have appropriate configured receptacles marked between 100-240V AC. • If you encounter technical problems with the monitor, contact a qualified service technician or your local power standard. • Do not overload power strips and extention cords. If you are...
.... Overloading can result in serious physical injury. • If the power supply is provided. • The monitor should be used for ventilation. Place the monitor on the label. Never place this product near or over a radiator or heat source unless proper ventilation is broken...Use the appropriate power plug which have appropriate configured receptacles marked between 100-240V AC. • If you encounter technical problems with the monitor, contact a qualified service technician or your local power standard. • Do not overload power strips and extention cords. If you are...

User Manual
Page 7
... used in completing a task. Stubborn stains may flicker during the initial use with a lint-free, non-abrasive cloth. The following symptoms are normal with the monitor: • The screen may be removed with a cloth dampened with mild cleaner. • Avoid using a cleaner containing alcohol or acetone. I M P O R T A ... when trying to disconnect the cables and power cord. Use a cleaner intended for use due to complete a task. Clean the monitor surface with the LCD. Never spray cleaner directly on the screen, as it may find slightly uneven brightness on the screen depending ...
... used in completing a task. Stubborn stains may flicker during the initial use with a lint-free, non-abrasive cloth. The following symptoms are normal with the monitor: • The screen may be removed with a cloth dampened with mild cleaner. • Avoid using a cleaner containing alcohol or acetone. I M P O R T A ... when trying to disconnect the cables and power cord. Use a cleaner intended for use due to complete a task. Clean the monitor surface with the LCD. Never spray cleaner directly on the screen, as it may find slightly uneven brightness on the screen depending ...
User Manual
Page 9
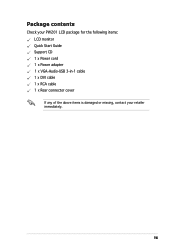
Package contents Check your PW201 LCD package for the following items: LCD monitor Quick Start Guide Support CD 1 x Power cord 1 x Power adapter 1 x VGA-Audio-USB 3-in-1 cable 1 x DVI cable 1 x RCA cable 1 x Rear connector cover If any of the above items is damaged or missing, contact your retailer immediately. ix
Package contents Check your PW201 LCD package for the following items: LCD monitor Quick Start Guide Support CD 1 x Power cord 1 x Power adapter 1 x VGA-Audio-USB 3-in-1 cable 1 x DVI cable 1 x RCA cable 1 x Rear connector cover If any of the above items is damaged or missing, contact your retailer immediately. ix

User Manual
Page 11
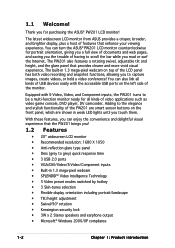
The chapter lists the monitor features including introduction on the front and rear panels as well as the side view. Product introduction Chapter 1 This chapter gives a general description of the ASUS LCD monitor PW201.
The chapter lists the monitor features including introduction on the front and rear panels as well as the side view. Product introduction Chapter 1 This chapter gives a general description of the ASUS LCD monitor PW201.
User Manual
Page 12
...camcorder. With these features, you can enjoy the convenience and delightful visual experience that the PW201 brings you for purchasing the ASUS® PW201 LCD monitor! Thank you ! 1.2 Features • 20" widescreen LCD monitor • Recommended resolution: 1680 X 1050 • Anti-reflection glare type panel •... clearer and more vivid visual experience. You can turn the ASUS® PW201 LCD monitor counterclockwise for all kinds of USB devices easily with S-Video, Video, and Component inputs, the PW201 turns to the elegance and stylish functionality of having to scroll...
...camcorder. With these features, you can enjoy the convenience and delightful visual experience that the PW201 brings you for purchasing the ASUS® PW201 LCD monitor! Thank you ! 1.2 Features • 20" widescreen LCD monitor • Recommended resolution: 1680 X 1050 • Anti-reflection glare type panel •... clearer and more vivid visual experience. You can turn the ASUS® PW201 LCD monitor counterclockwise for all kinds of USB devices easily with S-Video, Video, and Component inputs, the PW201 turns to the elegance and stylish functionality of having to scroll...

User Manual
Page 13
... is activated. ASUS LCD Monitor PW201 1-3 Sensor: • Touch this sensor to select the input source you want to enable. • VESA Display Data Channel DDC2B compliance • VESA wall mount compliance (100 x 100 mm) • EPA ENERGY STAR® and ergonomic design • Touch sensor buttons • RoHS compliance 1.3 Monitor introduction Front view...
... is activated. ASUS LCD Monitor PW201 1-3 Sensor: • Touch this sensor to select the input source you want to enable. • VESA Display Data Channel DDC2B compliance • VESA wall mount compliance (100 x 100 mm) • EPA ENERGY STAR® and ergonomic design • Touch sensor buttons • RoHS compliance 1.3 Monitor introduction Front view...

User Manual
Page 14
... to its optimized position, clock, and phase. 6. Power sensor/indicator • Touch this sensor for 2 to 4 seconds to automatically adjust the image to turn the monitor on/off. Sensor: • Touch this sensor to increase the value of the function selected or move to the previous function. • This is also...
... to its optimized position, clock, and phase. 6. Power sensor/indicator • Touch this sensor for 2 to 4 seconds to automatically adjust the image to turn the monitor on/off. Sensor: • Touch this sensor to increase the value of the function selected or move to the previous function. • This is also...

User Manual
Page 15
... cable, which usually has red, blue, and green colored plugs. 5. The component cable (YPbPr) and the S-Video cable are purchased separately. D V I p o r t . This port connects your monitor to an S-video cable. 6. U S B p o r t . ASUS LCD Monitor PW201 1-5
... cable, which usually has red, blue, and green colored plugs. 5. The component cable (YPbPr) and the S-Video cable are purchased separately. D V I p o r t . This port connects your monitor to an S-video cable. 6. U S B p o r t . ASUS LCD Monitor PW201 1-5

User Manual
Page 17
Setup Chapter 2 This chapter provides instructions on how to correctly connect cables, properly adjust the LCD monitor, and install the VESA wall mount.
Setup Chapter 2 This chapter provides instructions on how to correctly connect cables, properly adjust the LCD monitor, and install the VESA wall mount.

User Manual
Page 18
Adjust the monitor to your desired height and tilt. 2. Stand 2.2 Connecting the cables To connect the cables: 1. To unfold the monitor, hold the stand with one hand and carefully tilt the monitor forward with the other hand. Input ports Front view Side view 2-2 Chapter 2: Setup 2.1 Unfolding the monitor The monitor is folded in the package. Turn the monitor 90º counterclockwise so you can clearly see the ports at the bottom of the rear panel.
Adjust the monitor to your desired height and tilt. 2. Stand 2.2 Connecting the cables To connect the cables: 1. To unfold the monitor, hold the stand with one hand and carefully tilt the monitor forward with the other hand. Input ports Front view Side view 2-2 Chapter 2: Setup 2.1 Unfolding the monitor The monitor is folded in the package. Turn the monitor 90º counterclockwise so you can clearly see the ports at the bottom of the rear panel.
User Manual
Page 19
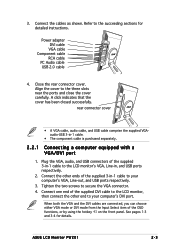
...cover. rear connector cover • A VGA cable, audio cable, and USB cable comprise the supplied VGAaudio-USB 3-in -1 cable to the LCD monitor's VGA, Line-in, and USB ports respectively. 2. Connect one end of the supplied DVI cable to the succeeding sections for details. A click ...indicates that the cover has been closed successfully. ASUS LCD Monitor PW201 2-3 Plug the VGA, audio, and USB connectors of the OSD functions, or by using the hotkey on the front panel. 3. Refer ...
...cover. rear connector cover • A VGA cable, audio cable, and USB cable comprise the supplied VGAaudio-USB 3-in -1 cable to the LCD monitor's VGA, Line-in, and USB ports respectively. 2. Connect one end of the supplied DVI cable to the succeeding sections for details. A click ...indicates that the cover has been closed successfully. ASUS LCD Monitor PW201 2-3 Plug the VGA, audio, and USB connectors of the OSD functions, or by using the hotkey on the front panel. 3. Refer ...
User Manual
Page 20
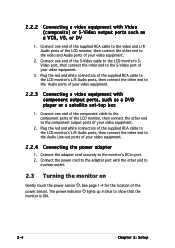
... of your video equipment. 2.2.4 Connecting the power adapter 1. Plug the red and white connectors of the supplied RCA cable to the LCD monitor's L/R Audio ports, then connect the other end to the video and Audio ports of your video equipment. 2. Connect the adapter cord ...securely to show that the monitor is ON. 2-4 Chapter 2: Setup Connect one end of your video equipment. 2.2.3 Connecting a video equipment with component output ports, such as a VCR...
... of your video equipment. 2.2.4 Connecting the power adapter 1. Plug the red and white connectors of the supplied RCA cable to the LCD monitor's L/R Audio ports, then connect the other end to the video and Audio ports of your video equipment. 2. Connect the adapter cord ...securely to show that the monitor is ON. 2-4 Chapter 2: Setup Connect one end of your video equipment. 2.2.3 Connecting a video equipment with component output ports, such as a VCR...

User Manual
Page 21
2.4 Adjusting the monitor You can adjust the monitor to several directions as shown below. • For optimal viewing, we recommend that you look at the monitor, then adjust the monitor to the angle that is most comfortable for you. • Hold the stand to prevent the monitor from falling when you change its angle. • You can adjust the monitor's angle from -5º to 25º. -5º~25º • You can also turn the monitor 90º counterclockwise. 90º ASUS LCD Monitor PW201 2-5
2.4 Adjusting the monitor You can adjust the monitor to several directions as shown below. • For optimal viewing, we recommend that you look at the monitor, then adjust the monitor to the angle that is most comfortable for you. • Hold the stand to prevent the monitor from falling when you change its angle. • You can adjust the monitor's angle from -5º to 25º. -5º~25º • You can also turn the monitor 90º counterclockwise. 90º ASUS LCD Monitor PW201 2-5

User Manual
Page 22
• The stand allows you cover the surface with soft cloth to prevent damage to the monitor. Remove the VESA cover from the stand. Position the front of the PW201 monitor is specially designed for VESA wall mount) The detachable stand of the monitor face down to open it. 2. We recommend that you to turn the monitor left/right up to 120º. 120º 2.5 Detaching the stand (for VESA wall mount. VESA Cover 2-6 Chapter 2: Setup To detach the stand: 1. Turn the VESA cover counterclockwise to make the detachment safer and easier.
• The stand allows you cover the surface with soft cloth to prevent damage to the monitor. Remove the VESA cover from the stand. Position the front of the PW201 monitor is specially designed for VESA wall mount) The detachable stand of the monitor face down to open it. 2. We recommend that you to turn the monitor left/right up to 120º. 120º 2.5 Detaching the stand (for VESA wall mount. VESA Cover 2-6 Chapter 2: Setup To detach the stand: 1. Turn the VESA cover counterclockwise to make the detachment safer and easier.

User Manual
Page 23
Use a screwdriver to remove the four screws on the monitor stand. ASUS LCD Monitor PW201 2-7 3. The VESA wall mount (100 mm x 100 mm) is purchased separately.
Use a screwdriver to remove the four screws on the monitor stand. ASUS LCD Monitor PW201 2-7 3. The VESA wall mount (100 mm x 100 mm) is purchased separately.

User Manual
Page 27
... adjusting range is from this function. • Contrast. C o l o r Select the image color you like from 0-100. the adjusting range is from this function. • Brightness. ASUS LCD Monitor PW201 3-3 Adjusts the horizontal postition (H-Position) and the vertical position (V-Position) of R (Red), G (Green), and B (Bluee) are userconfigurable; In the User mode, colors of the...
... adjusting range is from this function. • Contrast. C o l o r Select the image color you like from 0-100. the adjusting range is from this function. • Brightness. ASUS LCD Monitor PW201 3-3 Adjusts the horizontal postition (H-Position) and the vertical position (V-Position) of R (Red), G (Green), and B (Bluee) are userconfigurable; In the User mode, colors of the...

User Manual
Page 28
... can also use this function by touching the sensor on the front bezel. 5. PIP Setup • This Picture-in-Picture (PIP) function allows the LCD monitor to display two pictures at the same time. Main and PIP input combination matrix PIP VGA DVI Video S-Video Main VGA o o o DVI o o o Video o o x S-Video o o x Component...
... can also use this function by touching the sensor on the front bezel. 5. PIP Setup • This Picture-in-Picture (PIP) function allows the LCD monitor to display two pictures at the same time. Main and PIP input combination matrix PIP VGA DVI Video S-Video Main VGA o o o DVI o o o Video o o x S-Video o o x Component...
User Manual
Page 29
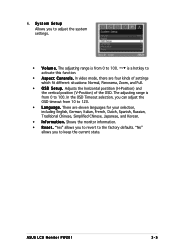
6. Shows the monitor information. • R e s e t . activate this function. The adjusting range is a hotkey to • Aspect Controls. There are four kinds of the OSD. is from 0 to 100. ... mode, there are eleven languages for your selection, including English, German, Italian, French, Dutch, Spanish, Russian, Traditional Chinese, Simplified Chinese, Japanese, and Korean. • Information. ASUS LCD Monitor PW201 3-5
6. Shows the monitor information. • R e s e t . activate this function. The adjusting range is a hotkey to • Aspect Controls. There are four kinds of the OSD. is from 0 to 100. ... mode, there are eleven languages for your selection, including English, German, Italian, French, Dutch, Spanish, Russian, Traditional Chinese, Simplified Chinese, Japanese, and Korean. • Information. ASUS LCD Monitor PW201 3-5

User Manual
Page 30
...; The Pivot®Pro software is designed for different rotation degrees by 90º, 180º, and 270º to meet the orientation of the monitor. • Before starting to www.portrait.com. • This software only supports Windows® 98SE, ME, NT 4.0, 2000, and XP operating systems. 3-6 Chapter 3: General Instruction...
...; The Pivot®Pro software is designed for different rotation degrees by 90º, 180º, and 270º to meet the orientation of the monitor. • Before starting to www.portrait.com. • This software only supports Windows® 98SE, ME, NT 4.0, 2000, and XP operating systems. 3-6 Chapter 3: General Instruction...


