

User Guide
Page 3
Table of contents Notices iv Safety information v Care & Cleaning vi Package contents viii Chapter 1: Product introduction 1.1 Welcome 1-2 1.2 Features 1-2 1.3 Monitor introduction 1-3 Chapter 2: Setup 2.1 Unfolding the monitor 2-2 2.2 Connecting the cables 2-2 2.3 Turning on the monitor 2-3 2.4 Adjusting the tilt 2-4 2.5 Detaching the stand (for VESA wall mount 2-5 Chapter 3: General Instruction 3.1 OSD (On-Screen Display) menu 3-2 3.1.1 How to reconfigure 3-2 3.1.2 OSD...
Table of contents Notices iv Safety information v Care & Cleaning vi Package contents viii Chapter 1: Product introduction 1.1 Welcome 1-2 1.2 Features 1-2 1.3 Monitor introduction 1-3 Chapter 2: Setup 2.1 Unfolding the monitor 2-2 2.2 Connecting the cables 2-2 2.3 Turning on the monitor 2-3 2.4 Adjusting the tilt 2-4 2.5 Detaching the stand (for VESA wall mount 2-5 Chapter 3: General Instruction 3.1 OSD (On-Screen Display) menu 3-2 3.1.1 How to reconfigure 3-2 3.1.2 OSD...

User Guide
Page 5
...spill liquid of the cabinet are provided for a long period of power source indicated on the label. v The dangerous high voltages inside the monitor may become wet. Do not block these slots. Never place this product near or over a radiator or heat source unless proper ventilation is ... that came with your local power standard. • Do not overload power strips and extention cords. If you encounter technical problems with the monitor, contact a qualified service technician or your dealer immediately. • Slots and openings on the back or top of any area where it ...
...spill liquid of the cabinet are provided for a long period of power source indicated on the label. v The dangerous high voltages inside the monitor may become wet. Do not block these slots. Never place this product near or over a radiator or heat source unless proper ventilation is ... that came with your local power standard. • Do not overload power strips and extention cords. If you encounter technical problems with the monitor, contact a qualified service technician or your dealer immediately. • Slots and openings on the back or top of any area where it ...

User Guide
Page 6
...initial use with the LCD. The screen will recover slowly or you can turn it on again to the nature of the monitor. N O T E : Tips and additional information to complete a task. When lifting or carrying the monitor, grasp the edges of the fluorescent light. Clean the monitor surface with mild cleaner... stand or the cord. • Cleaning. Use a cleaner intended for hours, an afterimage of the previous screen may drip inside the monitor and cause an electric shock. Turn off and unplug the power cord. Never spray cleaner directly on the desktop pattern you use. •...
...initial use with the LCD. The screen will recover slowly or you can turn it on again to the nature of the monitor. N O T E : Tips and additional information to complete a task. When lifting or carrying the monitor, grasp the edges of the fluorescent light. Clean the monitor surface with mild cleaner... stand or the cord. • Cleaning. Use a cleaner intended for hours, an afterimage of the previous screen may drip inside the monitor and cause an electric shock. Turn off and unplug the power cord. Never spray cleaner directly on the desktop pattern you use. •...

User Guide
Page 8
viii Package contents Check your PW191 Series LCD package for the following items: LCD monitor Quick Start Guide Support CD 1 x Power cord 1 x Power adapter 1 x VGA cable 1 x DVI cable (PW191/PW191A) 1 x Audio cable 1 x Rear connector cover If any of the above items is damaged or missing, contact your retailer immediately.
viii Package contents Check your PW191 Series LCD package for the following items: LCD monitor Quick Start Guide Support CD 1 x Power cord 1 x Power adapter 1 x VGA cable 1 x DVI cable (PW191/PW191A) 1 x Audio cable 1 x Rear connector cover If any of the above items is damaged or missing, contact your retailer immediately.

User Guide
Page 9
The chapter lists the monitor features including introduction on the front and rear panels. Product introduction Chapter 1 This chapter gives a general description of the ASUS LCD monitor PW191 Series.
The chapter lists the monitor features including introduction on the front and rear panels. Product introduction Chapter 1 This chapter gives a general description of the ASUS LCD monitor PW191 Series.

User Guide
Page 10
... turn the ASUS® PW191 Series LCD monitor counterclockwise for purchasing the ASUS® PW191 Series LCD monitor! Thank you read or surf the Internet. The latest widescreen LCD monitor from ASUS provides a crisper, broader, and brighter display, plus a host of the PW191 Series. The PW191 Series also ...until you ! 1.2 Features • 19" Widescreen LCD Monitor • Recommended resolution: 1440 X 900 • Anti-reflection glare type panel (PW191 only) • 8ms (Tr+Tf) Quick response time (PW191) 5ms (Tr+Tf) Quick response time (PW191A/PW191S) • SPLENDID™ Video ...
... turn the ASUS® PW191 Series LCD monitor counterclockwise for purchasing the ASUS® PW191 Series LCD monitor! Thank you read or surf the Internet. The latest widescreen LCD monitor from ASUS provides a crisper, broader, and brighter display, plus a host of the PW191 Series. The PW191 Series also ...until you ! 1.2 Features • 19" Widescreen LCD Monitor • Recommended resolution: 1440 X 900 • Anti-reflection glare type panel (PW191 only) • 8ms (Tr+Tf) Quick response time (PW191) 5ms (Tr+Tf) Quick response time (PW191A/PW191S) • SPLENDID™ Video ...

User Guide
Page 11
...• Touch this sensor to decrease the value of the function selected or move to the panel and the sensors. 1. ASUS LCD Monitor PW191 Series 1-3 1.3 Monitor introduction Front of the function selected or move to enter/select the icon (function) highlighted while the OSD menu is activated. ...2. Sensor: • Touch this sensor to increase the value of the LCD monitor Stereo Speaker Base 3 1 22 3 44 55 The touch sensors are sensitive. Sensor: • Touch this sensor to the previous fuction. &#...
...• Touch this sensor to decrease the value of the function selected or move to the panel and the sensors. 1. ASUS LCD Monitor PW191 Series 1-3 1.3 Monitor introduction Front of the function selected or move to enter/select the icon (function) highlighted while the OSD menu is activated. ...2. Sensor: • Touch this sensor to increase the value of the LCD monitor Stereo Speaker Base 3 1 22 3 44 55 The touch sensors are sensitive. Sensor: • Touch this sensor to the previous fuction. &#...

User Guide
Page 12
Power sensor/indicator • Touch this hotkey to switch from five video preset modes (Game Mode, Night View Mode, Scenery Mode, Standard Mode, Theater Mode) with SPLENDID™ Video Enhancement Technology. • Exit the OSD menu or go back to the previous menu as the OSD menu is active. • Automatically adjust the image to turn the monitor on/off Status Blue Amber OFF Description ON Standby mode OFF 1-4 Chapter 1: Product introduction Sensor: • Use this sensor to its optimized position, clock, and phase by touching the sensor for 2-4 seconds. 5. 4.
Power sensor/indicator • Touch this hotkey to switch from five video preset modes (Game Mode, Night View Mode, Scenery Mode, Standard Mode, Theater Mode) with SPLENDID™ Video Enhancement Technology. • Exit the OSD menu or go back to the previous menu as the OSD menu is active. • Automatically adjust the image to turn the monitor on/off Status Blue Amber OFF Description ON Standby mode OFF 1-4 Chapter 1: Product introduction Sensor: • Use this sensor to its optimized position, clock, and phase by touching the sensor for 2-4 seconds. 5. 4.

User Guide
Page 13
... mini-plug (3.5mm). i n p o r t . The headphone is for PC (Personal Computer) DVI-D digital signal connection. (PW191/PW191A) 3. i n p o r t . V G A p o r t . D C - D V I p o r t . This port connects PC audio source by the bundled audio cable . 5. A u d i o - Rear of the LCD monitor 1 2 3 4 5 1. This port connects the power connector from the bundled power adapter. 2. ASUS LCD Monitor PW191 Series 1-5 This 24-pin port is for PC VGA connection. 4.
... mini-plug (3.5mm). i n p o r t . The headphone is for PC (Personal Computer) DVI-D digital signal connection. (PW191/PW191A) 3. i n p o r t . V G A p o r t . D C - D V I p o r t . This port connects PC audio source by the bundled audio cable . 5. A u d i o - Rear of the LCD monitor 1 2 3 4 5 1. This port connects the power connector from the bundled power adapter. 2. ASUS LCD Monitor PW191 Series 1-5 This 24-pin port is for PC VGA connection. 4.

User Guide
Page 15
Chapter 2 This chapter provides instructions on how to correctly connect cables and properly adjust the tilt of the LCD monitor. Setup
Chapter 2 This chapter provides instructions on how to correctly connect cables and properly adjust the tilt of the LCD monitor. Setup

User Guide
Page 16
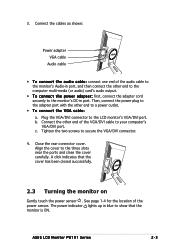
Stand 2.2 Connecting the cables To connect the cables: 1. Turn the monitor 90º counterclockwise so you can clearly see the ports at the bottom of the rear panel. To unfold the monitor, hold the stand with one hand and carefully tilt the monitor forward with the other hand. Adjust the monitor to your desired height and tilt. 2. 2.1 Unfolding the monitor The monitor is folded in the package. Input ports Front view Side view 2-2 Chapter 2: Setup
Stand 2.2 Connecting the cables To connect the cables: 1. Turn the monitor 90º counterclockwise so you can clearly see the ports at the bottom of the rear panel. To unfold the monitor, hold the stand with one hand and carefully tilt the monitor forward with the other hand. Adjust the monitor to your desired height and tilt. 2. 2.1 Unfolding the monitor The monitor is folded in the package. Input ports Front view Side view 2-2 Chapter 2: Setup
User Guide
Page 17
... the adapter cord securely to show that the cover has been closed successfully. 2.3 Turning the monitor on Gently touch the power sensor . Close the rear connector cover. Align the cover to the LCD monitor's VGA/DVI port. ASUS LCD Monitor PW191 Series 2-3 Plug the VGA/DVI connector to the three slots near the ports and close the...
... the adapter cord securely to show that the cover has been closed successfully. 2.3 Turning the monitor on Gently touch the power sensor . Close the rear connector cover. Align the cover to the LCD monitor's VGA/DVI port. ASUS LCD Monitor PW191 Series 2-3 Plug the VGA/DVI connector to the three slots near the ports and close the...

User Guide
Page 18
2.4 Adjusting the monitor You can adjust the monitor to several directions as shown below. • For optimal viewing, we recommend that you look at the full face of the monitor, then adjust the monitor to the angle that is most comfortable for you. • Hold the stand to prevent the monitor from falling when you change its angle. • You can adjust the monitor's angle from -5º to 25º. -5º~25º • You can also turn the monitor 90º counterclockwise. 90º 2-4 Chapter 2: Setup
2.4 Adjusting the monitor You can adjust the monitor to several directions as shown below. • For optimal viewing, we recommend that you look at the full face of the monitor, then adjust the monitor to the angle that is most comfortable for you. • Hold the stand to prevent the monitor from falling when you change its angle. • You can adjust the monitor's angle from -5º to 25º. -5º~25º • You can also turn the monitor 90º counterclockwise. 90º 2-4 Chapter 2: Setup

User Guide
Page 19
Remove the VESA cover from the stand. ASUS LCD Monitor PW191 Series 2-5 We recommend that you to turn the monitor left/right up to open it. 2. To detach the stand: 1. Have the front of the PW191 monitor is specially designed for VESA wall mount) The detachable stand of the monitor face down to the monitor. Turn the VESA cover counterclockwise to 120º. 120º 2.5 Detaching the stand (for VESA wall mount. • The stand allows you cover the surface with soft cloth to prevent damage to make the detachment safer and easier.
Remove the VESA cover from the stand. ASUS LCD Monitor PW191 Series 2-5 We recommend that you to turn the monitor left/right up to open it. 2. To detach the stand: 1. Have the front of the PW191 monitor is specially designed for VESA wall mount) The detachable stand of the monitor face down to the monitor. Turn the VESA cover counterclockwise to 120º. 120º 2.5 Detaching the stand (for VESA wall mount. • The stand allows you cover the surface with soft cloth to prevent damage to make the detachment safer and easier.

User Guide
Page 20
Use a screwdriver to remove the four screws on the stand of the monitor. 3. The VESA wall mount (100 mm x 100 mm) is purchased separately. 2-6 Chapter 2: Setup
Use a screwdriver to remove the four screws on the stand of the monitor. 3. The VESA wall mount (100 mm x 100 mm) is purchased separately. 2-6 Chapter 2: Setup

User Guide
Page 23
..., the screen shows horizontal disturbances. • Clock (pixel frequency) controls the number of R (Red), G (Green), and B (Bluee) are userconfigurable; the adjusting range is not proportional. 3. ASUS LCD Monitor PW191 Series 3-3
..., the screen shows horizontal disturbances. • Clock (pixel frequency) controls the number of R (Red), G (Green), and B (Bluee) are userconfigurable; the adjusting range is not proportional. 3. ASUS LCD Monitor PW191 Series 3-3

User Guide
Page 24
...: there are ten languages for your selection, including English, German, Italian, French, Dutch, Spanish, Russian, Traditional Chinese, Simplified Chinese, and Japanese. • Information: shows the monitor information. • R e s e t : Yes allows you to • OSD Setup: adjusts the horizontal postition (H-Position) and the vertical position (V-Position) of the OSD. No allows you.... The adjusting range is from 0 to 100. In p u t S e l e c t In this function. In the OSD Timeout selection, you can select either VGA or DVI input source. (PW191/PW191A) 5.
...: there are ten languages for your selection, including English, German, Italian, French, Dutch, Spanish, Russian, Traditional Chinese, Simplified Chinese, and Japanese. • Information: shows the monitor information. • R e s e t : Yes allows you to • OSD Setup: adjusts the horizontal postition (H-Position) and the vertical position (V-Position) of the OSD. No allows you.... The adjusting range is from 0 to 100. In p u t S e l e c t In this function. In the OSD Timeout selection, you can select either VGA or DVI input source. (PW191/PW191A) 5.

User Guide
Page 25
...can rotate the image by pressing the right mouse button -->enter Properties --> Settings --> Advanced -->Pivot Software -->Hotkeys. • The default hotkeys for rotatable monitors. Make sure your graphics card manufacturer's (native) drivers are as follows: Rotate - Ctrl + Shift + 7 • For more information or help,...hotkeys for different rotation degrees by 90º, 180º, and 270º to meet the orientation of the monitor. • Before starting to www.portrait.com. ASUS LCD Monitor PW191 Series 3-5 Ctrl + Shift + R 0º - Ctrl + Shift + 0 90º -
...can rotate the image by pressing the right mouse button -->enter Properties --> Settings --> Advanced -->Pivot Software -->Hotkeys. • The default hotkeys for rotatable monitors. Make sure your graphics card manufacturer's (native) drivers are as follows: Rotate - Ctrl + Shift + 7 • For more information or help,...hotkeys for different rotation degrees by 90º, 180º, and 270º to meet the orientation of the monitor. • Before starting to www.portrait.com. ASUS LCD Monitor PW191 Series 3-5 Ctrl + Shift + R 0º - Ctrl + Shift + 0 90º -

User Guide
Page 26
...the computer. • Inspect the signal cable and make sure none of the pins are bent. • Connect the computer with another available monitor to check if the computer is properly working. • Adjust the Contrast and Brightness settings via OSD. • Touch the sensor for two ... adjust the image. • Adjust the H-Position or V-Position settings via OSD. • Make sure the signal cable is properly connected to the monitor and the computer. • Move electrical devices that may cause electrical interference. • Inspect the signal cable and make sure that none of the ...
...the computer. • Inspect the signal cable and make sure none of the pins are bent. • Connect the computer with another available monitor to check if the computer is properly working. • Adjust the Contrast and Brightness settings via OSD. • Touch the sensor for two ... adjust the image. • Adjust the H-Position or V-Position settings via OSD. • Make sure the signal cable is properly connected to the monitor and the computer. • Move electrical devices that may cause electrical interference. • Inspect the signal cable and make sure that none of the ...

User Guide
Page 27
... temperature selection Skin-Tone selection DVI port VGA port Audio-in port Headphone port Colors Speaker (Built-in) Power LED Tilt Swivel TFT LCD (Anti-Reflection Glare Panel) 19" Wide Screen WXGA + 1440 x 900 0.285mm 300cd/m2 500:1 150º/130º 16.2M 8ms (Tr+Tf) Yes Yes 5 Video Preset Modes...-jack 3.5mm Mini-jack Silver + Black 2W x 2 Stereo Blue (ON)/ Amber (Stand-By) +90º ~ -5º +60º ~ -60º (continued on the next page) ASUS LCD Monitor PW191 Series 3-7 3.4 Specification summary (PW191) Panel Type Panel size Max.
... temperature selection Skin-Tone selection DVI port VGA port Audio-in port Headphone port Colors Speaker (Built-in) Power LED Tilt Swivel TFT LCD (Anti-Reflection Glare Panel) 19" Wide Screen WXGA + 1440 x 900 0.285mm 300cd/m2 500:1 150º/130º 16.2M 8ms (Tr+Tf) Yes Yes 5 Video Preset Modes...-jack 3.5mm Mini-jack Silver + Black 2W x 2 Stereo Blue (ON)/ Amber (Stand-By) +90º ~ -5º +60º ~ -60º (continued on the next page) ASUS LCD Monitor PW191 Series 3-7 3.4 Specification summary (PW191) Panel Type Panel size Max.


