Users Manual English
Page 3
Contents Safety information...vi About this guide...vii PRIME Z390-A specifications summary ix Package contents...xiv Installation tools and components xv Chapter 1: ...CPU installation 2-1 2.1.2 Cooling system installation 2-2 2.1.3 Motherboard installation 2-5 2.1.4 DIMM installation 2-6 2.1.5 ATX power connection 2-7 2.1.6 SATA device connection 2-8 2.1.7 Front I/O connector 2-9 2.1.8 Expansion card installation 2-10 2.1.9 M.2 installation 2-13 2.1.10 ASUS fan holder installation 2-14 2.2 Motherboard rear and audio connections 2-15 2.2.1 Rear I/O connection 2-15...
Contents Safety information...vi About this guide...vii PRIME Z390-A specifications summary ix Package contents...xiv Installation tools and components xv Chapter 1: ...CPU installation 2-1 2.1.2 Cooling system installation 2-2 2.1.3 Motherboard installation 2-5 2.1.4 DIMM installation 2-6 2.1.5 ATX power connection 2-7 2.1.6 SATA device connection 2-8 2.1.7 Front I/O connector 2-9 2.1.8 Expansion card installation 2-10 2.1.9 M.2 installation 2-13 2.1.10 ASUS fan holder installation 2-14 2.2 Motherboard rear and audio connections 2-15 2.2.1 Rear I/O connection 2-15...

Users Manual English
Page 13
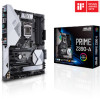
xiii Please refer to change without notice. PRIME Z390-A specifications summary BIOS Manageability Support DVD Operating System Support Form Factor 128 Mb Flash ROM, UEFI AMI BIOS, PnP, SM BIOS 3.1, ACPI 6.1, Multi-language BIOS, ASUS EZ Flash 3, CrashFree BIOS 3, F11 EZ Tuning Wizard, F6 Qfan Control,... Favorites, Last Modified log, F9 Search, F12 PrintScreen, and ASUS DRAM SPD (Serial Presence Detect) memory information WfM 2.0, DMI 3.0, WOL by PME, PXE Drivers ASUS Utilities ASUS EZ Update Anti-virus software (OEM version) Windows® 10 64-bit ATX Form Factor, 12" x 9.6" (30.5 cm x 24.4...
xiii Please refer to change without notice. PRIME Z390-A specifications summary BIOS Manageability Support DVD Operating System Support Form Factor 128 Mb Flash ROM, UEFI AMI BIOS, PnP, SM BIOS 3.1, ACPI 6.1, Multi-language BIOS, ASUS EZ Flash 3, CrashFree BIOS 3, F11 EZ Tuning Wizard, F6 Qfan Control,... Favorites, Last Modified log, F9 Search, F12 PrintScreen, and ASUS DRAM SPD (Serial Presence Detect) memory information WfM 2.0, DMI 3.0, WOL by PME, PXE Drivers ASUS Utilities ASUS EZ Update Anti-virus software (OEM version) Windows® 10 64-bit ATX Form Factor, 12" x 9.6" (30.5 cm x 24.4...
Users Manual English
Page 17
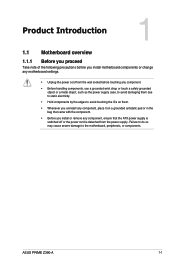
..., or components. Failure to do so may cause severe damage to avoid touching the ICs on a grounded antistatic pad or in the bag that the ATX power supply is switched off or the power cord is detached from the power supply. ASUS PRIME Z390-A 1-1
..., or components. Failure to do so may cause severe damage to avoid touching the ICs on a grounded antistatic pad or in the bag that the ATX power supply is switched off or the power cord is detached from the power supply. ASUS PRIME Z390-A 1-1

Users Manual English
Page 19
... connector (10-1 pin AAFP) 20. Thunderbolt header (5-pin TB_HEADER) 12. ATX power connectors (24-pin EATXPWR; 8-pin EATX12V) 2. DDR4 DIMM slots 6. USB 3.1 Gen 1 Type-C™ front panel connector (U31G1_C5) 9. Intel® Z390 Serial ATA 6 Gb/s connectors (7-pin SATA6G_12; Serial port connector (10-1 pin... 1-23 1-5 1-9 1-10 1-15 1-14 1-17 1-24 1-21 1-11 1-17 1-16 1-19 1-19 1-24 1-15 1-22 1-25 1-12 ASUS PRIME Z390-A 1-3 SATA6G_34; Chapter 1 Layout contents Connectors/Jumpers/Buttons and switches/Slots 1. Node connector (12-1 pin NODE) 18. M.2 sockets (M.2_1 (Socket 3);
... connector (10-1 pin AAFP) 20. Thunderbolt header (5-pin TB_HEADER) 12. ATX power connectors (24-pin EATXPWR; 8-pin EATX12V) 2. DDR4 DIMM slots 6. USB 3.1 Gen 1 Type-C™ front panel connector (U31G1_C5) 9. Intel® Z390 Serial ATA 6 Gb/s connectors (7-pin SATA6G_12; Serial port connector (10-1 pin... 1-23 1-5 1-9 1-10 1-15 1-14 1-17 1-24 1-21 1-11 1-17 1-16 1-19 1-19 1-24 1-15 1-22 1-25 1-12 ASUS PRIME Z390-A 1-3 SATA6G_34; Chapter 1 Layout contents Connectors/Jumpers/Buttons and switches/Slots 1. Node connector (12-1 pin NODE) 18. M.2 sockets (M.2_1 (Socket 3);

Users Manual English
Page 36
...8226; For a fully configured system, we recommend that complies with more high-end PCIe x16 cards, use two or more power-consuming devices. ATX power connectors (24-pin EATXPWR; 8-pin EATX12V) These connectors are designed to ensure the system stability. 1-20 Chapter 1: Product Introduction The ...power supply plugs are for ATX power supply plugs. Chapter 1 10. The system may become unstable or may not boot up if the power is inadequate. • If ...
...8226; For a fully configured system, we recommend that complies with more high-end PCIe x16 cards, use two or more power-consuming devices. ATX power connectors (24-pin EATXPWR; 8-pin EATX12V) These connectors are designed to ensure the system stability. 1-20 Chapter 1: Product Introduction The ...power supply plugs are for ATX power supply plugs. Chapter 1 10. The system may become unstable or may not boot up if the power is inadequate. • If ...

Users Manual English
Page 37
... chassis-mounted reset button for system reboot without turning off button (2-pin PWRSW) This connector is for the chassis-mounted system warning speaker. ASUS PRIME Z390-A 1-21 Pressing the power button turns the system on the operating system settings. The chassis intrusion sensor or switch sends a high-level...or flashes when data is for the HDD Activity LED. Connect the HDD Activity LED cable to hear system beeps and warnings. • ATX power button/soft-off the system power. • Chassis intrusion connector (2-pin CHASSIS) This connector is read from or written to this ...
... chassis-mounted reset button for system reboot without turning off button (2-pin PWRSW) This connector is for the chassis-mounted system warning speaker. ASUS PRIME Z390-A 1-21 Pressing the power button turns the system on the operating system settings. The chassis intrusion sensor or switch sends a high-level...or flashes when data is for the HDD Activity LED. Connect the HDD Activity LED cable to hear system beeps and warnings. • ATX power button/soft-off the system power. • Chassis intrusion connector (2-pin CHASSIS) This connector is read from or written to this ...

Users Manual English
Page 39
... LED strip will only light up when the system is detached from the power supply. Before you install or remove any component, ensure that the ATX power supply is switched off or the power cord is operating. • The LED strips are for RGB LED strips. Failure to do so may... LED strip is connected in the correct orientation, and the 12V connector is aligned with a maximum power rating of 3A (12V), and no longer than 3 m. ASUS PRIME Z390-A 1-23
... LED strip will only light up when the system is detached from the power supply. Before you install or remove any component, ensure that the ATX power supply is switched off or the power cord is operating. • The LED strips are for RGB LED strips. Failure to do so may... LED strip is connected in the correct orientation, and the 12V connector is aligned with a maximum power rating of 3A (12V), and no longer than 3 m. ASUS PRIME Z390-A 1-23

Users Manual English
Page 49
ASUS PRIME Z390-A 2-7 2.1.5 ATX power connection Chapter 2 Ensure to connect the 8-pin power plug, or connect both the 8-pin and 4-pin power plugs.
ASUS PRIME Z390-A 2-7 2.1.5 ATX power connection Chapter 2 Ensure to connect the 8-pin power plug, or connect both the 8-pin and 4-pin power plugs.

Users Manual English
Page 61
... power on the BIOS setting. Press the power button for less than four seconds to the power connector at the back of the BIOS setting. ASUS PRIME Z390-A 2-19 Connect the power cord to a power outlet that all the connections, replace the system case cover. 2. If your retailer for the ...first time 1. If you press the ATX power button. Follow the instructions in the following order: a. After making all switches are running, the BIOS beeps (refer to disabled No keyboard ...
... power on the BIOS setting. Press the power button for less than four seconds to the power connector at the back of the BIOS setting. ASUS PRIME Z390-A 2-19 Connect the power cord to a power outlet that all the connections, replace the system case cover. 2. If your retailer for the ...first time 1. If you press the ATX power button. Follow the instructions in the following order: a. After making all switches are running, the BIOS beeps (refer to disabled No keyboard ...


