
Users Manual English
Page 1
Motherboard PRIME H310M-A
Motherboard PRIME H310M-A
Users Manual English
Page 3
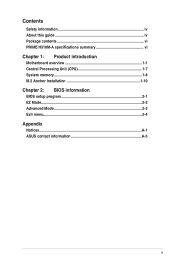
Contents Safety information iv About this guide iv Package contents vi PRIME H310M-A specifications summary vi Chapter 1: Product introduction Motherboard overview 1-1 Central Processing Unit (CPU 1-7 System memory 1-8 M.2 Anchor Installation 1-10 Chapter 2: BIOS information BIOS setup program 2-1 EZ Mode...2-2 Advanced Mode 2-3 Exit menu...2-4 Appendix Notices...A-1 ASUS contact information A-5 iii
Contents Safety information iv About this guide iv Package contents vi PRIME H310M-A specifications summary vi Chapter 1: Product introduction Motherboard overview 1-1 Central Processing Unit (CPU 1-7 System memory 1-8 M.2 Anchor Installation 1-10 Chapter 2: BIOS information BIOS setup program 2-1 EZ Mode...2-2 Advanced Mode 2-3 Exit menu...2-4 Appendix Notices...A-1 ASUS contact information A-5 iii

Users Manual English
Page 4
...jumpers, and connectors on a stable surface. • If you add a device. • Before connecting or removing signal cables from the motherboard, ensure that all cables are correctly connected and the power cables are not damaged. How this guide This user guide contains the information you ...short circuits, keep paper clips, screws, and staples away from the system, ensure that your retailer. It includes descriptions of the motherboard and the new technology it supports. Detailed descriptions for the devices are unplugged before the signal cables are using an adapter or extension cord...
...jumpers, and connectors on a stable surface. • If you add a device. • Before connecting or removing signal cables from the motherboard, ensure that all cables are correctly connected and the power cables are not damaged. How this guide This user guide contains the information you ...short circuits, keep paper clips, screws, and staples away from the system, ensure that your retailer. It includes descriptions of the motherboard and the new technology it supports. Detailed descriptions for the devices are unplugged before the signal cables are using an adapter or extension cord...

Users Manual English
Page 6
... support (SATA mode & x2 PCIE mode)* - 4 x SATA 6.0 Gb/s ports (gray) * When a SATA mode M.2 device is set to www.asus.com for the following items. Motherboard Cables Accessories Application DVD Documentation ASUS PRIME H310M-A motherboard 2 x Serial ATA 6.0 Gb/s cables 1 x ASUS I/O Shield 1 x M.2 Anchor Support DVD User Guide If any of 1920 x 1200 @60Hz - Supports D-Sub output with a maximum resolution...
... support (SATA mode & x2 PCIE mode)* - 4 x SATA 6.0 Gb/s ports (gray) * When a SATA mode M.2 device is set to www.asus.com for the following items. Motherboard Cables Accessories Application DVD Documentation ASUS PRIME H310M-A motherboard 2 x Serial ATA 6.0 Gb/s cables 1 x ASUS I/O Shield 1 x M.2 Anchor Support DVD User Guide If any of 1920 x 1200 @60Hz - Supports D-Sub output with a maximum resolution...

Users Manual English
Page 9
ASUS PRIME H310M-A 1-1 Product introduction Motherboard overview 1 • Unplug the power cord from the power supply. KBMS 12 3 18.5cm(7.3in) 42 5 ATX12V CPU_FAN DIGI +VRM DVI VGA M.2(SOCKET3) DDR4 DIMM_B1*... rear of the chassis HDMI LGA1151 U31G1_34 1 CHA_FAN LAN_USB56 M.2(SOCKET3) PCIE SATA IRST X2 V X AUDIO 2280 Realtek 8111H 2260 2242 PCIEX16 SATA6G_1 16 16 PRIME H310M-A Super I/O PCIEX1_1 15 BATTERY Intel® 128Mb H310 BIOS ALC 887 PCIEX1_2 SPDIF_OUT COM USB914 USB78 U31G1_12 SATA6G_4 SATA6G_3 SATA6G_2 SPEAKER 17 AAFP CLRTC F_PANEL...
ASUS PRIME H310M-A 1-1 Product introduction Motherboard overview 1 • Unplug the power cord from the power supply. KBMS 12 3 18.5cm(7.3in) 42 5 ATX12V CPU_FAN DIGI +VRM DVI VGA M.2(SOCKET3) DDR4 DIMM_B1*... rear of the chassis HDMI LGA1151 U31G1_34 1 CHA_FAN LAN_USB56 M.2(SOCKET3) PCIE SATA IRST X2 V X AUDIO 2280 Realtek 8111H 2260 2242 PCIEX16 SATA6G_1 16 16 PRIME H310M-A Super I/O PCIEX1_1 15 BATTERY Intel® 128Mb H310 BIOS ALC 887 PCIEX1_2 SPDIF_OUT COM USB914 USB78 U31G1_12 SATA6G_4 SATA6G_3 SATA6G_2 SPEAKER 17 AAFP CLRTC F_PANEL...

Users Manual English
Page 10
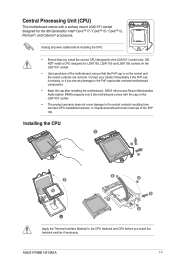
Ensure this surface mount LGA1151 socket, which is inadequate. • DO NOT forget to connect the 4-pin ATX +12V power plug. asus.com/PowerSupplyCalculator/PSCalculator.aspx?SLanguage=en-us for 8th Generation Intel® Core™ i7 / i5 / i3, Pentium®, and Celeron...PCIe 2.0. 1-2 Chapter 1: Product introduction M.2 socket 3 This socket allows you are not jumpers! The system may become unstable or may damage the motherboard components. Do not forget to connect the fan cables to Central Processing Unit (CPU). The CPU_FAN connector supports a CPU fan of the connector. Intel...
Ensure this surface mount LGA1151 socket, which is inadequate. • DO NOT forget to connect the 4-pin ATX +12V power plug. asus.com/PowerSupplyCalculator/PSCalculator.aspx?SLanguage=en-us for 8th Generation Intel® Core™ i7 / i5 / i3, Pentium®, and Celeron...PCIe 2.0. 1-2 Chapter 1: Product introduction M.2 socket 3 This socket allows you are not jumpers! The system may become unstable or may damage the motherboard components. Do not forget to connect the fan cables to Central Processing Unit (CPU). The CPU_FAN connector supports a CPU fan of the connector. Intel...

Users Manual English
Page 12
...) Connect the serial port module cable to this connector, then install the module to a slot opening at the back of the motherboard's high-definition audio capability. • If you want to connect a high-definition front panel audio module to this connector to 480Mbps... 5 Gbps, faster charging time for USB-chargeable devices, optimized power efficiency, and backward compatibility with USB 2.0. PCI Express 3.0/2.0 x16 slot This motherboard supports a PCI Express 3.0/2.0 x16 graphic card that you connect a high-definition front panel audio module to this connector, set the Front Panel ...
...) Connect the serial port module cable to this connector, then install the module to a slot opening at the back of the motherboard's high-definition audio capability. • If you want to connect a high-definition front panel audio module to this connector to 480Mbps... 5 Gbps, faster charging time for USB-chargeable devices, optimized power efficiency, and backward compatibility with USB 2.0. PCI Express 3.0/2.0 x16 slot This motherboard supports a PCI Express 3.0/2.0 x16 graphic card that you connect a high-definition front panel audio module to this connector, set the Front Panel ...
Users Manual English
Page 15
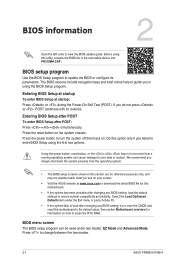
... socket and the socket contacts are not bent. ASUS PRIME H310M-A 1-7 Installing the CPU 1 A B 2 3 4A D5 4 C 5 B 4 Apply the Thermal Interface Material to the PnP cap/socket contacts/motherboard components. • Keep the cap after installing the motherboard. Contact your retailer immediately if the PnP cap ...is on the LGA1151 socket. • Upon purchase of the PnP cap. ASUS will process Return Merchandise Authorization (RMA) requests only if the motherboard comes with a surface mount LGA1151 socket designed for the LGA1151 socket only. Unplug all power cables...
... socket and the socket contacts are not bent. ASUS PRIME H310M-A 1-7 Installing the CPU 1 A B 2 3 4A D5 4 C 5 B 4 Apply the Thermal Interface Material to the PnP cap/socket contacts/motherboard components. • Keep the cap after installing the motherboard. Contact your retailer immediately if the PnP cap ...is on the LGA1151 socket. • Upon purchase of the PnP cap. ASUS will process Return Merchandise Authorization (RMA) requests only if the motherboard comes with a surface mount LGA1151 socket designed for the LGA1151 socket only. Unplug all power cables...

Users Manual English
Page 16
Profile is then mapped for single-channel operation. • Always install DIMMs with the retailer to www.asus.com for the latest Memory QVL (Qualified Vendors List) Recommended memory configuration * 1-8 * * Chapter 1: Product introduction System memory Overview This motherboard comes with memory frequency higher than the vendor-marked value. • For system stability, use...
Profile is then mapped for single-channel operation. • Always install DIMMs with the retailer to www.asus.com for the latest Memory QVL (Qualified Vendors List) Recommended memory configuration * 1-8 * * Chapter 1: Product introduction System memory Overview This motherboard comes with memory frequency higher than the vendor-marked value. • For system stability, use...

Users Manual English
Page 18
Locate the M.2 mounting hole on itself. 1-10 Chapter 1: Product introduction The notch at the end of the M.2 SSD card shall align with the rod of the M.2 Anchor. 3. Firmly insert the pin on the M.2 Anchor into the hole on your motherboard without using the M.2 Anchor: 1. M.2 Anchor Installation The M.2 Anchor is a tool-less design to easily fasten and secure your M.2 SSD card to your motherboard and firmly insert the M.2 Anchor into the hole. 2. To install the M.2 SSD card using extra tools. Insert the M.2 SSD card into the M.2 slot.
Locate the M.2 mounting hole on itself. 1-10 Chapter 1: Product introduction The notch at the end of the M.2 SSD card shall align with the rod of the M.2 Anchor. 3. Firmly insert the pin on the M.2 Anchor into the hole on your motherboard without using the M.2 Anchor: 1. M.2 Anchor Installation The M.2 Anchor is a tool-less design to easily fasten and secure your M.2 SSD card to your motherboard and firmly insert the M.2 Anchor into the hole. 2. To install the M.2 SSD card using extra tools. Insert the M.2 SSD card into the M.2 slot.
Users Manual English
Page 20
.... Entering BIOS Setup after POST To enter BIOS Setup after changing any BIOS setting, try to clear the CMOS and reset the motherboard to erase the RTC RAM. See section Motherboard overview for information on . Press the power button to turn the system off then back on how to the default value... view the BIOS update guide. We recommend you see on the system chassis. BIOS information 2 Scan the QR code to change between the two modes. 2-1 ASUS PRIME H310M-A Before using the first two options. Press the reset button on your data or system.
.... Entering BIOS Setup after POST To enter BIOS Setup after changing any BIOS setting, try to clear the CMOS and reset the motherboard to erase the RTC RAM. See section Motherboard overview for information on . Press the power button to turn the system off then back on how to the default value... view the BIOS update guide. We recommend you see on the system chassis. BIOS information 2 Scan the QR code to change between the two modes. 2-1 ASUS PRIME H310M-A Before using the first two options. Press the reset button on your data or system.

Users Manual English
Page 21
The default screen for entering the BIOS setup program can be changed. Displays the CPU/motherboard Searches by BIOS item temperature, CPU voltage output, name, enter the item name CPU/chassis fan speed, and SATA to find the related item information ...
The default screen for entering the BIOS setup program can be changed. Displays the CPU/motherboard Searches by BIOS item temperature, CPU voltage output, name, enter the item name CPU/chassis fan speed, and SATA to find the related item information ...
Users Manual English
Page 26
DO NOT throw the motherboard in providing solutions for the specific language governing permissions and limitations under the Apache License, Version 2.0 (the "License"); Check local regulations for protecting our ... battery in different regions. Regional notice for detailed recycling information in municipal waste. Please go to the highest standards for disposal of electronic products. A-3 ASUS PRIME H310M-A This symbol of the crossed out wheeled bin indicates that the product (electrical and electronic equipment) should not be placed in writing, software distributed under...
DO NOT throw the motherboard in providing solutions for the specific language governing permissions and limitations under the Apache License, Version 2.0 (the "License"); Check local regulations for protecting our ... battery in different regions. Regional notice for detailed recycling information in municipal waste. Please go to the highest standards for disposal of electronic products. A-3 ASUS PRIME H310M-A This symbol of the crossed out wheeled bin indicates that the product (electrical and electronic equipment) should not be placed in writing, software distributed under...
Users Manual English
Page 29
... Party: Address: Phone/Fax No: Asus Computer International 48720 Kato Rd., Fremont, CA 94538 (510)739-3777/(510)608-4555 hereby declares that may not cause harmful interference, and (2) this device must accept any interference received, including interference that the product Product Name : Motherboard Model Number : PRIME H310M-A compliance statement: This device complies with...
... Party: Address: Phone/Fax No: Asus Computer International 48720 Kato Rd., Fremont, CA 94538 (510)739-3777/(510)608-4555 hereby declares that may not cause harmful interference, and (2) this device must accept any interference received, including interference that the product Product Name : Motherboard Model Number : PRIME H310M-A compliance statement: This device complies with...


