Motherboard Pin Definition.English
Page 4
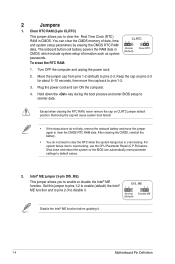
...then move the jumper again to pins 2-3. For system failure due to pins 1-2. 3. Shut down the key during the boot process and enter BIOS setup to default values. 2. Keep the cap on CLRTC jumper default position. You can automatically reset parameter settings to reenter data. Hold down and... pins 1-2 (default) to clear the CMOS RTC RAM data. DIS_ME 12 23 Normal (Default) Disable ME Disable the Intel® ME function before updating it . To erase the RTC RAM: CLRTC 12 23 Normal (Default) Clear RTC 1. Removing the cap will cause system boot failure! • ...
...then move the jumper again to pins 2-3. For system failure due to pins 1-2. 3. Shut down the key during the boot process and enter BIOS setup to default values. 2. Keep the cap on CLRTC jumper default position. You can automatically reset parameter settings to reenter data. Hold down and... pins 1-2 (default) to clear the CMOS RTC RAM data. DIS_ME 12 23 Normal (Default) Disable ME Disable the Intel® ME function before updating it . To erase the RTC RAM: CLRTC 12 23 Normal (Default) Clear RTC 1. Removing the cap will cause system boot failure! • ...

Motherboard Pin Definition.English
Page 16
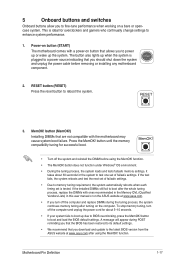
... power cable before removing or plugging in soft-off mode. This user-friendly design provides an intuitive way to indicate the hard disk activity. USB BIOS Flashback LED (FLBK_LED) This LED flashes when you with a standby power LED that lights up to the motherboard or when the hard disk drive does... or read from the hard disk drive. SB_PWR ON OFF Standby Power Powered Off 2. Q-Code LED (Q_CODE) The Q-Code LED design provides you press the BIOS Flashback button for BIOS update. 6.
... power cable before removing or plugging in soft-off mode. This user-friendly design provides an intuitive way to indicate the hard disk activity. USB BIOS Flashback LED (FLBK_LED) This LED flashes when you with a standby power LED that lights up to the motherboard or when the hard disk drive does... or read from the hard disk drive. SB_PWR ON OFF Standby Power Powered Off 2. Q-Code LED (Q_CODE) The Q-Code LED design provides you press the BIOS Flashback button for BIOS update. 6.
Motherboard Pin Definition.English
Page 17
...RESET) Press the reset button to memory tuning requirement, the system automatically reboots when each timing set is plugged to the latest BIOS version from the ASUS website at www.asus.com. • If you to fine-tune performance when working on a bare or opencase system. Press the MemOK! If ...successful boot. • Turn off the computer and replace DIMMs during POST reminding you that the BIOS has been restored to its default settings. • We recommend that you download and update to a power source indicating that you to boot after turning on button that are not compatible ...
...RESET) Press the reset button to memory tuning requirement, the system automatically reboots when each timing set is plugged to the latest BIOS version from the ASUS website at www.asus.com. • If you to fine-tune performance when working on a bare or opencase system. Press the MemOK! If ...successful boot. • Turn off the computer and replace DIMMs during POST reminding you that the BIOS has been restored to its default settings. • We recommend that you download and update to a power source indicating that you to boot after turning on button that are not compatible ...

User Guide
Page 3
Contents Safety information iv About this guide iv Package contents vi PRIME H270M-PLUS specifications summary vi Chapter 1: Product introduction 1.1 Before you proceed 1-1 1.2 Motherboard overview 1-1 1.3 Central Processing Unit (CPU 1-10 1.4 System memory 1-11 Chapter 2: BIOS information 2.1 Managing and updating your BIOS 2-1 2.2 BIOS setup program 2-6 2.3 Exit menu 2-11 Appendix Notices...A-1 ASUS contact information A-4 iii
Contents Safety information iv About this guide iv Package contents vi PRIME H270M-PLUS specifications summary vi Chapter 1: Product introduction 1.1 Before you proceed 1-1 1.2 Motherboard overview 1-1 1.3 Central Processing Unit (CPU 1-10 1.4 System memory 1-11 Chapter 2: BIOS information 2.1 Managing and updating your BIOS 2-1 2.2 BIOS setup program 2-6 2.3 Exit menu 2-11 Appendix Notices...A-1 ASUS contact information A-4 iii

User Guide
Page 7
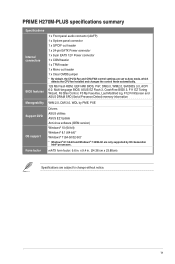
...and static-electricity discharges - ASUS SafeSlot Core: Fortified PCIe Slot prevents damage - ASUS DIGI+ VRM: 6 Phase digital power design Superb Performance M.2 onboard - Ready for greater durability - Audio Shielding: Ensures precision analog/digital separation and greatly reduces multi-lateral interference Audio - PRIME H270M-PLUS specifications summary Specifications Storage ...a device in SATA mode is only supported when using Intel® Optane memory modules, ensure that you have updated your motherboard drivers and BIOS to the latest version from ASUS support website.
...and static-electricity discharges - ASUS SafeSlot Core: Fortified PCIe Slot prevents damage - ASUS DIGI+ VRM: 6 Phase digital power design Superb Performance M.2 onboard - Ready for greater durability - Audio Shielding: Ensures precision analog/digital separation and greatly reduces multi-lateral interference Audio - PRIME H270M-PLUS specifications summary Specifications Storage ...a device in SATA mode is only supported when using Intel® Optane memory modules, ensure that you have updated your motherboard drivers and BIOS to the latest version from ASUS support website.
User Guide
Page 9
... PME, PXE Drivers ASUS utilities ASUS EZ Update Anti-virus software (OEM version) Windows® 10 (64-bit) Windows® 8.1 (64-bit)* Windows® 7 (64-bit/32-bit)* * Windows® 8.1 64-bit and Windows® 7 32/64-bit are set to change without notice. x 9.4 in . PRIME H270M-PLUS specifications summary Specifications Internal connectors BIOS features Manageability Support...
... PME, PXE Drivers ASUS utilities ASUS EZ Update Anti-virus software (OEM version) Windows® 10 (64-bit) Windows® 8.1 (64-bit)* Windows® 7 (64-bit/32-bit)* * Windows® 8.1 64-bit and Windows® 7 32/64-bit are set to change without notice. x 9.4 in . PRIME H270M-PLUS specifications summary Specifications Internal connectors BIOS features Manageability Support...

User Guide
Page 23
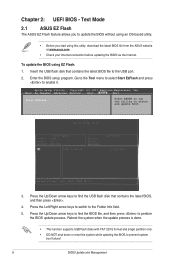
...settings to the USB port, then select by Internet. Go to the Tool menu to select ASUS EZ Flash 3 and press to complete the update. 3. d) Press to switch to perform the BIOS update process. Chapter 2: Getting started 2-2 Select the Load Optimized Defaults item under the Exit menu... for details. • Check your local Internet connection before updating through the Internet. 2.1.2 ASUS EZ Flash 3 The ASUS EZ Flash 3 feature allows you to update the BIOS without using EZ Flash 3: 1. Follow the steps below to find the BIOS file, and then press to the Folder Info field. c)...
...settings to the USB port, then select by Internet. Go to the Tool menu to select ASUS EZ Flash 3 and press to complete the update. 3. d) Press to switch to perform the BIOS update process. Chapter 2: Getting started 2-2 Select the Load Optimized Defaults item under the Exit menu... for details. • Check your local Internet connection before updating through the Internet. 2.1.2 ASUS EZ Flash 3 The ASUS EZ Flash 3 feature allows you to update the BIOS without using EZ Flash 3: 1. Follow the steps below to find the BIOS file, and then press to the Folder Info field. c)...

User Guide
Page 24
... a USB flash drive. • Download the latest BIOS file and BIOS Updater from the ASUS website at www.asus.com. The screen captures used in this utility, rename the BIOS file in your computer screen. Turn on your USB flash drive. 2-3 ASUS PRIME H270M-PLUS When found, the utility reads the BIOS file and enters ASUS EZ Flash 3 utility automatically. 4. The utility...
... a USB flash drive. • Download the latest BIOS file and BIOS Updater from the ASUS website at www.asus.com. The screen captures used in this utility, rename the BIOS file in your computer screen. Turn on your USB flash drive. 2-3 ASUS PRIME H270M-PLUS When found, the utility reads the BIOS file and enters ASUS EZ Flash 3 utility automatically. 4. The utility...
User Guide
Page 25
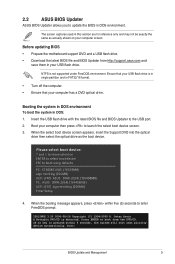
...supported under FreeDOS environment. Insert the USB flash drive with the latest BIOS file and BIOS Updater to boot using defaults P2: ST3808110AS (76319MB) aigo miniking (250MB) UEFI: (FAT) ASUS DRW-2014L1T(4458MB) P1: ASUS DRW-2014L1T(4458MB) UEFI: (FAT) aigo miniking (250MB) Enter ...CD. D:/> bupdater /g Chapter 2: Getting started 2-4 If no key is in single partition and in DOS: 1. C:/> d: D:/> Updating the BIOS file To update the BIOS file: 1. When the booting message appears, press within 5 seconds, the system will boot next priority device automatically. ISOLINUX 3.20 2006...
...supported under FreeDOS environment. Insert the USB flash drive with the latest BIOS file and BIOS Updater to boot using defaults P2: ST3808110AS (76319MB) aigo miniking (250MB) UEFI: (FAT) ASUS DRW-2014L1T(4458MB) P1: ASUS DRW-2014L1T(4458MB) UEFI: (FAT) aigo miniking (250MB) Enter ...CD. D:/> bupdater /g Chapter 2: Getting started 2-4 If no key is in single partition and in DOS: 1. C:/> d: D:/> Updating the BIOS file To update the BIOS file: 1. When the booting message appears, press within 5 seconds, the system will boot next priority device automatically. ISOLINUX 3.20 2006...

User Guide
Page 26
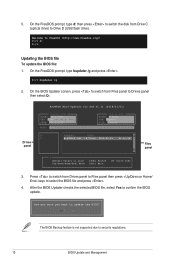
Ensure to load the BIOS default settings to confirm the BIOS update. After the BIOS Updater checks the selected BIOS file, select Yes to ensure system compatibility and stability. Select the Load Optimized Defaults item under the Exit BIOS menu. 2-5 ASUS PRIME H270M-PLUS Yes No The BIOS Backup feature is completed. 2. Press to switch from Files panel to Drives panel then select...
Ensure to load the BIOS default settings to confirm the BIOS update. After the BIOS Updater checks the selected BIOS file, select Yes to ensure system compatibility and stability. Select the Load Optimized Defaults item under the Exit BIOS menu. 2-5 ASUS PRIME H270M-PLUS Yes No The BIOS Backup feature is completed. 2. Press to switch from Files panel to Drives panel then select...

BIOSUpdateE-Manual English
Page 1
Motherboard BIOS Update and Management
Motherboard BIOS Update and Management
BIOSUpdateE-Manual English
Page 2
... software that we would be registered trademarks or copyrights of the product, either (1) for the cost of ASUSTeK COMPUTER INC. ("ASUS"). IN NO EVENT SHALL ASUS, ITS DIRECTORS, OFFICERS, EMPLOYEES OR AGENTS BE LIABLE FOR ANY INDIRECT, SPECIAL, INCIDENTAL, OR CONSEQUENTIAL DAMAGES (INCLUDING DAMAGES FOR ...ARE SUBJECT TO CHANGE AT ANY TIME WITHOUT NOTICE, AND SHOULD NOT BE CONSTRUED AS A COMMITMENT BY ASUS. Products and corporate names appearing in this email address). 2 BIOS Update and Management Such software in the About Box of these licenses are used only for which is dependent ...
... software that we would be registered trademarks or copyrights of the product, either (1) for the cost of ASUSTeK COMPUTER INC. ("ASUS"). IN NO EVENT SHALL ASUS, ITS DIRECTORS, OFFICERS, EMPLOYEES OR AGENTS BE LIABLE FOR ANY INDIRECT, SPECIAL, INCIDENTAL, OR CONSEQUENTIAL DAMAGES (INCLUDING DAMAGES FOR ...ARE SUBJECT TO CHANGE AT ANY TIME WITHOUT NOTICE, AND SHOULD NOT BE CONSTRUED AS A COMMITMENT BY ASUS. Products and corporate names appearing in this email address). 2 BIOS Update and Management Such software in the About Box of these licenses are used only for which is dependent ...
BIOSUpdateE-Manual English
Page 4
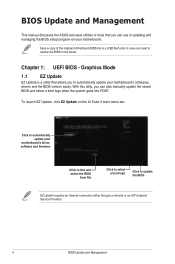
... need to restore the BIOS in updating and managing the BIOS setup program on the AI Suite 3 main menu bar. Chapter 1: UEFI BIOS - BIOS Update and Management This manual discusses the ASUS-exclusive utilities or tools that allows you to automatically update your motherboard's softwares, drivers and the BIOS version easily. Graphics Mode 1.1 EZ Update EZ Update is a utility that you...
... need to restore the BIOS in updating and managing the BIOS setup program on the AI Suite 3 main menu bar. Chapter 1: UEFI BIOS - BIOS Update and Management This manual discusses the ASUS-exclusive utilities or tools that allows you to automatically update your motherboard's softwares, drivers and the BIOS version easily. Graphics Mode 1.1 EZ Update EZ Update is a utility that you...

BIOSUpdateE-Manual English
Page 5
...find the USB flash disk that contains the latest BIOS file to the USB port. 2. 1.2 ASUS EZ Flash 2 The ASUS EZ Flash 2 feature allows you start using this utility, download the latest BIOS file from the ASUS website at www.asus.com To update the BIOS using an OS‑based utility. Reboot the ...system when the update process is done. • This function supports USB flash disks with FAT 32/16 ...
...find the USB flash disk that contains the latest BIOS file to the USB port. 2. 1.2 ASUS EZ Flash 2 The ASUS EZ Flash 2 feature allows you start using this utility, download the latest BIOS file from the ASUS website at www.asus.com To update the BIOS using an OS‑based utility. Reboot the ...system when the update process is done. • This function supports USB flash disks with FAT 32/16 ...
BIOSUpdateE-Manual English
Page 6
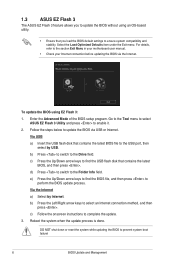
... USB or Internet. For details, refer to prevent system boot failure! 6 BIOS Update and Management b) Press the Left/Right arrow keys to ensure system compatibility and stability. 1.3 ASUS EZ Flash 3 The ASUS EZ Flash 3 feature allows you load the BIOS default settings to select an Internet connection method, and then press . Go to the Tool...
... USB or Internet. For details, refer to prevent system boot failure! 6 BIOS Update and Management b) Press the Left/Right arrow keys to ensure system compatibility and stability. 1.3 ASUS EZ Flash 3 The ASUS EZ Flash 3 feature allows you load the BIOS default settings to select an Internet connection method, and then press . Go to the Tool...

BIOSUpdateE-Manual English
Page 7
... flash drive that contains the BIOS file to recover BIOS settings. DO NOT shut down or reset the system while updating the BIOS! You can cause system boot failure! The system requires you to enter BIOS Setup to the USB port. 3. BIOS Update and Management 7 Turn on the system. 2. 1.4 ASUS CrashFree BIOS 3 The ASUS CrashFree BIOS 3 is an auto recovery tool...
... flash drive that contains the BIOS file to recover BIOS settings. DO NOT shut down or reset the system while updating the BIOS! You can cause system boot failure! The system requires you to enter BIOS Setup to the USB port. 3. BIOS Update and Management 7 Turn on the system. 2. 1.4 ASUS CrashFree BIOS 3 The ASUS CrashFree BIOS 3 is an auto recovery tool...
BIOSUpdateE-Manual English
Page 8
... arrow keys to find the USB flash disk that contains the latest BIOS file to perform the BIOS update process. To update the BIOS using this utility, download the latest BIOS file from the ASUS website at www.asus.com • Check your Internet connection before updating the BIOS via the Internet. Go to the Tool menu to select Start...
... arrow keys to find the USB flash disk that contains the latest BIOS file to perform the BIOS update process. To update the BIOS using this utility, download the latest BIOS file from the ASUS website at www.asus.com • Check your Internet connection before updating the BIOS via the Internet. Go to the Tool menu to select Start...
BIOSUpdateE-Manual English
Page 9
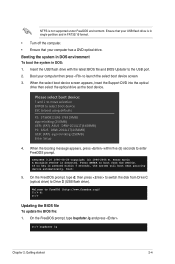
2.2 ASUS BIOS Updater ASUS BIOS Updater allows you to the USB port. 2. Insert the USB flash drive with the latest BIOS file and BIOS Updater to update the BIOS in DOS environment. boot: BIOS Update and Management 9 NTFS is pressed within five (5) seconds to launch the select boot device screen. 3. Boot your computer then press to enter FreeDOS prompt. If ...
2.2 ASUS BIOS Updater ASUS BIOS Updater allows you to the USB port. 2. Insert the USB flash drive with the latest BIOS file and BIOS Updater to update the BIOS in DOS environment. boot: BIOS Update and Management 9 NTFS is pressed within five (5) seconds to launch the select boot device screen. 3. Boot your computer then press to enter FreeDOS prompt. If ...
BIOSUpdateE-Manual English
Page 10
... is not supported due to confirm the BIOS update. On the FreeDOS prompt, type bupdater /g and press . After the BIOS Updater checks the selected BIOS file, select Yes to security regulations. 10 BIOS Update and Management Drives panel ASUSTeK BIOS Updater for DOS V1.31 [2014/01/01] Current ROM BOARD: B150-PLUS VER: 0303 (H :00 B :00) DATE: 09/21...
... is not supported due to confirm the BIOS update. On the FreeDOS prompt, type bupdater /g and press . After the BIOS Updater checks the selected BIOS file, select Yes to security regulations. 10 BIOS Update and Management Drives panel ASUSTeK BIOS Updater for DOS V1.31 [2014/01/01] Current ROM BOARD: B150-PLUS VER: 0303 (H :00 B :00) DATE: 09/21...
BIOSUpdateE-Manual English
Page 11
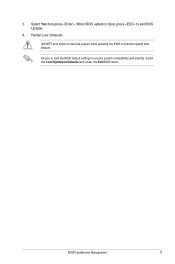
DO NOT shut down or reset the system while updating the BIOS to ensure system compatibility and stability. Select Yes then press . Ensure to load the BIOS default settings to prevent system boot failaure. BIOS Update and Management 11 5. Select the Load Optimized Defaults item under the Exit BIOS menu. Restart your computer. When BIOS update is done, press to exit BIOS Updater. 6.
DO NOT shut down or reset the system while updating the BIOS to ensure system compatibility and stability. Select Yes then press . Ensure to load the BIOS default settings to prevent system boot failaure. BIOS Update and Management 11 5. Select the Load Optimized Defaults item under the Exit BIOS menu. Restart your computer. When BIOS update is done, press to exit BIOS Updater. 6.


