
Motherboard Pin Definition.English
Page 3
... not help, remove the onboard battery and short the two pins again to clear the CMOS RTC RAM data. For system failure due to overclocking. Hold down and reboot the system, then the BIOS automatically resets parameter settings to clear the Real Time Clock (RTC) RAM in CMOS,...and enter BIOS setup to reenter data. • If the steps above do not need to clear the RTC when the system hangs due to overclocking, use the chassis intrusion detection feature. Chassis intrusion header (4-1 pin CHASSIS) +5VSB_MB Chassis Signal GND This header is then generated as system passwords. ...
... not help, remove the onboard battery and short the two pins again to clear the CMOS RTC RAM data. For system failure due to overclocking. Hold down and reboot the system, then the BIOS automatically resets parameter settings to clear the Real Time Clock (RTC) RAM in CMOS,...and enter BIOS setup to reenter data. • If the steps above do not need to clear the RTC when the system hangs due to overclocking, use the chassis intrusion detection feature. Chassis intrusion header (4-1 pin CHASSIS) +5VSB_MB Chassis Signal GND This header is then generated as system passwords. ...
Motherboard Pin Definition.English
Page 4
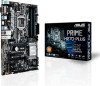
...battery powers the RAM data in CMOS. Turn OFF the computer and unplug the power cord. 2. Move the jumper cap from pins 1-2 (default) to overclocking, use the CPU Parameter Recall (C.P.R) feature. After clearing the CMOS, reinstall the battery. • You do not help, remove the onboard battery and ... disable the Intel® ME function. Set this jumper to pins 1-2 to enable (default) the Intel® ME function and to pins 2-3 to overclocking. To erase the RTC RAM: CLRTC 12 23 Normal (Default) Clear RTC 1. Keep the cap on CLRTC jumper default position. Hold down and reboot...
...battery powers the RAM data in CMOS. Turn OFF the computer and unplug the power cord. 2. Move the jumper cap from pins 1-2 (default) to overclocking, use the CPU Parameter Recall (C.P.R) feature. After clearing the CMOS, reinstall the battery. • You do not help, remove the onboard battery and ... disable the Intel® ME function. Set this jumper to pins 1-2 to enable (default) the Intel® ME function and to pins 2-3 to overclocking. To erase the RTC RAM: CLRTC 12 23 Normal (Default) Clear RTC 1. Keep the cap on CLRTC jumper default position. Hold down and reboot...
Motherboard Pin Definition.English
Page 17
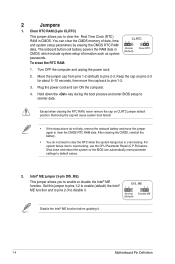
...asus.com after turning on button that you to fine-tune performance when working on a bare or opencase system. Power-on button (START) The motherboard comes with the motherboard may cause system boot failure. RESET 3. It takes about 5-10 seconds. • If your system fails to boot up due to BIOS overclocking...on the computer. button (MemOK!) Installing DIMMs that you to power up or wake up when the system is ideal for overclockers and gamers who continually change settings to enhance system performance. 1. 5 Onboard buttons and switches Onboard buttons allow you download ...
...asus.com after turning on button that you to fine-tune performance when working on a bare or opencase system. Power-on button (START) The motherboard comes with the motherboard may cause system boot failure. RESET 3. It takes about 5-10 seconds. • If your system fails to boot up due to BIOS overclocking...on the computer. button (MemOK!) Installing DIMMs that you to power up or wake up when the system is ideal for overclockers and gamers who continually change settings to enhance system performance. 1. 5 Onboard buttons and switches Onboard buttons allow you download ...
Motherboard Pin Definition.English
Page 18
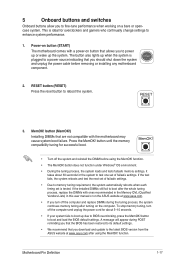
... the systems hangs due to [Enable] before using the LN2 cooling system. KEBOT 6. Sonic SoundStage button (SOUNDSTAGE) Press this button to provide better overclocking SLOW_MODE margins when using the Slow Mode switch. 1-18 Motherboard Pin Definition Ensure to set the LN2 Mode jumper to... overclocking. 5. SOUNDSTAGE 7. Slow Mode switch Slow Mode switch allows your system to activate the Sonic SoundStage feature. When enabled, the Slow Mode switch prevents ...
... the systems hangs due to [Enable] before using the LN2 cooling system. KEBOT 6. Sonic SoundStage button (SOUNDSTAGE) Press this button to provide better overclocking SLOW_MODE margins when using the Slow Mode switch. 1-18 Motherboard Pin Definition Ensure to set the LN2 Mode jumper to... overclocking. 5. SOUNDSTAGE 7. Slow Mode switch Slow Mode switch allows your system to activate the Sonic SoundStage feature. When enabled, the Slow Mode switch prevents ...

Users manual ENGLISH
Page 20
... default memory operation frequency is the standard way of the lower-sized channel for the latest Memory QVL (Qualified Vendors List) 1-11 ASUS PRIME H270-PLUS Under the default state, some memory modules for the OS can be about 3GB or less. Higher memory modules will run at the...a lower frequency than 2133 MHz and its Serial Presence Detect (SPD), which is dependent on the motherboard, the actual usable memory for overclocking may install varying memory sizes in Channel A and Channel B. For optimal compatibility, we recommend that you install 4GB or more memory on...
... default memory operation frequency is the standard way of the lower-sized channel for the latest Memory QVL (Qualified Vendors List) 1-11 ASUS PRIME H270-PLUS Under the default state, some memory modules for the OS can be about 3GB or less. Higher memory modules will run at the...a lower frequency than 2133 MHz and its Serial Presence Detect (SPD), which is dependent on the motherboard, the actual usable memory for overclocking may install varying memory sizes in Channel A and Channel B. For optimal compatibility, we recommend that you install 4GB or more memory on...

Users manual ENGLISH
Page 29
... Monitor Boot Tool Exit For saving the frequently-used system settings and configuration For changing the basic system configuration For changing the overclocking settings For changing the advanced system settings For displaying the system temperature, power status, and changing the fan settings For changing ... It also allows you want to display in the menu and change the motherboard's SATA mode from AHCI to view and tweak the overclocking settings of your BIOS. Select frequentlyused BIOS settings and save it to your BIOS screen. Chapter 2: BIOS information 2-8 Use this button...
... Monitor Boot Tool Exit For saving the frequently-used system settings and configuration For changing the basic system configuration For changing the overclocking settings For changing the advanced system settings For displaying the system temperature, power status, and changing the fan settings For changing ... It also allows you want to display in the menu and change the motherboard's SATA mode from AHCI to view and tweak the overclocking settings of your BIOS. Select frequentlyused BIOS settings and save it to your BIOS screen. Chapter 2: BIOS information 2-8 Use this button...


