
User Guide
Page 3
Contents Safety information iv About this guide iv Package contents vi PRIME B250M-C specifications summary vi Chapter 1 Product introduction Motherboard overview 1-1 Central Processing Unit (CPU 1-8 System memory 1-9 Chapter 2 BIOS information BIOS setup program 2-1 BIOS menu screen 2-2 Exit menu...2-3 Appendix Notices...A-1 ASUS contact information A-5 iii
Contents Safety information iv About this guide iv Package contents vi PRIME B250M-C specifications summary vi Chapter 1 Product introduction Motherboard overview 1-1 Central Processing Unit (CPU 1-8 System memory 1-9 Chapter 2 BIOS information BIOS setup program 2-1 BIOS menu screen 2-2 Exit menu...2-3 Appendix Notices...A-1 ASUS contact information A-5 iii

User Guide
Page 4
.... How this guide This user guide contains the information you need when installing and configuring the motherboard. Detailed descriptions fo the BIOS parameters are not damaged. Operation safety • Before installing the motherboard and adding components, carefully read all the manuals that ..., do not try to moisture. • Place the product on the motherboard. • Chapter 2: BIOS information This chapter discusses changing system settings through the BIOS Setup menus. If you are unplugged. • Seek professional assistance before you detect any area where it...
.... How this guide This user guide contains the information you need when installing and configuring the motherboard. Detailed descriptions fo the BIOS parameters are not damaged. Operation safety • Before installing the motherboard and adding components, carefully read all the manuals that ..., do not try to moisture. • Place the product on the motherboard. • Chapter 2: BIOS information This chapter discusses changing system settings through the BIOS Setup menus. If you are unplugged. • Seek professional assistance before you detect any area where it...
User Guide
Page 7
...audio connector (AAFP) 1 x System panel connector 1 x Speaker connector (continued on the next page) vii DIGI + VRM- PRIME B250M-C specifications summary Audio USB ASUS unique features Rear panel I /O - 3X corrosion-resistance for stable power - Overvoltage Protection - Pumped-up throughput 2.5X higher ...a chassis with HD audio module in the front panel to minimize damage risk Q-Design - Precision control for greater durability Superb performance: UEFI BIOS: - ASUS Q-DIMM - Supports jack-detection and front panel jack-retasking 6 x USB 3.0 ports (2 ports at midboard, 4 ports at back panel...
...audio connector (AAFP) 1 x System panel connector 1 x Speaker connector (continued on the next page) vii DIGI + VRM- PRIME B250M-C specifications summary Audio USB ASUS unique features Rear panel I /O - 3X corrosion-resistance for stable power - Overvoltage Protection - Pumped-up throughput 2.5X higher ...a chassis with HD audio module in the front panel to minimize damage risk Q-Design - Precision control for greater durability Superb performance: UEFI BIOS: - ASUS Q-DIMM - Supports jack-detection and front panel jack-retasking 6 x USB 3.0 ports (2 ports at midboard, 4 ports at back panel...
User Guide
Page 8
viii PRIME B250M-C specifications summary Internal connectors/ switches/ buttons BIOS features Manageability Support DVD Operating systems Form factor 1 x LPT connector 2 x COM connectors 1 x 14-1 pin TPM connector 1 x MONO-out header* 1 x Chassis intrusion header 1 x Clear CMOS header 1...12V power connector * You must use this header with an amplified speaker. 64 Mb Flash ROM, UEFI AMI BIOS, PnP, DMI3.0, WfM2.0, SM BIOS 3.0, ACPI 5.1, Multi-language BIOS, ASUSbackup, LOGO flash, ME update, DMI value edit, BIOS value edit WfM 2.0, DMI 3.0, WOL by PME, WOR by PME, PXE Drivers Windows® 10 (...
viii PRIME B250M-C specifications summary Internal connectors/ switches/ buttons BIOS features Manageability Support DVD Operating systems Form factor 1 x LPT connector 2 x COM connectors 1 x 14-1 pin TPM connector 1 x MONO-out header* 1 x Chassis intrusion header 1 x Clear CMOS header 1...12V power connector * You must use this header with an amplified speaker. 64 Mb Flash ROM, UEFI AMI BIOS, PnP, DMI3.0, WfM2.0, SM BIOS 3.0, ACPI 5.1, Multi-language BIOS, ASUSbackup, LOGO flash, ME update, DMI value edit, BIOS value edit WfM 2.0, DMI 3.0, WOL by PME, WOR by PME, PXE Drivers Windows® 10 (...

User Guide
Page 9
..., ensure that the ATX power supply is switched off or the power cord is detached from the wall socket before installing or removing the motherboard. ASUS PRIME B250M-C 1-1 Failure to do so may cause severe damage to static electricity. • Before you physical injury and damage to motherboard components. 1 2 34 1 5... 887 17 AAFP PCI1 COM1 COM2 LPT TPM 16 15 14 13 3 M.2_2(SOCKET3) SATA6G_4 SATA6G_3 6 7 1 Intel® B250 6 SATA6G_6 SATA6G_5 64Mb BIOS USB910 USB78 CLRTC SPEAKER CHASSIS F_PANEL 12 11 10 9 8 Scan the QR code to get the detailed pin definitions.
..., ensure that the ATX power supply is switched off or the power cord is detached from the wall socket before installing or removing the motherboard. ASUS PRIME B250M-C 1-1 Failure to do so may cause severe damage to static electricity. • Before you physical injury and damage to motherboard components. 1 2 34 1 5... 887 17 AAFP PCI1 COM1 COM2 LPT TPM 16 15 14 13 3 M.2_2(SOCKET3) SATA6G_4 SATA6G_3 6 7 1 Intel® B250 6 SATA6G_6 SATA6G_5 64Mb BIOS USB910 USB78 CLRTC SPEAKER CHASSIS F_PANEL 12 11 10 9 8 Scan the QR code to get the detailed pin definitions.

User Guide
Page 11
...this connector. The signal is removed or replaced. PIN 1 3. After clearing the CMOS, reinstall the battery. To erase the RTC RAM: CLRTC +3V_BAT GND 1. ASUS PRIME B250M-C 1-3 Speaker connector (4-pin SPEAKER) The 4-pin connector is for USBchargeable devices, optimized power efficiency, and backward compatibility with a jumper cap. Remove the jumper caps only... re-enter data. Use a metal object such as date, time, and system passwords. Hold down the key during the boot process and enter BIOS setup to Serial ATA 6.0 Gb/s hard disk drives via Serial ATA 6.0 Gb/s signal cables.
...this connector. The signal is removed or replaced. PIN 1 3. After clearing the CMOS, reinstall the battery. To erase the RTC RAM: CLRTC +3V_BAT GND 1. ASUS PRIME B250M-C 1-3 Speaker connector (4-pin SPEAKER) The 4-pin connector is for USBchargeable devices, optimized power efficiency, and backward compatibility with a jumper cap. Remove the jumper caps only... re-enter data. Use a metal object such as date, time, and system passwords. Hold down the key during the boot process and enter BIOS setup to Serial ATA 6.0 Gb/s hard disk drives via Serial ATA 6.0 Gb/s signal cables.

User Guide
Page 12
... connector supports a Trusted Platform Module (TPM) system, which is for basic system sound capability. The subsystem is set the Front Panel Type item in the BIOS setup to [HD Audio]. Connect one end of the front panel audio I /O module that supports either HD Audio or legacy AC`97 audio standard. If...
... connector supports a Trusted Platform Module (TPM) system, which is for basic system sound capability. The subsystem is set the Front Panel Type item in the BIOS setup to [HD Audio]. Connect one end of the front panel audio I /O module that supports either HD Audio or legacy AC`97 audio standard. If...
User Guide
Page 18
... running operating system can cause damage to guide you in this section are for information on . The BIOS screens include navigation keys and brief online help to your screen. • Visit the ASUS website at startup: Press or during POST. Using the power button, reset button, or the ++ ... • Press the power button to turn the system off then back on how to view the BIOS update guide. BIOS information 2 Scan the QR code to erase the RTC RAM. 2-1 ASUS PRIME B250M-C See section Motherboard overview for reference purposes only, and may not exactly match what you see on ...
... running operating system can cause damage to guide you in this section are for information on . The BIOS screens include navigation keys and brief online help to your screen. • Visit the ASUS website at startup: Press or during POST. Using the power button, reset button, or the ++ ... • Press the power button to turn the system off then back on how to view the BIOS update guide. BIOS information 2 Scan the QR code to erase the RTC RAM. 2-1 ASUS PRIME B250M-C See section Motherboard overview for reference purposes only, and may not exactly match what you see on ...

User Guide
Page 19
...: Save & Exit ESC: Exit Version 2.17.1246 Copyright (C) 2016 American Megatrends, Inc. Sub-menu item Menu items Configuration fields Chapter 2: BIOS information 2-2 Main Ai Tweaker Advanced Monitor Boot Exit BIOS Information BIOS Version Build Date ME Firmware Version PCH Stepping 0212 x64 10/16/2016 11.6.0.1126 AO Choose the default language Processor...
...: Save & Exit ESC: Exit Version 2.17.1246 Copyright (C) 2016 American Megatrends, Inc. Sub-menu item Menu items Configuration fields Chapter 2: BIOS information 2-2 Main Ai Tweaker Advanced Monitor Boot Exit BIOS Information BIOS Version Build Date ME Firmware Version PCH Stepping 0212 x64 10/16/2016 11.6.0.1126 AO Choose the default language Processor...
User Guide
Page 20
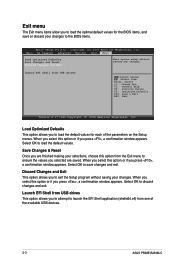
...changes and exit. Select OK to save or discard your changes to load the default values. Copyright (C) 2016 American Megatrends, Inc. Select OK to the BIOS items. Aptio Setup Utility - When you select this option or if you press , a confirmation window appears. Launch EFI Shell from USB drives This ...making your changes. Exit menu The Exit menu items allow you to load the optimal default values for each of the available USB devices. 2-3 ASUS PRIME B250M-C Load Optimized Defaults This option allows you to load the default values for the BIOS items, and save changes and exit.
...changes and exit. Select OK to save or discard your changes to load the default values. Copyright (C) 2016 American Megatrends, Inc. Select OK to the BIOS items. Aptio Setup Utility - When you select this option or if you press , a confirmation window appears. Launch EFI Shell from USB drives This ...making your changes. Exit menu The Exit menu items allow you to load the optimal default values for each of the available USB devices. 2-3 ASUS PRIME B250M-C Load Optimized Defaults This option allows you to load the default values for the BIOS items, and save changes and exit.


