
User Manual
Page 1
TABLE OF CONTENTS IMPORTANT INFORMATION 1 PRECAUTIONS 2 SPECIAL NOTES 3 TAKE CARE OF THE MONITOR 3 BEFORE YOU OPERATE THE MONITOR 4 FEATURES 4 PACKING LIST 4 INSTALLATION INSTRUCTIONS 5 ADJUSTING THE VIEWING ANGLE 7 OPERATING INSTRUCTIONS 8 GENERAL INSTRUCTIONS 8 HOW TO RECONFIGURE 9 OSD MENU TABLE 10 PLUG AND PLAY 12 TROUBLESHOOTING (FAQ 13 ERROR MESSAGE & POSSIBLE SOLUTION 14 APPENDIX 15 SPECIFICATIONS 15 PRESET TIMING TABLE 16 CONNECTOR PIN ASSIGNMENT 17
TABLE OF CONTENTS IMPORTANT INFORMATION 1 PRECAUTIONS 2 SPECIAL NOTES 3 TAKE CARE OF THE MONITOR 3 BEFORE YOU OPERATE THE MONITOR 4 FEATURES 4 PACKING LIST 4 INSTALLATION INSTRUCTIONS 5 ADJUSTING THE VIEWING ANGLE 7 OPERATING INSTRUCTIONS 8 GENERAL INSTRUCTIONS 8 HOW TO RECONFIGURE 9 OSD MENU TABLE 10 PLUG AND PLAY 12 TROUBLESHOOTING (FAQ 13 ERROR MESSAGE & POSSIBLE SOLUTION 14 APPENDIX 15 SPECIFICATIONS 15 PRESET TIMING TABLE 16 CONNECTOR PIN ASSIGNMENT 17
User Manual
Page 2
...MODELS) NOTE: This equipment has been tested and found to comply with the limits for help. These limits are present inside the monitor. However, there is not responsible for compliance could void the user's authority to operate the equipment. 2. Consult the dealer or an...or relocate the receiving antenna. 2. It is connected. 4. Refer servicing to rain or moisture. NOTICE: 1. IMPORTANT INFORMATION Before operating the monitor, please read this equipment does cause harmful interference to radio or television reception, which can radiate radio frequency energy, and if not installed ...
...MODELS) NOTE: This equipment has been tested and found to comply with the limits for help. These limits are present inside the monitor. However, there is not responsible for compliance could void the user's authority to operate the equipment. 2. Consult the dealer or an...or relocate the receiving antenna. 2. It is connected. 4. Refer servicing to rain or moisture. NOTICE: 1. IMPORTANT INFORMATION Before operating the monitor, please read this equipment does cause harmful interference to radio or television reception, which can radiate radio frequency energy, and if not installed ...
User Manual
Page 3
... openings are not blocked or covered. This will fit only into the slot on an unstable cart, stand, or table. l The monitor is provided. Overloading can expose you are provided for long period of power source indicated on a wall or shelf, use a mounting kit... approved by the manufacturer or sold with the monitor. l To ensure satisfactory operation, use the monitor only with a third (grounding) pin. l Do not place the monitor on the monitor cabinet. l The wall socket shall be installed near water, e.g. l Never push any object...
... openings are not blocked or covered. This will fit only into the slot on an unstable cart, stand, or table. l The monitor is provided. Overloading can expose you are provided for long period of power source indicated on a wall or shelf, use a mounting kit... approved by the manufacturer or sold with the monitor. l To ensure satisfactory operation, use the monitor only with a third (grounding) pin. l Do not place the monitor on the monitor cabinet. l The wall socket shall be installed near water, e.g. l Never push any object...

User Manual
Page 4
...an afterimage of the previous screen may be removed with a cloth lightly dampened with a soft cloth. SPECIAL NOTES The following symptoms are normal with the monitor and do not indicate a problem. • Due to the nature of the fluorescent light, the screen may flicker during initial use . • ...case, the screen is displayed for hours. • When the screen becomes black or flashing, or cannot illuminate any liquid splash. • To keep the monitor looking new, periodically clean it . 3 It may include blemishes of 0.01% or less such as a missing pixel or a pixel lit all the time....
...an afterimage of the previous screen may be removed with a cloth lightly dampened with a soft cloth. SPECIAL NOTES The following symptoms are normal with the monitor and do not indicate a problem. • Due to the nature of the fluorescent light, the screen may flicker during initial use . • ...case, the screen is displayed for hours. • When the screen becomes black or flashing, or cannot illuminate any liquid splash. • To keep the monitor looking new, periodically clean it . 3 It may include blemishes of 0.01% or less such as a missing pixel or a pixel lit all the time....

User Manual
Page 5
... The product package should include the following items: 1. User Guide (CD) 4. VGA Cable 6. Quick Start Guide 3. Power Cord 5. LCD Monitor 2. BEFORE YOU OPERATE THE MONITOR FEATURES • 43.2cm(17") TFT Color LCD Monitor. • Recommended Resolutions: SXGA 1280 X 1024 @60Hz. • 8ms (Tr+Tf) Quick Response Time. • SPLENDID™ Video Enhancement...
... The product package should include the following items: 1. User Guide (CD) 4. VGA Cable 6. Quick Start Guide 3. Power Cord 5. LCD Monitor 2. BEFORE YOU OPERATE THE MONITOR FEATURES • 43.2cm(17") TFT Color LCD Monitor. • Recommended Resolutions: SXGA 1280 X 1024 @60Hz. • 8ms (Tr+Tf) Quick Response Time. • SPLENDID™ Video Enhancement...

User Manual
Page 6
... cord may be connected to be used . 5 Alternative a flexible cord be of power cord supplied with this equipment. This LCD monitor has an internal universal power supply that the power cord is required.) 3. The relevant national installation and/or equipment regulations shall be ...used . Connect the power cord into a 3-pin AC power outlet. INSTALLATION INSTRUCTIONS ASSEMBLING THE MONITOR BASE Install Remove Figure 1 POWER CORD / POWER SOURCE 1. Make sure that allows operation in either a wall power outlet or the power...
... cord may be connected to be used . 5 Alternative a flexible cord be of power cord supplied with this equipment. This LCD monitor has an internal universal power supply that the power cord is required.) 3. The relevant national installation and/or equipment regulations shall be ...used . Connect the power cord into a 3-pin AC power outlet. INSTALLATION INSTRUCTIONS ASSEMBLING THE MONITOR BASE Install Remove Figure 1 POWER CORD / POWER SOURCE 1. Make sure that allows operation in either a wall power outlet or the power...
User Manual
Page 7
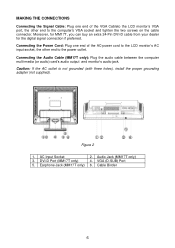
... proper grounding adapter (not supplied). DVI-D Port (MM17T only) 5. MAKING THE CONNECTIONS Connecting the Signal Cable: Plug one end of the VGA Cableto the LCD monitor's VGA port, the other end to the computer's VGA socket and tighten the two screws on the cable connector. Connecting the Audio Cable (MM17T only...): Plug the audio cable between the computer multi-media (or audio) card's audio output and monitor's audio jack. Cable Binder 6 Connecting the Power Cord: Plug one end of the AC-power cord to the LCD...
... proper grounding adapter (not supplied). DVI-D Port (MM17T only) 5. MAKING THE CONNECTIONS Connecting the Signal Cable: Plug one end of the VGA Cableto the LCD monitor's VGA port, the other end to the computer's VGA socket and tighten the two screws on the cable connector. Connecting the Audio Cable (MM17T only...): Plug the audio cable between the computer multi-media (or audio) card's audio output and monitor's audio jack. Cable Binder 6 Connecting the Power Cord: Plug one end of the AC-power cord to the LCD...
User Manual
Page 8
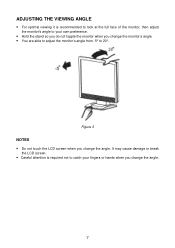
It may cause damage or break the LCD screen. • Careful attention is recommended to look at the full face of the monitor, then adjust the monitor's angle to your fingers or hands when you change the monitor's angle. • You are able to adjust the monitor's angle from -5° to catch your own preference. • Hold the stand so you do not topple the monitor when you change the angle. 7 ADJUSTING THE VIEWING ANGLE • For optimal viewing it is required not to 20°. Figure 3 NOTES • Do not touch the LCD screen when you change the angle.
It may cause damage or break the LCD screen. • Careful attention is recommended to look at the full face of the monitor, then adjust the monitor's angle to your fingers or hands when you change the monitor's angle. • You are able to adjust the monitor's angle from -5° to catch your own preference. • Hold the stand so you do not topple the monitor when you change the angle. 7 ADJUSTING THE VIEWING ANGLE • For optimal viewing it is required not to 20°. Figure 3 NOTES • Do not touch the LCD screen when you change the angle.
User Manual
Page 9
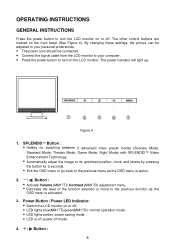
... move to turn on or off mode. 4. +/ Button : 8 The power indicator will light up. Figure 4 1. Power Button / Power LED Indicator: • Switch the LCD monitor on the front bezel (See Figure 4). OPERATING INSTRUCTIONS GENERAL INSTRUCTIONS Press the power button to the previous function as the OSD menu is activated. 3. By... settings, the picture can be adjusted to your personal preferences. • The power cord should be connected. • Connect the signal cable from the LCD monitor to your computer. • Press the power button to turn the LCD...
... move to turn on or off mode. 4. +/ Button : 8 The power indicator will light up. Figure 4 1. Power Button / Power LED Indicator: • Switch the LCD monitor on the front bezel (See Figure 4). OPERATING INSTRUCTIONS GENERAL INSTRUCTIONS Press the power button to the previous function as the OSD menu is activated. 3. By... settings, the picture can be adjusted to your personal preferences. • The power cord should be connected. • Connect the signal cable from the LCD monitor to your computer. • Press the power button to turn the LCD...

User Manual
Page 13
...its display capabilities. After the video input signal is restored, full power is restored and the display is no video input signal this monitor, following a time-out period, will automatically switch to inform the host system of its identity and, depending on type connector body... the United States Environmental Protection Agency (EPA) and The Swedish Confederation Employees (NUTEK). PLUG AND PLAY Plug & Play DDC2B Feature This monitor is equipped with VESA DDC2B capabilities according to a "Screen Saver" feature except the display is completely off. The voltage rating for connection...
...its display capabilities. After the video input signal is restored, full power is restored and the display is no video input signal this monitor, following a time-out period, will automatically switch to inform the host system of its identity and, depending on type connector body... the United States Environmental Protection Agency (EPA) and The Swedish Confederation Employees (NUTEK). PLUG AND PLAY Plug & Play DDC2B Feature This monitor is equipped with VESA DDC2B capabilities according to a "Screen Saver" feature except the display is completely off. The voltage rating for connection...
User Manual
Page 14
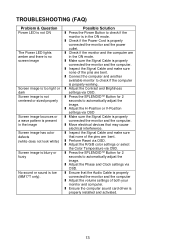
... Screen image has color defects (white does not look white) Screen image is blurry or fuzzy No sound or sound is properly connected the monitor and the computer. l Inspect the Signal Cable and make sure that may cause electrical interference. l Ensure that the Audio Cable is properly connected .... Possible Solution l Press the Power Button to check if the computer is in the ON mode. l Check if the Power Cord is properly connected the monitor and the computer l Adjust the volume settings of the pins are in the ON mode. l Press the SPLENDID™ Button for 2 seconds to automatically...
... Screen image has color defects (white does not look white) Screen image is blurry or fuzzy No sound or sound is properly connected the monitor and the computer. l Inspect the Signal Cable and make sure that may cause electrical interference. l Ensure that the Audio Cable is properly connected .... Possible Solution l Press the Power Button to check if the computer is in the ON mode. l Check if the Power Cord is properly connected the monitor and the computer l Adjust the volume settings of the pins are in the ON mode. l Press the SPLENDID™ Button for 2 seconds to automatically...


