
User Manual
Page 3
... Safety information ix About this guide x P9X79 WS specifications summary xii Chapter 1: Product introduction 1.1 Welcome 1-1 1.2 Package contents 1-1 1.3 Special features 1-2 1.3.1 Product highlights 1-2 1.3.2 ASUS Workstation Exclusive Features 1-3 1.3.3 ASUS features 1-4 1.3.4 Other special features 1-8 Chapter 2: Hardware information 2.1 Before you proceed 2-1 2.2 Motherboard overview 2-2 2.2.1 Motherboard layout 2-2 2.2.2 Layout contents 2-3 2.2.3 Central Processing Unit (CPU 2-4 2.2.4 System memory 2-5 2.2.5 Expansion slots 2-7 2.2.6 Onboard switches 2-9 2.2.7 Onboard...
... Safety information ix About this guide x P9X79 WS specifications summary xii Chapter 1: Product introduction 1.1 Welcome 1-1 1.2 Package contents 1-1 1.3 Special features 1-2 1.3.1 Product highlights 1-2 1.3.2 ASUS Workstation Exclusive Features 1-3 1.3.3 ASUS features 1-4 1.3.4 Other special features 1-8 Chapter 2: Hardware information 2.1 Before you proceed 2-1 2.2 Motherboard overview 2-2 2.2.1 Motherboard layout 2-2 2.2.2 Layout contents 2-3 2.2.3 Central Processing Unit (CPU 2-4 2.2.4 System memory 2-5 2.2.5 Expansion slots 2-7 2.2.6 Onboard switches 2-9 2.2.7 Onboard...
User Manual
Page 12
...of individual CPUs. ** Due to CPU behavior, DDR3 2200/2000/1800 MHz memory module will be available when using PCIe 3.0compliant devices. P9X79 WS specifications summary CPU Chipset Memory Expansion Slots Multi-GPU support Storage LAN USB 2nd Generation Intel® Core&#...8482; i7 Processor family for the LGA 2011 Socket Intel® Xeon® series processor for the LGA 2011 Socket * Supports Intel® Turbo Boost Technology 2.0 ** Refer to www.asus...
...of individual CPUs. ** Due to CPU behavior, DDR3 2200/2000/1800 MHz memory module will be available when using PCIe 3.0compliant devices. P9X79 WS specifications summary CPU Chipset Memory Expansion Slots Multi-GPU support Storage LAN USB 2nd Generation Intel® Core&#...8482; i7 Processor family for the LGA 2011 Socket Intel® Xeon® series processor for the LGA 2011 Socket * Supports Intel® Turbo Boost Technology 2.0 ** Refer to www.asus...
User Manual
Page 20
...; i7 Processor Extreme Edition This motherboard supports the latest Intel® 2nd Generation Core™ i7 Processor Extreme in LGA2011 package, with memory and PCI Express controllers integrated to www.asus. This provides great graphicsperformance. Intel® 2nd Generation Core™ i7 Processor Extreme is one of the most future-proof technology...
...; i7 Processor Extreme Edition This motherboard supports the latest Intel® 2nd Generation Core™ i7 Processor Extreme in LGA2011 package, with memory and PCI Express controllers integrated to www.asus. This provides great graphicsperformance. Intel® 2nd Generation Core™ i7 Processor Extreme is one of the most future-proof technology...
User Manual
Page 22
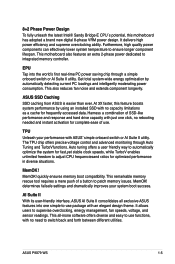
...with accurate input through UEFI BIOS tuning or the exclusive ASUS interface. This proprietary design, with two digital voltage regulator modules (VRMs), including an all-new DRAM controller that allows ultra-precise memory tuning in class power efficiency and stability Two critical ...accurate voltages for both CPU and DRAM ASUS X79 motherboards include New DIGI+ Power Control with its precise yet flexible power adjustments, increases overclocking headroom to push performance to its full potential. 1-4 Chapter 1: Product Introduction Diag. P9X79 WS with this unique design provides a ...
...with accurate input through UEFI BIOS tuning or the exclusive ASUS interface. This proprietary design, with two digital voltage regulator modules (VRMs), including an all-new DRAM controller that allows ultra-precise memory tuning in class power efficiency and stability Two critical ...accurate voltages for both CPU and DRAM ASUS X79 motherboards include New DIGI+ Power Control with its precise yet flexible power adjustments, increases overclocking headroom to push performance to its full potential. 1-4 Chapter 1: Product Introduction Diag. P9X79 WS with this unique design provides a ...
User Manual
Page 23
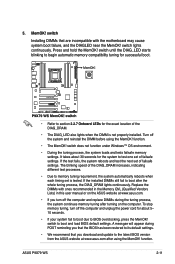
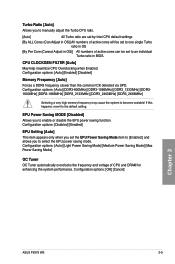
...memory boot compatibility. The TPU chip offers precise voltage control and advanced monitoring through a simple onboard switch or AI Suite II utility. MemOK! AI Suite II With its user-friendly interface, ASUS AI Suite II consolidates all -inone software offers diverse and easy to switch back and forth between different utilities. ASUS P9X79 WS... 1-5 MemOK! MemOK! ASUS SSD Caching SSD caching from ASUS is easier than ever. 8+2 Phase Power Design To fully unleash the latest Intel...
...memory boot compatibility. The TPU chip offers precise voltage control and advanced monitoring through a simple onboard switch or AI Suite II utility. MemOK! AI Suite II With its user-friendly interface, ASUS AI Suite II consolidates all -inone software offers diverse and easy to switch back and forth between different utilities. ASUS P9X79 WS... 1-5 MemOK! MemOK! ASUS SSD Caching SSD caching from ASUS is easier than ever. 8+2 Phase Power Design To fully unleash the latest Intel...

User Manual
Page 25
... of connecting the system panel cables one at a time and avoiding wrong cable connections. ASUS Q-Design ASUS Q-Design enhances your motherboard against Electronic Magnetic Interference (EMI). ASUS P9X79 WS 1-7 Quick and easy info for sharing UEFI setup info and troubleshooting - New F3 Shortcut...keyboard-only controls. Users can choose system performance settings and drag and drop boot priorities. ASUS DRAM SPD (Serial Presence Detect) Information for accessing memory info, detecting faulty DIMMs and helping with selectable modes, providing a user-friendly interface that ...
... of connecting the system panel cables one at a time and avoiding wrong cable connections. ASUS Q-Design ASUS Q-Design enhances your motherboard against Electronic Magnetic Interference (EMI). ASUS P9X79 WS 1-7 Quick and easy info for sharing UEFI setup info and troubleshooting - New F3 Shortcut...keyboard-only controls. Users can choose system performance settings and drag and drop boot priorities. ASUS DRAM SPD (Serial Presence Detect) Information for accessing memory info, detecting faulty DIMMs and helping with selectable modes, providing a user-friendly interface that ...
User Manual
Page 33
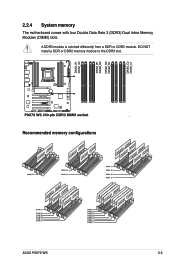
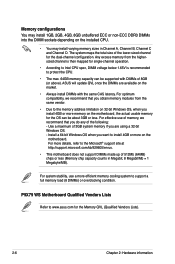
2.2.4 System memory The motherboard comes with four Double Data Rate 3 (DDR3) Dual Inline Memory Modules (DIMM) slots. DO NOT install a DDR or DDR2 memory module to the DDR3 slot. ® ® Recommended memory configurations ASUS P9X79 WS 2-5 A DDR3 module is notched differently from a DDR or DDR2 module.
2.2.4 System memory The motherboard comes with four Double Data Rate 3 (DDR3) Dual Inline Memory Modules (DIMM) slots. DO NOT install a DDR or DDR2 memory module to the DDR3 slot. ® ® Recommended memory configurations ASUS P9X79 WS 2-5 A DDR3 module is notched differently from a DDR or DDR2 module.
User Manual
Page 34
...total size of 3GB system memory if you install 4GB or more on the market. • Always install DIMMs with DIMMs of 8GB (or above). Any excess memory from the same vendor. • Due to www.asus.com for the dual-channel configuration. P9X79 WS Motherboard Qualified Vendors Lists ...Refer to the memory address limitation on 32-bit Windows OS, when you are available on the...
...total size of 3GB system memory if you install 4GB or more on the market. • Always install DIMMs with DIMMs of 8GB (or above). Any excess memory from the same vendor. • Due to www.asus.com for the dual-channel configuration. P9X79 WS Motherboard Qualified Vendors Lists ...Refer to the memory address limitation on 32-bit Windows OS, when you are available on the...
User Manual
Page 39
...; OS environment. • During the tuning process, the system loads and tests failsafe memory settings. ASUS P9X79 WS 2-11 function. • The MemOK! A messgae will appear during the tuning process, the system continues memory tuning after turning on the ASUS website at www.asus.com. • If you download and update to the latest BIOS version from...
...; OS environment. • During the tuning process, the system loads and tests failsafe memory settings. ASUS P9X79 WS 2-11 function. • The MemOK! A messgae will appear during the tuning process, the system continues memory tuning after turning on the ASUS website at www.asus.com. • If you download and update to the latest BIOS version from...
User Manual
Page 43
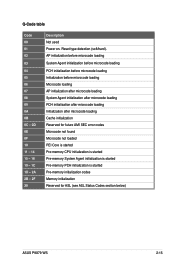
... Microcode not found Microcode not loaded PEI Core is started Pre-memory CPU initialization is started Pre-memory System Agent initialization is started Pre-memory PCH initialization is started Pre-memory initialization codes Memory initialization Reserved for ASL (see ASL Status Codes section below) ASUS P9X79 WS 2-15 Q-Code table Code 00 01 02 03 04 05 06...
... Microcode not found Microcode not loaded PEI Core is started Pre-memory CPU initialization is started Pre-memory System Agent initialization is started Pre-memory PCH initialization is started Pre-memory initialization codes Memory initialization Reserved for ASL (see ASL Status Codes section below) ASUS P9X79 WS 2-15 Q-Code table Code 00 01 02 03 04 05 06...

User Manual
Page 44
...50 - 53 54 55 56 57 58 59 5A 5B 5C - 5F E0 E1 E2 E3 E4 - Invalid memory type or incompatible memory speed Unspecified memory initialization error Memory not installed Invalid CPU type or Speed CPU mismatch CPU self test failed or possible CPU cache error CPU micro-code... information E7 E8 E9 EA EB EC - EF F0 F1 F2 F3 F4 Description Memory Installed CPU post-memory initialization Post-Memory System Agent initialization is started Post-Memory PCH initialization is started Post memory initialization codes DXE IPL is started Recovery firmware image is found Recovery firmware image is called...
...50 - 53 54 55 56 57 58 59 5A 5B 5C - 5F E0 E1 E2 E3 E4 - Invalid memory type or incompatible memory speed Unspecified memory initialization error Memory not installed Invalid CPU type or Speed CPU mismatch CPU self test failed or possible CPU cache error CPU micro-code... information E7 E8 E9 EA EB EC - EF F0 F1 F2 F3 F4 Description Memory Installed CPU post-memory initialization Post-Memory System Agent initialization is started Post-Memory PCH initialization is started Post memory initialization codes DXE IPL is started Recovery firmware image is found Recovery firmware image is called...

User Manual
Page 78
... power, the system power LED on the chain) c. Connect the power cord to disabled No keyboard detected One continuous beep followed by two short No memory detected beeps then a pause (repeated) One continuous beep followed by three No VGA detected short beeps One continuous beep followed by four Hardware component failure...
... power, the system power LED on the chain) c. Connect the power cord to disabled No keyboard detected One continuous beep followed by two short No memory detected beeps then a pause (repeated) One continuous beep followed by three No VGA detected short beeps One continuous beep followed by four Hardware component failure...

User Manual
Page 85
... ME Version 0238 x64 09/16/2011 MBEC-X79-0218 7.1.20.1089 CPU Information Genuine Intel(R) CPU @ 2.00GHz Speed 2066 MHz Memory Information Total Memory 4096 MB (DDR3) Speed 1373 MHz System Language English System Date System Time Access Level [Friday 09/23/2011] [16:46:15... Setup the User will have forgotten your BIOS password, erase the CMOS Real Time Clock (RTC) RAM to clear the BIOS password. Chapter 3 ASUS P9X79 WS 3-5 UEFI BIOS Utility - UEFI BIOS Utility - 3.3 Main menu The Main menu screen appears when you enter the Advanced Mode of the basic...
... ME Version 0238 x64 09/16/2011 MBEC-X79-0218 7.1.20.1089 CPU Information Genuine Intel(R) CPU @ 2.00GHz Speed 2066 MHz Memory Information Total Memory 4096 MB (DDR3) Speed 1373 MHz System Language English System Date System Time Access Level [Friday 09/23/2011] [16:46:15... Setup the User will have forgotten your BIOS password, erase the CMOS Real Time Clock (RTC) RAM to clear the BIOS password. Chapter 3 ASUS P9X79 WS 3-5 UEFI BIOS Utility - UEFI BIOS Utility - 3.3 Main menu The Main menu screen appears when you enter the Advanced Mode of the basic...

User Manual
Page 88
... options: [Auto] Loads the optimal settings for the system. [Manual] Allows you to individually set the profiles supported by your memory modules for better overclocking. [Disabled] To skip system shutdown at BCLK frequency adjustment. 3-8 Chapter 3: BIOS setup Use the and keys... to set overclocking parameters. [X.M.P.] If you install memory modules supporting the eXtreme Memory Profile (X.M.P.) Technology, choose this item to adjust the value. BCLK Frequency [XXX] Allows you to adjust the CPU and...
... options: [Auto] Loads the optimal settings for the system. [Manual] Allows you to individually set the profiles supported by your memory modules for better overclocking. [Disabled] To skip system shutdown at BCLK frequency adjustment. 3-8 Chapter 3: BIOS setup Use the and keys... to set overclocking parameters. [X.M.P.] If you install memory modules supporting the eXtreme Memory Profile (X.M.P.) Technology, choose this item to adjust the value. BCLK Frequency [XXX] Allows you to adjust the CPU and...
User Manual
Page 89
... [DDR3_2133MHz] [DDR3_2400MHz] [DDR3_2666MHz] Selecting a very high memory frequency may cause the system to the default setting. If this happens, revert to become unstable! Configuration options: [OK] [Cancel] Chapter 3 ASUS P9X79 WS 3-9 CPU CLOCKGEN FILTER [Auto] May help maximize CPU ...Overclocking when Enabled. Configuration options: [Auto] [Enabled] [Disabled] Memory Frequency [Auto] Forces a DDR3 frequency slower than the common...
... [DDR3_2133MHz] [DDR3_2400MHz] [DDR3_2666MHz] Selecting a very high memory frequency may cause the system to the default setting. If this happens, revert to become unstable! Configuration options: [OK] [Cancel] Chapter 3 ASUS P9X79 WS 3-9 CPU CLOCKGEN FILTER [Auto] May help maximize CPU ...Overclocking when Enabled. Configuration options: [Auto] [Enabled] [Disabled] Memory Frequency [Auto] Forces a DDR3 frequency slower than the common...
User Manual
Page 100
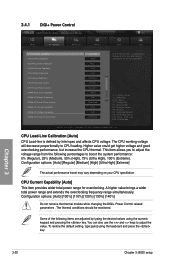
... the desired values using the keyboard and press the key. CPU Load-Line Calibration [Auto] CPU Load-line is enabled BLCK frequency, CPU ratio and memory parameters will decrease proportionally to adjust the value. Configuration options: [Auto] [Regular] [Medium] [High] [Ultra High] [Extreme] The actual performance boost may vary depending ...CPU Current Capability [Auto] This item provides wider total power range for overclocking. F1: General Help F2: Previous Values F3: Shortcut F5: Optimized Defaults F6: ASUS Ratio Boost F10: Save ESC: Exit F12: Print Screen Version 2.10.1208.
... the desired values using the keyboard and press the key. CPU Load-Line Calibration [Auto] CPU Load-line is enabled BLCK frequency, CPU ratio and memory parameters will decrease proportionally to adjust the value. Configuration options: [Auto] [Regular] [Medium] [High] [Ultra High] [Extreme] The actual performance boost may vary depending ...CPU Current Capability [Auto] This item provides wider total power range for overclocking. F1: General Help F2: Previous Values F3: Shortcut F5: Optimized Defaults F6: ASUS Ratio Boost F10: Save ESC: Exit F12: Print Screen Version 2.10.1208.

User Manual
Page 126
Profile > Advanced Monitor O.C. Load from the same memory/CPU configuration and BIOS version. Press , and then select Yes. • DO NOT shut down or reset the system while updating the BIOS to prevent...65533;n�u��m��b�e�r�. ��P��r�e�s�s� , and then select Yes. 3.8.3 ASUS O.C. Advanced Mode Exit Main Back Ai Tweaker Tool\ ASUS O.C. Save to Profile Allows you to load the previous BIOS settings saved in the BIOS Flash. �K�e��y�...
Profile > Advanced Monitor O.C. Load from the same memory/CPU configuration and BIOS version. Press , and then select Yes. • DO NOT shut down or reset the system while updating the BIOS to prevent...65533;n�u��m��b�e�r�. ��P��r�e�s�s� , and then select Yes. 3.8.3 ASUS O.C. Advanced Mode Exit Main Back Ai Tweaker Tool\ ASUS O.C. Save to Profile Allows you to load the previous BIOS settings saved in the BIOS Flash. �K�e��y�...

User Manual
Page 142
... Every CPU Strap support is strongly recommended. • Fast Tuning: fast CPU overclocking • Extreme Tuning: extreme overclocking for CPU and memory Using Fast Tuning 1. CPU Strap Adjustment bar Click to the desired value. Click the Auto Tuning tab and then click Fast. 2. CPU ... Allows you to the physical characteristics of individual CPUs. Click on the adjustment bar to restore all start auto-overclocking. Auto Tuning ASUS TurboV EVO includes two auto tuning modes, providing the most flexible auto-tuning options. • The overclocking result varies with the ...
... Every CPU Strap support is strongly recommended. • Fast Tuning: fast CPU overclocking • Extreme Tuning: extreme overclocking for CPU and memory Using Fast Tuning 1. CPU Strap Adjustment bar Click to the desired value. Click the Auto Tuning tab and then click Fast. 2. CPU ... Allows you to the physical characteristics of individual CPUs. Click on the adjustment bar to restore all start auto-overclocking. Auto Tuning ASUS TurboV EVO includes two auto tuning modes, providing the most flexible auto-tuning options. • The overclocking result varies with the ...

User Manual
Page 143
TurboV automatically overclocks the CPU, saves BIOS settings and restarts the system. TurboV automatically overclocks the CPU and memory and restarts the system. To keep the result, click Stop. Click Stop if you did not click ...to exit. After re-entering Windows, a message appears indicating auto tuning success. After re-entering Windows, a message appears indicating auto tuning success. 3. ASUS P9X79 WS 4-7 Chapter 4 4. An animation appears indicating the overclocking process. Click OK to cancel the Overclocking process. 5. After re-entering Windows, a message appears...
TurboV automatically overclocks the CPU, saves BIOS settings and restarts the system. TurboV automatically overclocks the CPU and memory and restarts the system. To keep the result, click Stop. Click Stop if you did not click ...to exit. After re-entering Windows, a message appears indicating auto tuning success. After re-entering Windows, a message appears indicating auto tuning success. 3. ASUS P9X79 WS 4-7 Chapter 4 4. An animation appears indicating the overclocking process. Click OK to cancel the Overclocking process. 5. After re-entering Windows, a message appears...

User Manual
Page 182
... more details if needed. • Visit the NVIDIA CUDA Zone website at http://www.nvidia.com/object/ cuda_home.html for the latest driver, list of memory and power supply vary with the Telsa cards you selected and the VGA output functions. Follow the installation procedures in this section. 5.3.1 Requirements • 32...
... more details if needed. • Visit the NVIDIA CUDA Zone website at http://www.nvidia.com/object/ cuda_home.html for the latest driver, list of memory and power supply vary with the Telsa cards you selected and the VGA output functions. Follow the installation procedures in this section. 5.3.1 Requirements • 32...


