
User Manual
Page 6
... the device drivers 5-3 5.1.5 Enabling the ATI® CrossFireX™ technology 5-3 5.2 NVIDIA® SLI™ technology 5-5 5.2.1 Requirements 5-5 5.2.2 Installing two SLI-ready graphics cards 5-6 5.2.3 Installing three SLI-ready graphics cards 5-7 5.2.4 Installing four SLI-ready graphics cards 5-8 5.2.5 Installing the device drivers 5-9 5.2.6 Enabling the NVIDIA® SLI™ technology 5-9 5.3 NVIDIA® CUDA™ technology 5-12 5.3.1 Requirements 5-12 5.3.2 Installing CUDA-ready...
... the device drivers 5-3 5.1.5 Enabling the ATI® CrossFireX™ technology 5-3 5.2 NVIDIA® SLI™ technology 5-5 5.2.1 Requirements 5-5 5.2.2 Installing two SLI-ready graphics cards 5-6 5.2.3 Installing three SLI-ready graphics cards 5-7 5.2.4 Installing four SLI-ready graphics cards 5-8 5.2.5 Installing the device drivers 5-9 5.2.6 Enabling the NVIDIA® SLI™ technology 5-9 5.3 NVIDIA® CUDA™ technology 5-12 5.3.1 Requirements 5-12 5.3.2 Installing CUDA-ready...

User Manual
Page 7
... can radiate radio frequency energy and, if not installed and used in the Radio Interference Regulations of the Canadian Department of the monitor to the graphics card is encouraged to try to correct the interference by one or more of the following two conditions: • This device may not cause harmful interference...
... can radiate radio frequency energy and, if not installed and used in the Radio Interference Regulations of the Canadian Department of the monitor to the graphics card is encouraged to try to correct the interference by one or more of the following two conditions: • This device may not cause harmful interference...
User Manual
Page 10
... contains the information you have been added by your dealer. ASUS websites The ASUS website provides updated information on the motherboard. • Chapter 3: BIOS setup This chapter tells how to install and configure multiple ATI® CrossFireX™ and NVIDIA® SLI™ graphics cards. Detailed descriptions of the BIOS parameters are not part...
... contains the information you have been added by your dealer. ASUS websites The ASUS website provides updated information on the motherboard. • Chapter 3: BIOS setup This chapter tells how to install and configure multiple ATI® CrossFireX™ and NVIDIA® SLI™ graphics cards. Detailed descriptions of the BIOS parameters are not part...
User Manual
Page 22
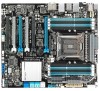
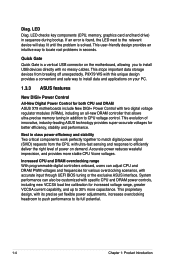
...the motherboard, allowing you to efficiently deliver the right level of innovative, industry-leading ASUS technology provides super-accurate voltages for increased voltage range, greater VCCSA current capability, .... Quick Gate Quick Gate is solved. Diag. LED checks key components (CPU, memory, graphics card and hard drive) in addition to its precise yet flexible power adjustments, increases overclocking headroom ...data and applications on demand. LED Diag. P9X79 WS with its full potential. 1-4 Chapter 1: Product Introduction Accurate power reduces wasteful imprecision, and provides ...
...the motherboard, allowing you to efficiently deliver the right level of innovative, industry-leading ASUS technology provides super-accurate voltages for increased voltage range, greater VCCSA current capability, .... Quick Gate Quick Gate is solved. Diag. LED checks key components (CPU, memory, graphics card and hard drive) in addition to its precise yet flexible power adjustments, increases overclocking headroom ...data and applications on demand. LED Diag. P9X79 WS with its full potential. 1-4 Chapter 1: Product Introduction Accurate power reduces wasteful imprecision, and provides ...

User Manual
Page 61
ASUS P9X79 WS 2-33 When using 3 or more graphic cards, more power may be needed, Use this connector to enhance power by 12V. 14. EZ Plug connector (4-pin EZ_PLUG) This 4-pin connector is for HDD power supply plug.
ASUS P9X79 WS 2-33 When using 3 or more graphic cards, more power may be needed, Use this connector to enhance power by 12V. 14. EZ Plug connector (4-pin EZ_PLUG) This 4-pin connector is for HDD power supply plug.

User Manual
Page 63
ASUS P9X79 WS 2-35 2.3 Building your computer system 2.3.1 Additional tools and components to build a PC system 1 bag of screws PC chassis Philips (cross) screwdriver Power supply unit Intel LGA 2011 CPU Intel LGA 2011 compatible CPU Fan DIMM SATA hard disk drive SATA optical disc drive (optional) Graphics card The tools and components in the table above are not included in the motherboard package.
ASUS P9X79 WS 2-35 2.3 Building your computer system 2.3.1 Additional tools and components to build a PC system 1 bag of screws PC chassis Philips (cross) screwdriver Power supply unit Intel LGA 2011 CPU Intel LGA 2011 compatible CPU Fan DIMM SATA hard disk drive SATA optical disc drive (optional) Graphics card The tools and components in the table above are not included in the motherboard package.

User Manual
Page 169
Multiple 5GPU This chapter describes how to install and configure multiple ATI® CrossFireX™ and NVIDIA® SLI™ graphics cards. technology support
Multiple 5GPU This chapter describes how to install and configure multiple ATI® CrossFireX™ and NVIDIA® SLI™ graphics cards. technology support

User Manual
Page 171
... Panel > Add/Remove Programs. For Windows Vista, go to your computer. ASUS P9X79 WS 5-1 Select your graphics card driver supports the ATI CrossFireX technology. Turn off your system. Close all existing graphics card drivers before installing ATI CrossFireX graphics cards to Control Panel > Programs and Features. 3. To uninstall existing graphics card drivers 1. 5.1 ATI® CrossFireX™ technology The motherboard supports the...
... Panel > Add/Remove Programs. For Windows Vista, go to your computer. ASUS P9X79 WS 5-1 Select your graphics card driver supports the ATI CrossFireX technology. Turn off your system. Close all existing graphics card drivers before installing ATI CrossFireX graphics cards to Control Panel > Programs and Features. 3. To uninstall existing graphics card drivers 1. 5.1 ATI® CrossFireX™ technology The motherboard supports the...

User Manual
Page 172
... for reference only. Connect two independent auxiliary power sources from the power supply to the graphics card. 5.1.3 Installing CrossFireX graphics cards The following pictures are properly seated on each graphics card. Prepare two CrossFireX-ready graphics cards. 2. Ensure that the cards are for multi-graphics card installation. 3. CrossFireX bridge 5. Align and firmly insert the CrossFireX bridge connector to Chapter 2 in place...
... for reference only. Connect two independent auxiliary power sources from the power supply to the graphics card. 5.1.3 Installing CrossFireX graphics cards The following pictures are properly seated on each graphics card. Prepare two CrossFireX-ready graphics cards. 2. Ensure that the cards are for multi-graphics card installation. 3. CrossFireX bridge 5. Align and firmly insert the CrossFireX bridge connector to Chapter 2 in place...
User Manual
Page 173
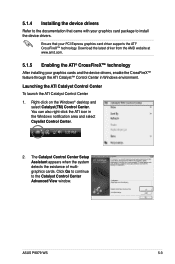
... Center 1. Right-click on the Windows® desktop and select Catalyst(TM) Control Center. ASUS P9X79 WS 5-3 Download the latest driver from the AMD website at www.amd.com. 5.1.5 Enabling the ATI® CrossFireX™ technology After installing your graphics cards and the device drivers, enable the CrossFireX™ feature through the ATI Catalyst™...
... Center 1. Right-click on the Windows® desktop and select Catalyst(TM) Control Center. ASUS P9X79 WS 5-3 Download the latest driver from the AMD website at www.amd.com. 5.1.5 Enabling the ATI® CrossFireX™ technology After installing your graphics cards and the device drivers, enable the CrossFireX™ feature through the ATI Catalyst™...

User Manual
Page 174
Enabling Dual CrossFireX settings 1. Select Enable CrossFireX. 1 4. From the Graphics Adapter list, select the graphics card to exit the window. 2 3 4 5-4 Chapter 5: Multiple GPU technology support Click Apply, and then click OK to act as the display GPU. 3. In the Catalyst Control Center window, click Graphics Settings > CrossFireX > Configure. 2.
Enabling Dual CrossFireX settings 1. Select Enable CrossFireX. 1 4. From the Graphics Adapter list, select the graphics card to exit the window. 2 3 4 5-4 Chapter 5: Multiple GPU technology support Click Apply, and then click OK to act as the display GPU. 3. In the Catalyst Control Center window, click Graphics Settings > CrossFireX > Configure. 2.

User Manual
Page 175
ASUS P9X79 WS 5-5 Follow the installation procedures in this section. 5.2.1 Requirements • In Dual SLI mode, you should have three identical SLI-ready graphics cards that are NVIDIA® certified. • Ensure that your system. • We recommend that you install additional chassis ...by Windows® Vista™ operating system only. • Visit the NVIDIA zone website at least the minimum power required by your graphics card driver supports the NVIDIA SLI technology. 5.2 NVIDIA® SLI™ technology The motherboard supports the NVIDIA® SLI™ (Scalable...
ASUS P9X79 WS 5-5 Follow the installation procedures in this section. 5.2.1 Requirements • In Dual SLI mode, you should have three identical SLI-ready graphics cards that are NVIDIA® certified. • Ensure that your system. • We recommend that you install additional chassis ...by Windows® Vista™ operating system only. • Visit the NVIDIA zone website at least the minimum power required by your graphics card driver supports the NVIDIA SLI technology. 5.2 NVIDIA® SLI™ technology The motherboard supports the NVIDIA® SLI™ (Scalable...

User Manual
Page 176
... 5: Multiple GPU technology support Prepare two SLI-ready graphics cards. 2. 5.2.2 Installing two SLI-ready graphics cards The following pictures are properly seated on each graphics card. Insert the two graphics card into the PCIEX16 slots. Ensure that the cards are for multi-graphics card installation. 3. Connect a VGA or a DVI cable to the two graphics cards separately. 6. Align and firmly insert the SLI bridge...
... 5: Multiple GPU technology support Prepare two SLI-ready graphics cards. 2. 5.2.2 Installing two SLI-ready graphics cards The following pictures are properly seated on each graphics card. Insert the two graphics card into the PCIEX16 slots. Ensure that the cards are for multi-graphics card installation. 3. Connect a VGA or a DVI cable to the two graphics cards separately. 6. Align and firmly insert the SLI bridge...

User Manual
Page 177
... 3Way SLI bridge connector to the graphics card. 3-Way SLI bridge ASUS P9X79 WS 5-7 Connect a VGA or a DVI cable to the goldfingers on the slots. 4. Ensure that the connector is firmly in this user manual for the locations of the PCIEX16 slots recommended for multi-graphics card installation. 3. 5.2.3 Installing three SLI-ready graphics cards 1. If your motherboard has more...
... 3Way SLI bridge connector to the graphics card. 3-Way SLI bridge ASUS P9X79 WS 5-7 Connect a VGA or a DVI cable to the goldfingers on the slots. 4. Ensure that the connector is firmly in this user manual for the locations of the PCIEX16 slots recommended for multi-graphics card installation. 3. 5.2.3 Installing three SLI-ready graphics cards 1. If your motherboard has more...

User Manual
Page 178
... user manual for the locations of the PCIEX16 slots recommended for multi-graphics card installation. 3. Connect a VGA or a DVI cable to Chapter 2 in place. 5. Prepare four SLI-ready graphics cards. 2. If your motherboard has more than two PCIEX16 slots, refer to the graphics card. 4-Way SLI bridge 5-8 Chapter 5: Multiple GPU technology support Align and firmly insert...
... user manual for the locations of the PCIEX16 slots recommended for multi-graphics card installation. 3. Connect a VGA or a DVI cable to Chapter 2 in place. 5. Prepare four SLI-ready graphics cards. 2. If your motherboard has more than two PCIEX16 slots, refer to the graphics card. 4-Way SLI bridge 5-8 Chapter 5: Multiple GPU technology support Align and firmly insert...
User Manual
Page 179
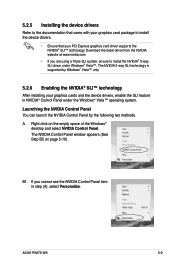
...Windows® Vista™ only. 5.2.6 Enabling the NVIDIA® SLI™ technology After installing your graphics cards and the device drivers, enable the SLI feature in step (A), select Personalize. B1. ASUS P9X79 WS 5-9 Download the latest driver from the NVIDIA website at www.nvidia.com. • If you ... If you are using a Triple SLI system, ensure to install the device drivers. • Ensure that your PCI Express graphics card driver supports the NVIDIA® SLI™ technology. A. 5.2.5 Installing the device drivers Refer to the documentation that came with your...
...Windows® Vista™ only. 5.2.6 Enabling the NVIDIA® SLI™ technology After installing your graphics cards and the device drivers, enable the SLI feature in step (A), select Personalize. B1. ASUS P9X79 WS 5-9 Download the latest driver from the NVIDIA website at www.nvidia.com. • If you ... If you are using a Triple SLI system, ensure to install the device drivers. • Ensure that your PCI Express graphics card driver supports the NVIDIA® SLI™ technology. A. 5.2.5 Installing the device drivers Refer to the documentation that came with your...

User Manual
Page 182
...nvidia.com/object/ cuda_home.html for reference only. The graphics cards and the motherboard layout may vary with the Telsa cards you selected and the VGA output functions. Insert four Tesla computing processor card(s) into the PCIe x16_1, PCIe x16_2, PCIe x16_3, ... Microsoft® Windows XP/ Vista/ Linux RHEL5.X/ Open SuSE11.X OS • The requirements of CUDA-certified graphics card and supported 3D application list. 5.3.2 Installing CUDA-ready graphics cards The following pictures are properly seated on the slot. 5-12 Chapter 5: Multiple GPU technology support 5.3 NVIDIA®...
...nvidia.com/object/ cuda_home.html for reference only. The graphics cards and the motherboard layout may vary with the Telsa cards you selected and the VGA output functions. Insert four Tesla computing processor card(s) into the PCIe x16_1, PCIe x16_2, PCIe x16_3, ... Microsoft® Windows XP/ Vista/ Linux RHEL5.X/ Open SuSE11.X OS • The requirements of CUDA-certified graphics card and supported 3D application list. 5.3.2 Installing CUDA-ready graphics cards The following pictures are properly seated on the slot. 5-12 Chapter 5: Multiple GPU technology support 5.3 NVIDIA®...

User Manual
Page 183
... Manager. 2. ASUS P9X79 WS 5-13 Connect either one 8-pin power connector or two 6-pin power connectors from the menu. Connect a display cable to install the device drivers. 5. Click the "+" sign before Display adapters, and the installed graphics card and computing processor card(s) should appear. Refer to the documentation that came with your graphics card package to the graphics card. The...
... Manager. 2. ASUS P9X79 WS 5-13 Connect either one 8-pin power connector or two 6-pin power connectors from the menu. Connect a display cable to install the device drivers. 5. Click the "+" sign before Display adapters, and the installed graphics card and computing processor card(s) should appear. Refer to the documentation that came with your graphics card package to the graphics card. The...


