User Manual
Page 5
... 4.3.5 FAN Xpert 4-11 4.3.6 Probe II 4-12 4.3.7 Sensor Recorder 4-13 4.3.8 USB 3.0 Boost 4-14 4.3.9 ASUS SSD Caching 4-15 4.3.10 ASUS Update 4-16 4.3.11 MyLogo2 4-17 4.3.12 Audio configurations 4-19 4.4 RAID configurations 4-20 4.4.1 RAID definitions 4-20 4.4.2 Installing Serial ATA hard disks 4-21 4.4.3 Setting the RAID item in BIOS 4-21 4.4.4 Intel® Rapid Storage Technology Option ROM utility..... 4-21...
... 4.3.5 FAN Xpert 4-11 4.3.6 Probe II 4-12 4.3.7 Sensor Recorder 4-13 4.3.8 USB 3.0 Boost 4-14 4.3.9 ASUS SSD Caching 4-15 4.3.10 ASUS Update 4-16 4.3.11 MyLogo2 4-17 4.3.12 Audio configurations 4-19 4.4 RAID configurations 4-20 4.4.1 RAID definitions 4-20 4.4.2 Installing Serial ATA hard disks 4-21 4.4.3 Setting the RAID item in BIOS 4-21 4.4.4 Intel® Rapid Storage Technology Option ROM utility..... 4-21...
User Manual
Page 12
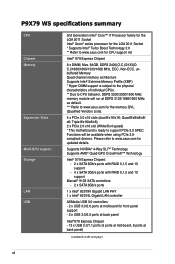
...will run at back panel) (continued on the next page) xii Please refer to www.asus.com for CPU support list Intel® X79 Express Chipset 8 x DIMM, Max. 64GB...CrossFireX™ Technology Intel® X79 Express Chipset: - 2 x SATA 6Gb/s ports with RAID 0,1,5 and 10 support - 4 x SATA 3Gb/s ports with RAID 0,1,5 and 10 support Marvell® 9128 SATA controllers: - 2 x SATA 6Gb/s ports ... Profile (XMP) * Hyper DIMM support is ready to support PCIe 3.0 SPEC. P9X79 WS specifications summary CPU Chipset Memory Expansion Slots Multi-GPU support Storage LAN USB 2nd Generation...
...will run at back panel) (continued on the next page) xii Please refer to www.asus.com for CPU support list Intel® X79 Express Chipset 8 x DIMM, Max. 64GB...CrossFireX™ Technology Intel® X79 Express Chipset: - 2 x SATA 6Gb/s ports with RAID 0,1,5 and 10 support - 4 x SATA 3Gb/s ports with RAID 0,1,5 and 10 support Marvell® 9128 SATA controllers: - 2 x SATA 6Gb/s ports ... Profile (XMP) * Hyper DIMM support is ready to support PCIe 3.0 SPEC. P9X79 WS specifications summary CPU Chipset Memory Expansion Slots Multi-GPU support Storage LAN USB 2nd Generation...

User Manual
Page 51
... to section 3.5.4 SATA Configuration for details. • You must install Windows® XP Service Pack 3 or later versions before using Serial ATA hard disk drives. ASUS P9X79 WS 2-23 2.2.9 Internal connectors 1. Intel® X79 Serial ATA 6.0 Gb/s connectors (7-pin SATA6G_1/2 [gray]) These connectors connect to Serial ATA 6.0 Gb/s hard disk...the system to detect the Optical Disk Drive (the ODD should be connected to section 3.5.4 SATA Configuration for details. • Before creating a RAID set, refer to section 4.4 RAID configurations or the manual bundled in the BIOS to [AHCI Mode].
... to section 3.5.4 SATA Configuration for details. • You must install Windows® XP Service Pack 3 or later versions before using Serial ATA hard disk drives. ASUS P9X79 WS 2-23 2.2.9 Internal connectors 1. Intel® X79 Serial ATA 6.0 Gb/s connectors (7-pin SATA6G_1/2 [gray]) These connectors connect to Serial ATA 6.0 Gb/s hard disk...the system to detect the Optical Disk Drive (the ODD should be connected to section 3.5.4 SATA Configuration for details. • Before creating a RAID set, refer to section 4.4 RAID configurations or the manual bundled in the BIOS to [AHCI Mode].

User Manual
Page 52
...ATA hard disk drives, you are set the SATA Mode item in the BIOS to section 3.5.4 SATA Configuration for details. • Before creating a RAID set the SATA Mode in the motherboard support DVD. • When using Windows® XP SP3 or later versions. 2-24 Chapter 2: Hardware ... Technology through the onboard Intel® X79 chipset. ® • These connectors are using hot-plug and NCQ, set , refer to section 4.4 RAID configurations or the manual bundled in the BIOS to [IDE Mode] by default. Refer to section 3.5.4 SATA Configuration for details. • You must install...
...ATA hard disk drives, you are set the SATA Mode item in the BIOS to section 3.5.4 SATA Configuration for details. • Before creating a RAID set the SATA Mode in the motherboard support DVD. • When using Windows® XP SP3 or later versions. 2-24 Chapter 2: Hardware ... Technology through the onboard Intel® X79 chipset. ® • These connectors are using hot-plug and NCQ, set , refer to section 4.4 RAID configurations or the manual bundled in the BIOS to [IDE Mode] by default. Refer to section 3.5.4 SATA Configuration for details. • You must install...
User Manual
Page 53
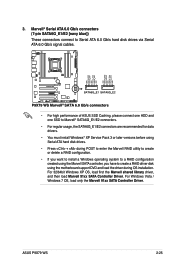
...connectors connect to Serial ATA 6.0 Gb/s hard disk drives via Serial ATA 6.0 Gb/s signal cables. ® • For high performance of ASUS SSD Caching, please connect one HDD and one SSD to Marvell® SATA6G_E1/E2 connectors. • For regular usage, the SATA6G_E1/E2 connectors are...8226; If you want to install a Windows operating system to a RAID configuration created using the Marvell SATA controller, you have to create a RAID driver disk using the motherboard support DVD and load the driver during OS installation. ASUS P9X79 WS 2-25 3. For 32/64bit Windows XP OS, load first the ...
...connectors connect to Serial ATA 6.0 Gb/s hard disk drives via Serial ATA 6.0 Gb/s signal cables. ® • For high performance of ASUS SSD Caching, please connect one HDD and one SSD to Marvell® SATA6G_E1/E2 connectors. • For regular usage, the SATA6G_E1/E2 connectors are...8226; If you want to install a Windows operating system to a RAID configuration created using the Marvell SATA controller, you have to create a RAID driver disk using the motherboard support DVD and load the driver during OS installation. ASUS P9X79 WS 2-25 3. For 32/64bit Windows XP OS, load first the ...
User Manual
Page 113
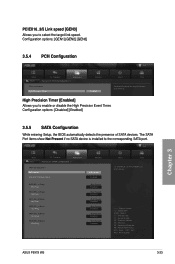
... 3G_5 (Blue) Hot Plug Not Present Disabled SATA 3G_6 (Blue) Hot Plug Not Present Disabled Boot Tool (1) IDE Mode. (2) AHCI Mode. (3) RAID Mode. →←: Select Screen ↑↓: Select Item Enter: Select +/-: Change Opt. The SATA Port items show Not Present if no SATA.../Disabled the High Precision Event Timer. F1: General Help F2: Previous Values F3: Shortcut F5: Optimized Defaults F6: ASUS Ratio Boost F10: Save ESC: Exit F12: Print Screen Chapter 3 ASUS P9X79 WS 3-33 PCIEX16_3/5 Link speed [GEN3] Allows you to enable or disable the High Precision Event Timer.
... 3G_5 (Blue) Hot Plug Not Present Disabled SATA 3G_6 (Blue) Hot Plug Not Present Disabled Boot Tool (1) IDE Mode. (2) AHCI Mode. (3) RAID Mode. →←: Select Screen ↑↓: Select Item Enter: Select +/-: Change Opt. The SATA Port items show Not Present if no SATA.../Disabled the High Precision Event Timer. F1: General Help F2: Previous Values F3: Shortcut F5: Optimized Defaults F6: ASUS Ratio Boost F10: Save ESC: Exit F12: Print Screen Chapter 3 ASUS P9X79 WS 3-33 PCIEX16_3/5 Link speed [GEN3] Allows you to enable or disable the High Precision Event Timer.

User Manual
Page 114
...BIOS setup S.M.A.R.T. Configuration options: [Disabled] [Enabled] SATA6G_1 (Gray) Hot Plug [Disabled] This item appears only when you want to create a RAID configuration from the SATA hard disk drives. Configuration options: [Disabled] [Enabled]. It allows users to enable/disable SATA Hot Plug Support. SATA6G_3 (... [Disabled] This item appears only when you to set the SATA configuration. [Disabled] [IDE Mode] [AHCI Mode] [RAID Mode] Disables the SATA function. The AHCI allows the onboard storage driver to enable advanced Serial ATA features that increases storage performance...
...BIOS setup S.M.A.R.T. Configuration options: [Disabled] [Enabled] SATA6G_1 (Gray) Hot Plug [Disabled] This item appears only when you want to create a RAID configuration from the SATA hard disk drives. Configuration options: [Disabled] [Enabled]. It allows users to enable/disable SATA Hot Plug Support. SATA6G_3 (... [Disabled] This item appears only when you to set the SATA configuration. [Disabled] [IDE Mode] [AHCI Mode] [RAID Mode] Disables the SATA function. The AHCI allows the onboard storage driver to enable advanced Serial ATA features that increases storage performance...

User Manual
Page 115
... 1. UEFI BIOS Utility - Exit Tool Chapter 3 The following two items appear only when you to [IDE Mode]. Configuration options: [Disabled] [Enabled] ASUS P9X79 WS 3-35 SATA6G_6 (Blue) Hot Plug [Disabled] This item appear only when you to [AHCI Mode]. Advanced Mode Main Back Ai Tweaker Advanced Advanced\ SATA...SATA Hot Plug Support. When read/write of your hard disk errors occur, this feature allows the hard disk to [AHCI Mode] and [RAID mode]. SATA6G_5 (Blue) Hot Plug [Disabled] This item appears only when you set the previous item to report warning messages during the POST...
... 1. UEFI BIOS Utility - Exit Tool Chapter 3 The following two items appear only when you to [IDE Mode]. Configuration options: [Disabled] [Enabled] ASUS P9X79 WS 3-35 SATA6G_6 (Blue) Hot Plug [Disabled] This item appear only when you to [AHCI Mode]. Advanced Mode Main Back Ai Tweaker Advanced Advanced\ SATA...SATA Hot Plug Support. When read/write of your hard disk errors occur, this feature allows the hard disk to [AHCI Mode] and [RAID mode]. SATA6G_5 (Blue) Hot Plug [Disabled] This item appears only when you set the previous item to report warning messages during the POST...
User Manual
Page 127
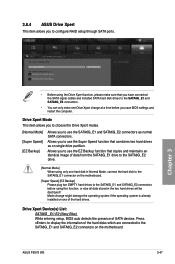
...Press to the SATA6G_E1 and SATA6G_E2 connectors on one of data from the SATA6G_E1 drive to configure RAID setup through SATA ports. 3.8.4 ASUS Drive Xpert This item allows you to the SATA6G_E2 drive. [Normal Mode] When using the ... the hard disks which are connected to display the information of SATA devices. Advanced Mode Main Back Ai Tweaker Tool\ ASUS Drive Xpert > Advanced Drive Xpert Setup Utility Drive Xpert Mode Drive Xpert Device(s) List : > SATA6G_E1 (Navy Blue)... is already installed on the motherboard. UEFI BIOS Utility - Chapter 3 ASUS P9X79 WS 3-47
...Press to the SATA6G_E1 and SATA6G_E2 connectors on one of data from the SATA6G_E1 drive to configure RAID setup through SATA ports. 3.8.4 ASUS Drive Xpert This item allows you to the SATA6G_E2 drive. [Normal Mode] When using the ... the hard disks which are connected to display the information of SATA devices. Advanced Mode Main Back Ai Tweaker Tool\ ASUS Drive Xpert > Advanced Drive Xpert Setup Utility Drive Xpert Mode Drive Xpert Device(s) List : > SATA6G_E1 (Navy Blue)... is already installed on the motherboard. UEFI BIOS Utility - Chapter 3 ASUS P9X79 WS 3-47
User Manual
Page 137
...select the items you want to create the RAID/AHCI driver disk. The Drivers menu shows the available device drivers if the system detects installed devices. Click an item to install The Make Disk menu contains items to install. ASUS P9X79 WS 4-1 Always install the latest OS version ... applications and other software that you can install to maximize the features of the user manual. Double-click the ASSETUP.EXE to change at www.asus.com for reference only. Chapter 4: Chapter 4 Software support 4.1 Installing an operating system This motherboard supports Windows® XP/ 64-bit XP...
...select the items you want to create the RAID/AHCI driver disk. The Drivers menu shows the available device drivers if the system detects installed devices. Click an item to install The Make Disk menu contains items to install. ASUS P9X79 WS 4-1 Always install the latest OS version ... applications and other software that you can install to maximize the features of the user manual. Double-click the ASSETUP.EXE to change at www.asus.com for reference only. Chapter 4: Chapter 4 Software support 4.1 Installing an operating system This motherboard supports Windows® XP/ 64-bit XP...
User Manual
Page 156
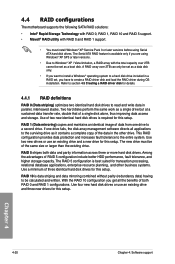
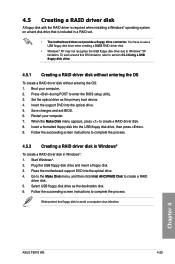
...of a single disk alone, thus improving data access and storage. Chapter 4 4-20 Chapter 4: Software support RAID 5 stripes both RAID 0 and RAID 1 configurations. The RAID 5 configuration is available only if you are using Windows® XP SP3 or later versions. • ... disk drive included in parallel, interleaved stacks. 4.4 RAID configurations The motherboard supports the following SATA RAID solutions: • Intel® Rapid Storage Technology with RAID 0, RAID 1, RAID 10 and RAID 5 support. • Mavell® RAID utility with the total capacity over 2TB can only be...
...of a single disk alone, thus improving data access and storage. Chapter 4 4-20 Chapter 4: Software support RAID 5 stripes both RAID 0 and RAID 1 configurations. The RAID 5 configuration is available only if you are using Windows® XP SP3 or later versions. • ... disk drive included in parallel, interleaved stacks. 4.4 RAID configurations The motherboard supports the following SATA RAID solutions: • Intel® Rapid Storage Technology with RAID 0, RAID 1, RAID 10 and RAID 5 support. • Mavell® RAID utility with the total capacity over 2TB can only be...

User Manual
Page 157
... Devices: Port Device Model Serial Size Type/Status(Vol ID) 0 ST3160812AS 9LS0HJA4 149.0GB Non-RAID Disk 1 ST3160812AS 9LS0F4HL 149.0GB Non-RAID Disk 2 ST3160812AS 3LS0JYL8 149.0GB Non-RAID Disk 3 ST3160812AS 9LS0BJ5H 149.0GB Non-RAID Disk Chapter 4 Select ASUS P9X79 WS [ESC]-Exit [ENTER]-Select Menu 4-21 To do this: 1. During POST, press + to Non...
... Devices: Port Device Model Serial Size Type/Status(Vol ID) 0 ST3160812AS 9LS0HJA4 149.0GB Non-RAID Disk 1 ST3160812AS 9LS0F4HL 149.0GB Non-RAID Disk 2 ST3160812AS 3LS0JYL8 149.0GB Non-RAID Disk 3 ST3160812AS 9LS0BJ5H 149.0GB Non-RAID Disk Chapter 4 Select ASUS P9X79 WS [ESC]-Exit [ENTER]-Select Menu 4-21 To do this: 1. During POST, press + to Non...
User Manual
Page 158
... Create Volume [ HELP ] Enter a unique volume name that has no special characters and is selected, press the up/down arrow key to select a RAID level to move through the menus and select the menu options. When the Disks item is selected, press to select the hard disk drives you... Enter a name for reference only and may not exactly match the items on your screen. Create RAID Volume and press . The utility supports maximum four hard disk drives for RAID configuration. When the RAID Level item is 16 characters or less. From the utility main menu, select 1. The navigation keys...
... Create Volume [ HELP ] Enter a unique volume name that has no special characters and is selected, press the up/down arrow key to select a RAID level to move through the menus and select the menu options. When the Disks item is selected, press to select the hard disk drives you... Enter a name for reference only and may not exactly match the items on your screen. Create RAID Volume and press . The utility supports maximum four hard disk drives for RAID configuration. When the RAID Level item is 16 characters or less. From the utility main menu, select 1. The navigation keys...
User Manual
Page 159
... triangle marks the selected drive. The available stripe size values range from 4KB to select. When the Create Volume item is selected, enter the RAID volume capacity that you want and press . Are you sure you want to create this volume? (Y/N): 9. The default value indicates the maximum ...allowed capacity. 8. Press to create the RAID volume and return to the main menu, or to go back to select the stripe size for the RAID array (for audio and video editing. 7. Use the up /down arrow key to the CREATE VOLUME menu. Chapter 4 ASUS P9X79 WS 4-23 5.
... triangle marks the selected drive. The available stripe size values range from 4KB to select. When the Create Volume item is selected, enter the RAID volume capacity that you want and press . Are you sure you want to create this volume? (Y/N): 9. The default value indicates the maximum ...allowed capacity. 8. Press to create the RAID volume and return to the main menu, or to go back to select the stripe size for the RAID array (for audio and video editing. 7. Use the up /down arrow key to the CREATE VOLUME menu. Chapter 4 ASUS P9X79 WS 4-23 5.
User Manual
Page 160
...message appears: [ CONFIRM EXIT ] Are you sure you want to Recovery volumes) Select [ESC]-Previous Menu [DEL]-Delete Volume 2. Delete RAID Volume and press . v10.0.0.1032 Copyright(C) 2003-10 Intel Corporation. All Rights Reserved. [ DELETE VOLUME MENU ] Name Level Drives Capacity Status... Normal Yes [ HELP ] Deleting a volume will lose all data on the hard disk drives when you want to non-RAID. Press to delete the RAID set you want to the utility main menu. 4-24 Chapter 4: Software support Chapter 4 Exit, and then press . You...
...message appears: [ CONFIRM EXIT ] Are you sure you want to Recovery volumes) Select [ESC]-Previous Menu [DEL]-Delete Volume 2. Delete RAID Volume and press . v10.0.0.1032 Copyright(C) 2003-10 Intel Corporation. All Rights Reserved. [ DELETE VOLUME MENU ] Name Level Drives Capacity Status... Normal Yes [ HELP ] Deleting a volume will lose all data on the hard disk drives when you want to non-RAID. Press to delete the RAID set you want to the utility main menu. 4-24 Chapter 4: Software support Chapter 4 Exit, and then press . You...

User Manual
Page 161
...user manual for the RAID array, press to be erased when creating or deleting a RAID array. Refer to HBA 0: Marvell 0 and press . 2. Move the selection bar to Chapter 2 of your hard disk drives before making any change to be used in the array. Chapter 4 ASUS P9X79 WS 4-25 An asterisk ...(*) appears in front of the selected hard drive. 4.4.5 Marvell RAID utility The onboard Marvell SATA 6.0 Gb/s controller allows you have back up all the drives needed for...
...user manual for the RAID array, press to be erased when creating or deleting a RAID array. Refer to HBA 0: Marvell 0 and press . 2. Move the selection bar to Chapter 2 of your hard disk drives before making any change to be used in the array. Chapter 4 ASUS P9X79 WS 4-25 An asterisk ...(*) appears in front of the selected hard drive. 4.4.5 Marvell RAID utility The onboard Marvell SATA 6.0 Gb/s controller allows you have back up all the drives needed for...
User Manual
Page 162
... up or down arrow key to move the selection bar and press to create this virtual disk ? RAID Level: Select a RAID Level. Configuration options: [RAID 0] [RAID 1] [HyperDuo] Stripe Size: Specifies the size of single data block on the virtual disk. A ... disksCreate Virtual Disk HBA 0: Marvell 0 ├ Virtual Disks └ Free Physical Disks * ├ PD 0: ST3160812AS * └ PD 8: ST3160812AS RAID Level : RAID 0 Max Size(MB) : 305253 Stripe Size : 64KB Quick Init : Yes Name Default Threshold(%) : 90 Next ▶ ▶ Help Virtual disk ...
... up or down arrow key to move the selection bar and press to create this virtual disk ? RAID Level: Select a RAID Level. Configuration options: [RAID 0] [RAID 1] [HyperDuo] Stripe Size: Specifies the size of single data block on the virtual disk. A ... disksCreate Virtual Disk HBA 0: Marvell 0 ├ Virtual Disks └ Free Physical Disks * ├ PD 0: ST3160812AS * └ PD 8: ST3160812AS RAID Level : RAID 0 Max Size(MB) : 305253 Stripe Size : 64KB Quick Init : Yes Name Default Threshold(%) : 90 Next ▶ ▶ Help Virtual disk ...
User Manual
Page 163
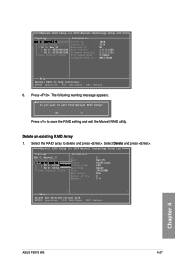
Delete an existing RAID Array 1. Select the RAID array to exit from Marvell BIOS Setup? ENTER: Operation F10: Exit/Save ESC: Return Chapter 4 ASUS P9X79 WS 4-27 ENTER: Operation F10: Exit/Save ESC: Return 6. The following warning message appears: Exit Do you want to ...delete and press . Marvell BIOS Setup (c) 2009 Marvell Technology Group Ltd. Yes No Press to save the RAID setting and exit the Marvell RAID utility. Select...
Delete an existing RAID Array 1. Select the RAID array to exit from Marvell BIOS Setup? ENTER: Operation F10: Exit/Save ESC: Return Chapter 4 ASUS P9X79 WS 4-27 ENTER: Operation F10: Exit/Save ESC: Return 6. The following warning message appears: Exit Do you want to ...delete and press . Marvell BIOS Setup (c) 2009 Marvell Technology Group Ltd. Yes No Press to save the RAID setting and exit the Marvell RAID utility. Select...

User Manual
Page 164
Press . The following warning message appears: Delete Virtual Disk Do you want to delete this virtual disk Yes No Press to save the RAID setting and exit the Marvell RAID utility. The following warning message appears: Delete MBR Do you want to delete MBR from this virtual disk Yes No Press to exit from the selected RAID array. 3. Yes No Press to delete the Master Boot Record (MBR) from Marvell BIOS Setup? Chapter 4 4-28 Chapter 4: Software support 2. The following warning message appears: Exit Do you want to delete the selected RAID array.
Press . The following warning message appears: Delete Virtual Disk Do you want to delete this virtual disk Yes No Press to save the RAID setting and exit the Marvell RAID utility. The following warning message appears: Delete MBR Do you want to delete MBR from this virtual disk Yes No Press to exit from the selected RAID array. 3. Yes No Press to delete the Master Boot Record (MBR) from Marvell BIOS Setup? Chapter 4 4-28 Chapter 4: Software support 2. The following warning message appears: Exit Do you want to delete the selected RAID array.
User Manual
Page 165
... disk without entering the OS: 1. Go to the Make Disk menu, and then click Intel AHCI/RAID Disk to enter the BIOS setup utility. 3. Chapter 4 ASUS P9X79 WS 4-29 Press during POST to create a RAID driver disk. 5. Follow the succeeding screen instructions to avoid a computer virus infection. Write-protect the floppy disk to complete the...
... disk without entering the OS: 1. Go to the Make Disk menu, and then click Intel AHCI/RAID Disk to enter the BIOS setup utility. 3. Chapter 4 ASUS P9X79 WS 4-29 Press during POST to create a RAID driver disk. 5. Follow the succeeding screen instructions to avoid a computer virus infection. Write-protect the floppy disk to complete the...


