User Manual
Page 5
...4.3.6 Probe II 4-12 4.3.7 Sensor Recorder 4-13 4.3.8 USB 3.0 Boost 4-14 4.3.9 ASUS SSD Caching 4-15 4.3.10 ASUS Update 4-16 4.3.11 MyLogo2 4-17 4.3.12 Audio configurations 4-19 4.4 RAID configurations ...4-20 4.4.1 RAID definitions 4-20 4.4.2 Installing Serial ATA hard disks 4-21 4.4.3 Setting the RAID item in BIOS 4-21 4.4.4 Intel® Rapid Storage Technology Option ROM utility..... 4-21 4.4.5 Marvell RAID utility 4-25 4.5 Creating a RAID driver disk 4-29 4.5.1 Creating a RAID driver...
...4.3.6 Probe II 4-12 4.3.7 Sensor Recorder 4-13 4.3.8 USB 3.0 Boost 4-14 4.3.9 ASUS SSD Caching 4-15 4.3.10 ASUS Update 4-16 4.3.11 MyLogo2 4-17 4.3.12 Audio configurations 4-19 4.4 RAID configurations ...4-20 4.4.1 RAID definitions 4-20 4.4.2 Installing Serial ATA hard disks 4-21 4.4.3 Setting the RAID item in BIOS 4-21 4.4.4 Intel® Rapid Storage Technology Option ROM utility..... 4-21 4.4.5 Marvell RAID utility 4-25 4.5 Creating a RAID driver disk 4-29 4.5.1 Creating a RAID driver...

User Manual
Page 6
...174; CrossFireX™ technology 5-1 5.1.1 Requirements 5-1 5.1.2 Before you begin 5-1 5.1.3 Installing CrossFireX graphics cards 5-2 5.1.4 Installing the device drivers 5-3 5.1.5 Enabling the ATI® CrossFireX™ technology 5-3 5.2 NVIDIA® SLI™ technology 5-5 5.2.1 Requirements 5-5 5.2.2 ... Installing three SLI-ready graphics cards 5-7 5.2.4 Installing four SLI-ready graphics cards 5-8 5.2.5 Installing the device drivers 5-9 5.2.6 Enabling the NVIDIA® SLI™ technology 5-9 5.3 NVIDIA® CUDA™ technology 5-12 5.3.1 Requirements 5-12 5.3.2 Installing...
...174; CrossFireX™ technology 5-1 5.1.1 Requirements 5-1 5.1.2 Before you begin 5-1 5.1.3 Installing CrossFireX graphics cards 5-2 5.1.4 Installing the device drivers 5-3 5.1.5 Enabling the ATI® CrossFireX™ technology 5-3 5.2 NVIDIA® SLI™ technology 5-5 5.2.1 Requirements 5-5 5.2.2 ... Installing three SLI-ready graphics cards 5-7 5.2.4 Installing four SLI-ready graphics cards 5-8 5.2.5 Installing the device drivers 5-9 5.2.6 Enabling the NVIDIA® SLI™ technology 5-9 5.3 NVIDIA® CUDA™ technology 5-12 5.3.1 Requirements 5-12 5.3.2 Installing...
User Manual
Page 15
Accessories 4 x Serial ATA 6Gb/s cables 4 x Serial ATA 3Gb/s cables 1 x ASUS 4-Way SLI bridge connector 1 x ASUS 3-Way SLI bridge connector 1 x ASUS SLI bridge connector 2 in 1 Q-connector I/O shield User's Manual Support DVD Form Factor Drivers ASUS Utilities ASUS Update Anti-virus software (OEM version) CEB Form Factor, 12"x 10.5" *Specifications are subject to change without notice. xv
Accessories 4 x Serial ATA 6Gb/s cables 4 x Serial ATA 3Gb/s cables 1 x ASUS 4-Way SLI bridge connector 1 x ASUS 3-Way SLI bridge connector 1 x ASUS SLI bridge connector 2 in 1 Q-connector I/O shield User's Manual Support DVD Form Factor Drivers ASUS Utilities ASUS Update Anti-virus software (OEM version) CEB Form Factor, 12"x 10.5" *Specifications are subject to change without notice. xv
User Manual
Page 21
...PCIe allocation in total. Built-in mechanical, architectural, interior design, aeronautics, audio and video design applications. Quad-GPU CrossFireX Support! ASUS P9X79 WS 1-3 Red means overclocked, blue means normal, while green denotes power saving mode. Base on performance testing, CPU utilization of either ...most demanding PC games in dual Intel® Gigabit LAN that features lower CPU utilization, less package drop rate, wide driver supported. Additionally, this ample graphics power can achieve 71% improvement to let users know more efficiently. This is built in...
...PCIe allocation in total. Built-in mechanical, architectural, interior design, aeronautics, audio and video design applications. Quad-GPU CrossFireX Support! ASUS P9X79 WS 1-3 Red means overclocked, blue means normal, while green denotes power saving mode. Base on performance testing, CPU utilization of either ...most demanding PC games in dual Intel® Gigabit LAN that features lower CPU utilization, less package drop rate, wide driver supported. Additionally, this ample graphics power can achieve 71% improvement to let users know more efficiently. This is built in...
User Manual
Page 45
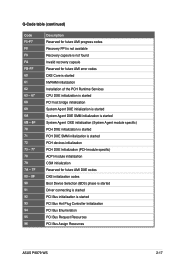
... (PCH module specific) ACPI module initialization CSM initialization Reserved for future AMI DXE codes DXE initialization codes Boot Device Selection (BDS) phase is started Driver connecting is started PCI Bus initialization is started PCI Bus Hot Plug Controller Initialization PCI Bus Enumeration PCI Bus Request Resources PCI Bus Assign Resources ASUS P9X79 WS 2-17
... (PCH module specific) ACPI module initialization CSM initialization Reserved for future AMI DXE codes DXE initialization codes Boot Device Selection (BDS) phase is started Driver connecting is started PCI Bus initialization is started PCI Bus Hot Plug Controller Initialization PCI Bus Enumeration PCI Bus Request Resources PCI Bus Assign Resources ASUS P9X79 WS 2-17

User Manual
Page 51
...(the ODD should be connected to [AHCI Mode]. If you are set to create a Serial ATA RAID set using Serial ATA hard disk drives. ASUS P9X79 WS 2-23 Refer to section 3.5.4 SATA Configuration for details. • Before creating a RAID set, refer to section 4.4 RAID configurations or the manual ...bundled in the motherboard support DVD. • When using Windows® XP SP3 or later versions. • You must load IRST Driver during OS installation for details. • You must install Windows® XP Service Pack 3 or later versions before using these connectors, set ...
...(the ODD should be connected to [AHCI Mode]. If you are set to create a Serial ATA RAID set using Serial ATA hard disk drives. ASUS P9X79 WS 2-23 Refer to section 3.5.4 SATA Configuration for details. • Before creating a RAID set, refer to section 4.4 RAID configurations or the manual ...bundled in the motherboard support DVD. • When using Windows® XP SP3 or later versions. • You must load IRST Driver during OS installation for details. • You must install Windows® XP Service Pack 3 or later versions before using these connectors, set ...
User Manual
Page 53
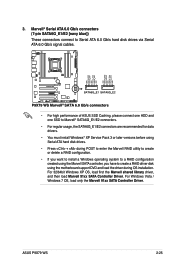
...ATA 6.0 Gb/s signal cables. ® • For high performance of ASUS SSD Caching, please connect one HDD and one SSD to Marvell® SATA6G_E1/E2 connectors. • For regular usage, the SATA6G_E1/E2 connectors are recommended for data drivers. • You must install Windows® XP Service Pack 3 or later... configuration. • If you want to install a Windows operating system to a RAID configuration created using the Marvell SATA controller, you have to create a RAID driver disk using the motherboard support DVD and load the driver during OS installation. ASUS P9X79 WS 2-25 3.
...ATA 6.0 Gb/s signal cables. ® • For high performance of ASUS SSD Caching, please connect one HDD and one SSD to Marvell® SATA6G_E1/E2 connectors. • For regular usage, the SATA6G_E1/E2 connectors are recommended for data drivers. • You must install Windows® XP Service Pack 3 or later... configuration. • If you want to install a Windows operating system to a RAID configuration created using the Marvell SATA controller, you have to create a RAID driver disk using the motherboard support DVD and load the driver during OS installation. ASUS P9X79 WS 2-25 3.
User Manual
Page 74
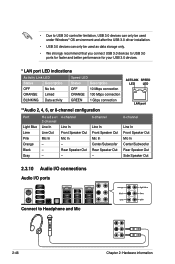
• Due to USB 3.0 controller limitation, USB 3.0 devices can only be used under Windows® OS environment and after the USB 3.0 driver installation. • USB 3.0 devices can only be used as data storage only. • We strongly recommend that you connect USB 3.0 devices to Headphone and Mic 2-...
• Due to USB 3.0 controller limitation, USB 3.0 devices can only be used under Windows® OS environment and after the USB 3.0 driver installation. • USB 3.0 devices can only be used as data storage only. • We strongly recommend that you connect USB 3.0 devices to Headphone and Mic 2-...

User Manual
Page 114
... allows users to enable/disable SATA Hot Plug Support. It allows users to enable/disable SATA Hot Plug Support. The AHCI allows the onboard storage driver to enable advanced Serial ATA features that increases storage performance on random workloads by allowing the drive to internally optimize the order of your hard...
... allows users to enable/disable SATA Hot Plug Support. It allows users to enable/disable SATA Hot Plug Support. The AHCI allows the onboard storage driver to enable advanced Serial ATA features that increases storage performance on random workloads by allowing the drive to internally optimize the order of your hard...
User Manual
Page 137
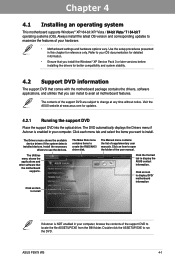
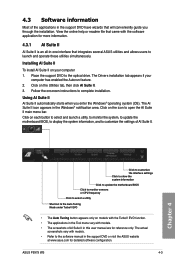
...65533;�is enabled in your computer, browse the contents of the support DVD to locate the file ASSETUP.EXE from the BIN folder. ASUS P9X79 WS 4-1 Click an item to maximize the features of the user manual. Always install the latest OS version and corresponding updates to open the ...OS documentation for detailed information. • Ensure that you install the Windows® XP Service Pack 3 or later versions before installing the drivers for better compatibility and system stability. 4.2 Support DVD information The support DVD that comes with the motherboard package contains the...
...65533;�is enabled in your computer, browse the contents of the support DVD to locate the file ASSETUP.EXE from the BIN folder. ASUS P9X79 WS 4-1 Click an item to maximize the features of the user manual. Always install the latest OS version and corresponding updates to open the ...OS documentation for detailed information. • Ensure that you install the Windows® XP Service Pack 3 or later versions before installing the drivers for better compatibility and system stability. 4.2 Support DVD information The support DVD that comes with the motherboard package contains the...
User Manual
Page 139
... AI Suite II AI Suite II is an all-in the support DVD have wizards that integrates several ASUS utilities and allows users to open the AI Suite II main menu bar. The Drivers installation tab appears if your computer 1. Click on the icon to launch and operate these utilities simultaneously...vary with models. • The screeshots of AI Suite II in the Tool menu vary with models. • Refer to the optical drive. ASUS P9X79 WS 4-3 Place the support DVD to the software manual in the Windows® notification area. Follow the onscreen instructions to the Auto Tuning Mode under ...
... AI Suite II AI Suite II is an all-in the support DVD have wizards that integrates several ASUS utilities and allows users to open the AI Suite II main menu bar. The Drivers installation tab appears if your computer 1. Click on the icon to launch and operate these utilities simultaneously...vary with models. • The screeshots of AI Suite II in the Tool menu vary with models. • Refer to the optical drive. ASUS P9X79 WS 4-3 Place the support DVD to the software manual in the Windows® notification area. Follow the onscreen instructions to the Auto Tuning Mode under ...

User Manual
Page 155
...Realtek HD Audio Manager with DTS UltraPC II for all audio ports, eliminating cable connection errors and giving users plug and play convenience. ASUS P9X79 WS 4-19 The CODEC also includes the Realtek® proprietary UAJ® (Universal Audio Jack) technology for Windows® 7™ / ...buttons Connector settings Exit button Minimize button Control settings window Chapter 4 Information button Refer to install the Realtek® Audio Driver from the support DVD that came with the audio devices connected) Device advanced settings Information button Exit button Minimize button ...
...Realtek HD Audio Manager with DTS UltraPC II for all audio ports, eliminating cable connection errors and giving users plug and play convenience. ASUS P9X79 WS 4-19 The CODEC also includes the Realtek® proprietary UAJ® (Universal Audio Jack) technology for Windows® 7™ / ...buttons Connector settings Exit button Minimize button Control settings window Chapter 4 Information button Refer to install the Realtek® Audio Driver from the support DVD that came with the audio devices connected) Device advanced settings Information button Exit button Minimize button ...
User Manual
Page 156
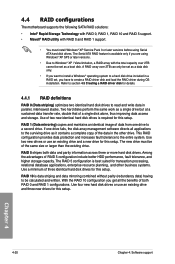
... the total capacity over 2TB can only be of the same size or larger than the existing drive. Refer to section 4.5 Creating a RAID driver disk for this setup. Two hard disks perform the same work as it contains a complete copy of the data in parallel, interleaved stacks. ...If one drive to create a RAID driver disk and load the RAID driver during OS installation. RAID 5 stripes both RAID 0 and RAID 1 configurations. A RAID array over 2TB cannot be calculated and written. ...
... the total capacity over 2TB can only be of the same size or larger than the existing drive. Refer to section 4.5 Creating a RAID driver disk for this setup. Two hard disks perform the same work as it contains a complete copy of the data in parallel, interleaved stacks. ...If one drive to create a RAID driver disk and load the RAID driver during OS installation. RAID 5 stripes both RAID 0 and RAID 1 configurations. A RAID array over 2TB cannot be calculated and written. ...
User Manual
Page 165
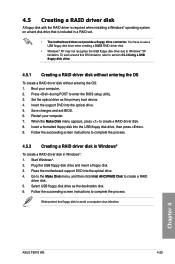
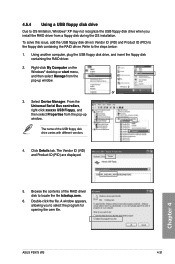
... connector. Follow the succeeding screen instructions to avoid a computer virus infection. Restart your computer. 2. 4.5 Creating a RAID driver disk A floppy disk with the RAID driver is required when installing a Windows® operating system on a hard disk drive that is included in Windows®: 1.... Windows® XP limitation. Chapter 4 ASUS P9X79 WS 4-29 Start Windows®. 2. Save changes and exit BIOS. 6. Insert the support DVD into the optical drive. 5. You have to use a USB floppy disk drive when creating a SATA RAID driver disk. • Windows® XP ...
... connector. Follow the succeeding screen instructions to avoid a computer virus infection. Restart your computer. 2. 4.5 Creating a RAID driver disk A floppy disk with the RAID driver is required when installing a Windows® operating system on a hard disk drive that is included in Windows®: 1.... Windows® XP limitation. Chapter 4 ASUS P9X79 WS 4-29 Start Windows®. 2. Save changes and exit BIOS. 6. Insert the support DVD into the optical drive. 5. You have to use a USB floppy disk drive when creating a SATA RAID driver disk. • Windows® XP ...
User Manual
Page 166
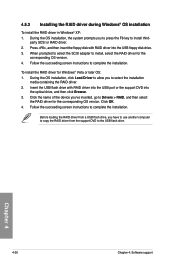
... instructions to install third- During the OS installation, the system prompts you to Drivers > RAID, and then select the RAID driver for the corresponding OS version. During the OS installation, click Load Driver to allow you to press the F6 key to complete the installation. Click the...then click Browse. 3. Chapter 4 4-30 Chapter 4: Software support To install the RAID driver for the corresponding OS version. 4. party SCSI or RAID driver. 2. Press , and then insert the floppy disk with RAID driver into the USB port or the support DVD into the USB floppy disk drive. 3....
... instructions to install third- During the OS installation, the system prompts you to Drivers > RAID, and then select the RAID driver for the corresponding OS version. During the OS installation, click Load Driver to allow you to press the F6 key to complete the installation. Click the...then click Browse. 3. Chapter 4 4-30 Chapter 4: Software support To install the RAID driver for the corresponding OS version. 4. party SCSI or RAID driver. 2. Press , and then insert the floppy disk with RAID driver into the USB port or the support DVD into the USB floppy disk drive. 3....
User Manual
Page 167
...drive, and insert the floppy disk containing the RAID driver. 2. or 3. Chapter 4 ASUS P9X79 WS 4-31 Right-click My Computer on the Windows® desktop or start menu, and then select Manage from the pop-up window. The name of the RAID driver disk to select the program for opening the oem file... the OS installation. Browse the contents of the USB floppy disk drive varies with different vendors. 4. A window appears, allowing you install the RAID driver from the pop-up window. To solve this issue, add the USB floppy disk drive's Vendor ID (VID) and Product ID (PID) to ...
...drive, and insert the floppy disk containing the RAID driver. 2. or 3. Chapter 4 ASUS P9X79 WS 4-31 Right-click My Computer on the Windows® desktop or start menu, and then select Manage from the pop-up window. The name of the RAID driver disk to select the program for opening the oem file... the OS installation. Browse the contents of the USB floppy disk drive varies with different vendors. 4. A window appears, allowing you install the RAID driver from the pop-up window. To solve this issue, add the USB floppy disk drive's Vendor ID (VID) and Product ID (PID) to ...

User Manual
Page 171
... For Windows XP, go to Control Panel > Add/Remove Programs. For Windows Vista, go to your system. Download the latest driver from the AMD website (www.amd.com). • Ensure that you install additional chassis fans for better thermal environment. •...power required by your graphics card driver supports the ATI CrossFireX technology. Turn off your current graphics card driver/s. 4. To uninstall existing graphics card drivers 1. For Windows XP, select Add/Remove. ASUS P9X79 WS 5-1 Close all existing graphics card drivers before installing ATI CrossFireX graphics cards...
... For Windows XP, go to Control Panel > Add/Remove Programs. For Windows Vista, go to your system. Download the latest driver from the AMD website (www.amd.com). • Ensure that you install additional chassis fans for better thermal environment. •...power required by your graphics card driver supports the ATI CrossFireX technology. Turn off your current graphics card driver/s. 4. To uninstall existing graphics card drivers 1. For Windows XP, select Add/Remove. ASUS P9X79 WS 5-1 Close all existing graphics card drivers before installing ATI CrossFireX graphics cards...
User Manual
Page 173
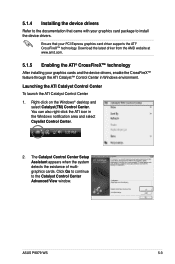
...Right-click on the Windows® desktop and select Catalyst(TM) Control Center. ASUS P9X79 WS 5-3 The Catalyst Control Center Setup Assistant appears when the system detects the existance of multigraphics cards. Download the latest driver from the AMD website at www.amd.com. 5.1.5 Enabling the ATI® ...CrossFireX™ technology After installing your graphics cards and the device drivers, enable the CrossFireX™ feature through the ATI Catalyst™ Control Center in the Windows notification area and select Cayalist Control ...
...Right-click on the Windows® desktop and select Catalyst(TM) Control Center. ASUS P9X79 WS 5-3 The Catalyst Control Center Setup Assistant appears when the system detects the existance of multigraphics cards. Download the latest driver from the AMD website at www.amd.com. 5.1.5 Enabling the ATI® ...CrossFireX™ technology After installing your graphics cards and the device drivers, enable the CrossFireX™ feature through the ATI Catalyst™ Control Center in the Windows notification area and select Cayalist Control ...

User Manual
Page 175
...-ready graphics cards that your power supply unit (PSU) can provide at least the minimum power required by your graphics card driver supports the NVIDIA SLI technology. ASUS P9X79 WS 5-5 Download the latest driver from the NVIDIA website (www.nvidia.com). • Ensure that are NVIDIA® certified. • Ensure that your system. • We...
...-ready graphics cards that your power supply unit (PSU) can provide at least the minimum power required by your graphics card driver supports the NVIDIA SLI technology. ASUS P9X79 WS 5-5 Download the latest driver from the NVIDIA website (www.nvidia.com). • Ensure that are NVIDIA® certified. • Ensure that your system. • We...
User Manual
Page 179
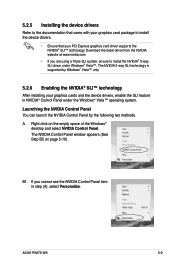
...in step (A), select Personalize. B1. If you are using a Triple SLI system, ensure to install the device drivers. • Ensure that your PCI Express graphics card driver supports the NVIDIA® SLI™ technology. The NVIDIA Control Panel window appears (See Step B5 on the... you cannot see the NVIDIA Control Panel item in NVIDIA® Control Panel under Windows® Vista™. ASUS P9X79 WS 5-9 Right click on page 5-10). 5.2.5 Installing the device drivers Refer to the documentation that came with your graphics card package to install the NVIDIA® 3-way SLI...
...in step (A), select Personalize. B1. If you are using a Triple SLI system, ensure to install the device drivers. • Ensure that your PCI Express graphics card driver supports the NVIDIA® SLI™ technology. The NVIDIA Control Panel window appears (See Step B5 on the... you cannot see the NVIDIA Control Panel item in NVIDIA® Control Panel under Windows® Vista™. ASUS P9X79 WS 5-9 Right click on page 5-10). 5.2.5 Installing the device drivers Refer to the documentation that came with your graphics card package to install the NVIDIA® 3-way SLI...


