P8H77-M LE User's Manual
Page 19
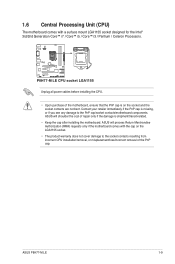
... the LGA1155 socket. • The product warranty does not cover damage to the PnP cap/socket contacts/motherboard components. ASUS P8H77-M LE 1-9 1.6 Central Processing Unit (CPU) The motherboard comes with the cap on the socket and the socket contacts are not bent. P8H77-M LE P8H77-M LE CPU socket LGA1155 Unplug all power cables before installing the CPU. • Upon...
... the LGA1155 socket. • The product warranty does not cover damage to the PnP cap/socket contacts/motherboard components. ASUS P8H77-M LE 1-9 1.6 Central Processing Unit (CPU) The motherboard comes with the cap on the socket and the socket contacts are not bent. P8H77-M LE P8H77-M LE CPU socket LGA1155 Unplug all power cables before installing the CPU. • Upon...
P8H77-M LE User's Manual
Page 31
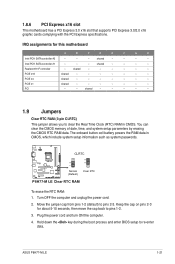
...x16 slot that supports PCI Express 3.0/2.0 x16 graphic cards complying with the PCI Express specifications. Intel PCH SATA controller #1 - - - Realtek 8111F controller - Keep the cap on pins 2-3 for this motherboard A B C D E F G H Intel PCH SATA controller #0 - - - shared - - - - PCIE x16 shared ...23 P8H77-M LE Normal (Default) Clear RTC P8H77-M LE Clear RTC RAM To erase the RTC RAM: 1. Move the jumper cap from pins 1-2 (default) to pins 1-2. 3. IRQ assignments for about 5-10 seconds, then move the cap back to pins 2-3. ASUS P8H77-M LE ...
...x16 slot that supports PCI Express 3.0/2.0 x16 graphic cards complying with the PCI Express specifications. Intel PCH SATA controller #1 - - - Realtek 8111F controller - Keep the cap on pins 2-3 for this motherboard A B C D E F G H Intel PCH SATA controller #0 - - - shared - - - - PCIE x16 shared ...23 P8H77-M LE Normal (Default) Clear RTC P8H77-M LE Clear RTC RAM To erase the RTC RAM: 1. Move the jumper cap from pins 1-2 (default) to pins 1-2. 3. IRQ assignments for about 5-10 seconds, then move the cap back to pins 2-3. ASUS P8H77-M LE ...
P8H77-M LE User's Manual
Page 32
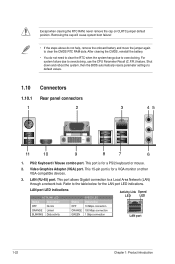
Except when clearing the RTC RAM, never remove the cap on CLRTC jumper default position. PS/2 Keyboard / Mouse combo port. LAN (RJ-45) port. LAN port LED indications ACT/LINK LED Status Description OFF No .../2 keyboard or mouse. 2. This 15-pin port is for a VGA monitor or other VGA-compatible devices. 3. This port allows Gigabit connection to overclocking. Removing the cap will cause system boot failure! • If the steps above do not need to clear the RTC when the system hangs due to a Local Area...
Except when clearing the RTC RAM, never remove the cap on CLRTC jumper default position. PS/2 Keyboard / Mouse combo port. LAN (RJ-45) port. LAN port LED indications ACT/LINK LED Status Description OFF No .../2 keyboard or mouse. 2. This 15-pin port is for a VGA monitor or other VGA-compatible devices. 3. This port allows Gigabit connection to overclocking. Removing the cap will cause system boot failure! • If the steps above do not need to clear the RTC when the system hangs due to a Local Area...
P8H77-M LE User's Manual
Page 36
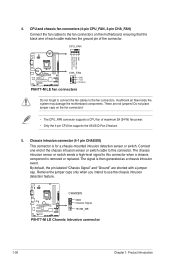
... ASUS Q-Fan 2 feature. 5. By default, the pin labeled "Chassis Signal" and "Ground" are not jumpers! The chassis intrusion sensor or switch sends a high-level signal to this connector when a chassis component is removed or replaced. P8H77-M LE CHASSIS GND Chassis Signal +5VSB_MB P8H77-M LE... Chassis intrusion connector 1-26 Chapter 1: Product introduction Connect one end of the connector. Do not place jumper caps on the motherboard, ensuring that the black wire of...
... ASUS Q-Fan 2 feature. 5. By default, the pin labeled "Chassis Signal" and "Ground" are not jumpers! The chassis intrusion sensor or switch sends a high-level signal to this connector when a chassis component is removed or replaced. P8H77-M LE CHASSIS GND Chassis Signal +5VSB_MB P8H77-M LE... Chassis intrusion connector 1-26 Chapter 1: Product introduction Connect one end of the connector. Do not place jumper caps on the motherboard, ensuring that the black wire of...
P8H77-M LE User's Manual
Page 44
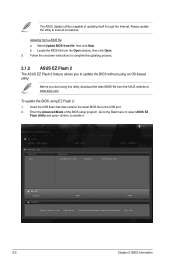
... flash disk that contains the latest BIOS file to complete the updating process. 2.1.2 ASUS EZ Flash 2 The ASUS EZ Flash 2 feature allows you start using EZ Flash 2: 1. ASUS EZ Flash 2 Utility V01.04 Flash Info MODEL: P8H77-M LE File Path: fs0:\ Drive Info fs0:\ VER: 0301 Folder Info 01/05/2012... 10:23p 8390656 Exit DATE: 01/05/2012 P8H77MLE.CAP File Info MODEL: Help Info VER: DATE [Enter] Select ...
... flash disk that contains the latest BIOS file to complete the updating process. 2.1.2 ASUS EZ Flash 2 The ASUS EZ Flash 2 feature allows you start using EZ Flash 2: 1. ASUS EZ Flash 2 Utility V01.04 Flash Info MODEL: P8H77-M LE File Path: fs0:\ Drive Info fs0:\ VER: 0301 Folder Info 01/05/2012... 10:23p 8390656 Exit DATE: 01/05/2012 P8H77MLE.CAP File Info MODEL: Help Info VER: DATE [Enter] Select ...
P8H77-M LE User's Manual
Page 45
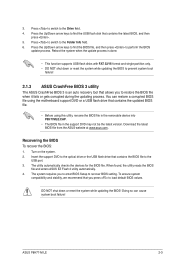
... 3 is an auto recovery tool that contains the BIOS file to restore the BIOS file when it fails or gets corrupted during the updating process. ASUS P8H77-M LE 2-3 Press to switch to the Folder Info field. 6. Press to switch to the Drive field. 4. To ensure system compatibility and stability, we ...2 utility automatically. 4. 3. Doing so can restore a corrupted BIOS file using this utility, rename the BIOS file in the removable device into P8H77MLE.CAP. • The BIOS file in the support DVD may not be the latest version. Press the Up/Down arrow keys to find the BIOS file...
... 3 is an auto recovery tool that contains the BIOS file to restore the BIOS file when it fails or gets corrupted during the updating process. ASUS P8H77-M LE 2-3 Press to switch to the Folder Info field. 6. Press to switch to the Drive field. 4. To ensure system compatibility and stability, we ...2 utility automatically. 4. 3. Doing so can restore a corrupted BIOS file using this utility, rename the BIOS file in the removable device into P8H77MLE.CAP. • The BIOS file in the support DVD may not be the latest version. Press the Up/Down arrow keys to find the BIOS file...
P8H77-M LE User's Manual
Page 47
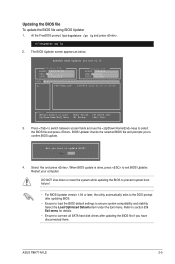
...: 01/05/2012 Update ROM BOARD: Unknown VER: Unknown DATE: Unknown PATH: A:\ A: P8H77MLE.CAP 8390656 2012-01-05 17:30:48 Note [Enter] Select or Load [Up/Down/Home/End] Move [Tab] Switch [B] Backup [V] Drive Info [Esc] Exit 3. ASUS P8H77-M LE 2-5 Are you have disconnected them. Restart your computer. Refer to ensure system compatibility...
...: 01/05/2012 Update ROM BOARD: Unknown VER: Unknown DATE: Unknown PATH: A:\ A: P8H77MLE.CAP 8390656 2012-01-05 17:30:48 Note [Enter] Select or Load [Up/Down/Home/End] Move [Tab] Switch [B] Backup [V] Drive Info [Esc] Exit 3. ASUS P8H77-M LE 2-5 Are you have disconnected them. Restart your computer. Refer to ensure system compatibility...
