P8H77-I User's Manual
Page 11
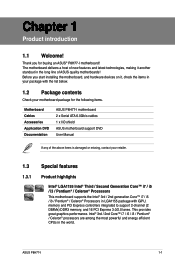
... DIMMs) DDR3 memory, and 16 PCI Express 3.0/2.0 lanes. This provides great graphics performance. Before you for the following items. Motherboard Cables Accessories Application DVD Documentation ASUS P8H77-I motherboard 2 x Serial ATA 6.0Gb/s cables 1 x I 1-1 Intel® 3rd / 2nd Core™ i7 / i5 / i3 / Pentium®... efficient CPUs in your package with the list below. 1.2 Package contents Check your motherboard package for buying an ASUS® P8H77-I motherboard! Thank you start installing the motherboard, and hardware devices on it another standout in the long line ...
... DIMMs) DDR3 memory, and 16 PCI Express 3.0/2.0 lanes. This provides great graphics performance. Before you for the following items. Motherboard Cables Accessories Application DVD Documentation ASUS P8H77-I motherboard 2 x Serial ATA 6.0Gb/s cables 1 x I 1-1 Intel® 3rd / 2nd Core™ i7 / i5 / i3 / Pentium®... efficient CPUs in your package with the list below. 1.2 Package contents Check your motherboard package for buying an ASUS® P8H77-I motherboard! Thank you start installing the motherboard, and hardware devices on it another standout in the long line ...
P8H77-I User's Manual
Page 13
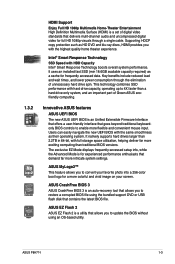
...capacity required) as their operating system. ASUS P8H77-I 1-3 Innovative ASUS features ASUS UEFI BIOS The new ASUS UEFI BIOS is an Unified Extensible Firmware Interface that offers a user-friendly interface that demand far more flexible and convenient mouse input. ASUS MyLogo2™ This feature allows you ... new UEFI BIOS with full storage space utilization, helping deliver far more colorful and vivid image on your screen. ASUS EZ Flash 2 ASUS EZ Flash 2 is a set of digital video standards that delivers mulit-channel audio and uncompressed digital video for experienced...
...capacity required) as their operating system. ASUS P8H77-I 1-3 Innovative ASUS features ASUS UEFI BIOS The new ASUS UEFI BIOS is an Unified Extensible Firmware Interface that offers a user-friendly interface that demand far more flexible and convenient mouse input. ASUS MyLogo2™ This feature allows you ... new UEFI BIOS with full storage space utilization, helping deliver far more colorful and vivid image on your screen. ASUS EZ Flash 2 ASUS EZ Flash 2 is a set of digital video standards that delivers mulit-channel audio and uncompressed digital video for experienced...

P8H77-I User's Manual
Page 15
ASUS P8H77-I 1-5 Also with fast computing iGPU. When the discrete graphics card is in regards to energy consumptions. C.P.R. (CPU Parameter Recall) The BIOS C.P.R. feature automatically restores the ... cards. LucidLogix® Virtu MVP could also dynamically assign tasks to their default settings. eliminates the need to fully utilize 3x faster video conversion with ASUS vision of creating environment-friendly and energy-efficient products through product design and innovation to 60% beyond its original performance. This allows users to open...
ASUS P8H77-I 1-5 Also with fast computing iGPU. When the discrete graphics card is in regards to energy consumptions. C.P.R. (CPU Parameter Recall) The BIOS C.P.R. feature automatically restores the ... cards. LucidLogix® Virtu MVP could also dynamically assign tasks to their default settings. eliminates the need to fully utilize 3x faster video conversion with ASUS vision of creating environment-friendly and energy-efficient products through product design and innovation to 60% beyond its original performance. This allows users to open...
P8H77-I User's Manual
Page 17
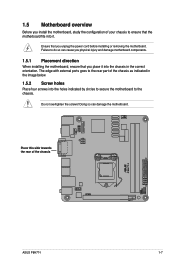
... damage the motherboard. Place this side towards the rear of your chassis to ensure that you install the motherboard, study the configuration of the chassis P8H77-I ASUS P8H77-I 1-7 Doing so can cause you physical injury and damage motherboard components. 1.5.1 Placement direction When installing the motherboard, ensure that you place it into it. 1.5 Motherboard...
... damage the motherboard. Place this side towards the rear of your chassis to ensure that you install the motherboard, study the configuration of the chassis P8H77-I ASUS P8H77-I 1-7 Doing so can cause you physical injury and damage motherboard components. 1.5.1 Placement direction When installing the motherboard, ensure that you place it into it. 1.5 Motherboard...
P8H77-I User's Manual
Page 19
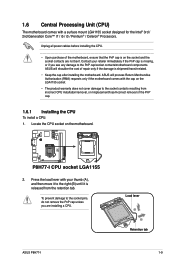
... the PnP cap. 1.6.1 Installing the CPU To install a CPU: 1. Locate the CPU socket on the socket and the socket contacts are installing a CPU. ASUS P8H77-I CPU socket LGA1155 2. ASUS will process Return Merchandise Authorization (RMA) requests only if the motherboard comes with a surface mount LGA1155 socket designed for the Intel® 3rd / 2nd... the damage is missing, or if you see any damage to the socket pins, do not remove the PnP cap unless you are not bent. P8H77-I P8H77-I Load lever A B Retention tab 1-9 Contact your thumb (A), and then move it is on the motherboard.
... the PnP cap. 1.6.1 Installing the CPU To install a CPU: 1. Locate the CPU socket on the socket and the socket contacts are installing a CPU. ASUS P8H77-I CPU socket LGA1155 2. ASUS will process Return Merchandise Authorization (RMA) requests only if the motherboard comes with a surface mount LGA1155 socket designed for the Intel® 3rd / 2nd... the damage is missing, or if you see any damage to the socket pins, do not remove the PnP cap unless you are not bent. P8H77-I P8H77-I Load lever A B Retention tab 1-9 Contact your thumb (A), and then move it is on the motherboard.
P8H77-I User's Manual
Page 21
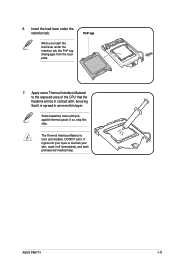
... and inedible. The Thermal Interface Material is spread in contact with preapplied thermal paste. DO NOT eat it off immediately, and seek professional medical help. ASUS P8H77-I 1-11 Some heatsinks come with , ensuring that the heatsink will be in an even thin layer. Insert the load lever under the retention tab, the...
... and inedible. The Thermal Interface Material is spread in contact with preapplied thermal paste. DO NOT eat it off immediately, and seek professional medical help. ASUS P8H77-I 1-11 Some heatsinks come with , ensuring that the heatsink will be in an even thin layer. Insert the load lever under the retention tab, the...
P8H77-I User's Manual
Page 23
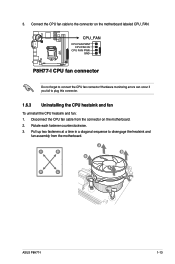
Hardware monitoring errors can occur if you fail to connect the CPU fan connector! A B A B B A B A ASUS P8H77-I CPU fan connector Do not forget to plug this connector. 1.6.3 Uninstalling the CPU heatsink and fan To uninstall the CPU heatsink and fan: 1. Disconnect the ...CPU fan cable from the motherboard. CPU_FAN CPU FAN PWM CPU FAN IN CPU FAN PWR GND P8H77-I P8H77-I 1-13 Pull up two fasteners at a time in a diagonal sequence to the connector on the motherboard. 2. Connect the CPU fan cable to disengage the ...
Hardware monitoring errors can occur if you fail to connect the CPU fan connector! A B A B B A B A ASUS P8H77-I CPU fan connector Do not forget to plug this connector. 1.6.3 Uninstalling the CPU heatsink and fan To uninstall the CPU heatsink and fan: 1. Disconnect the ...CPU fan cable from the motherboard. CPU_FAN CPU FAN PWM CPU FAN IN CPU FAN PWR GND P8H77-I P8H77-I 1-13 Pull up two fasteners at a time in a diagonal sequence to the connector on the motherboard. 2. Connect the CPU fan cable to disengage the ...
P8H77-I User's Manual
Page 25
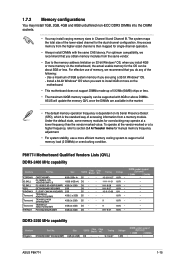
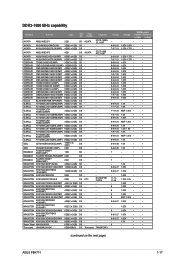
...mapped for single-channel operation. • Always install DIMMs with 8GB or above DIMMs. ASUS will update the memory QVL once the DIMMs are using a 32-bit Windows® OS. - P8H77-I 1-15 Timing Voltage CMGTX8(XMP) 8GB (2GBx 4) SS - GET34GB2400C9DC(XMP) 2GB ...(2 x 2GB) SS - Timing DS - - 9-11-9-27 Voltage 1.65V • DIMM socket support (Optional) 1 DIMM 2 DIMMs • ASUS P8H77-I Motherboard Qualified Vendors Lists (QVL) DDR3-2400 MHz capability Vendors CORSAIR G.SKILL G.SKILL GEIL KINGMAX Transcend Transcend Transcend PATRIOT Part No. TX2400KLU4GK(374243)(XMP)...
...mapped for single-channel operation. • Always install DIMMs with 8GB or above DIMMs. ASUS will update the memory QVL once the DIMMs are using a 32-bit Windows® OS. - P8H77-I 1-15 Timing Voltage CMGTX8(XMP) 8GB (2GBx 4) SS - GET34GB2400C9DC(XMP) 2GB ...(2 x 2GB) SS - Timing DS - - 9-11-9-27 Voltage 1.65V • DIMM socket support (Optional) 1 DIMM 2 DIMMs • ASUS P8H77-I Motherboard Qualified Vendors Lists (QVL) DDR3-2400 MHz capability Vendors CORSAIR G.SKILL G.SKILL GEIL KINGMAX Transcend Transcend Transcend PATRIOT Part No. TX2400KLU4GK(374243)(XMP)...
P8H77-I User's Manual
Page 27
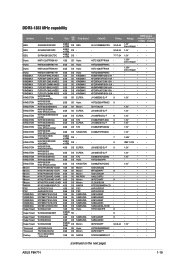
... • • 9 1.65V • • 9-9-9-27 1.65V • • 9-9-9-27 1.65V • • - 1.5V • • 9 - • • - - • • (continued on the next page) ASUS P8H77-I 1-17 DDR3-1600 MHz capability Vendors Part No. KTC - - - - - - - Transcend 3CCD-1509A EL1126T 3CCD-1509 A EL1126T - - - - - - - - - - - - - - D1288JPND PLD9U - - - - - - - A-DATA AM2U16BC2P1 2GB SS A-DATA A-DATA AD31600E001GM...
... • • 9 1.65V • • 9-9-9-27 1.65V • • 9-9-9-27 1.65V • • - 1.5V • • 9 - • • - - • • (continued on the next page) ASUS P8H77-I 1-17 DDR3-1600 MHz capability Vendors Part No. KTC - - - - - - - Transcend 3CCD-1509A EL1126T 3CCD-1509 A EL1126T - - - - - - - - - - - - - - D1288JPND PLD9U - - - - - - - A-DATA AM2U16BC2P1 2GB SS A-DATA A-DATA AD31600E001GM...
P8H77-I User's Manual
Page 29
...; • - • • - • • - • • - • • - • • 1.5V • • - • • - • • - • • (continued on the next page) ASUS P8H77-I 1-19 H5TC1G83TFRH9A - J1108BFBG-DJ-F 9 D1288JPNDPLD9U 9 J1108BDSE-DJ-F 9 D1288JEMFNGD9U - DDR3-1333 MHz capability Vendors GEIL GEIL GEIL Hynix Hynix Hynix Hynix KINGMAX KINGMAX KINGMAX KINGMAX KINGMAX...
...; • - • • - • • - • • - • • - • • 1.5V • • - • • - • • - • • (continued on the next page) ASUS P8H77-I 1-19 H5TC1G83TFRH9A - J1108BFBG-DJ-F 9 D1288JPNDPLD9U 9 J1108BDSE-DJ-F 9 D1288JEMFNGD9U - DDR3-1333 MHz capability Vendors GEIL GEIL GEIL Hynix Hynix Hynix Hynix KINGMAX KINGMAX KINGMAX KINGMAX KINGMAX...

P8H77-I User's Manual
Page 31
... severe damage to avoid damaging the DIMM. 3. Firmly insert the DIMM into a socket in place 3 and the DIMM is keyed with extra force. DIMM notch ASUS P8H77-I 1-21 The DIMM might get damaged when it flips out with a notch so that it fits in only one direction. Support the DIMM lightly with...
... severe damage to avoid damaging the DIMM. 3. Firmly insert the DIMM into a socket in place 3 and the DIMM is keyed with extra force. DIMM notch ASUS P8H77-I 1-21 The DIMM might get damaged when it flips out with a notch so that it fits in only one direction. Support the DIMM lightly with...
P8H77-I User's Manual
Page 33
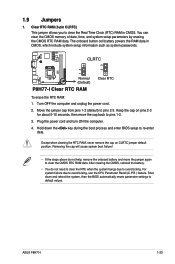
... CMOS, reinstall the battery. • You do not help, remove the onboard battery and move the cap back to clear the CMOS RTC RAM data. ASUS P8H77-I Clear RTC RAM Clear RTC To erase the RTC RAM: 1. The onboard button cell battery powers the RAM data in CMOS. Turn OFF the computer...
... CMOS, reinstall the battery. • You do not help, remove the onboard battery and move the cap back to clear the CMOS RTC RAM data. ASUS P8H77-I Clear RTC RAM Clear RTC To erase the RTC RAM: 1. The onboard button cell battery powers the RAM data in CMOS. Turn OFF the computer...
P8H77-I User's Manual
Page 35
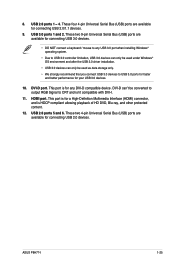
...-D port. This port is for connecting USB 2.0 devices. This port is HDCP compliant allowing playback of HD DVD, Blu-ray, and other protected content. 12. ASUS P8H77-I . 11. USB 2.0 ports 1 ~ 4. These four 4-pin Universal Serial Bus (USB) ports are available for your USB 3.0 devices. 10. 8. HDMI port...
...-D port. This port is for connecting USB 2.0 devices. This port is HDCP compliant allowing playback of HD DVD, Blu-ray, and other protected content. 12. ASUS P8H77-I . 11. USB 2.0 ports 1 ~ 4. These four 4-pin Universal Serial Bus (USB) ports are available for your USB 3.0 devices. 10. 8. HDMI port...
P8H77-I User's Manual
Page 37
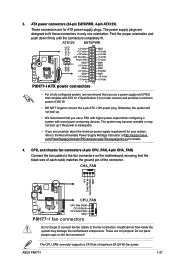
... +12 Volts +12 Volts +5V Standby Power OK GND PIN 1 +5 Volts GND +5 Volts GND +3 Volts +3 Volts PIN 1 P8H77-I 1-27 These are designed to fit these connectors in only one orientation. Find the proper orientation and push down firmly until the connectors ... connector supports a CPU fan of 350 W. • DO NOT forget to the Recommended Power Supply Wattage Calculator at http://support.asus. 3. The system may become unstable or may damage the motherboard components. ASUS P8H77-I ATX power connectors GND GND GND +5 Volts +5 Volts +5 Volts -5 Volts GND GND GND PSON# GND -12 Volts +3...
... +12 Volts +12 Volts +5V Standby Power OK GND PIN 1 +5 Volts GND +5 Volts GND +3 Volts +3 Volts PIN 1 P8H77-I 1-27 These are designed to fit these connectors in only one orientation. Find the proper orientation and push down firmly until the connectors ... connector supports a CPU fan of 350 W. • DO NOT forget to the Recommended Power Supply Wattage Calculator at http://support.asus. 3. The system may become unstable or may damage the motherboard components. ASUS P8H77-I ATX power connectors GND GND GND +5 Volts +5 Volts +5 Volts -5 Volts GND GND GND PSON# GND -12 Volts +3...
P8H77-I User's Manual
Page 39
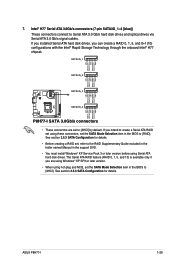
... RSATA_TXN4 GND RSATA_RXN4 RSATA_RXP4 GND ASUS P8H77-I SATA 3.0Gb/s connectors • These connectors are using Windows® XP SP3 or later version. • When using hot-plug and NCQ, set to [RAID]. ... 0, 1, 5, and 10) is available only if you are set the SATA Mode Selection item in the BIOS to [AHCI] by default. SATA3G_1 SATA3G_2 SATA3G_3 SATA3G_4 P8H77-I 1-29 See section 2.5.3 SATA Configuration for details. • Before creating a RAID set, refer to the RAID Supplementary Guide included in the folder named Manual in...
... RSATA_TXN4 GND RSATA_RXN4 RSATA_RXP4 GND ASUS P8H77-I SATA 3.0Gb/s connectors • These connectors are using Windows® XP SP3 or later version. • When using hot-plug and NCQ, set to [RAID]. ... 0, 1, 5, and 10) is available only if you are set the SATA Mode Selection item in the BIOS to [AHCI] by default. SATA3G_1 SATA3G_2 SATA3G_3 SATA3G_4 P8H77-I 1-29 See section 2.5.3 SATA Configuration for details. • Before creating a RAID set, refer to the RAID Supplementary Guide included in the folder named Manual in...
P8H77-I User's Manual
Page 41
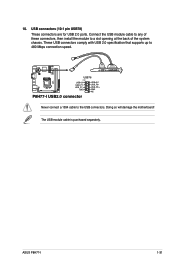
Connect the USB module cable to any of the system chassis. These USB connectors comply with USB 2.0 specification that supports up to a slot opening at the back of these connectors, then install the module to 480 Mbps connection speed. Doing so will damage the motherboard! The USB module cable is purchased separately. 10. P8H77-I USB78 PIN 1 USB+5V USB_P7USB_P7+ GND USB+5V USB_P8USB_P8+ GND NC P8H77-I 1-31 USB connectors (10-1 pin USB78) These connectors are for USB 2.0 ports. ASUS P8H77-I USB2.0 connector Never connect a 1394 cable to the USB connectors.
Connect the USB module cable to any of the system chassis. These USB connectors comply with USB 2.0 specification that supports up to a slot opening at the back of these connectors, then install the module to 480 Mbps connection speed. Doing so will damage the motherboard! The USB module cable is purchased separately. 10. P8H77-I USB78 PIN 1 USB+5V USB_P7USB_P7+ GND USB+5V USB_P8USB_P8+ GND NC P8H77-I 1-31 USB connectors (10-1 pin USB78) These connectors are for USB 2.0 ports. ASUS P8H77-I USB2.0 connector Never connect a 1394 cable to the USB connectors.
P8H77-I User's Manual
Page 43
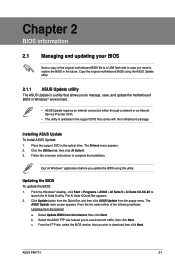
...Windows® applications before you to restore the BIOS in the optical drive. Place the support DVD in the future. c. Installing ASUS Update To install ASUS Update: 1. Updating the BIOS To update the BIOS: 1. From the FTP site, select the BIOS version that allows you update...in the support DVD that comes with the motherboard package. The ASUS Update main screen appears. Select the ASUS FTP site nearest you wish to avoid network traffic, then click Next. Select Update BIOS from the popup menu. ASUS P8H77-I 2-1 Chapter 2 BIOS information 2.1 Managing and updating your ...
...Windows® applications before you to restore the BIOS in the optical drive. Place the support DVD in the future. c. Installing ASUS Update To install ASUS Update: 1. Updating the BIOS To update the BIOS: 1. From the FTP site, select the BIOS version that allows you update...in the support DVD that comes with the motherboard package. The ASUS Update main screen appears. Select the ASUS FTP site nearest you wish to avoid network traffic, then click Next. Select Update BIOS from the popup menu. ASUS P8H77-I 2-1 Chapter 2 BIOS information 2.1 Managing and updating your ...
P8H77-I User's Manual
Page 45
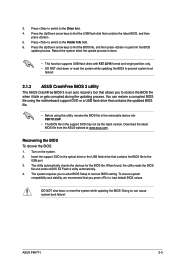
... BIOS file. • Before using the motherboard support DVD or a USB flash drive that contains the BIOS file to recover BIOS setting. ASUS P8H77-I 2-3 The system requires you to perform the BIOS update process. You can cause system boot failure! Download the latest BIOS file from the... ASUS website at www.asus.com. 3. Turn on the system. 2. Press to switch to the Drive field. 4. Doing so can restore a corrupted BIOS file using this utility,...
... BIOS file. • Before using the motherboard support DVD or a USB flash drive that contains the BIOS file to recover BIOS setting. ASUS P8H77-I 2-3 The system requires you to perform the BIOS update process. You can cause system boot failure! Download the latest BIOS file from the... ASUS website at www.asus.com. 3. Turn on the system. 2. Press to switch to the Drive field. 4. Doing so can restore a corrupted BIOS file using this utility,...
P8H77-I User's Manual
Page 47
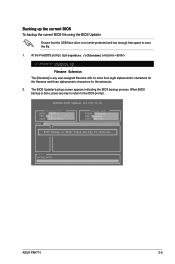
... user-assigned filename with no more than eight alphanumeric characters for the filename and three alphanumeric characters for DOS V1.18 Current ROM BOARD: P8H77-I 2-5 Note Saving BIOS: ASUS P8H77-I VER: 0214 DATE: 12/09/2011 Update ROM BOARD: Unknown VER: Unknown DATE: Unknown PATH: A:\ BIOS backup is not write-protected and has...
... user-assigned filename with no more than eight alphanumeric characters for the filename and three alphanumeric characters for DOS V1.18 Current ROM BOARD: P8H77-I 2-5 Note Saving BIOS: ASUS P8H77-I VER: 0214 DATE: 12/09/2011 Update ROM BOARD: Unknown VER: Unknown DATE: Unknown PATH: A:\ BIOS backup is not write-protected and has...
P8H77-I User's Manual
Page 49
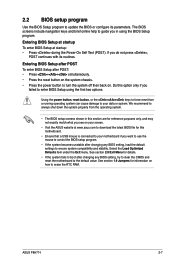
..., load the default settings to the default value. Entering BIOS Setup at startup To enter BIOS Setup at www.asus.com to your motherboard if you in using the first two options. ASUS P8H77-I 2-7 2.2 BIOS setup program Use the BIOS Setup program to turn the system off then back on. See section ...setup screens shown in this section are for reference purposes only, and may not exactly match what you see on your screen. • Visit the ASUS website at startup: • Press during the Power-On Self Test (POST). We recommend to always shut down the system properly from a running ...
..., load the default settings to the default value. Entering BIOS Setup at startup To enter BIOS Setup at www.asus.com to your motherboard if you in using the first two options. ASUS P8H77-I 2-7 2.2 BIOS setup program Use the BIOS Setup program to turn the system off then back on. See section ...setup screens shown in this section are for reference purposes only, and may not exactly match what you see on your screen. • Visit the ASUS website at startup: • Press during the Power-On Self Test (POST). We recommend to always shut down the system properly from a running ...


