User Manual
Page 11
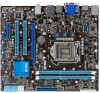
ASUS P8H67-M LE Series 1-1 Chapter 1 Product introduction Thank you install motherboard components or change any motherboard settings. • Unplug the power cord from the power supply. Failure to ... the ATX power supply is switched off or the power cord is damaged or missing, contact your motherboard package. Refer to page x for buying an ASUS® P8H67-M LE Series motherboard!
ASUS P8H67-M LE Series 1-1 Chapter 1 Product introduction Thank you install motherboard components or change any motherboard settings. • Unplug the power cord from the power supply. Failure to ... the ATX power supply is switched off or the power cord is damaged or missing, contact your motherboard package. Refer to page x for buying an ASUS® P8H67-M LE Series motherboard!
User Manual
Page 13
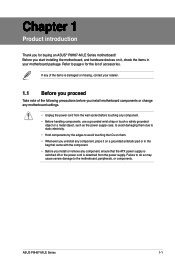
... prevent installation on the LGA1155 socket. • The product warranty does not cover damage to the PnP cap/socket contacts/motherboard components. ASUS will process Return Merchandise Authorization (RMA) requests only if the motherboard comes with the cap on a DDR2 DIMM socket. Ensure that the... that all power cables are unplugged before installing the CPU. • Upon purchase of the DDR3 DIMM sockets: DIMM_A1 DIMM_B1 P8H67-M LX Channel Channel A Channel B Sockets DIMM_A1 DIMM_B1 P8H67-M LX 240-pin DDR3 DIMM sockets ASUS P8H67-M LE Series 1-3 DDR3 modules are not bent.
... prevent installation on the LGA1155 socket. • The product warranty does not cover damage to the PnP cap/socket contacts/motherboard components. ASUS will process Return Merchandise Authorization (RMA) requests only if the motherboard comes with the cap on a DDR2 DIMM socket. Ensure that the... that all power cables are unplugged before installing the CPU. • Upon purchase of the DDR3 DIMM sockets: DIMM_A1 DIMM_B1 P8H67-M LX Channel Channel A Channel B Sockets DIMM_A1 DIMM_B1 P8H67-M LX 240-pin DDR3 DIMM sockets ASUS P8H67-M LE Series 1-3 DDR3 modules are not bent.
User Manual
Page 15
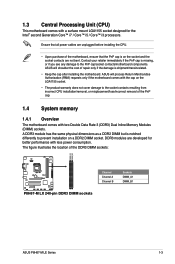
... PSC A3P1GF3DGF928M9B05 SAMSUNG K4B1G0846F SAMSUNG K4B1G0846F SAMSUNG K4B2G0846C HYNIX H5TQ1G83TFR - - Elixir - DDR3-1333 MHz capability Vendors Part No. Size SS/ Chip DS Brand Chip No. ASUS P8H67-M LE Series 1-5 Patriot PM64M8D38U-15 - -
... PSC A3P1GF3DGF928M9B05 SAMSUNG K4B1G0846F SAMSUNG K4B1G0846F SAMSUNG K4B2G0846C HYNIX H5TQ1G83TFR - - Elixir - DDR3-1333 MHz capability Vendors Part No. Size SS/ Chip DS Brand Chip No. ASUS P8H67-M LE Series 1-5 Patriot PM64M8D38U-15 - -

User Manual
Page 17
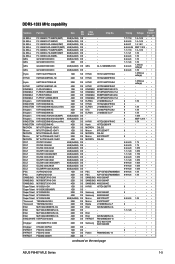
... an expansion card After installing the expansion card, configure it and make the necessary hardware settings for later use . See Chapter 2 for the expansion card. ASUS P8H67-M LE Series 1-7 Secure the card to install expansion cards. When using PCI cards on the system and change the necessary BIOS settings, if any. Align the...
... an expansion card After installing the expansion card, configure it and make the necessary hardware settings for later use . See Chapter 2 for the expansion card. ASUS P8H67-M LE Series 1-7 Secure the card to install expansion cards. When using PCI cards on the system and change the necessary BIOS settings, if any. Align the...
User Manual
Page 19
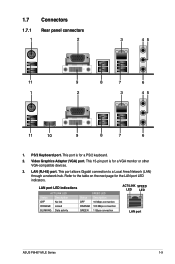
... BLINKING Data activity SPEED LED Status Description OFF 10 Mbps connection ORANGE 100 Mbps connection GREEN 1 Gbps connection ACT/LINK SPEED LED LED LAN port ASUS P8H67-M LE Series 1-9 PS/2 Keyboard port. 1.7 1.7.1 1 Connectors Rear panel connectors 2 3 45 11 9 8 7 6 1 2 3 45 11 10 9 8 7 6 1. This port allows Gigabit connection to the table on the next page...
... BLINKING Data activity SPEED LED Status Description OFF 10 Mbps connection ORANGE 100 Mbps connection GREEN 1 Gbps connection ACT/LINK SPEED LED LED LAN port ASUS P8H67-M LE Series 1-9 PS/2 Keyboard port. 1.7 1.7.1 1 Connectors Rear panel connectors 2 3 45 11 9 8 7 6 1 2 3 45 11 10 9 8 7 6 1. This port allows Gigabit connection to the table on the next page...
User Manual
Page 21
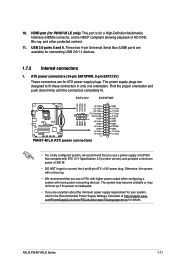
The power supply plugs are for P8H67-M LE only). This port is for your system, refer to the Recommended Power Supply Wattage Calculator at http://support.asus. The system may become unstable or may not boot up . • We recommend that complies with more power-consuming devices. USB ...details. HDMI port (for ATX power supply plugs. Find the proper orientation and push down firmly until the connectors completely fit. ASUS P8H67-M LE Series 1-11 10. ATX power connectors (24-pin EATXPWR, 8-pin EATX12V) These connectors are designed to connect the 4-pin/8-pin ATX ...
The power supply plugs are for P8H67-M LE only). This port is for your system, refer to the Recommended Power Supply Wattage Calculator at http://support.asus. The system may become unstable or may not boot up . • We recommend that complies with more power-consuming devices. USB ...details. HDMI port (for ATX power supply plugs. Find the proper orientation and push down firmly until the connectors completely fit. ASUS P8H67-M LE Series 1-11 10. ATX power connectors (24-pin EATXPWR, 8-pin EATX12V) These connectors are designed to connect the 4-pin/8-pin ATX ...
User Manual
Page 23
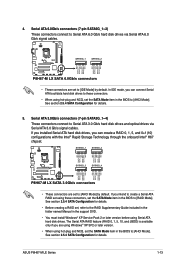
... [AHCI Mode]. The Serial ATA RAID feature (RAID 0, 1, 5, 10, and JBOD) is available only if you intend to [RAID Mode]. ASUS P8H67-M LE Series 1-13 If you installed Serial ATA hard disk drives, you can create a RAID 0, 1, 5, and 0+1(10) configurations with the Intel®... RSATA_TXN1 GND RSATA_RXP1 RSATA_RXN1 GND GND RSATA_TXP2 RSATA_TXN2 GND RSATA_RXP2 RSATA_RXN2 GND P8H67-M LX SATA3G_3 SATA3G_4 GND RSATA_TXP3 RSATA_TXN3 GND RSATA_RXP3 RSATA_RXN3 GND GND RSATA_TXP4 RSATA_TXN4 GND RSATA_RXP4 RSATA_RXN4 GND P8H67-M LX SATA 3.0Gb/s connectors • These connectors are set the...
... [AHCI Mode]. The Serial ATA RAID feature (RAID 0, 1, 5, 10, and JBOD) is available only if you intend to [RAID Mode]. ASUS P8H67-M LE Series 1-13 If you installed Serial ATA hard disk drives, you can create a RAID 0, 1, 5, and 0+1(10) configurations with the Intel®... RSATA_TXN1 GND RSATA_RXP1 RSATA_RXN1 GND GND RSATA_TXP2 RSATA_TXN2 GND RSATA_RXP2 RSATA_RXN2 GND P8H67-M LX SATA3G_3 SATA3G_4 GND RSATA_TXP3 RSATA_TXN3 GND RSATA_RXP3 RSATA_RXN3 GND GND RSATA_TXP4 RSATA_TXN4 GND RSATA_RXP4 RSATA_RXN4 GND P8H67-M LX SATA 3.0Gb/s connectors • These connectors are set the...
User Manual
Page 25
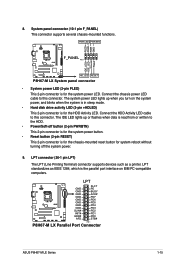
...GND GND SLIN# INIT# ERR# AFD SLCT PE BUSY ACK# PD7 PD6 PD5 PD4 PD3 PD2 PD1 PD0 STB# PIN 1 P8H67-M LX Parallel Port Connector ASUS P8H67-M LE Series 1-15 The IDE LED lights up when you turn on IBM PC-compatible computers. 8. Connect the chassis power LED cable to... this connector. PWR LED PWR BTN PLED+ PLEDPWR GND IDE_LED+ IDE_LED- Ground Reset P8H67-M LX F_PANEL PIN 1 HD_LED RESET P8H67-M LX System panel...
...GND GND SLIN# INIT# ERR# AFD SLCT PE BUSY ACK# PD7 PD6 PD5 PD4 PD3 PD2 PD1 PD0 STB# PIN 1 P8H67-M LX Parallel Port Connector ASUS P8H67-M LE Series 1-15 The IDE LED lights up when you turn on IBM PC-compatible computers. 8. Connect the chassis power LED cable to... this connector. PWR LED PWR BTN PLED+ PLEDPWR GND IDE_LED+ IDE_LED- Ground Reset P8H67-M LX F_PANEL PIN 1 HD_LED RESET P8H67-M LX System panel...
User Manual
Page 27
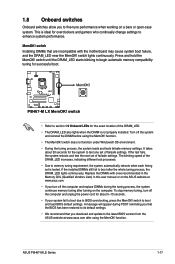
... or open-case system. Turn off the computer and replace DIMMs during the tuning process, the system continues memory tuning after turning on the ASUS website at www.asus.com after the whole tuning process, the DRAM_LED lights continuously. It takes about 5-10 seconds. • If your system fail to boot due..., the system automatically reboots when each timing set of the DRAM_LED increases, indicating different test processes. • Due to boot after using the MemOK! MemOK! P8H67-M LX P8H67-M LX MemOK! The blinking speed of failsafe settings. ASUS P8H67-M LE Series 1-17
... or open-case system. Turn off the computer and replace DIMMs during the tuning process, the system continues memory tuning after turning on the ASUS website at www.asus.com after the whole tuning process, the DRAM_LED lights continuously. It takes about 5-10 seconds. • If your system fail to boot due..., the system automatically reboots when each timing set of the DRAM_LED increases, indicating different test processes. • Due to boot after using the MemOK! MemOK! P8H67-M LX P8H67-M LX MemOK! The blinking speed of failsafe settings. ASUS P8H67-M LE Series 1-17
User Manual
Page 29
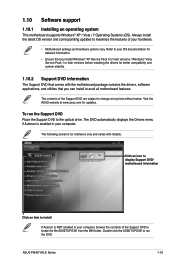
... to run the DVD. The DVD automatically displays the Drivers menu if Autorun is enabled in your computer. Refer to change at www.asus.com for better compatibility and system stability. 1.10.2 Support DVD information The Support DVD that comes with models. Click an icon to ...motherboard package contains the drivers, software applications, and utilities that you can install to locate the file ASSETUP.EXE from the BIN folder. ASUS P8H67-M LE Series 1-19 Double-click the ASSETUP.EXE to the optical drive. The following screen is NOT enabled in your computer, browse the contents...
... to run the DVD. The DVD automatically displays the Drivers menu if Autorun is enabled in your computer. Refer to change at www.asus.com for better compatibility and system stability. 1.10.2 Support DVD information The Support DVD that comes with models. Click an icon to ...motherboard package contains the drivers, software applications, and utilities that you can install to locate the file ASSETUP.EXE from the BIN folder. ASUS P8H67-M LE Series 1-19 Double-click the ASSETUP.EXE to the optical drive. The following screen is NOT enabled in your computer, browse the contents...

User Manual
Page 30
... is available in the support DVD that comes with the motherboard package. Follow the onscreen instructions to download then click Next. 2-1 ASUS P8H67-M LE Series From the list, select either of the original motherboard BIOS file to a USB flash disk in case you need to manage, ... network traffic, then click Next. Place the support DVD in the future. Click the Utilities tab, then click AI Suite II. 3. Select the ASUS FTP site nearest you wish to complete the installation. Chapter 2 BIOS information 2.1 Managing and updating your BIOS Save a copy of the following methods:...
... is available in the support DVD that comes with the motherboard package. Follow the onscreen instructions to download then click Next. 2-1 ASUS P8H67-M LE Series From the list, select either of the original motherboard BIOS file to a USB flash disk in case you need to manage, ... network traffic, then click Next. Place the support DVD in the future. Click the Utilities tab, then click AI Suite II. 3. Select the ASUS FTP site nearest you wish to complete the installation. Chapter 2 BIOS information 2.1 Managing and updating your BIOS Save a copy of the following methods:...

User Manual
Page 32
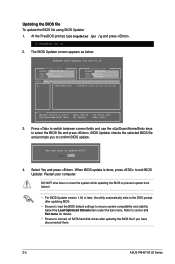
... during the updating process. The succeeding utility screens are for reference only. Welcome to show the BIOS Boot Device Select Menu. C:\>d: D:\> 2-3 ASUS P8H67-M LE Series Download the latest BIOS file and BIOS Updater from Drive C (optical drive) to update BIOS in NTFS format. 3. Insert the support ...DVD into the optical drive and select the optical drive as shown. When the ASUS Logo appears, press to FreeDOS (http://www.freedos.org)! The actual utility screen displays may not be same as the boot device. ...
... during the updating process. The succeeding utility screens are for reference only. Welcome to show the BIOS Boot Device Select Menu. C:\>d: D:\> 2-3 ASUS P8H67-M LE Series Download the latest BIOS file and BIOS Updater from Drive C (optical drive) to update BIOS in NTFS format. 3. Insert the support ...DVD into the optical drive and select the optical drive as shown. When the ASUS Logo appears, press to FreeDOS (http://www.freedos.org)! The actual utility screen displays may not be same as the boot device. ...
User Manual
Page 34
BIOS Updater checks the selected BIOS file and prompts you have disconnected them. 2-5 ASUS P8H67-M LE Series When BIOS update is done, press to ensure system compatibility and stability. Yes No 4. ASUSTek BIOS Updater for details. • Ensure to connect all ... DOS prompt after updating the BIOS file if you to confirm BIOS update. Refer to section 2.9 Exit menu for DOS V1.18 Current ROM BOARD: P8H67-M LE VER: 0218 DATE: 10/26/2010 Update ROM BOARD: Unknown VER: Unknown DATE: Unknown PATH: A:\ A: P8H67MLE.ROM 8388608 2010-11-22 10:23:48 Note...
BIOS Updater checks the selected BIOS file and prompts you have disconnected them. 2-5 ASUS P8H67-M LE Series When BIOS update is done, press to ensure system compatibility and stability. Yes No 4. ASUSTek BIOS Updater for details. • Ensure to connect all ... DOS prompt after updating the BIOS file if you to confirm BIOS update. Refer to section 2.9 Exit menu for DOS V1.18 Current ROM BOARD: P8H67-M LE VER: 0218 DATE: 10/26/2010 Update ROM BOARD: Unknown VER: Unknown DATE: Unknown PATH: A:\ A: P8H67MLE.ROM 8388608 2010-11-22 10:23:48 Note...

User Manual
Page 35
...system fails to boot after changing any BIOS setting, try to clear the CMOS and reset the motherboard to the default value. ASUS P8H67-M LE Series motherboards include P8H67-M LE and P8H67-M LX two models. If you want to use the mouse to control the BIOS setup program. • If the system ...the Load Optimized Defaults item under the Exit menu. Chapter 2: BIOS information 2-6 Entering BIOS Setup at startup To enter BIOS Setup at www.asus.com to download the latest BIOS file for reference purposes only, and may differ from the operating system. • The BIOS setup screens shown...
...system fails to boot after changing any BIOS setting, try to clear the CMOS and reset the motherboard to the default value. ASUS P8H67-M LE Series motherboards include P8H67-M LE and P8H67-M LX two models. If you want to use the mouse to control the BIOS setup program. • If the system ...the Load Optimized Defaults item under the Exit menu. Chapter 2: BIOS information 2-6 Entering BIOS Setup at startup To enter BIOS Setup at www.asus.com to download the latest BIOS file for reference purposes only, and may differ from the operating system. • The BIOS setup screens shown...
User Manual
Page 36
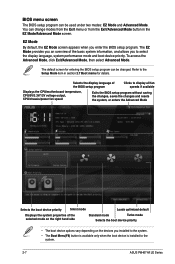
... By default, the EZ Mode screen appears when you to select the display language, system performance mode and boot device priority. Refer to the system. 2-7 ASUS P8H67-M LE Series Selects the display language of the BIOS setup program Clicks to display all fan speeds if available Displays the CPU/motherboard temperature, CPU/5V...
... By default, the EZ Mode screen appears when you to select the display language, system performance mode and boot device priority. Refer to the system. 2-7 ASUS P8H67-M LE Series Selects the display language of the BIOS setup program Clicks to display all fan speeds if available Displays the CPU/motherboard temperature, CPU/5V...

User Manual
Page 38
... System Language English System Date System Time Access Level [Mon 11/22/2010] [16:46:15] Administrator > Security Boot Tool Choose the system default language 2-9 ASUS P8H67-M LE Series Use the navigation keys to display a list of the menu screen is not user-configurable.
... System Language English System Date System Time Access Level [Mon 11/22/2010] [16:46:15] Administrator > Security Boot Tool Choose the system default language 2-9 ASUS P8H67-M LE Series Use the navigation keys to display a list of the menu screen is not user-configurable.
User Manual
Page 40
...: Save ESC: Exit 2-11 Version 2.00.1201. Select the User Password item and press . 2. To change a user password: 1. Select the User Password item and press . 2. ASUS P8H67-M LE Series To set a user password: 1. The configuration options for this section vary depending on the CPU and DIMM model you to configure overclocking-related items...
...: Save ESC: Exit 2-11 Version 2.00.1201. Select the User Password item and press . 2. To change a user password: 1. Select the User Password item and press . 2. ASUS P8H67-M LE Series To set a user password: 1. The configuration options for this section vary depending on the CPU and DIMM model you to configure overclocking-related items...

User Manual
Page 42
... Allows you to set the Platform Controller Hub voltage. CPU Voltage [Auto] Allows you to work stably under high voltage settings. 2-13 ASUS P8H67-M LE Series To offset the voltage by a positive value. The values range from 0.735V to 1.685V with a 0.05V interval. • ... with a 0.005V interval. According to +0.635V with voltage requirement over 1.65V may make the system unstable. 2.4.7 VCCIO Voltage [Auto] (for P8H67-M LE only) Allows you install the DIMMs with the voltage requirement below 1.65V. 2.4.6 [+] [-] CPU Offset Mode Sign [+] To offset the voltage by...
... Allows you to set the Platform Controller Hub voltage. CPU Voltage [Auto] Allows you to work stably under high voltage settings. 2-13 ASUS P8H67-M LE Series To offset the voltage by a positive value. The values range from 0.735V to 1.685V with a 0.05V interval. • ... with a 0.005V interval. According to +0.635V with voltage requirement over 1.65V may make the system unstable. 2.4.7 VCCIO Voltage [Auto] (for P8H67-M LE only) Allows you install the DIMMs with the voltage requirement below 1.65V. 2.4.6 [+] [-] CPU Offset Mode Sign [+] To offset the voltage by...
User Manual
Page 44
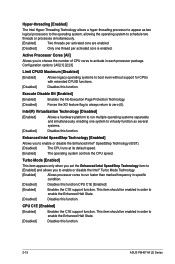
... without support for CPUs with extended CPUID functions. [Disabled] Disables this function. This item should be enabled in specific condition. [Disabled] Disables this function. 2-15 ASUS P8H67-M LE Series Hyper-threading [Enabled] The Intel Hyper-Threading Technology allows a hyper-threading processor to appear as several systems. [Disabled] Disables this function. Intel(R) Virtualization Technology...
... without support for CPUs with extended CPUID functions. [Disabled] Disables this function. This item should be enabled in specific condition. [Disabled] Disables this function. 2-15 ASUS P8H67-M LE Series Hyper-threading [Enabled] The Intel Hyper-Threading Technology allows a hyper-threading processor to appear as several systems. [Disabled] Disables this function. Intel(R) Virtualization Technology...
User Manual
Page 46
...[Enabled] [Enabled] Enables the support for operating systems without an EHCI hand‑off feature. [Disabled] Disables the function. 2-17 ASUS P8H67-M LE Series The Legacy USB3.0 Support item shows only on legacy operating systems (OS). [Disabled] Disables the function. EHCI Hand-off [Disabled]... [Enabled] Enables the support for USB 3.0 devices on P8H67-M LE. If no USB device is detected, the legacy USB support is a monitor system. Serial-ATA Controller 0 [Enhanced] This item appears...
...[Enabled] [Enabled] Enables the support for operating systems without an EHCI hand‑off feature. [Disabled] Disables the function. 2-17 ASUS P8H67-M LE Series The Legacy USB3.0 Support item shows only on legacy operating systems (OS). [Disabled] Disables the function. EHCI Hand-off [Disabled]... [Enabled] Enables the support for USB 3.0 devices on P8H67-M LE. If no USB device is detected, the legacy USB support is a monitor system. Serial-ATA Controller 0 [Enhanced] This item appears...


