
User Manual
Page 11
... any of the items is detached from the power supply. Refer to indicate that lights up to page x for buying an ASUS® P8H61-M2 USB3 motherboard! SB_PWR P8H61-M2 USB3 ON OFF Standby Power Powered Off P8H61-M2 USB3 Onboard LED Chapter 1: Product introduction 1-1 Standby Power LED The motherboard comes with the component. • Before you install or remove...
... any of the items is detached from the power supply. Refer to indicate that lights up to page x for buying an ASUS® P8H61-M2 USB3 motherboard! SB_PWR P8H61-M2 USB3 ON OFF Standby Power Powered Off P8H61-M2 USB3 Onboard LED Chapter 1: Product introduction 1-1 Standby Power LED The motherboard comes with the component. • Before you install or remove...

User Manual
Page 12
Place this side towards the rear of the chassis P8H61-M2 USB3 1-2 ASUS P8H61-M2 USB3 The edge with external ports goes to the rear part of the chassis as indicated in the image below. 1.2.2 Screw holes Place six screws into ...
Place this side towards the rear of the chassis P8H61-M2 USB3 1-2 ASUS P8H61-M2 USB3 The edge with external ports goes to the rear part of the chassis as indicated in the image below. 1.2.2 Screw holes Place six screws into ...

User Manual
Page 14
...with your retailer immediately if the PnP cap is missing, or if you are not bent. Load lever A B Retention tab 1-4 ASUS P8H61-M2 USB3 Unplug all power cables before installing the CPU. • Upon purchase of repair only if the damage is released from incorrect CPU...a CPU: 1. Contact your thumb (A), and then move it is shipment/transit-related. • Keep the cap after installing the motherboard. P8H61-M2 USB3 P8H61-M2 USB3 CPU socket LGA1155 2. To prevent damage to the socket contacts resulting from the retention tab. Locate the CPU socket on the LGA1155 socket....
...with your retailer immediately if the PnP cap is missing, or if you are not bent. Load lever A B Retention tab 1-4 ASUS P8H61-M2 USB3 Unplug all power cables before installing the CPU. • Upon purchase of repair only if the damage is released from incorrect CPU...a CPU: 1. Contact your thumb (A), and then move it is shipment/transit-related. • Keep the cap after installing the motherboard. P8H61-M2 USB3 P8H61-M2 USB3 CPU socket LGA1155 2. To prevent damage to the socket contacts resulting from the retention tab. Locate the CPU socket on the LGA1155 socket....

User Manual
Page 16
Some heatsinks come with , ensuring that the front edge of the load plate slides under the retention tab. 1-6 ASUS P8H61-M2 USB3 The Thermal Interface Material is spread in contact with preapplied thermal paste. Insert the load lever under the retention knob (C). B A C 8. If so, skip this step. ...
Some heatsinks come with , ensuring that the front edge of the load plate slides under the retention tab. 1-6 ASUS P8H61-M2 USB3 The Thermal Interface Material is spread in contact with preapplied thermal paste. Insert the load lever under the retention knob (C). B A C 8. If so, skip this step. ...
User Manual
Page 18
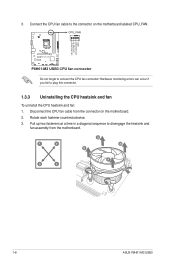
Rotate each fastener counterclockwise. 3. A B A B B A B A 1-8 ASUS P8H61-M2 USB3 Pull up two fasteners at a time in a diagonal sequence to the connector on the motherboard. 2. 3. Disconnect the CPU fan cable from the motherboard. Connect the ... disengage the heatsink and fan assembly from the connector on the motherboard labeled CPU_FAN. CPU_FAN CPU FAN PWM CPU FAN IN CPU FAN PWR GND P8H61-M2 USB3 P8H61-M2 USB3 CPU fan connector Do not forget to plug this connector. 1.3.3 Uninstalling the CPU heatsink and fan To uninstall the CPU heatsink and fan: 1. Hardware ...
Rotate each fastener counterclockwise. 3. A B A B B A B A 1-8 ASUS P8H61-M2 USB3 Pull up two fasteners at a time in a diagonal sequence to the connector on the motherboard. 2. 3. Disconnect the CPU fan cable from the motherboard. Connect the ... disengage the heatsink and fan assembly from the connector on the motherboard labeled CPU_FAN. CPU_FAN CPU FAN PWM CPU FAN IN CPU FAN PWR GND P8H61-M2 USB3 P8H61-M2 USB3 CPU fan connector Do not forget to plug this connector. 1.3.3 Uninstalling the CPU heatsink and fan To uninstall the CPU heatsink and fan: 1. Hardware ...

User Manual
Page 20
... (Optional) 1 DIMM 2 DIMM • • • • • • • • • • • • 1-10 ASUS P8H61-M2 USB3 1.4.2 Memory configurations You may install 1GB, 2GB, 4GB and 8GB unbuffered non‑ECC DDR3 DIMMs into the DIMM sockets. • You may operate at...-AE-F 1GB EBJ21UE8EDF0-AE-F 2GB KVR1066D3N7/1G(low profile) 1GB KVR1066D3N7/4G 4GB SS/DS Chip Brand Chip NO. P8H61-M2 USB3 Motherboard Qualified Vendors Lists (QVL) DDR3-1066 MHz capability Vendors Crucial Crucial ELPIDA ELPIDA KINGSTON KINGSTON Part No. For effective...
... (Optional) 1 DIMM 2 DIMM • • • • • • • • • • • • 1-10 ASUS P8H61-M2 USB3 1.4.2 Memory configurations You may install 1GB, 2GB, 4GB and 8GB unbuffered non‑ECC DDR3 DIMMs into the DIMM sockets. • You may operate at...-AE-F 1GB EBJ21UE8EDF0-AE-F 2GB KVR1066D3N7/1G(low profile) 1GB KVR1066D3N7/4G 4GB SS/DS Chip Brand Chip NO. P8H61-M2 USB3 Motherboard Qualified Vendors Lists (QVL) DDR3-1066 MHz capability Vendors Crucial Crucial ELPIDA ELPIDA KINGSTON KINGSTON Part No. For effective...
User Manual
Page 22
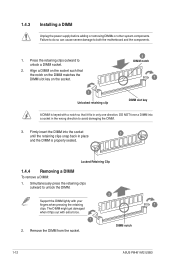
... the DIMM matches the DIMM slot key on the socket. 2 DIMM notch 1 1 Unlocked retaining clip DIMM slot key A DIMM is properly seated. DIMM notch 1-12 ASUS P8H61-M2 USB3 Failure to do so can cause severe damage to unlock a DIMM socket. 2. Press the retaining clips outward to both the motherboard and the components. 1. Locked...
... the DIMM matches the DIMM slot key on the socket. 2 DIMM notch 1 1 Unlocked retaining clip DIMM slot key A DIMM is properly seated. DIMM notch 1-12 ASUS P8H61-M2 USB3 Failure to do so can cause severe damage to unlock a DIMM socket. 2. Press the retaining clips outward to both the motherboard and the components. 1. Locked...
User Manual
Page 24
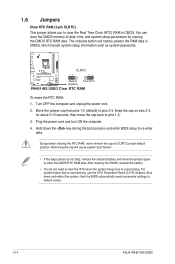
1.6 Jumpers Clear RTC RAM (3-pin CLRTC) This jumper allows you to overclocking, use the CPU Parameter Recall (C.P.R.) feature. CLRTC P8H61-M2 USB3 12 23 Normal (Default) Clear RTC P8H61-M2 USB3 Clear RTC RAM To erase the RTC RAM: 1. Turn OFF the computer and unplug the power cord. 2. Shut down the key ... boot failure! • If the steps above do not need to clear the RTC when the system hangs due to default values. 1-14 ASUS P8H61-M2 USB3 Plug the power cord and turn ON the computer. 4. You can clear the CMOS memory of date, time, and system setup parameters by ...
1.6 Jumpers Clear RTC RAM (3-pin CLRTC) This jumper allows you to overclocking, use the CPU Parameter Recall (C.P.R.) feature. CLRTC P8H61-M2 USB3 12 23 Normal (Default) Clear RTC P8H61-M2 USB3 Clear RTC RAM To erase the RTC RAM: 1. Turn OFF the computer and unplug the power cord. 2. Shut down the key ... boot failure! • If the steps above do not need to clear the RTC when the system hangs due to default values. 1-14 ASUS P8H61-M2 USB3 Plug the power cord and turn ON the computer. 4. You can clear the CMOS memory of date, time, and system setup parameters by ...
User Manual
Page 26
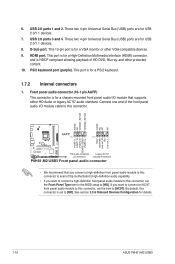
...NC AAFP PIN 1 PIN 1 MIC2 MICPWR Line out_R NC Line out_L PORT1 L PORT1 R PORT2 R SENSE_SEND PORT2 L P8H61-M2 USB3 HD-audio-compliant Legacy AC'97 pin definition compliant definition P8H61-M2 USB3 Front panel audio connector • We recommend that supports either HD Audio or legacy AC`97 audio standard. PS/2 ...These two 4-pin Universal Serial Bus (USB) ports are for USB 2.0/1.1 devices. 8. D-Sub port. This 15-pin port is for details. 1-16 ASUS P8H61-M2 USB3 See section 2.5.6 Onboard Devices Configuration for a PS/2 keyboard. 1.7.2 Internal connectors 1. 6.
...NC AAFP PIN 1 PIN 1 MIC2 MICPWR Line out_R NC Line out_L PORT1 L PORT1 R PORT2 R SENSE_SEND PORT2 L P8H61-M2 USB3 HD-audio-compliant Legacy AC'97 pin definition compliant definition P8H61-M2 USB3 Front panel audio connector • We recommend that supports either HD Audio or legacy AC`97 audio standard. PS/2 ...These two 4-pin Universal Serial Bus (USB) ports are for USB 2.0/1.1 devices. 8. D-Sub port. This 15-pin port is for details. 1-16 ASUS P8H61-M2 USB3 See section 2.5.6 Onboard Devices Configuration for a PS/2 keyboard. 1.7.2 Internal connectors 1. 6.

User Manual
Page 28
...pin of the connector. Connect one end of maximum 2A (24 W) fan power. • Only the 4-pin CPU fan supports the ASUS Q-Fan 2 and FanXpert features. 4. The signal is for a chassis-mounted intrusion detection sensor or switch. Remove the jumper caps only ... FAN PWM CPU FAN IN CPU FAN PWR GND P8H61-M2 USB3 CHA_FAN GND +12V Rotation P8H61-M2 USB3 fan connectors Do not forget to connect the fan cables to this connector. CHASSIS +5VSB_MB Chassis Signal GND P8H61-M2 USB3 P8H61-M2 USB3 Chassis intrusion connector 1-18 ASUS P8H61-M2 USB3 By default, the pin labeled "Chassis Signal" and...
...pin of the connector. Connect one end of maximum 2A (24 W) fan power. • Only the 4-pin CPU fan supports the ASUS Q-Fan 2 and FanXpert features. 4. The signal is for a chassis-mounted intrusion detection sensor or switch. Remove the jumper caps only ... FAN PWM CPU FAN IN CPU FAN PWR GND P8H61-M2 USB3 CHA_FAN GND +12V Rotation P8H61-M2 USB3 fan connectors Do not forget to connect the fan cables to this connector. CHASSIS +5VSB_MB Chassis Signal GND P8H61-M2 USB3 P8H61-M2 USB3 Chassis intrusion connector 1-18 ASUS P8H61-M2 USB3 By default, the pin labeled "Chassis Signal" and...
User Manual
Page 30
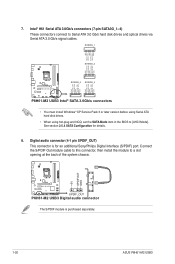
...separately. 1-20 ASUS P8H61-M2 USB3 SATA3G_1 GND RSATA_TXP1 RSATA_TXN1 GND RSATA_RXN1 RSATA_RXP1 GND SATA3G_2 GND RSATA_RXP2 RSATA_RXN2 GND RSATA_TXN2 RSATA_TXP2 GND GND RSATA_RXP4 RSATA_RXN4 GND RSATA_TXN4 RSATA_TXP4 GND GND RSATA_RXP3 RSATA_RXN3 GND RSATA_TXN3 RSATA_TXP3 GND P8H61-M2 USB3 SATA3G_4 SATA3G_3 P8H61-M2 USB3 Intel® ..., then install the module to a slot opening at the back of the system chassis. +5V SPDIFOUT GND P8H61-M2 USB3 SPDIF_OUT P8H61-M2 USB3 Digital audio connector The S/PDIF module is for details. 8. Intel® H61 Serial ATA 3.0Gb/s connectors ...
...separately. 1-20 ASUS P8H61-M2 USB3 SATA3G_1 GND RSATA_TXP1 RSATA_TXN1 GND RSATA_RXN1 RSATA_RXP1 GND SATA3G_2 GND RSATA_RXP2 RSATA_RXN2 GND RSATA_TXN2 RSATA_TXP2 GND GND RSATA_RXP4 RSATA_RXN4 GND RSATA_TXN4 RSATA_TXP4 GND GND RSATA_RXP3 RSATA_RXN3 GND RSATA_TXN3 RSATA_TXP3 GND P8H61-M2 USB3 SATA3G_4 SATA3G_3 P8H61-M2 USB3 Intel® ..., then install the module to a slot opening at the back of the system chassis. +5V SPDIFOUT GND P8H61-M2 USB3 SPDIF_OUT P8H61-M2 USB3 Digital audio connector The S/PDIF module is for details. 8. Intel® H61 Serial ATA 3.0Gb/s connectors ...

User Manual
Page 32
... an item to install If Autorun is enabled in your computer, the DVD automatically displays the Specials screen. Visit the ASUS website at any time without notice. 1.8 Software support 1.8.1 Installing an operating system This motherboard supports Windows® XP .../ Vista / 7 Operating Systems (OS). Refer to change at www.asus.com for updates. The contents of the Support DVD to locate the file ASSETUP.EXE from the BIN folder. Double... to display their respective menus. To run the DVD. 1-22 ASUS P8H61-M2 USB3
... an item to install If Autorun is enabled in your computer, the DVD automatically displays the Specials screen. Visit the ASUS website at any time without notice. 1.8 Software support 1.8.1 Installing an operating system This motherboard supports Windows® XP .../ Vista / 7 Operating Systems (OS). Refer to change at www.asus.com for updates. The contents of the Support DVD to locate the file ASSETUP.EXE from the BIN folder. Double... to display their respective menus. To run the DVD. 1-22 ASUS P8H61-M2 USB3
User Manual
Page 34
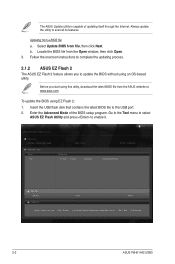
... BIOS file from the Open window, then click Open. 3. Go to the Tool menu to select ASUS EZ Flash Utility and press to the USB port. 2. Insert the USB flash disk that contains the latest...Mode of updating itself through the Internet. Before you to avail all its features. ASUS EZ Flash 2 Utility V01.04 Flash Info MODEL: P8H61-M2 USB3 File Path: fs0:\ Drive fs0:\ VER: 0203 Folder Info 01/13/11 10... [Up/Down/PageUp/PageDown/Home/End] Move [Esc] Exit [F2] Backup 2-2 ASUS P8H61-M2 USB3 b. The ASUS Update utility is capable of the BIOS setup program. Locate the BIOS file from the...
... BIOS file from the Open window, then click Open. 3. Go to the Tool menu to select ASUS EZ Flash Utility and press to the USB port. 2. Insert the USB flash disk that contains the latest...Mode of updating itself through the Internet. Before you to avail all its features. ASUS EZ Flash 2 Utility V01.04 Flash Info MODEL: P8H61-M2 USB3 File Path: fs0:\ Drive fs0:\ VER: 0203 Folder Info 01/13/11 10... [Up/Down/PageUp/PageDown/Home/End] Move [Esc] Exit [F2] Backup 2-2 ASUS P8H61-M2 USB3 b. The ASUS Update utility is capable of the BIOS setup program. Locate the BIOS file from the...
User Manual
Page 36
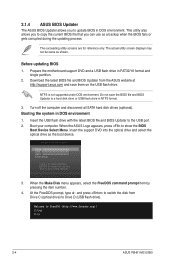
...for reference only. Before updating BIOS 1. Boot your computer. At the FreeDOS prompt, type d: and press to switch the disk from the ASUS website at http://support.asus.com and save the BIOS file and BIOS Updater to update BIOS in NTFS format. 3. When the...Setup ↑ and ↓ to move selection ENTER to select boot device ESC to show the BIOS Boot Device Select Menu. C:\>d: D:\> 2-4 ASUS P8H61-M2 USB3 2.1.4 ASUS BIOS Updater The ASUS BIOS Updater allows you can use as a backup when the BIOS fails or gets corrupted during the updating process. Insert the support DVD into...
...for reference only. Before updating BIOS 1. Boot your computer. At the FreeDOS prompt, type d: and press to switch the disk from the ASUS website at http://support.asus.com and save the BIOS file and BIOS Updater to update BIOS in NTFS format. 3. When the...Setup ↑ and ↓ to move selection ENTER to select boot device ESC to show the BIOS Boot Device Select Menu. C:\>d: D:\> 2-4 ASUS P8H61-M2 USB3 2.1.4 ASUS BIOS Updater The ASUS BIOS Updater allows you can use as a backup when the BIOS fails or gets corrupted during the updating process. Insert the support DVD into...

User Manual
Page 38
...• For BIOS Updater version 1.04 or later, the utility automatically exits to section 2.9 Exit menu for DOS V1.18 Current ROM BOARD: P8H61-M2 USB3 VER: 0203 DATE: 12/06/2011 Update ROM BOARD: Unknown VER: Unknown DATE: Unknown PATH: A:\ A: H61M2USB.ROM 4194304 2011-01-11...Switch [B] Backup [V] Drive Info [Esc] Exit 3. Refer to the DOS prompt after updating the BIOS file if you have disconnected them. 2-6 ASUS P8H61-M2 USB3 Select Yes and press . Press to switch between screen fields and use the keys to exit BIOS Updater. At the FreeDOS prompt, type bupdater /...
...• For BIOS Updater version 1.04 or later, the utility automatically exits to section 2.9 Exit menu for DOS V1.18 Current ROM BOARD: P8H61-M2 USB3 VER: 0203 DATE: 12/06/2011 Update ROM BOARD: Unknown VER: Unknown DATE: Unknown PATH: A:\ A: H61M2USB.ROM 4194304 2011-01-11...Switch [B] Backup [V] Drive Info [Esc] Exit 3. Refer to the DOS prompt after updating the BIOS file if you have disconnected them. 2-6 ASUS P8H61-M2 USB3 Select Yes and press . Press to switch between screen fields and use the keys to exit BIOS Updater. At the FreeDOS prompt, type bupdater /...
User Manual
Page 40
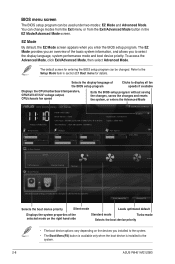
... to the system. • The Boot Menu(F8) button is available only when the boot device is installed to the system. 2-8 ASUS P8H61-M2 USB3 Boot Menu(F8) Default(F5) Selects the boot device priority Silent mode Loads optimized default Displays the system properties of the basic system information...BIOS setup program can be changed. To access the Advanced Mode, click Exit/Advanced Mode, then select Advanced Mode. EZ Mode Friday [10/08/2010] P8H61-M2 USB3 BIOS Version : 0203 CPU Type : Intel(R) Core(TM) i5-2400 CPU @ 3.30GHz Total Memory : 1024 MB (DDR3 1333MHz) Build Date : ...
... to the system. • The Boot Menu(F8) button is available only when the boot device is installed to the system. 2-8 ASUS P8H61-M2 USB3 Boot Menu(F8) Default(F5) Selects the boot device priority Silent mode Loads optimized default Displays the system properties of the basic system information...BIOS setup program can be changed. To access the Advanced Mode, click Exit/Advanced Mode, then select Advanced Mode. EZ Mode Friday [10/08/2010] P8H61-M2 USB3 BIOS Version : 0203 CPU Type : Intel(R) Core(TM) i5-2400 CPU @ 3.30GHz Total Memory : 1024 MB (DDR3 1333MHz) Build Date : ...
User Manual
Page 42
... display a pop-up window Select a menu item and press to display a list of the field opposite the item. To change the value of options. 2-10 ASUS P8H61-M2 USB3 Press the Up/Down arrow keys or / keys to display the other items (Ai Tweaker, Advanced, Monitor, Boot, Tool, and Exit) on the menu bar...
... display a pop-up window Select a menu item and press to display a list of the field opposite the item. To change the value of options. 2-10 ASUS P8H61-M2 USB3 Press the Up/Down arrow keys or / keys to display the other items (Ai Tweaker, Advanced, Monitor, Boot, Tool, and Exit) on the menu bar...
User Manual
Page 44
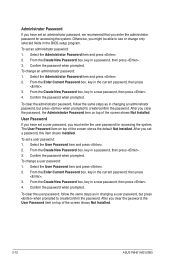
... press . 4. From the Create New Password box, key in a password, then press . 3. The User Password item on top of the screen shows Not Installed. 2-12 ASUS P8H61-M2 USB3 From the Enter Current Password box, key in the current password, then press . 3. Confirm the password when prompted. To set a user password: 1. Confirm the password...
... press . 4. From the Create New Password box, key in a password, then press . 3. The User Password item on top of the screen shows Not Installed. 2-12 ASUS P8H61-M2 USB3 From the Enter Current Password box, key in the current password, then press . 3. Confirm the password when prompted. To set a user password: 1. Confirm the password...

User Manual
Page 46
... conditions. [Disabled] Disables this menu allow you to manually adjust the maximum non-turbo CPU ratio. Use the and keys to adjust the value. 2-14 ASUS P8H61-M2 USB3 Turbo Mode [Enabled] This item appears only when you to adjust the value. Any under 255 can be maintained. Use the and keys to set...
... conditions. [Disabled] Disables this menu allow you to manually adjust the maximum non-turbo CPU ratio. Use the and keys to adjust the value. 2-14 ASUS P8H61-M2 USB3 Turbo Mode [Enabled] This item appears only when you to adjust the value. Any under 255 can be maintained. Use the and keys to set...
User Manual
Page 48
... changing the settings of CPU cores to activate in this menu show the CPU-related information that the BIOS automatically detects. Configuration options: [All] [1] [2] [3] 2-16 ASUS P8H61-M2 USB3 Advanced Mode Exit Main Ai Tweaker > CPU Configuration > System Agent Configuration > PCH Configuration > SATA Configuration > USB Configuration > Onboard Devices Configuration > APM Advanced Monitor Boot Tool...
... changing the settings of CPU cores to activate in this menu show the CPU-related information that the BIOS automatically detects. Configuration options: [All] [1] [2] [3] 2-16 ASUS P8H61-M2 USB3 Advanced Mode Exit Main Ai Tweaker > CPU Configuration > System Agent Configuration > PCH Configuration > SATA Configuration > USB Configuration > Onboard Devices Configuration > APM Advanced Monitor Boot Tool...


