P8H61-M LX R2 User's Manual
Page 2
...after our last shipment of the product, either (1) for free by downloading it from http://support.asus.com/download or (2) for the cost of reproduction and shipment, which you wish to the email address gpl@asus.com, stating the product and describing the problem (please DO NOT send large attachments such... or by any problems in obtaining the full corresponding source code we can coordinate the terms and cost of alteration is defaced or missing. ASUS PROVIDES THIS MANUAL "AS IS" WITHOUT WARRANTY OF ANY KIND, EITHER EXPRESS OR IMPLIED, INCLUDING BUT NOT LIMITED TO THE IMPLIED WARRANTIES OR...
...after our last shipment of the product, either (1) for free by downloading it from http://support.asus.com/download or (2) for the cost of reproduction and shipment, which you wish to the email address gpl@asus.com, stating the product and describing the problem (please DO NOT send large attachments such... or by any problems in obtaining the full corresponding source code we can coordinate the terms and cost of alteration is defaced or missing. ASUS PROVIDES THIS MANUAL "AS IS" WITHOUT WARRANTY OF ANY KIND, EITHER EXPRESS OR IMPLIED, INCLUDING BUT NOT LIMITED TO THE IMPLIED WARRANTIES OR...

P8H61-M LX R2 User's Manual
Page 3
Contents Safety information vi About this guide vii P8H61-M LX2 R2.0 specifications summary ix Chapter 1 Product introduction 1.1 Before you proceed 1-1 1.2 Motherboard overview 1-2 1.2.1 Placement direction 1-2 1.2.2 Screw holes 1-2 1.2.3 Motherboard layout 1-3 1.2.4 Layout contents 1-3 1.3 Central Processing Unit (CPU 1-4 1.3.1 ... slot 1-18 1.5.4 PCI Express x1 slot 1-18 1.5.5 PCI Express x16 slot 1-18 1.6 Jumpers 1-19 1.7 Connectors 1-20 1.7.1 Rear panel connectors 1-20 1.7.2 Internal connectors 1-21 1.8 Software support 1-27 1.8.1 Installing an operating system 1-27...
Contents Safety information vi About this guide vii P8H61-M LX2 R2.0 specifications summary ix Chapter 1 Product introduction 1.1 Before you proceed 1-1 1.2 Motherboard overview 1-2 1.2.1 Placement direction 1-2 1.2.2 Screw holes 1-2 1.2.3 Motherboard layout 1-3 1.2.4 Layout contents 1-3 1.3 Central Processing Unit (CPU 1-4 1.3.1 ... slot 1-18 1.5.4 PCI Express x1 slot 1-18 1.5.5 PCI Express x16 slot 1-18 1.6 Jumpers 1-19 1.7 Connectors 1-20 1.7.1 Rear panel connectors 1-20 1.7.2 Internal connectors 1-21 1.8 Software support 1-27 1.8.1 Installing an operating system 1-27...
P8H61-M LX R2 User's Manual
Page 7
... This user guide contains the information you perform certain tasks properly, take note of the following parts: • Chapter 1: Product introduction This chapter describes the supported features of the motherboard. • Chapter 2: BIOS information This chapter provides a detailed guide to complete a task. About this manual. NOTE: Tips and additional information to...
... This user guide contains the information you perform certain tasks properly, take note of the following parts: • Chapter 1: Product introduction This chapter describes the supported features of the motherboard. • Chapter 2: BIOS information This chapter provides a detailed guide to complete a task. About this manual. NOTE: Tips and additional information to...
P8H61-M LX R2 User's Manual
Page 9
...P8H61-M LX2 R2.0 specifications summary CPU Chipset Memory Graphics Expansion slots Storage LAN Audio USB ASUS unique features LGA1155 socket for Intel® 3rd/2nd generation Core™ i7/ i5 / i3 / Pentium® / Celeron® Processors Supports Intel® 22 nm CPU Supports Intel® 32 nm CPU * Refer to www.asus....com or this user manual for CPU support list Intel® H61 Express Chipset 2 x DIMM, max. 16GB, DDR3 2200 ...
...P8H61-M LX2 R2.0 specifications summary CPU Chipset Memory Graphics Expansion slots Storage LAN Audio USB ASUS unique features LGA1155 socket for Intel® 3rd/2nd generation Core™ i7/ i5 / i3 / Pentium® / Celeron® Processors Supports Intel® 22 nm CPU Supports Intel® 32 nm CPU * Refer to www.asus....com or this user manual for CPU support list Intel® H61 Express Chipset 2 x DIMM, max. 16GB, DDR3 2200 ...
P8H61-M LX R2 User's Manual
Page 10
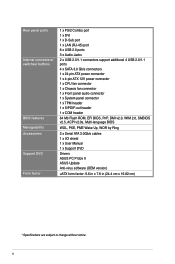
... 1 x PS/2 Combo port 1 x DVI 1 x D-Sub port 1 x LAN (RJ-45) port 6 x USB 2.0 ports 3 x Audio Jacks 2 x USB 2.0/1.1 connectors support additional 4 USB 2.0/1.1 ports 4 x SATA 3.0 Gb/s connectors 1 x 24-pin ATX power connector 1 x 4-pin ATX 12V power connector 1 x CPU fan connector 1 x Chassis fan...Multi-language BIOS WOL, PXE, PME Wake Up, WOR by Ring 2 x Serial ATA 3.0Gb/s cables 1 x I/O shield 1 x User Manual 1 x Support DVD Drivers ASUS PC Probe II ASUS Update Anti-virus software (OEM version) uATX form factor: 9.6 in x 7.8 in (24.4 cm x 19.82 cm) * Specifications are subject to change ...
... 1 x PS/2 Combo port 1 x DVI 1 x D-Sub port 1 x LAN (RJ-45) port 6 x USB 2.0 ports 3 x Audio Jacks 2 x USB 2.0/1.1 connectors support additional 4 USB 2.0/1.1 ports 4 x SATA 3.0 Gb/s connectors 1 x 24-pin ATX power connector 1 x 4-pin ATX 12V power connector 1 x CPU fan connector 1 x Chassis fan...Multi-language BIOS WOL, PXE, PME Wake Up, WOR by Ring 2 x Serial ATA 3.0Gb/s cables 1 x I/O shield 1 x User Manual 1 x Support DVD Drivers ASUS PC Probe II ASUS Update Anti-virus software (OEM version) uATX form factor: 9.6 in x 7.8 in (24.4 cm x 19.82 cm) * Specifications are subject to change ...
P8H61-M LX R2 User's Manual
Page 14
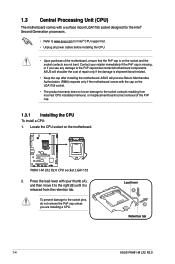
...of the motherboard, ensure that the PnP cap is missing, or if you are not bent. P8H61-M LX2 R2.0 P8H61-M LX2 R2.0 CPU socket LGA1155 2. Load lever A B Retention tab 1-4 ASUS P8H61-M LX2 R2.0 Press the load lever with your retailer immediately if the PnP cap is on the socket ...contacts resulting from the retention tab. 1.3 Central Processing Unit (CPU) The motherboard comes with a surface mount LGA1155 socket designed for Intel® CPU support list. • Unplug all power cables before installing the CPU. • Upon purchase of the PnP cap. 1.3.1 Installing the CPU To install...
...of the motherboard, ensure that the PnP cap is missing, or if you are not bent. P8H61-M LX2 R2.0 P8H61-M LX2 R2.0 CPU socket LGA1155 2. Load lever A B Retention tab 1-4 ASUS P8H61-M LX2 R2.0 Press the load lever with your retailer immediately if the PnP cap is on the socket ...contacts resulting from the retention tab. 1.3 Central Processing Unit (CPU) The motherboard comes with a surface mount LGA1155 socket designed for Intel® CPU support list. • Unplug all power cables before installing the CPU. • Upon purchase of the PnP cap. 1.3.1 Installing the CPU To install...
P8H61-M LX R2 User's Manual
Page 20
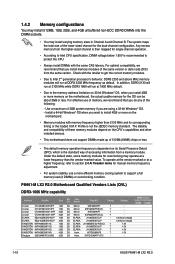
...-channel configuration. Under the default state, some memory modules for overclocking may install varying memory sizes in Channel A and Channel B. P8H61-M LX2 R2.0 Motherboard Qualified Vendors Lists (QVL) DDR3-1066 MHz capability Vendors Part No. Crucial CT25664BA1067.16FF 2GB DS Micron 9HF22D9KPT 7 -...5V Kingtiger 2GB DIMM PC3-8500 2GB DS Hynix H5TQ1G83AFP G7C - - 1-10 ASUS P8H61-M LX2 R2.0 Install a 64-bit Windows® OS when you want to install 4GB or more efficient memory cooling system to support a full memory load (2 DIMMs) or overclocking condition. Size SS/ DS ...
...-channel configuration. Under the default state, some memory modules for overclocking may install varying memory sizes in Channel A and Channel B. P8H61-M LX2 R2.0 Motherboard Qualified Vendors Lists (QVL) DDR3-1066 MHz capability Vendors Part No. Crucial CT25664BA1067.16FF 2GB DS Micron 9HF22D9KPT 7 -...5V Kingtiger 2GB DIMM PC3-8500 2GB DS Hynix H5TQ1G83AFP G7C - - 1-10 ASUS P8H61-M LX2 R2.0 Install a 64-bit Windows® OS when you want to install 4GB or more efficient memory cooling system to support a full memory load (2 DIMMs) or overclocking condition. Size SS/ DS ...
P8H61-M LX R2 User's Manual
Page 26
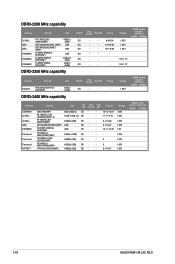
... - 9 - 9-11-9-27 Voltage 1.65V 1.65V 1.65V 1.65V 1.8V 1.65V 1.65V 1.65V 1.65V DIMM socket support (optional) 1DIMM 2DIMMs 1-16 ASUS P8H61-M LX2 R2.0 Timing CMGTX8(XMP) 8GB (2GBx 4) SS - Size G.SKILL GEIL GEIL KINGMAX KINGMAX KINGMAX F3-17600CL8D4GBPS(XMP) GET34GB2200C9DC (...- - DS - - - Timing DS - - - Voltage 1.65V 1.65V 1.65V DIMM socket support (optional) 1DIMM 2DIMMs - 1.5V-1.7V 1.5V-1.7V Voltage 1.65V DIMM socket support (optional) 1DIMM 2DIMMs DDR3-2400 MHz capability Vendors CORSAIR G.SKILL G.SKILL GEIL KINGMAX Transcend Transcend Transcend ...
... - 9 - 9-11-9-27 Voltage 1.65V 1.65V 1.65V 1.65V 1.8V 1.65V 1.65V 1.65V 1.65V DIMM socket support (optional) 1DIMM 2DIMMs 1-16 ASUS P8H61-M LX2 R2.0 Timing CMGTX8(XMP) 8GB (2GBx 4) SS - Size G.SKILL GEIL GEIL KINGMAX KINGMAX KINGMAX F3-17600CL8D4GBPS(XMP) GET34GB2200C9DC (...- - DS - - - Timing DS - - - Voltage 1.65V 1.65V 1.65V DIMM socket support (optional) 1DIMM 2DIMMs - 1.5V-1.7V 1.5V-1.7V Voltage 1.65V DIMM socket support (optional) 1DIMM 2DIMMs DDR3-2400 MHz capability Vendors CORSAIR G.SKILL G.SKILL GEIL KINGMAX Transcend Transcend Transcend ...

P8H61-M LX R2 User's Manual
Page 27
... only one direction. Remove the DIMM from the socket. The DIMM might get damaged when it fits in the wrong direction to unlock the DIMM. 2 Support the DIMM lightly with extra force. 1 2.
... only one direction. Remove the DIMM from the socket. The DIMM might get damaged when it fits in the wrong direction to unlock the DIMM. 2 Support the DIMM lightly with extra force. 1 2.
P8H61-M LX R2 User's Manual
Page 28
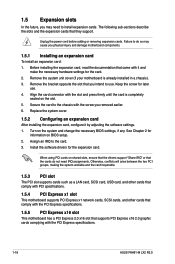
...documentation that supports PCI Express x16 2.0 graphic cards complying with the screw you intend to do not need to the card. 3. Remove the bracket opposite the slot that you removed earlier. 6. Secure the card to the chassis with the PCI Express specifications. 1-18 ASUS P8H61-M LX2 R2.0 Replace ...on the slot. 5. Remove the system unit cover (if your motherboard is completely seated on shared slots, ensure that the drivers support "Share IRQ" or that they support. Keep the screw for the card. 2. Failure to use . 4. See Chapter 2 for the expansion card. Assign an ...
...documentation that supports PCI Express x16 2.0 graphic cards complying with the screw you intend to do not need to the card. 3. Remove the bracket opposite the slot that you removed earlier. 6. Secure the card to the chassis with the PCI Express specifications. 1-18 ASUS P8H61-M LX2 R2.0 Replace ...on the slot. 5. Remove the system unit cover (if your motherboard is completely seated on shared slots, ensure that the drivers support "Share IRQ" or that they support. Keep the screw for the card. 2. Failure to use . 4. See Chapter 2 for the expansion card. Assign an ...
P8H61-M LX R2 User's Manual
Page 30
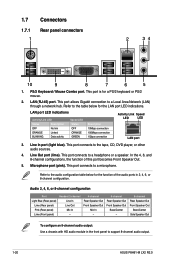
... Speaker Out To configure an 8-channel audio output: Use a chassis with HD audio module in 2, 4, 6, or 8-channel configuration. This port connects to support 8-channel audio output. 1-20 ASUS P8H61-M LX2 R2.0 This port connects to the table below for the LAN port LED indications. Line Out port (lime). Refer to a headphone or a speaker. In...
... Speaker Out To configure an 8-channel audio output: Use a chassis with HD audio module in 2, 4, 6, or 8-channel configuration. This port connects to support 8-channel audio output. 1-20 ASUS P8H61-M LX2 R2.0 This port connects to the table below for the LAN port LED indications. Line Out port (lime). Refer to a headphone or a speaker. In...
P8H61-M LX R2 User's Manual
Page 31
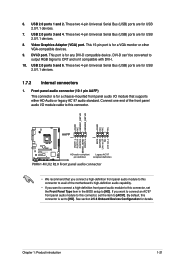
... AAFP PIN 1 PIN 1 MIC2 MICPWR Line out_R NC Line out_L PORT1 L PORT1 R PORT2 R SENSE_SEND PORT2 L P8H61-M LX2 R2.0 HD-audio-compliant Legacy AC'97 pin definition compliant definition P8H61-M LX2 R2.0 Front panel audio connector • We recommend that supports either HD Audio or legacy AC`97 audio standard. These two 4-pin Universal Serial Bus...
... AAFP PIN 1 PIN 1 MIC2 MICPWR Line out_R NC Line out_L PORT1 L PORT1 R PORT2 R SENSE_SEND PORT2 L P8H61-M LX2 R2.0 HD-audio-compliant Legacy AC'97 pin definition compliant definition P8H61-M LX2 R2.0 Front panel audio connector • We recommend that supports either HD Audio or legacy AC`97 audio standard. These two 4-pin Universal Serial Bus...
P8H61-M LX R2 User's Manual
Page 32
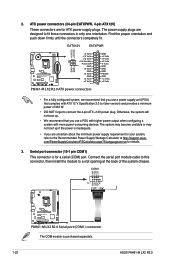
...about the minimum power supply requirement for a serial (COM) port. COM1 RXD DTR DSR CTS PIN 1 DCD TXD GND RTS RI P8H61-M LX2 R2.0 P8H61-M LX2 R2.0 Serial port (COM1) connector The COM module is for your system, refer to connect the 4-pin ATX +12V power plug. Otherwise,... pin COM1) This connector is purchased separately. 1-22 ASUS P8H61-M LX2 R2.0 The power supply plugs are designed to a slot opening at the back of 350 W. • DO NOT forget to the Recommended Power Supply Wattage Calculator at http://support.asus. Connect the serial port module cable to this connector,...
...about the minimum power supply requirement for a serial (COM) port. COM1 RXD DTR DSR CTS PIN 1 DCD TXD GND RTS RI P8H61-M LX2 R2.0 P8H61-M LX2 R2.0 Serial port (COM1) connector The COM module is for your system, refer to connect the 4-pin ATX +12V power plug. Otherwise,... pin COM1) This connector is purchased separately. 1-22 ASUS P8H61-M LX2 R2.0 The power supply plugs are designed to a slot opening at the back of 350 W. • DO NOT forget to the Recommended Power Supply Wattage Calculator at http://support.asus. Connect the serial port module cable to this connector,...
P8H61-M LX R2 User's Manual
Page 33
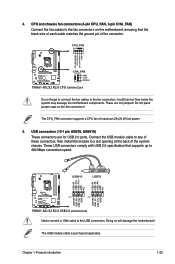
... P8H61-M LX2 R2.0 CHA_FAN GND +12V Rotation P8H61-M LX2 R2.0 CPU connectors Do not forget to connect the fan cables to a slot opening at the back of these connectors, then install the module to the fan connectors. Do not place jumper caps on the motherboard, ensuring that supports ...These are for USB 2.0 ports. USB910 USB78 USB+5V USB_P10USB_P10+ GND NC USB+5V USB_P8USB_P8+ GND NC P8H61-M LX2 R2.0 PIN 1 PIN 1 USB+5V USB_P9USB_P9+ GND USB+5V USB_P7USB_P7+ GND P8H61-M LX2 R2.0 USB2.0 connectors Never connect a 1394 cable to the fan connectors on the fan connectors! Chapter 1: ...
... P8H61-M LX2 R2.0 CHA_FAN GND +12V Rotation P8H61-M LX2 R2.0 CPU connectors Do not forget to connect the fan cables to a slot opening at the back of these connectors, then install the module to the fan connectors. Do not place jumper caps on the motherboard, ensuring that supports ...These are for USB 2.0 ports. USB910 USB78 USB+5V USB_P10USB_P10+ GND NC USB+5V USB_P8USB_P8+ GND NC P8H61-M LX2 R2.0 PIN 1 PIN 1 USB+5V USB_P9USB_P9+ GND USB+5V USB_P7USB_P7+ GND P8H61-M LX2 R2.0 USB2.0 connectors Never connect a 1394 cable to the fan connectors on the fan connectors! Chapter 1: ...
P8H61-M LX R2 User's Manual
Page 35
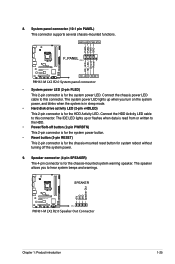
...The IDE LED lights up when you to this connector. PLED+ PLEDPWR GND HD_LED+ HD_LED- PWR LED PWR BTN F_PANEL PIN 1 P8H61-M LX2 R2.0 HD_LED RESET P8H61-M LX2 R2.0 System panel connector • System power LED (2-pin PLED) This 2-pin connector is for system reboot without turning off the system... button (2-pin RESET) This 2-pin connector is read from or written to this connector. System panel connector (10-1 pin PANEL) This connector supports several chassis-mounted functions. Connect the chassis power LED cable to the HDD. • Power/Soft-off button (2-pin PWRBTN) This 2-pin ...
...The IDE LED lights up when you to this connector. PLED+ PLEDPWR GND HD_LED+ HD_LED- PWR LED PWR BTN F_PANEL PIN 1 P8H61-M LX2 R2.0 HD_LED RESET P8H61-M LX2 R2.0 System panel connector • System power LED (2-pin PLED) This 2-pin connector is for system reboot without turning off the system... button (2-pin RESET) This 2-pin connector is read from or written to this connector. System panel connector (10-1 pin PANEL) This connector supports several chassis-mounted functions. Connect the chassis power LED cable to the HDD. • Power/Soft-off button (2-pin PWRBTN) This 2-pin ...
P8H61-M LX R2 User's Manual
Page 36
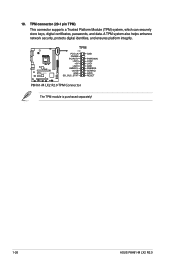
P8H61-M LX2 R2.0 TPM PIN 1 PCICLK FRAME PCIRST# LAD3 +3V LAD0 SMBSCL +3VSB GND SB_SUS_STAT GND PWROWN LAD2 LAD1 GND SMBSDA SERIRQ GPIO RESET P8H61-M LX2 R2.0 TPM Connector The TPM module is purchased separately! 1-26 ASUS P8H61-M LX2 R2.0 A TPM system also helps enhance network security, protects digital identities, and ensures platform integrity. 10. TPM connector (20-1 pin TPM) This connector supports a Trusted Platform Module (TPM) system, which can securely store keys, digital certificates, passwords, and data.
P8H61-M LX2 R2.0 TPM PIN 1 PCICLK FRAME PCIRST# LAD3 +3V LAD0 SMBSCL +3VSB GND SB_SUS_STAT GND PWROWN LAD2 LAD1 GND SMBSDA SERIRQ GPIO RESET P8H61-M LX2 R2.0 TPM Connector The TPM module is purchased separately! 1-26 ASUS P8H61-M LX2 R2.0 A TPM system also helps enhance network security, protects digital identities, and ensures platform integrity. 10. TPM connector (20-1 pin TPM) This connector supports a Trusted Platform Module (TPM) system, which can securely store keys, digital certificates, passwords, and data.

P8H61-M LX R2 User's Manual
Page 37
...that you can install to change at www.asus.com for reference only. Click Drivers, Utilities, Manual, Contact, and Specials tabs to run the Support DVD Place the Support DVD into the optical drive. 1.8 Software support 1.8.1 Installing an operating system This motherboard supports Windows® XP / Vista / 7 ...click the ASSETUP.EXE to display their respective menus. Click an icon to display Support DVD/ motherboard information Click an item to install If Autorun is for updates. Visit the ASUS website at any time without notice. Refer to locate the file ASSETUP.EXE from...
...that you can install to change at www.asus.com for reference only. Click Drivers, Utilities, Manual, Contact, and Specials tabs to run the Support DVD Place the Support DVD into the optical drive. 1.8 Software support 1.8.1 Installing an operating system This motherboard supports Windows® XP / Vista / 7 ...click the ASSETUP.EXE to display their respective menus. Click an icon to display Support DVD/ motherboard information Click an item to install If Autorun is for updates. Visit the ASUS website at any time without notice. Refer to locate the file ASSETUP.EXE from...
P8H61-M LX R2 User's Manual
Page 39
... the installation. Select Update BIOS from the popup menu. Select the ASUS FTP site nearest you to restore the BIOS in case you to download then click Next. c. Place the support DVD in the support DVD that allows you need to avoid network traffic, then click Next.... Quit all Windows® applications before you wish to manage, save, and update the motherboard BIOS in Windows® environment. • ASUS Update requires an Internet connection...
... the installation. Select Update BIOS from the popup menu. Select the ASUS FTP site nearest you to restore the BIOS in case you to download then click Next. c. Place the support DVD in the support DVD that allows you need to avoid network traffic, then click Next.... Quit all Windows® applications before you wish to manage, save, and update the motherboard BIOS in Windows® environment. • ASUS Update requires an Internet connection...
P8H61-M LX R2 User's Manual
Page 41
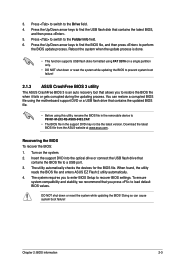
... update process is an auto recovery tool that contains the BIOS file to prevent system boot failure! 2.1.3 ASUS CrashFree BIOS 3 utility The ASUS CrashFree BIOS 3 is done. • This function supports USB flash disks formatted using this utility, rename the BIOS file in the removable device to perform the... Folder Info field. 6. Press the Up/Down arrow keys to find the BIOS file, and then press to P8H61-M-LX2-R2-ASUS-0402.CAP. • The BIOS file in the support DVD may not be the latest version. To ensure system compatibility and stability, we recommend that contains the latest ...
... update process is an auto recovery tool that contains the BIOS file to prevent system boot failure! 2.1.3 ASUS CrashFree BIOS 3 utility The ASUS CrashFree BIOS 3 is done. • This function supports USB flash disks formatted using this utility, rename the BIOS file in the removable device to perform the... Folder Info field. 6. Press the Up/Down arrow keys to find the BIOS file, and then press to P8H61-M-LX2-R2-ASUS-0402.CAP. • The BIOS file in the support DVD may not be the latest version. To ensure system compatibility and stability, we recommend that contains the latest ...
P8H61-M LX R2 User's Manual
Page 42
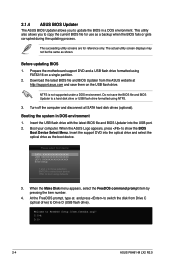
...use as the boot device. Prepare the motherboard support DVD and a USB flash drive formatted using FAT32/16 on the USB flash drive. Turn off the computer and disconnect all SATA hard disk drives (optional). Insert the support DVD into the USB port. 2. Do not... environment 1. Booting the system in a DOS environment. C:\>d: D:\> 2-4 ASUS P8H61-M LX2 R2.0 NTFS is not supported under a DOS environment. The actual utility screen displays may not be the same as shown. 2.1.4 ASUS BIOS Updater The ASUS BIOS Updater allows you to copy the current BIOS file for reference only...
...use as the boot device. Prepare the motherboard support DVD and a USB flash drive formatted using FAT32/16 on the USB flash drive. Turn off the computer and disconnect all SATA hard disk drives (optional). Insert the support DVD into the USB port. 2. Do not... environment 1. Booting the system in a DOS environment. C:\>d: D:\> 2-4 ASUS P8H61-M LX2 R2.0 NTFS is not supported under a DOS environment. The actual utility screen displays may not be the same as shown. 2.1.4 ASUS BIOS Updater The ASUS BIOS Updater allows you to copy the current BIOS file for reference only...


