P8H61-M LX R2 User's Manual
Page 11
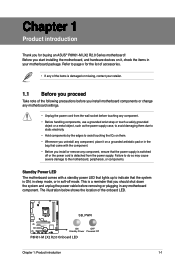
... socket before removing or plugging in soft-off mode. Failure to do so may cause severe damage to page x for buying an ASUS® P8H61-M LX2 R2.0 Series motherboard! The illustration below shows the location of the items is ON, in sleep mode, or in any of the onboard...with the component. • Before you uninstall any motherboard settings. • Unplug the power cord from the power supply. SB_PWR P8H61-M LX2 R2.0 ON OFF Standby Power Powered Off P8H61-M LX2 R2.0 Onboard LED Chapter 1: Product introduction 1-1 Refer to the motherboard, peripherals, or components.
... socket before removing or plugging in soft-off mode. Failure to do so may cause severe damage to page x for buying an ASUS® P8H61-M LX2 R2.0 Series motherboard! The illustration below shows the location of the items is ON, in sleep mode, or in any of the onboard...with the component. • Before you uninstall any motherboard settings. • Unplug the power cord from the power supply. SB_PWR P8H61-M LX2 R2.0 ON OFF Standby Power Powered Off P8H61-M LX2 R2.0 Onboard LED Chapter 1: Product introduction 1-1 Refer to the motherboard, peripherals, or components.
P8H61-M LX R2 User's Manual
Page 12
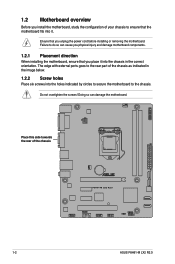
... to secure the motherboard to the chassis. Do not overtighten the screws! The edge with external ports goes to the rear part of the chassis P8H61-M LX2 R2.0 1-2 ASUS P8H61-M LX2 R2.0 Doing so can cause you physical injury and damage motherboard components. 1.2.1 Placement direction When installing the motherboard, ensure that you unplug the power cord before...
... to secure the motherboard to the chassis. Do not overtighten the screws! The edge with external ports goes to the rear part of the chassis P8H61-M LX2 R2.0 1-2 ASUS P8H61-M LX2 R2.0 Doing so can cause you physical injury and damage motherboard components. 1.2.1 Placement direction When installing the motherboard, ensure that you unplug the power cord before...
P8H61-M LX R2 User's Manual
Page 14
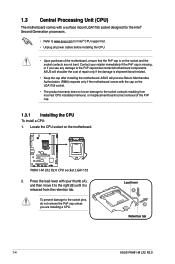
... product warranty does not cover damage to the socket contacts resulting from the retention tab. Load lever A B Retention tab 1-4 ASUS P8H61-M LX2 R2.0 ASUS will shoulder the cost of the motherboard, ensure that the PnP cap is on the motherboard. To prevent damage to the PnP... PnP cap unless you are not bent. P8H61-M LX2 R2.0 P8H61-M LX2 R2.0 CPU socket LGA1155 2. 1.3 Central Processing Unit (CPU) The motherboard comes with a surface mount LGA1155 socket designed for the Intel® Second Generation processors. • Refer to www.asus.com for Intel® CPU support list....
... product warranty does not cover damage to the socket contacts resulting from the retention tab. Load lever A B Retention tab 1-4 ASUS P8H61-M LX2 R2.0 ASUS will shoulder the cost of the motherboard, ensure that the PnP cap is on the motherboard. To prevent damage to the PnP... PnP cap unless you are not bent. P8H61-M LX2 R2.0 P8H61-M LX2 R2.0 CPU socket LGA1155 2. 1.3 Central Processing Unit (CPU) The motherboard comes with a surface mount LGA1155 socket designed for the Intel® Second Generation processors. • Refer to www.asus.com for Intel® CPU support list....
P8H61-M LX R2 User's Manual
Page 16
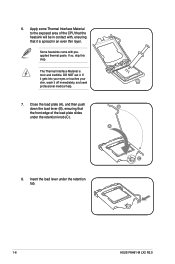
... (C). 6. Apply some Thermal Interface Material to the exposed area of the CPU that the front edge of the load plate slides under the retention tab. 1-6 ASUS P8H61-M LX2 R2.0
... (C). 6. Apply some Thermal Interface Material to the exposed area of the CPU that the front edge of the load plate slides under the retention tab. 1-6 ASUS P8H61-M LX2 R2.0

P8H61-M LX R2 User's Manual
Page 18
... fastener counterclockwise. 3. 3. CPU_FAN CPU FAN PWM CPU FAN IN CPU FAN PWR GND P8H61-M LX2 R2.0 P8H61-M LX2 R2.0 CPU fan connector Do not forget to plug this connector. 1.3.3 Uninstalling the CPU heatsink and fan To uninstall the CPU heatsink and fan: 1. A B A B B A B A 1-8 ASUS P8H61-M LX2 R2.0 Hardware monitoring errors can occur if you fail to connect the CPU fan connector...
... fastener counterclockwise. 3. 3. CPU_FAN CPU FAN PWM CPU FAN IN CPU FAN PWR GND P8H61-M LX2 R2.0 P8H61-M LX2 R2.0 CPU fan connector Do not forget to plug this connector. 1.3.3 Uninstalling the CPU heatsink and fan To uninstall the CPU heatsink and fan: 1. A B A B B A B A 1-8 ASUS P8H61-M LX2 R2.0 Hardware monitoring errors can occur if you fail to connect the CPU fan connector...
P8H61-M LX R2 User's Manual
Page 20
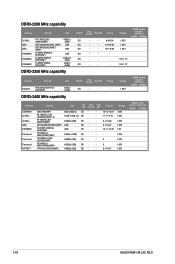
...7 1.5V KINGSTON KVR1066D3N7/4G 4GB DS Hynix H5TQ2G83AFR 7 1.5V Kingtiger 2GB DIMM PC3-8500 2GB DS Hynix H5TQ1G83AFP G7C - - 1-10 ASUS P8H61-M LX2 R2.0 Size SS/ DS Chip Brand Chip NO. Crucial CT25672BA1067.18FF 2GB DS Micron 9GF22D9KPT(ECC) 7 - Check with memory frequency higher than...For effective use a more memory on 32-bit Windows® OS, when you are using a 32-bit Windows® OS. - P8H61-M LX2 R2.0 Motherboard Qualified Vendors Lists (QVL) DDR3-1066 MHz capability Vendors Part No. Crucial CT12872BA1067.9FF 1GB SS Micron 9HF22D9KPT(ECC) 7 - ...
...7 1.5V KINGSTON KVR1066D3N7/4G 4GB DS Hynix H5TQ2G83AFR 7 1.5V Kingtiger 2GB DIMM PC3-8500 2GB DS Hynix H5TQ1G83AFP G7C - - 1-10 ASUS P8H61-M LX2 R2.0 Size SS/ DS Chip Brand Chip NO. Crucial CT25672BA1067.18FF 2GB DS Micron 9GF22D9KPT(ECC) 7 - Check with memory frequency higher than...For effective use a more memory on 32-bit Windows® OS, when you are using a 32-bit Windows® OS. - P8H61-M LX2 R2.0 Motherboard Qualified Vendors Lists (QVL) DDR3-1066 MHz capability Vendors Part No. Crucial CT12872BA1067.9FF 1GB SS Micron 9HF22D9KPT(ECC) 7 - ...
P8H61-M LX R2 User's Manual
Page 26
... - 9-11-9-27 - 10-11-10-30 - - - 9 - 9 - 9-11-9-27 Voltage 1.65V 1.65V 1.65V 1.65V 1.8V 1.65V 1.65V 1.65V 1.65V DIMM socket support (optional) 1DIMM 2DIMMs 1-16 ASUS P8H61-M LX2 R2.0 Kingston KHX2250C9D3T1K2/ 4GX(XMP) Size 4GB (2 x2GB) SS/DS Chip Brand Chip NO. TX2400KLU-4GK (381850)(XMP) 4GB(2x 2GB) SS - DDR3-2200 MHz capability...
... - 9-11-9-27 - 10-11-10-30 - - - 9 - 9 - 9-11-9-27 Voltage 1.65V 1.65V 1.65V 1.65V 1.8V 1.65V 1.65V 1.65V 1.65V DIMM socket support (optional) 1DIMM 2DIMMs 1-16 ASUS P8H61-M LX2 R2.0 Kingston KHX2250C9D3T1K2/ 4GX(XMP) Size 4GB (2 x2GB) SS/DS Chip Brand Chip NO. TX2400KLU-4GK (381850)(XMP) 4GB(2x 2GB) SS - DDR3-2200 MHz capability...
P8H61-M LX R2 User's Manual
Page 28
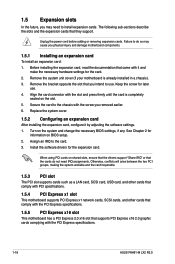
Secure the card to the chassis with the PCI Express specifications. 1-18 ASUS P8H61-M LX2 R2.0 See Chapter 2 for later use . When using PCI cards on BIOS setup. 2. Otherwise, conflicts will arise between the two PCI groups, making the system unstable ...
Secure the card to the chassis with the PCI Express specifications. 1-18 ASUS P8H61-M LX2 R2.0 See Chapter 2 for later use . When using PCI cards on BIOS setup. 2. Otherwise, conflicts will arise between the two PCI groups, making the system unstable ...
P8H61-M LX R2 User's Manual
Page 30
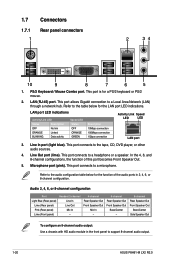
... Area Network (LAN) through a network hub. 1.7 1.7.1 1 Connectors Rear panel connectors 2 34 10 9 8 7 6 5 1. Line Out port (lime). This port connects to support 8-channel audio output. 1-20 ASUS P8H61-M LX2 R2.0
... Area Network (LAN) through a network hub. 1.7 1.7.1 1 Connectors Rear panel connectors 2 34 10 9 8 7 6 5 1. Line Out port (lime). This port connects to support 8-channel audio output. 1-20 ASUS P8H61-M LX2 R2.0
P8H61-M LX R2 User's Manual
Page 32
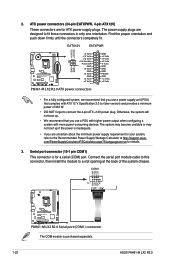
...us for a serial (COM) port. EATX12V EATXPWR +12V DC +12V DC P8H61-M LX2 R2.0 GND GND +3 Volts +12 Volts +12 Volts +5V Standby Power OK PIN 1 GND +5 Volts GND +5 Volts GND +3 Volts +3 Volts PIN 1 P8H61-M LX2 R2.0 ATX power connectors GND +5 Volts +5 Volts +5 Volts -5 Volts GND ... module cable to this connector, then install the module to a slot opening at http://support.asus. 2. Serial port connector (10-1 pin COM1) This connector is purchased separately. 1-22 ASUS P8H61-M LX2 R2.0 Otherwise, the system will not boot up if the power is inadequate. • If ...
...us for a serial (COM) port. EATX12V EATXPWR +12V DC +12V DC P8H61-M LX2 R2.0 GND GND +3 Volts +12 Volts +12 Volts +5V Standby Power OK PIN 1 GND +5 Volts GND +5 Volts GND +3 Volts +3 Volts PIN 1 P8H61-M LX2 R2.0 ATX power connectors GND +5 Volts +5 Volts +5 Volts -5 Volts GND ... module cable to this connector, then install the module to a slot opening at http://support.asus. 2. Serial port connector (10-1 pin COM1) This connector is purchased separately. 1-22 ASUS P8H61-M LX2 R2.0 Otherwise, the system will not boot up if the power is inadequate. • If ...

P8H61-M LX R2 User's Manual
Page 34
... RSATA_TXN3 RSATA_TXP3 GND GND RSATA_RXP4 RSATA_RXN4 GND RSATA_TXN4 RSATA_TXP4 GND P8H61-M LX2 R2.0 SATA3G_1 GND RSATA_TXP1 RSATA_TXN1 GND RSATA_RXN1 RSATA_RXP1 GND SATA3G_2 GND RSATA_TXP2 RSATA_TXN2 GND RSATA_RXN2 RSATA_RXP2 GND SATA3G_3 SATA3G_4 P8H61-M LX2 R2.0 SATA connectors • You must install Windows® ...connect to H61 Chipset limitation, AHCI Mode only works on Windows® XP. • [IDE] is purchased separately. 1-24 ASUS P8H61-M LX2 R2.0 Under Windows® XP, there is for details. 7. Connect the S/PDIF Out module cable to this connector, then install ...
... RSATA_TXN3 RSATA_TXP3 GND GND RSATA_RXP4 RSATA_RXN4 GND RSATA_TXN4 RSATA_TXP4 GND P8H61-M LX2 R2.0 SATA3G_1 GND RSATA_TXP1 RSATA_TXN1 GND RSATA_RXN1 RSATA_RXP1 GND SATA3G_2 GND RSATA_TXP2 RSATA_TXN2 GND RSATA_RXN2 RSATA_RXP2 GND SATA3G_3 SATA3G_4 P8H61-M LX2 R2.0 SATA connectors • You must install Windows® ...connect to H61 Chipset limitation, AHCI Mode only works on Windows® XP. • [IDE] is purchased separately. 1-24 ASUS P8H61-M LX2 R2.0 Under Windows® XP, there is for details. 7. Connect the S/PDIF Out module cable to this connector, then install ...
P8H61-M LX R2 User's Manual
Page 36
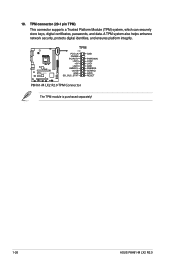
A TPM system also helps enhance network security, protects digital identities, and ensures platform integrity. P8H61-M LX2 R2.0 TPM PIN 1 PCICLK FRAME PCIRST# LAD3 +3V LAD0 SMBSCL +3VSB GND SB_SUS_STAT GND PWROWN LAD2 LAD1 GND SMBSDA SERIRQ GPIO RESET P8H61-M LX2 R2.0 TPM Connector The TPM module is purchased separately! 1-26 ASUS P8H61-M LX2 R2.0 10. TPM connector (20-1 pin TPM) This connector supports a Trusted Platform Module (TPM) system, which can securely store keys, digital certificates, passwords, and data.
A TPM system also helps enhance network security, protects digital identities, and ensures platform integrity. P8H61-M LX2 R2.0 TPM PIN 1 PCICLK FRAME PCIRST# LAD3 +3V LAD0 SMBSCL +3VSB GND SB_SUS_STAT GND PWROWN LAD2 LAD1 GND SMBSDA SERIRQ GPIO RESET P8H61-M LX2 R2.0 TPM Connector The TPM module is purchased separately! 1-26 ASUS P8H61-M LX2 R2.0 10. TPM connector (20-1 pin TPM) This connector supports a Trusted Platform Module (TPM) system, which can securely store keys, digital certificates, passwords, and data.
P8H61-M LX R2 User's Manual
Page 40
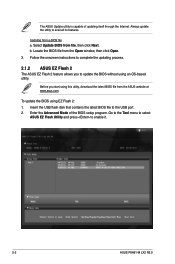
...the BIOS file from file, then click Next. Insert the USB flash disk that contains the latest BIOS file to enable it. 2-2 ASUS P8H61-M LX2 R2.0 Go to the Tool menu to select ASUS EZ Flash Utility and press to the USB port. 2. Select Update BIOS from the Open window, then click Open. 3. Before ... BIOS using this utility, download the latest BIOS file from a BIOS file a. Enter the Advanced Mode of updating itself through the Internet. The ASUS Update utility is capable of the BIOS setup program. Follow the onscreen instructions to avail all its features. Updating from the...
...the BIOS file from file, then click Next. Insert the USB flash disk that contains the latest BIOS file to enable it. 2-2 ASUS P8H61-M LX2 R2.0 Go to the Tool menu to select ASUS EZ Flash Utility and press to the USB port. 2. Select Update BIOS from the Open window, then click Open. 3. Before ... BIOS using this utility, download the latest BIOS file from a BIOS file a. Enter the Advanced Mode of updating itself through the Internet. The ASUS Update utility is capable of the BIOS setup program. Follow the onscreen instructions to avail all its features. Updating from the...
P8H61-M LX R2 User's Manual
Page 42
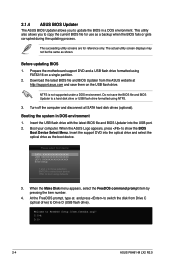
...Boot Device Select Menu. Boot your computer. At the FreeDOS prompt, type d: and press to switch the disk from the ASUS website at http://support.asus.com and save the BIOS file and BIOS Updater to a hard disk drive or USB flash drive formatted using defaults 3. NTFS...the latest BIOS file and BIOS Updater into the optical drive and select the optical drive as the boot device. C:\>d: D:\> 2-4 ASUS P8H61-M LX2 R2.0 2.1.4 ASUS BIOS Updater The ASUS BIOS Updater allows you to copy the current BIOS file for reference only. The succeeding utility screens are for use as shown....
...Boot Device Select Menu. Boot your computer. At the FreeDOS prompt, type d: and press to switch the disk from the ASUS website at http://support.asus.com and save the BIOS file and BIOS Updater to a hard disk drive or USB flash drive formatted using defaults 3. NTFS...the latest BIOS file and BIOS Updater into the optical drive and select the optical drive as the boot device. C:\>d: D:\> 2-4 ASUS P8H61-M LX2 R2.0 2.1.4 ASUS BIOS Updater The ASUS BIOS Updater allows you to copy the current BIOS file for reference only. The succeeding utility screens are for use as shown....
P8H61-M LX R2 User's Manual
Page 44
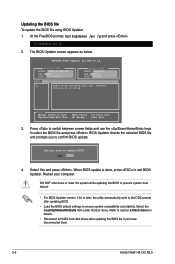
... between screen fields and use the keys to section 2.9 Exit menu for DOS V1.18 Current ROM BOARD: P8H61-M LX2 R2 VER: 0402 DATE: 01/13/2012 Update ROM BOARD: Unknown VER: Unknown DATE: Unknown PATH: A:\ A: P8H61-M-LX2-R2-ASUS-0402.CAP 4068078 2012-01-11 17:30:48 Note [Enter] Select or Load [Up/Down/Home...; For BIOS Updater version 1.04 or later, the utility automatically exits to the DOS prompt after updating the BIOS file if you have disconnected them. 2-6 ASUS P8H61-M LX2 R2.0
... between screen fields and use the keys to section 2.9 Exit menu for DOS V1.18 Current ROM BOARD: P8H61-M LX2 R2 VER: 0402 DATE: 01/13/2012 Update ROM BOARD: Unknown VER: Unknown DATE: Unknown PATH: A:\ A: P8H61-M-LX2-R2-ASUS-0402.CAP 4068078 2012-01-11 17:30:48 Note [Enter] Select or Load [Up/Down/Home...; For BIOS Updater version 1.04 or later, the utility automatically exits to the DOS prompt after updating the BIOS file if you have disconnected them. 2-6 ASUS P8H61-M LX2 R2.0
P8H61-M LX R2 User's Manual
Page 46
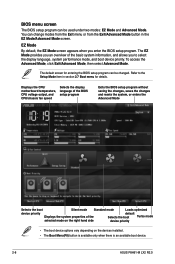
... boot device options vary depending on the devices installed. • The Boot Menu(F8) button is available only when there is an available boot device. 2-8 ASUS P8H61-M LX2 R2.0 BIOS menu screen The BIOS setup program can be changed. Displays the CPU/ motherboard temperature, CPU voltage output, and CPU/chassis fan speed Selects the...
... boot device options vary depending on the devices installed. • The Boot Menu(F8) button is available only when there is an available boot device. 2-8 ASUS P8H61-M LX2 R2.0 BIOS menu screen The BIOS setup program can be changed. Displays the CPU/ motherboard temperature, CPU voltage output, and CPU/chassis fan speed Selects the...
P8H61-M LX R2 User's Manual
Page 48
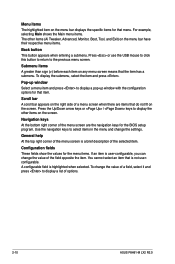
... on the menu bar displays the specific items for that item. Pop-up window Select a menu item and press to display a list of options. 2-10 ASUS P8H61-M LX2 R2.0 General help At the top right corner of the menu screen is user-configurable, you can change the value of the selected item. Configuration fields...
... on the menu bar displays the specific items for that item. Pop-up window Select a menu item and press to display a list of options. 2-10 ASUS P8H61-M LX2 R2.0 General help At the top right corner of the menu screen is user-configurable, you can change the value of the selected item. Configuration fields...

P8H61-M LX R2 User's Manual
Page 50
Otherwise, you clear the password, the Administrator Password item on top of the screen shows Not Installed. 2-12 ASUS P8H61-M LX2 R2.0 From the Create New Password box, key in a new password, then press . 4. To change an administrator password: 1. Administrator Password If you have forgotten your BIOS ...
Otherwise, you clear the password, the Administrator Password item on top of the screen shows Not Installed. 2-12 ASUS P8H61-M LX2 R2.0 From the Create New Password box, key in a new password, then press . 4. To change an administrator password: 1. Administrator Password If you have forgotten your BIOS ...
P8H61-M LX R2 User's Manual
Page 52
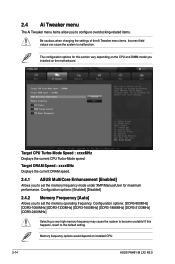
... for maximum performance. Configuration options: [Enabled] [Disabled] 2.4.2 Memory Frequency [Auto] Allows you to the default setting. Target DRAM Speed : xxxxMHz Displays the current DRAM speed. 2.4.1 ASUS MultiCore Enhancement [Enabled] Allows you to set the memory frequency mode under XMP/Manual/User for this happens, revert to set the memory operating frequency.... Incorrect field values can cause the system to become unstable! 2.4 Ai Tweaker menu The Ai Tweaker menu items allow you installed on installed CPU. 2-14 ASUS P8H61-M LX2 R2.0
... for maximum performance. Configuration options: [Enabled] [Disabled] 2.4.2 Memory Frequency [Auto] Allows you to the default setting. Target DRAM Speed : xxxxMHz Displays the current DRAM speed. 2.4.1 ASUS MultiCore Enhancement [Enabled] Allows you to set the memory frequency mode under XMP/Manual/User for this happens, revert to set the memory operating frequency.... Incorrect field values can cause the system to become unstable! 2.4 Ai Tweaker menu The Ai Tweaker menu items allow you installed on installed CPU. 2-14 ASUS P8H61-M LX2 R2.0

P8H61-M LX R2 User's Manual
Page 54
Secondary Plane Current Limit [Auto] Use / to adjust the value. 2.5 Advanced menu The Advanced menu items allow you to malfunction. 2-16 ASUS P8H61-M LX2 R2.0 Be cautious when changing the settings of the Advanced menu items. Incorrect field values can cause the system to change the settings for the CPU and other system devices.
Secondary Plane Current Limit [Auto] Use / to adjust the value. 2.5 Advanced menu The Advanced menu items allow you to malfunction. 2-16 ASUS P8H61-M LX2 R2.0 Be cautious when changing the settings of the Advanced menu items. Incorrect field values can cause the system to change the settings for the CPU and other system devices.


