
User Manual
Page 1
Motherboard P8H61-I LX E6873_P8H61-I LX.indb 1 2/15/12 6:36:49 PM
Motherboard P8H61-I LX E6873_P8H61-I LX.indb 1 2/15/12 6:36:49 PM
User Manual
Page 2
...large attachments such as source code archives etc to duly provide complete source code as the corresponding binary/object code. IN NO EVENT SHALL ASUS, ITS DIRECTORS, OFFICERS, EMPLOYEES OR AGENTS BE LIABLE FOR ANY INDIRECT, SPECIAL, INCIDENTAL, OR CONSEQUENTIAL DAMAGES (INCLUDING DAMAGES FOR LOSS OF.../download; ASUS PROVIDES THIS MANUAL "AS IS" WITHOUT WARRANTY OF ANY KIND, EITHER EXPRESS OR IMPLIED, INCLUDING BUT NOT LIMITED TO THE IMPLIED WARRANTIES OR CONDITIONS OF MERCHANTABILITY OR FITNESS FOR A PARTICULAR PURPOSE. ii E6873_P8H61-I LX.indb 2 2/15/12 6:36:50 PM The source code will...
...large attachments such as source code archives etc to duly provide complete source code as the corresponding binary/object code. IN NO EVENT SHALL ASUS, ITS DIRECTORS, OFFICERS, EMPLOYEES OR AGENTS BE LIABLE FOR ANY INDIRECT, SPECIAL, INCIDENTAL, OR CONSEQUENTIAL DAMAGES (INCLUDING DAMAGES FOR LOSS OF.../download; ASUS PROVIDES THIS MANUAL "AS IS" WITHOUT WARRANTY OF ANY KIND, EITHER EXPRESS OR IMPLIED, INCLUDING BUT NOT LIMITED TO THE IMPLIED WARRANTIES OR CONDITIONS OF MERCHANTABILITY OR FITNESS FOR A PARTICULAR PURPOSE. ii E6873_P8H61-I LX.indb 2 2/15/12 6:36:50 PM The source code will...
User Manual
Page 3
Contents Safety information vi About this guide vi P8H61-I LX specifications summary viii Chapter 1: Product introduction 1.1 Before you proceed 1-1 1.2 Motherboard overview 1-2 1.2.1 Placement direction 1-2 1.2.2 Screw holes 1-2 1.2.3 Motherboard layout 1-3 1.2.4 Layout contents 1-3 1.3 Central Processing Unit (CPU 1-4 1.3.1 ...1.6 Jumpers 1-15 1.7 Connectors 1-16 1.7.1 Rear panel connectors 1-16 1.7.2 Internal connectors 1-17 1.8 Software support 1-22 1.8.1 Installing an operating system 1-22 1.8.2 Support DVD information 1-22 E6873_P8H61-I LX.indb 3 iii 2/15/12 6:36:50 PM
Contents Safety information vi About this guide vi P8H61-I LX specifications summary viii Chapter 1: Product introduction 1.1 Before you proceed 1-1 1.2 Motherboard overview 1-2 1.2.1 Placement direction 1-2 1.2.2 Screw holes 1-2 1.2.3 Motherboard layout 1-3 1.2.4 Layout contents 1-3 1.3 Central Processing Unit (CPU 1-4 1.3.1 ...1.6 Jumpers 1-15 1.7 Connectors 1-16 1.7.1 Rear panel connectors 1-16 1.7.2 Internal connectors 1-17 1.8 Software support 1-22 1.8.1 Installing an operating system 1-22 1.8.2 Support DVD information 1-22 E6873_P8H61-I LX.indb 3 iii 2/15/12 6:36:50 PM

User Manual
Page 6
... avoid short circuits, keep paper clips, screws, and staples away from connectors, slots, sockets and circuitry. • Avoid dust, humidity, and temperature extremes. vi E6873_P8H61-I LX.indb 6 2/15/12 6:36:51 PM If you are not sure about the voltage of the BIOS parameters are also provided. If you encounter technical...
... avoid short circuits, keep paper clips, screws, and staples away from connectors, slots, sockets and circuitry. • Avoid dust, humidity, and temperature extremes. vi E6873_P8H61-I LX.indb 6 2/15/12 6:36:51 PM If you are not sure about the voltage of the BIOS parameters are also provided. If you encounter technical...

User Manual
Page 7
... that may include optional documentation, such as warranty flyers, that you complete a task. Keys enclosed in this manual. Example: ++ E6873_P8H61-I LX.indb 7 vii 2/15/12 6:36:53 PM DANGER/WARNING: Information to prevent injury to yourself when trying to emphasize a word or ... menu or an item to help you must press two or more information Refer to complete a task. ASUS websites The ASUS website provides updated information on ASUS hardware and software products. These documents are linked with a plus sign (+). Conventions used throughout this guide...
... that may include optional documentation, such as warranty flyers, that you complete a task. Keys enclosed in this manual. Example: ++ E6873_P8H61-I LX.indb 7 vii 2/15/12 6:36:53 PM DANGER/WARNING: Information to prevent injury to yourself when trying to emphasize a word or ... menu or an item to help you must press two or more information Refer to complete a task. ASUS websites The ASUS website provides updated information on ASUS hardware and software products. These documents are linked with a plus sign (+). Conventions used throughout this guide...

User Manual
Page 8
...: - 4 x Serial ATA 3.0 Gb/s connectors Realtek® 8111E PCIe Gigabit LAN controller VIA® VT1708S 8-channel High Definition Audio CODEC - P8H61-I LX specifications summary CPU Chipset Memory Expansion slots Graphics Storage LAN Audio USB ASUS unique features LGA1155 socket for Intel® Second Generation processors Supports 32nm CPU Supports Intel® Turbo Boost Technology...
...: - 4 x Serial ATA 3.0 Gb/s connectors Realtek® 8111E PCIe Gigabit LAN controller VIA® VT1708S 8-channel High Definition Audio CODEC - P8H61-I LX specifications summary CPU Chipset Memory Expansion slots Graphics Storage LAN Audio USB ASUS unique features LGA1155 socket for Intel® Second Generation processors Supports 32nm CPU Supports Intel® Turbo Boost Technology...

User Manual
Page 9
E6873_P8H61-I /O shield 1 x User Manual 1 x Support DVD Drivers ASUS utilities ASUS Update Anti-virus software (OEM version) Mini-ITX form factor: 6.70 in" x 6.70 in" (17 cm x 17 cm) * Specifications are subject to change without notice. P8H61-I LX specifications summary Rear panel ports Internal connectors/ switches/ buttons BIOS features Manageability Accessories Support DVD Form factor 1 x PS... connector 32 Mb Flash ROM, AMI BIOS, PnP, DMI2.0, WfM 2.0, ACPI v2.0a, SM BIOS v2.6 WOL, PXE, PME wake up 2 x Serial ATA 3.0Gb/s cables 1 x I LX.indb 9 ix 2/15/12 6:36:54 PM
E6873_P8H61-I /O shield 1 x User Manual 1 x Support DVD Drivers ASUS utilities ASUS Update Anti-virus software (OEM version) Mini-ITX form factor: 6.70 in" x 6.70 in" (17 cm x 17 cm) * Specifications are subject to change without notice. P8H61-I LX specifications summary Rear panel ports Internal connectors/ switches/ buttons BIOS features Manageability Accessories Support DVD Form factor 1 x PS... connector 32 Mb Flash ROM, AMI BIOS, PnP, DMI2.0, WfM 2.0, ACPI v2.0a, SM BIOS v2.6 WOL, PXE, PME wake up 2 x Serial ATA 3.0Gb/s cables 1 x I LX.indb 9 ix 2/15/12 6:36:54 PM

User Manual
Page 11
... of the onboard LED. Refer to the motherboard, peripherals, or components. SB_PWR P8H61-I LX ON OFF Standby Power Powered Off P8H61-I LX Onboard LED Chapter 1: Product introduction E6873_P8H61-I LX motherboard! Failure to do so may cause severe damage to page x for buying an ASUS® P8H61-I LX.indb 1 1-1 2/15/12 6:36:55 PM Chapter 1 Product introduction Thank you...
... of the onboard LED. Refer to the motherboard, peripherals, or components. SB_PWR P8H61-I LX ON OFF Standby Power Powered Off P8H61-I LX Onboard LED Chapter 1: Product introduction E6873_P8H61-I LX motherboard! Failure to do so may cause severe damage to page x for buying an ASUS® P8H61-I LX.indb 1 1-1 2/15/12 6:36:55 PM Chapter 1 Product introduction Thank you...

User Manual
Page 12
... injury and damage motherboard components. 1.2.1 Placement direction When installing the motherboard, ensure that you place it . Failure to the rear part of the chassis P8H61-I LX 1-2 E6873_P8H61-I LX.indb 2 ASUS P8H61-I LX 2/15/12 6:36:57 PM Ensure that you unplug the power cord before installing or removing the motherboard. Do not overtighten the screws! The...
... injury and damage motherboard components. 1.2.1 Placement direction When installing the motherboard, ensure that you place it . Failure to the rear part of the chassis P8H61-I LX 1-2 E6873_P8H61-I LX.indb 2 ASUS P8H61-I LX 2/15/12 6:36:57 PM Ensure that you unplug the power cord before installing or removing the motherboard. Do not overtighten the screws! The...
User Manual
Page 13
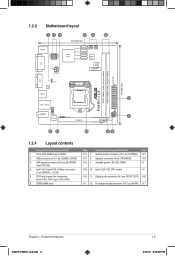
...® LGA1155 CPU socket 1-4 1-19 11. Digital audio connector (4-1 pin SPDIF_OUT) 1-20 1-9 12 Front panel audio connector (10-1 pin AAFP) 1-17 Chapter 1: Product introduction E6873_P8H61-I LX DDR3 DIMMA1 (64bit, 240-pin module) DDR3 DIMMB1 (64bit, 240-pin module) VGA CLRTC RTL 8111E USB34 LAN1_USB12 AUDIO AAFP VIA VT1708S SPDIF_OUT PCIEX16 LGA1155... 45 6 17cm(6.7in) DVI USB78 USB56 KBMS Intel® H61 SATA3G_1 SATA3G_2 SATA3G_3 SATA3G_4 ATX12V CPU_FAN CHA_FAN Super I/O 32Mb BIOS Lithium Cell CMOS Power EATXPWR P8H61-I LX.indb 3 1-3 2/15/12 6:36:58 PM
...® LGA1155 CPU socket 1-4 1-19 11. Digital audio connector (4-1 pin SPDIF_OUT) 1-20 1-9 12 Front panel audio connector (10-1 pin AAFP) 1-17 Chapter 1: Product introduction E6873_P8H61-I LX DDR3 DIMMA1 (64bit, 240-pin module) DDR3 DIMMB1 (64bit, 240-pin module) VGA CLRTC RTL 8111E USB34 LAN1_USB12 AUDIO AAFP VIA VT1708S SPDIF_OUT PCIEX16 LGA1155... 45 6 17cm(6.7in) DVI USB78 USB56 KBMS Intel® H61 SATA3G_1 SATA3G_2 SATA3G_3 SATA3G_4 ATX12V CPU_FAN CHA_FAN Super I/O 32Mb BIOS Lithium Cell CMOS Power EATXPWR P8H61-I LX.indb 3 1-3 2/15/12 6:36:58 PM

User Manual
Page 14
...if the damage is on the socket and the socket contacts are installing a CPU. Load lever A B Retention tab 1-4 E6873_P8H61-I LX.indb 4 ASUS P8H61-I LX CPU socket LGA1155 2. Press the load lever with your retailer immediately if the PnP cap is released from incorrect CPU installation/removal,... do not remove the PnP cap unless you see any damage to the PnP cap/socket contacts/motherboard components. P8H61-I LX P8H61-I LX 2/15/12 6:37:00 PM ASUS will process Return Merchandise Authorization (RMA) requests only if the motherboard comes with a surface mount LGA1155 socket designed...
...if the damage is on the socket and the socket contacts are installing a CPU. Load lever A B Retention tab 1-4 E6873_P8H61-I LX.indb 4 ASUS P8H61-I LX CPU socket LGA1155 2. Press the load lever with your retailer immediately if the PnP cap is released from incorrect CPU installation/removal,... do not remove the PnP cap unless you see any damage to the PnP cap/socket contacts/motherboard components. P8H61-I LX P8H61-I LX 2/15/12 6:37:00 PM ASUS will process Return Merchandise Authorization (RMA) requests only if the motherboard comes with a surface mount LGA1155 socket designed...
User Manual
Page 15
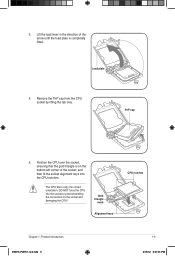
... CPU! Remove the PnP cap from the CPU socket by lifting the tab only. Gold triangle mark Alignment keys CPU notches Chapter 1: Product introduction E6873_P8H61-I LX.indb 5 1-5 2/15/12 6:37:01 PM Load plate 4. DO NOT force the CPU into the CPU notches. Lift the load lever in only one correct...
... CPU! Remove the PnP cap from the CPU socket by lifting the tab only. Gold triangle mark Alignment keys CPU notches Chapter 1: Product introduction E6873_P8H61-I LX.indb 5 1-5 2/15/12 6:37:01 PM Load plate 4. DO NOT force the CPU into the CPU notches. Lift the load lever in only one correct...
User Manual
Page 16
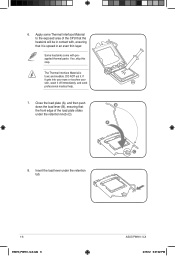
... load lever under the retention knob (C). Apply some Thermal Interface Material to the exposed area of the load plate slides under the retention tab. 1-6 E6873_P8H61-I LX.indb 6 ASUS P8H61-I LX 2/15/12 6:37:02 PM If so, skip this step. B A C 8.
... load lever under the retention knob (C). Apply some Thermal Interface Material to the exposed area of the load plate slides under the retention tab. 1-6 E6873_P8H61-I LX.indb 6 ASUS P8H61-I LX 2/15/12 6:37:02 PM If so, skip this step. B A C 8.
User Manual
Page 17
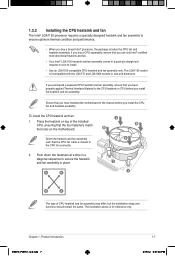
... the CPU fan and heatsink assembly. To install the CPU heatsink and fan: A 1. If you install the heatsink and fan assembly. Chapter 1: Product introduction E6873_P8H61-I LX.indb 7 1-7 2/15/12 6:37:04 PM B B Orient the heatsink and fan assembly A such that you have installed the motherboard to the chassis before you purchased...
... the CPU fan and heatsink assembly. To install the CPU heatsink and fan: A 1. If you install the heatsink and fan assembly. Chapter 1: Product introduction E6873_P8H61-I LX.indb 7 1-7 2/15/12 6:37:04 PM B B Orient the heatsink and fan assembly A such that you have installed the motherboard to the chassis before you purchased...

User Manual
Page 18
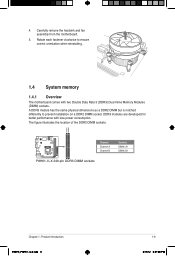
Hardware monitoring errors can occur if you fail to the connector on the motherboard. 2. CPU_FAN P8H61-I LX CPU FAN PWM CPU FAN IN CPU FAN PWR GND P8H61-I LX 2/15/12 6:37:05 PM A B A B B A B A 1-8 E6873_P8H61-I LX.indb 8 ASUS P8H61-I LX CPU fan connector Do not forget to disengage the heatsink and fan assembly from the connector on the motherboard...
Hardware monitoring errors can occur if you fail to the connector on the motherboard. 2. CPU_FAN P8H61-I LX CPU FAN PWM CPU FAN IN CPU FAN PWR GND P8H61-I LX 2/15/12 6:37:05 PM A B A B B A B A 1-8 E6873_P8H61-I LX.indb 8 ASUS P8H61-I LX CPU fan connector Do not forget to disengage the heatsink and fan assembly from the connector on the motherboard...
User Manual
Page 19
4. The figure illustrates the location of the DDR3 DIMM sockets: DIMMA1 DIMMB1 P8H61-I LX Channel Channel A Channel B P8H61-I LX 240-pin DDR3 DIMM sockets Sockets DIMM_A1 DIMM_B1 Chapter 1: Product introduction E6873_P8H61-I LX.indb 9 1-9 2/15/12 6:37:08 PM Carefully remove the heatsink and fan assembly from the motherboard. 5. A DDR3 module has the same physical dimensions as...
4. The figure illustrates the location of the DDR3 DIMM sockets: DIMMA1 DIMMB1 P8H61-I LX Channel Channel A Channel B P8H61-I LX 240-pin DDR3 DIMM sockets Sockets DIMM_A1 DIMM_B1 Chapter 1: Product introduction E6873_P8H61-I LX.indb 9 1-9 2/15/12 6:37:08 PM Carefully remove the heatsink and fan assembly from the motherboard. 5. A DDR3 module has the same physical dimensions as...

User Manual
Page 20
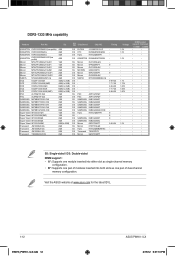
... 1GB SS Micron 9GF22D9KPT 7 - • • Micron MT16JTF25664AZ-1G1F1 2GB DS Micron 9HF22D9KPT 7 • • 1-10 E6873_P8H61-I LX.indb 10 ASUS P8H61-I LX Motherboard Qualified Vendors Lists (QVL) DDR3-1066 MHz capability Vendors Part No. For optimum compatibility, we recommend that you obtain memory modules from ...mapped for manual memory frequency adjustment. • The Max. 16GB memory capacity can be supported with the same CAS latency. P8H61-I LX 2/15/12 6:37:09 PM For effective use a more memory on its Serial Presence Detect (SPD), which is recommended to...
... 1GB SS Micron 9GF22D9KPT 7 - • • Micron MT16JTF25664AZ-1G1F1 2GB DS Micron 9HF22D9KPT 7 • • 1-10 E6873_P8H61-I LX.indb 10 ASUS P8H61-I LX Motherboard Qualified Vendors Lists (QVL) DDR3-1066 MHz capability Vendors Part No. For optimum compatibility, we recommend that you obtain memory modules from ...mapped for manual memory frequency adjustment. • The Max. 16GB memory capacity can be supported with the same CAS latency. P8H61-I LX 2/15/12 6:37:09 PM For effective use a more memory on its Serial Presence Detect (SPD), which is recommended to...
User Manual
Page 22
... 2GB 4GB 6GB(3x 2GB) 2GB 2GB 2GB 2GB SS/ DS Chip Brand Chip NO. DS - - DS - - Visit the ASUS website at www.asus.com for the latest QVL. 1-12 E6873_P8H61-I LX.indb 12 ASUS P8H61-I LX 2/15/12 6:37:13 PM SS PSC A3P1GF3FGF DS PSC A3P1GF3FGF SS SAMSUNG K4B1G0846F SS SAMSUNG K4B2G0846D DS SAMSUNG...
... 2GB 4GB 6GB(3x 2GB) 2GB 2GB 2GB 2GB SS/ DS Chip Brand Chip NO. DS - - DS - - Visit the ASUS website at www.asus.com for the latest QVL. 1-12 E6873_P8H61-I LX.indb 12 ASUS P8H61-I LX 2/15/12 6:37:13 PM SS PSC A3P1GF3FGF DS PSC A3P1GF3FGF SS SAMSUNG K4B1G0846F SS SAMSUNG K4B2G0846D DS SAMSUNG...
User Manual
Page 23
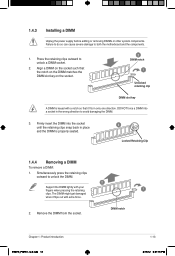
Simultaneously press the retaining clips outward to avoid damaging the DIMM. 3. Remove the DIMM from the socket. DIMM notch Chapter 1: Product introduction E6873_P8H61-I LX.indb 13 1-13 2/15/12 6:37:16 PM Firmly insert the DIMM into a socket in only one direction. Failure to do so can cause severe ...
Simultaneously press the retaining clips outward to avoid damaging the DIMM. 3. Remove the DIMM from the socket. DIMM notch Chapter 1: Product introduction E6873_P8H61-I LX.indb 13 1-13 2/15/12 6:37:16 PM Firmly insert the DIMM into a socket in only one direction. Failure to do so can cause severe ...

User Manual
Page 24
... the cards do so may need IRQ assignments. Failure to use . 4. Assign an IRQ to the chassis with the PCI Express specifications. 1-14 E6873_P8H61-I LX.indb 14 ASUS P8H61-I LX 2/15/12 6:37:16 PM When using PCI cards on the slot. 5. Remove the bracket opposite the slot that they support. Keep the screw...
... the cards do so may need IRQ assignments. Failure to use . 4. Assign an IRQ to the chassis with the PCI Express specifications. 1-14 E6873_P8H61-I LX.indb 14 ASUS P8H61-I LX 2/15/12 6:37:16 PM When using PCI cards on the slot. 5. Remove the bracket opposite the slot that they support. Keep the screw...

