
User Guide
Page 4
Contents 2.3.4 Installing the CPU heatsink in rack 2-15 2.4 System memory 2-16 2.4.1 Overview 2-16 2.4.2 Memory Configurations 2-16 2.4.3 Installing a DIMM 2-17 2.4.4 Removing a DIMM 2-17 2.5 Expansion slots 2-18 2.5.1 Installing an expansion card 2-18 ...shut down function 3-4 3.2.2 Using the dual function power switch 3-4 Chapter 4: BIOS setup 4.1 Managing and updating your BIOS 4-3 4.1.1 ASUS CrashFree BIOS 3 utility 4-3 4.1.2 ASUS EZ Flash Utility 4-4 4.1.3 BUPDATER utility 4-5 4.2 BIOS setup program 4-7 4.2.1 BIOS menu screen 4-8 4.2.2 Menu bar 4-8 4.2.3 Menu items 4-9 iv
Contents 2.3.4 Installing the CPU heatsink in rack 2-15 2.4 System memory 2-16 2.4.1 Overview 2-16 2.4.2 Memory Configurations 2-16 2.4.3 Installing a DIMM 2-17 2.4.4 Removing a DIMM 2-17 2.5 Expansion slots 2-18 2.5.1 Installing an expansion card 2-18 ...shut down function 3-4 3.2.2 Using the dual function power switch 3-4 Chapter 4: BIOS setup 4.1 Managing and updating your BIOS 4-3 4.1.1 ASUS CrashFree BIOS 3 utility 4-3 4.1.2 ASUS EZ Flash Utility 4-4 4.1.3 BUPDATER utility 4-5 4.2 BIOS setup program 4-7 4.2.1 BIOS menu screen 4-8 4.2.2 Menu bar 4-8 4.2.3 Menu items 4-9 iv

User Guide
Page 11
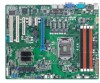
P8B-X specifications summary Processor Support / System Bus Core Logic Form Factor ASUS Features Fan Speed Control Rack Ready (Rack and Pedestal dual use) ASWM 2.0 Memory Total Slots Capacity Memory Type Expansion Total PCI/PCI-X/ Slots PCI-E Slots (follow SSI Location #) Slot Location 1 Slot Location 2 Slot Location 3 Slot Location 4 Slot Location 5 Slot Location 6 Storage SATA ...
P8B-X specifications summary Processor Support / System Bus Core Logic Form Factor ASUS Features Fan Speed Control Rack Ready (Rack and Pedestal dual use) ASWM 2.0 Memory Total Slots Capacity Memory Type Expansion Total PCI/PCI-X/ Slots PCI-E Slots (follow SSI Location #) Slot Location 1 Slot Location 2 Slot Location 3 Slot Location 4 Slot Location 5 Slot Location 6 Storage SATA ...
User Guide
Page 16
...below power, temperature and current limits. The Intel® EM64T feature allows your problems. P8B-X xxS2xxxxxxxx Made in China 合格 1.4 Special features 1.4.1 Product highlights Latest processor ... computing. 1-4 Chapter 1: Product introduction With the correct serial number of the product, ASUS Technical Support team members can then offer a quicker and satisfying solution to your computer to...run faster than the marked frequency if the processor is one of system memory for faster and more efficient use of the processor resources, higher processing throughout...
...below power, temperature and current limits. The Intel® EM64T feature allows your problems. P8B-X xxS2xxxxxxxx Made in China 合格 1.4 Special features 1.4.1 Product highlights Latest processor ... computing. 1-4 Chapter 1: Product introduction With the correct serial number of the product, ASUS Technical Support team members can then offer a quicker and satisfying solution to your computer to...run faster than the marked frequency if the processor is one of system memory for faster and more efficient use of the processor resources, higher processing throughout...
User Guide
Page 17
... 1.0 devices. Serial ATA allows thinner, more flexible cables with dual Gigabit LAN controllers and ports which makes it an ideal memory solution. This voltage reduction limits the power consumption and heat generation of DDR3 which provide a total solution for your networking needs...Serial ATA interface and Intel® C202 chipset. DDR3 memory support The P8B-X supports UDIMM DDR3 memory that features data transfer rates of 1333/1066 MHZ to just 1.5V for DDR3. ASUS P8B-X 1-5 Furthermore, the supply voltage for the memory is backward compatible with a host of new features,...
... 1.0 devices. Serial ATA allows thinner, more flexible cables with dual Gigabit LAN controllers and ports which makes it an ideal memory solution. This voltage reduction limits the power consumption and heat generation of DDR3 which provide a total solution for your networking needs...Serial ATA interface and Intel® C202 chipset. DDR3 memory support The P8B-X supports UDIMM DDR3 memory that features data transfer rates of 1333/1066 MHZ to just 1.5V for DDR3. ASUS P8B-X 1-5 Furthermore, the supply voltage for the memory is backward compatible with a host of new features,...
User Guide
Page 20
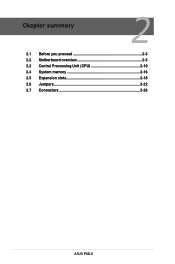
Chapter summary 2 2.1 Before you proceed 2-3 2.2 Motherboard overview 2-5 2.3 Central Processing Unit (CPU 2-10 2.4 System memory 2-16 2.5 Expansion slots 2-18 2.6 Jumpers 2-22 2.7 Connectors 2-26 ASUS P8B-X
Chapter summary 2 2.1 Before you proceed 2-3 2.2 Motherboard overview 2-5 2.3 Central Processing Unit (CPU 2-10 2.4 System memory 2-16 2.5 Expansion slots 2-18 2.6 Jumpers 2-22 2.7 Connectors 2-26 ASUS P8B-X
User Guide
Page 34
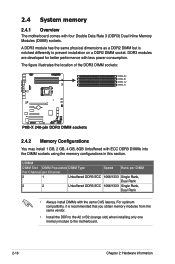
... You may install 1 GB, 2 GB, 4 GB, 8GB Unbuffered with four Double Data Rate 3 (DDR3) Dual Inline Memory Modules (DIMM) sockets. DDR3 modules are developed for better performance with the same CAS latency. UDIMM DIMM Slot DIMM Populated DIMM Type Speed Rank per ... Rank • Always install DIMMs with less power consumption. A DDR3 module has the same physical dimensions as a DDR2 DIMM but is recommended that you obtain memory modules from the same vendor. • Install the DDR to the A2 or B2 (orange slot) when installing only one...
... You may install 1 GB, 2 GB, 4 GB, 8GB Unbuffered with four Double Data Rate 3 (DDR3) Dual Inline Memory Modules (DIMM) sockets. DDR3 modules are developed for better performance with the same CAS latency. UDIMM DIMM Slot DIMM Populated DIMM Type Speed Rank per ... Rank • Always install DIMMs with less power consumption. A DDR3 module has the same physical dimensions as a DDR2 DIMM but is recommended that you obtain memory modules from the same vendor. • Install the DDR to the A2 or B2 (orange slot) when installing only one...
User Guide
Page 40
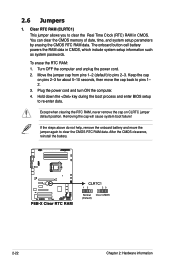
... RAM: 1. Move the jumper cap from pins 1-2 (default) to re-enter data. Keep the cap on CLRTC jumper default position. You can clear the CMOS memory of date, time, and system setup parameters by erasing the CMOS RTC RAM data. Turn OFF the computer and unplug the power cord. 2. Plug the...
... RAM: 1. Move the jumper cap from pins 1-2 (default) to re-enter data. Keep the cap on CLRTC jumper default position. You can clear the CMOS memory of date, time, and system setup parameters by erasing the CMOS RTC RAM data. Turn OFF the computer and unplug the power cord. 2. Plug the...
User Guide
Page 66
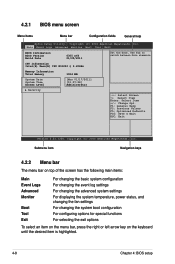
... right or left arrow key on the keyboard until the desired item is highlighted. 4-8 Chapter 4: BIOS setup CPU Information Intel(R) Xeon(R) CPU E31230 @ 3.20GHz Memory Information Total Memory 1024 MB System Date System Time Access Level [Mon 01/17/2011] [15:07:28] Administrator Security →←: Select Screen ↑↓: Select...
... right or left arrow key on the keyboard until the desired item is highlighted. 4-8 Chapter 4: BIOS setup CPU Information Intel(R) Xeon(R) CPU E31230 @ 3.20GHz Memory Information Total Memory 1024 MB System Date System Time Access Level [Mon 01/17/2011] [15:07:28] Administrator Security →←: Select Screen ↑↓: Select...
User Guide
Page 68
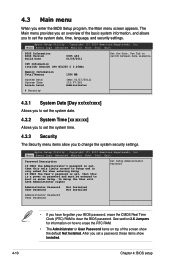
... Logs Advanced Monitor Boot Tool Exit BIOS Information BIOS Version Build Date 0305 x64 01/05/2011 CPU Information Intel(R) Xeon(R) CPU E31230 @ 3.20GHz Memory Information Total Memory 1024 MB System Date System Time Access Level [Mon 01/17/2011] [15:07:28] Administrator Security Set the Date, Use Tab to switch...
... Logs Advanced Monitor Boot Tool Exit BIOS Information BIOS Version Build Date 0305 x64 01/05/2011 CPU Information Intel(R) Xeon(R) CPU E31230 @ 3.20GHz Memory Information Total Memory 1024 MB System Date System Time Access Level [Mon 01/17/2011] [15:07:28] Administrator Security Set the Date, Use Tab to switch...
User Guide
Page 76
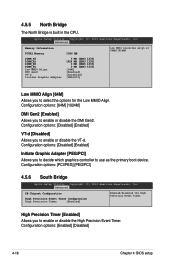
...: [Disabled] [Enabled] Initiate Graphic Adapter [PEG/PCI] Allows you to enable or disable the VT-d. Configuration options: [Enabled] [Disabled] 4-18 Chapter 4: BIOS setup Advanced Memory Information TOTAL Memory DIMM_A0 DIMM_A1 DIMM_B0 DIMM_B1 Low MMIO Align DMI Gen2 VT-d Initate Graphic Adapter 1024 MB 0 MB (DDR3 1333) 1024 MB (DDR3 1333) 0 MB (DDR3...
...: [Disabled] [Enabled] Initiate Graphic Adapter [PEG/PCI] Allows you to enable or disable the VT-d. Configuration options: [Enabled] [Disabled] 4-18 Chapter 4: BIOS setup Advanced Memory Information TOTAL Memory DIMM_A0 DIMM_A1 DIMM_B0 DIMM_B1 Low MMIO Align DMI Gen2 VT-d Initate Graphic Adapter 1024 MB 0 MB (DDR3 1333) 1024 MB (DDR3 1333) 0 MB (DDR3...


