
User Guide
Page 7
... 4-21 4.4.1 Using ASUS TurboV 4-21 4.4.2 Using ASUS TurboV Auto Tuning Mode 4-22 4.5 RAID configurations 4-25 4.5.1 RAID definitions 4-25 4.5.2 Installing Serial ATA hard disks 4-26 4.5.3 Setting the RAID item in BIOS 4-26 4.5.4 Intel® Matrix Storage Manager option ROM utility......... 4-26 4.6 Creating a RAID driver disk 4-30 4.6.1 Creating a RAID driver disk without entering the OS.... 4-30 4.6.2 Creating a RAID driver disk...
... 4-21 4.4.1 Using ASUS TurboV 4-21 4.4.2 Using ASUS TurboV Auto Tuning Mode 4-22 4.5 RAID configurations 4-25 4.5.1 RAID definitions 4-25 4.5.2 Installing Serial ATA hard disks 4-26 4.5.3 Setting the RAID item in BIOS 4-26 4.5.4 Intel® Matrix Storage Manager option ROM utility......... 4-26 4.6 Creating a RAID driver disk 4-30 4.6.1 Creating a RAID driver disk without entering the OS.... 4-30 4.6.2 Creating a RAID driver disk...
User Guide
Page 12
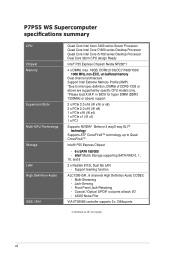
Jack-Sensing - ASUS Noise-Filer VIA VT6308S controller supports 2 x 1394a ports (continued on the next page) xii Multi-Streaming - Coaxial / Optical S/PDIF out ports at back I �n�t�e�l® Matrix Storage supporting SATA RAID 0, 1, 10, and 5 2 x Realtek ...8112L Dual Gb LAN - Support teaming function ALC1200-GR , 8 channels High Definition Audio CODEC - Front Panel Jack-Retasking - P7P55 WS Supercomputer specifications summary CPU Chipset Memory Expansion Slots Multi...
Jack-Sensing - ASUS Noise-Filer VIA VT6308S controller supports 2 x 1394a ports (continued on the next page) xii Multi-Streaming - Coaxial / Optical S/PDIF out ports at back I �n�t�e�l® Matrix Storage supporting SATA RAID 0, 1, 10, and 5 2 x Realtek ...8112L Dual Gb LAN - Support teaming function ALC1200-GR , 8 channels High Definition Audio CODEC - Front Panel Jack-Retasking - P7P55 WS Supercomputer specifications summary CPU Chipset Memory Expansion Slots Multi...
User Guide
Page 50
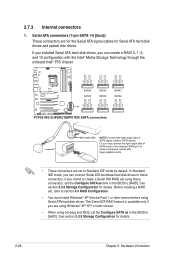
...using Windows® XP SP1 or later version. • When using hot-plug and NCQ, set to Standard IDE mode by default. The Serial ATA RAID feature is available only if you can connect Serial ATA boot/data hard disk drives to these connectors, set , refer to... [RAID]. Before creating a RAID set the Configure SATA as in the BIOS to section 4.4 RAID Configuration. • You must install Windows® XP Service Pack 1 or later version before using these connectors. In ...
...using Windows® XP SP1 or later version. • When using hot-plug and NCQ, set to Standard IDE mode by default. The Serial ATA RAID feature is available only if you can connect Serial ATA boot/data hard disk drives to these connectors, set , refer to... [RAID]. Before creating a RAID set the Configure SATA as in the BIOS to section 4.4 RAID Configuration. • You must install Windows® XP Service Pack 1 or later version before using these connectors. In ...

User Guide
Page 77
... will be effective only if the device is accessed through BIOS. Configuration options: [0] [5] [10] [15] [20] [25] [30] [35] ASUS P7P55 WS Supercomputer 3-13 3.3.5 Storage Configuration The Storage Configuration menu allows you want to create a RAID 0, RAID 1, RAID 5, RAID 10, or the Intel® Matrix Storage Technology configuration from the Serial ATA hard disk drives, set this item...
... will be effective only if the device is accessed through BIOS. Configuration options: [0] [5] [10] [15] [20] [25] [30] [35] ASUS P7P55 WS Supercomputer 3-13 3.3.5 Storage Configuration The Storage Configuration menu allows you want to create a RAID 0, RAID 1, RAID 5, RAID 10, or the Intel® Matrix Storage Technology configuration from the Serial ATA hard disk drives, set this item...

User Guide
Page 108
Chapter summary 4 4.1 Installing an operating system 4-1 4.2 Support DVD information 4-1 4.3 Software information 4-9 4.4 ASUS Unique Overclocking Utility-TurboV EVO 4-21 4.5 RAID configurations 4-25 4.6 Creating a RAID driver disk 4-30 ASUS P7P55 WS Supercomputer
Chapter summary 4 4.1 Installing an operating system 4-1 4.2 Support DVD information 4-1 4.3 Software information 4-9 4.4 ASUS Unique Overclocking Utility-TurboV EVO 4-21 4.5 RAID configurations 4-25 4.6 Creating a RAID driver disk 4-30 ASUS P7P55 WS Supercomputer

User Guide
Page 112
4.2.4 Make disk menu The Make disk menu contains items to create an AHCI/RAID Driver disk. 4.2.5 Manual menu The Manuals menu contains a list of the user manual. Install the Adobe® Acrobat® Reader from the Utilities menu before opening a user manual file. 4-4 Chapter 4: Software support Click an item to open the folder of supplementary user manuals. Intel AHCI/RAID Driver Allows you to create the Intel RAID driver disk. Most user manual files are in Portable Document Format (PDF).
4.2.4 Make disk menu The Make disk menu contains items to create an AHCI/RAID Driver disk. 4.2.5 Manual menu The Manuals menu contains a list of the user manual. Install the Adobe® Acrobat® Reader from the Utilities menu before opening a user manual file. 4-4 Chapter 4: Software support Click an item to open the folder of supplementary user manuals. Intel AHCI/RAID Driver Allows you to create the Intel RAID driver disk. Most user manual files are in Portable Document Format (PDF).

User Guide
Page 133
... the surviving drive as RAID sets. RAID 5 stripes both RAID 0 and RAID 1 configurations. The motherboard supports the following RAID configurations: RAID 0, RAID 1, RAID 10 and RAID 5. • You must be created by the difference RAID function. For example, RAID 0 and RAID 1 set , you get higher performance, capacity, or fault tolerance provided by using Serial ATA hard disk drives. ASUS P7P55 WS Supercomputer 4-25 RAID 10 is best...
... the surviving drive as RAID sets. RAID 5 stripes both RAID 0 and RAID 1 configurations. The motherboard supports the following RAID configurations: RAID 0, RAID 1, RAID 10 and RAID 5. • You must be created by the difference RAID function. For example, RAID 0 and RAID 1 set , you get higher performance, capacity, or fault tolerance provided by using Serial ATA hard disk drives. ASUS P7P55 WS Supercomputer 4-25 RAID 10 is best...

User Guide
Page 134
...identical drives of SATA ports to chipset limitation, when set (s) using SATA HDDs. Create RAID Volume 3. To do this: 1. Due to RAID mode, all SATA ports run at RAID mode together. 4.5.4 Intel® Matrix Storage Manager option ROM utility To enter the Intel... Size Type/Status(Vol ID) 0 ST3160812AS 9LS0HJA4 149.0GB Non-RAID Disk 1 ST3160812AS 9LS0F4HL 149.0GB Non-RAID Disk 2 ST3160812AS 3LS0JYL8 149.0GB Non-RAID Disk 3 ST3160812AS 9LS0BJ5H 149.0GB Non-RAID Disk 4-26 Select [ESC]-Exit [ENTER]-Select Menu Chapter 4: ...
...identical drives of SATA ports to chipset limitation, when set (s) using SATA HDDs. Create RAID Volume 3. To do this: 1. Due to RAID mode, all SATA ports run at RAID mode together. 4.5.4 Intel® Matrix Storage Manager option ROM utility To enter the Intel... Size Type/Status(Vol ID) 0 ST3160812AS 9LS0HJA4 149.0GB Non-RAID Disk 1 ST3160812AS 9LS0F4HL 149.0GB Non-RAID Disk 2 ST3160812AS 3LS0JYL8 149.0GB Non-RAID Disk 3 ST3160812AS 9LS0BJ5H 149.0GB Non-RAID Disk 4-26 Select [ESC]-Exit [ENTER]-Select Menu Chapter 4: ...

User Guide
Page 135
...ROM v8.9.0.1014 PCH-D wRAID5 Copyright(C) 2003-09 Intel Corporation. Enter a name for RAID configuration. When the RAID Level item is selected, press the up/down arrow key to select a RAID mode to move through the menus and select the menu options. The SELECT DISKS ...-RAID Disk Select 2 to 6 disks to include in the RAID set. The utility supports maximum four hard disk drives for the RAID set 1. Create RAID Volume and press . The RAID BIOS setup screens shown in creating the volume. [↑↓]-Prev/Next [SPACE]-SelectDisk [ENTER]-Done ASUS P7P55 WS Supercomputer ...
...ROM v8.9.0.1014 PCH-D wRAID5 Copyright(C) 2003-09 Intel Corporation. Enter a name for RAID configuration. When the RAID Level item is selected, press the up/down arrow key to select a RAID mode to move through the menus and select the menu options. The SELECT DISKS ...-RAID Disk Select 2 to 6 disks to include in the RAID set. The utility supports maximum four hard disk drives for the RAID set 1. Create RAID Volume and press . The RAID BIOS setup screens shown in creating the volume. [↑↓]-Prev/Next [SPACE]-SelectDisk [ENTER]-Done ASUS P7P55 WS Supercomputer ...

User Guide
Page 136
... We recommend a lower stripe size for server systems, and a higher stripe size for multimedia computer systems used mainly for RAID 0, 10 and 5 only), and then press . 5. Press after completing your selection. 6. When the Capacity item is selected, press . WARNING: ALL DATA ON SELECTED DISKS ... the maximum allowed capacity. 8. Use the up /down arrow key to select a drive, and then press to create this volume? (Y/N): 9. Press to create the RAID volume and return to the main menu, or to go back to 128 KB. The following warning message appears. Are you sure you want to...
... We recommend a lower stripe size for server systems, and a higher stripe size for multimedia computer systems used mainly for RAID 0, 10 and 5 only), and then press . 5. Press after completing your selection. 6. When the Capacity item is selected, press . WARNING: ALL DATA ON SELECTED DISKS ... the maximum allowed capacity. 8. Use the up /down arrow key to select a drive, and then press to create this volume? (Y/N): 9. Press to create the RAID volume and return to the main menu, or to go back to 128 KB. The following warning message appears. Are you sure you want to...

User Guide
Page 137
... utility main menu, select 5. Delete RAID Volume and press . The following screen appears. Exit, and then press . The following warning message appears. [ CONFIRM EXIT ] Are you sure you want to delete, and then press . ASUS P7P55 WS Supercomputer 4-29 Press to exit or press ...to return to the DELETE VOLUME menu. You will reset the disks to Recovery volumes) Select [ESC]-Previous Menu [DEL]-Delete Volume 2. Press to delete the RAID set you want to exit? (Y/N): ...
... utility main menu, select 5. Delete RAID Volume and press . The following screen appears. Exit, and then press . The following warning message appears. [ CONFIRM EXIT ] Are you sure you want to delete, and then press . ASUS P7P55 WS Supercomputer 4-29 Press to exit or press ...to return to the DELETE VOLUME menu. You will reset the disks to Recovery volumes) Select [ESC]-Previous Menu [DEL]-Delete Volume 2. Press to delete the RAID set you want to exit? (Y/N): ...

User Guide
Page 138
... The motherboard does not provide a floppy drive connector. For Windows® Vista or later operating systems, use a USB floppy disk drive when creating a SATA RAID driver disk. • Windows® XP may not recognize the USB floppy disk drive due to use either a floppy disk or a USB flash drive with... the RAID driver is required when installing Windows® XP operating system on a hard disk drive that is included in Windows®: 1. To work around this ...
... The motherboard does not provide a floppy drive connector. For Windows® Vista or later operating systems, use a USB floppy disk drive when creating a SATA RAID driver disk. • Windows® XP may not recognize the USB floppy disk drive due to use either a floppy disk or a USB flash drive with... the RAID driver is required when installing Windows® XP operating system on a hard disk drive that is included in Windows®: 1. To work around this ...

User Guide
Page 139
.... Using another computer, plug the USB floppy disk drive, and insert the floppy disk containing the RAID driver. 2. The name of the USB floppy disk drive varies with RAID driver into the USB floppy disk drive. 3. ASUS P7P55 WS Supercomputer 4-31 From the Universal Serial Bus controllers, right-click xxxxxx USB Floppy, and then select Properties...
.... Using another computer, plug the USB floppy disk drive, and insert the floppy disk containing the RAID driver. 2. The name of the USB floppy disk drive varies with RAID driver into the USB floppy disk drive. 3. ASUS P7P55 WS Supercomputer 4-31 From the Universal Serial Bus controllers, right-click xxxxxx USB Floppy, and then select Properties...

User Guide
Page 140
The Vendor ID (VID) and Product ID (PID) are displayed. 5. A window appears, allowing you to open the file. 4-32 Chapter 4: Software support Click Details tab. Use Notepad to select the program for opening the oem file. 7. Browse the contents of the RAID driver disk to locate the file txtsetup.oem. 6. 4. Double-click the file.
The Vendor ID (VID) and Product ID (PID) are displayed. 5. A window appears, allowing you to open the file. 4-32 Chapter 4: Software support Click Details tab. Use Notepad to select the program for opening the oem file. 7. Browse the contents of the RAID driver disk to locate the file txtsetup.oem. 6. 4. Double-click the file.


