
User Manual
Page 48
...network hub. This Marvell® LAN port allows Gigabit connection to a Local Area Network (LAN) through a network hub. This port connects the center/subwoofer speakers. This port connects an external audio output device via a coaxial S/PDIF cable. 3. Refer to the table below for the LAN port... LED indications. 4. LAN 1 (RJ-45) port. Center/Subwoofer port (orange). This port connects the tape, CD, DVD player, or other audio sources. 2-22 Chapter 2: Hardware information This port connects the...
...network hub. This Marvell® LAN port allows Gigabit connection to a Local Area Network (LAN) through a network hub. This port connects the center/subwoofer speakers. This port connects an external audio output device via a coaxial S/PDIF cable. 3. Refer to the table below for the LAN port... LED indications. 4. LAN 1 (RJ-45) port. Center/Subwoofer port (orange). This port connects the tape, CD, DVD player, or other audio sources. 2-22 Chapter 2: Hardware information This port connects the...

User Manual
Page 49
... port becomes Front Speaker Out. 9. Microphone port (pink). Rear Speaker Out - 6-channel Line In Front Speaker Out Mic In Center/Subwoofer Rear Speaker Out - 8-channel Line In Front Speaker Out Mic In Center/Subwoofer Rear Speaker Out Side Speaker Out 11. USB 2.0 ports 3 and 4. Optical S/PDIF Out port. Side Speaker Out port... 4-pin Universal Serial Bus (USB) ports are available for connecting USB 2.0 devices. USB 2.0 ports 5 and 6. 8. Line Out port (lime). This port connects a headphone or a speaker. ASUS P6T7 WS SuperComputer 2-23
... port becomes Front Speaker Out. 9. Microphone port (pink). Rear Speaker Out - 6-channel Line In Front Speaker Out Mic In Center/Subwoofer Rear Speaker Out - 8-channel Line In Front Speaker Out Mic In Center/Subwoofer Rear Speaker Out Side Speaker Out 11. USB 2.0 ports 3 and 4. Optical S/PDIF Out port. Side Speaker Out port... 4-pin Universal Serial Bus (USB) ports are available for connecting USB 2.0 devices. USB 2.0 ports 5 and 6. 8. Line Out port (lime). This port connects a headphone or a speaker. ASUS P6T7 WS SuperComputer 2-23

User Manual
Page 137
ASUS P6T7 WS SuperComputer Click to enable Sonic Focus Click to show license information of all individual speakers Click to choose a multi-speaker configuration Listening Experience The Listening Experience tab allows you to adjust multi-speaker settings. Click speaker to test individual speaker volume Drag slider to adjust individual speaker volume Click to swap center/subwoofer output in 5.1 / 7.1 Surround mode Click to test the volume of Sonic Focus 4-29 Setup The Setup tab allows you to enable or disable the Sonic Focus sound effects and adjust further sound settings.
ASUS P6T7 WS SuperComputer Click to enable Sonic Focus Click to show license information of all individual speakers Click to choose a multi-speaker configuration Listening Experience The Listening Experience tab allows you to adjust multi-speaker settings. Click speaker to test individual speaker volume Drag slider to adjust individual speaker volume Click to swap center/subwoofer output in 5.1 / 7.1 Surround mode Click to test the volume of Sonic Focus 4-29 Setup The Setup tab allows you to enable or disable the Sonic Focus sound effects and adjust further sound settings.

User Manual
Page 150
Click OK to create the virtual LAN adapter, and then click VLAN. Conduct necessary settings for the virtual LAN adapter, and then click Configure. 4-42 Chapter 4: Software support Launch the Realtek VLAN & Teaming Utility. 2. Click Start > Control Panel > Network and Sharing Center, and then click Manage network connections from the left Tasks list. Choose one adapter to close the message window and finish creating the virtual LAN adapter. 3. To create a virtual LAN adapter in Windows® Vista 1. Right-click the virtual LAN adapter icon and select Properties. 4.
Click OK to create the virtual LAN adapter, and then click VLAN. Conduct necessary settings for the virtual LAN adapter, and then click Configure. 4-42 Chapter 4: Software support Launch the Realtek VLAN & Teaming Utility. 2. Click Start > Control Panel > Network and Sharing Center, and then click Manage network connections from the left Tasks list. Choose one adapter to close the message window and finish creating the virtual LAN adapter. 3. To create a virtual LAN adapter in Windows® Vista 1. Right-click the virtual LAN adapter icon and select Properties. 4.
User Manual
Page 175
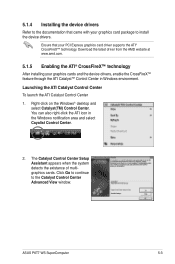
Click Go to continue to the Catalyst Control Center Advanced View window. Right-click on the Windows® desktop and select Catalyst(TM) Control Center. The Catalyst Control Center Setup Assistant appears when the system detects the existance of multigraphics cards. Ensure that ... card package to install the device drivers. Launching the ATI Catalyst Control Center To launch the ATI Catalyst Control Center 1. You can also right-click the ATI icon in Windows environment. ASUS P6T7 WS SuperComputer 5-3 5.1.4 Installing the device drivers Refer to the documentation that your PCI...
Click Go to continue to the Catalyst Control Center Advanced View window. Right-click on the Windows® desktop and select Catalyst(TM) Control Center. The Catalyst Control Center Setup Assistant appears when the system detects the existance of multigraphics cards. Ensure that ... card package to install the device drivers. Launching the ATI Catalyst Control Center To launch the ATI Catalyst Control Center 1. You can also right-click the ATI icon in Windows environment. ASUS P6T7 WS SuperComputer 5-3 5.1.4 Installing the device drivers Refer to the documentation that your PCI...

User Manual
Page 176
Click Apply, and then click OK to act as the display GPU. 3. Enabling Dual CrossFireX settings 1. From the Graphics Adapter list, select the graphics card to exit the window. 2 3 4 5-4 Chapter 5: Multiple GPU technology support Select Enable CrossFireX. 1 4. In the Catalyst Control Center window, click Graphics Settings > CrossFireX > Configure. 2.
Click Apply, and then click OK to act as the display GPU. 3. Enabling Dual CrossFireX settings 1. From the Graphics Adapter list, select the graphics card to exit the window. 2 3 4 5-4 Chapter 5: Multiple GPU technology support Select Enable CrossFireX. 1 4. In the Catalyst Control Center window, click Graphics Settings > CrossFireX > Configure. 2.