
User Guide
Page 4
... the OS shut down function 2-40 2.10.2 Using the dual function power switch 2-40 Chapter 3: BIOS setup 3.1 Managing and updating your BIOS 3-1 3.1.1 ASUS Update utility 3-1 3.1.2 ASUS EZ Flash 2 utility 3-4 3.1.3 Creating a bootable floppy disk 3-5 3.1.4 AFUDOS utility 3-6 3.1.5 ASUS CrashFree BIOS 3 utility 3-8 3.2 BIOS setup program 3-9 3.2.1 BIOS menu screen 3-10 3.2.2 Menu bar 3-10 3.2.3 Navigation keys 3-10 3.2.4 Menu items 3-11 3.2.5 Sub-menu items...
... the OS shut down function 2-40 2.10.2 Using the dual function power switch 2-40 Chapter 3: BIOS setup 3.1 Managing and updating your BIOS 3-1 3.1.1 ASUS Update utility 3-1 3.1.2 ASUS EZ Flash 2 utility 3-4 3.1.3 Creating a bootable floppy disk 3-5 3.1.4 AFUDOS utility 3-6 3.1.5 ASUS CrashFree BIOS 3 utility 3-8 3.2 BIOS setup program 3-9 3.2.1 BIOS menu screen 3-10 3.2.2 Menu bar 3-10 3.2.3 Navigation keys 3-10 3.2.4 Menu items 3-11 3.2.5 Sub-menu items...

User Guide
Page 10
ASUS websites The ASUS website provides updated information on the motherboard. • Chapter 3: BIOS setup This chapter tells how to perform when installing system components. Detailed descriptions of the BIOS parameters are not part of the support DVD that comes with the motherboard package and the... software. • Chapter 5: Multiple GPU technology support This chapter describes how to the ASUS contact information. 2. Refer to ...
ASUS websites The ASUS website provides updated information on the motherboard. • Chapter 3: BIOS setup This chapter tells how to perform when installing system components. Detailed descriptions of the BIOS parameters are not part of the support DVD that comes with the motherboard package and the... software. • Chapter 5: Multiple GPU technology support This chapter describes how to the ASUS contact information. 2. Refer to ...

User Guide
Page 12
... port-multiplier (excluded in package) is required while using RAID 5 or 10 on the next page) xii Visit www.asus. one at back panel) (continued on eSATA ports. 2 x Realtek® 8111C PCIe Gigabit LAN controllers supporting teaming ...asus.com for the Memory QVL (Qualified Vendors Lists) 2 x PCI Express 2.0 x16 slots (at x16 / x16 mode) 1 x PCI Express x1 slot 2 x PCI-X slots 1 x PCI 2.2 slot Supports NVIDIA® SLI™ Technology* Supports ATI® CrossFireX™ Technology * SLI support may need BIOS update. Intel® ICH10R Southbridge: - 6 x SATA 150/300 ports - P6T WS...
... port-multiplier (excluded in package) is required while using RAID 5 or 10 on the next page) xii Visit www.asus. one at back panel) (continued on eSATA ports. 2 x Realtek® 8111C PCIe Gigabit LAN controllers supporting teaming ...asus.com for the Memory QVL (Qualified Vendors Lists) 2 x PCI Express 2.0 x16 slots (at x16 / x16 mode) 1 x PCI Express x1 slot 2 x PCI-X slots 1 x PCI 2.2 slot Supports NVIDIA® SLI™ Technology* Supports ATI® CrossFireX™ Technology * SLI support may need BIOS update. Intel® ICH10R Southbridge: - 6 x SATA 150/300 ports - P6T WS...
User Guide
Page 13
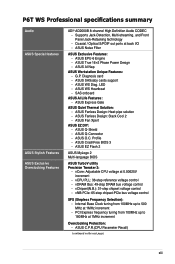
... technology - ASUS O.C. Internal Base Clock tuning from 100MHz up to 180MHz at 1MHz increment - ASUS Noise Filter ASUS Exclusive Features: - vDRAM Bus: 49-step DRAM bus voltage control - P6T WS Professional specifications summary Audio ASUS Special features ASUS Stylish Features ASUS Exclusive Overclocking Features ADI® AD2000B 8-channel High Definition Audio CODEC - ASUS Express Gate ASUS Quiet Thermal Solution: - ASUS CrashFree BIOS 3 -
... technology - ASUS O.C. Internal Base Clock tuning from 100MHz up to 180MHz at 1MHz increment - ASUS Noise Filter ASUS Exclusive Features: - vDRAM Bus: 49-step DRAM bus voltage control - P6T WS Professional specifications summary Audio ASUS Special features ASUS Stylish Features ASUS Exclusive Overclocking Features ADI® AD2000B 8-channel High Definition Audio CODEC - ASUS Express Gate ASUS Quiet Thermal Solution: - ASUS CrashFree BIOS 3 -

User Guide
Page 14
xiv P6T WS Professional specifications summary Back Panel I/O Ports 1 x PS/2 Keyboard / Mouse combo port 1 x S/PDIF Out (Coaxial + Optical) 2 x External SATA ports 1 x IEEE1394a port 2 x RJ45 ports 6 x USB 2.0/1.1 ports 8-...connector 8-pin ATX+ 12V Power connector System Panel (Q-Connector) 1 x TPM connector BIOS Features 16 Mb AMI BIOS, PnP, DMI 2.0, WfM 2.0, SM BIOS 2.4, Multi-language BIOS Manageability WOL by PME, WOR by PME, Chassis Intrusion, PXE Support DVD Contents Drivers ASUS PC Probe II ASUS Update ASUS AI Suite Image-Editing Suite Anti-virus software (OEM version) Form...
xiv P6T WS Professional specifications summary Back Panel I/O Ports 1 x PS/2 Keyboard / Mouse combo port 1 x S/PDIF Out (Coaxial + Optical) 2 x External SATA ports 1 x IEEE1394a port 2 x RJ45 ports 6 x USB 2.0/1.1 ports 8-...connector 8-pin ATX+ 12V Power connector System Panel (Q-Connector) 1 x TPM connector BIOS Features 16 Mb AMI BIOS, PnP, DMI 2.0, WfM 2.0, SM BIOS 2.4, Multi-language BIOS Manageability WOL by PME, WOR by PME, Chassis Intrusion, PXE Support DVD Contents Drivers ASUS PC Probe II ASUS Update ASUS AI Suite Image-Editing Suite Anti-virus software (OEM version) Form...

User Guide
Page 18
... for details. See page 2-5 for details. See chapter 5 for more details. 1-2 Chapter 1: Product Introduction Visit www.asus.com for details. SLI and CrossFireX on Demand The P6T WS Professional breaks the boundaries to bring you 've never experienced before! It also supports up to 25.6GB/s. SLI support ...may need BIOS update. Intel® Core™ i7 processor is one of the most powerful and ...
... for details. See page 2-5 for details. See chapter 5 for more details. 1-2 Chapter 1: Product Introduction Visit www.asus.com for details. SLI and CrossFireX on Demand The P6T WS Professional breaks the boundaries to bring you 've never experienced before! It also supports up to 25.6GB/s. SLI support ...may need BIOS update. Intel® Core™ i7 processor is one of the most powerful and ...

User Guide
Page 22
... It's a unique motherboard built-in touch with enhanced data protection via high-level encryption/decryption and ensures platform integrity. ASUS EZ DIY ASUS EZ DIY feature collection provides you to easily connect or disconnect the chassis front panel cables to install computer components, update the... BIOS or back up your favorite settings. ASUS Q-Connector ASUS Q-Connector allows you easy ways to the motherboard. ASUS Express Gate Taking only 5 seconds to keep in OS. The actual boot time...
... It's a unique motherboard built-in touch with enhanced data protection via high-level encryption/decryption and ensures platform integrity. ASUS EZ DIY ASUS EZ DIY feature collection provides you to easily connect or disconnect the chassis front panel cables to install computer components, update the... BIOS or back up your favorite settings. ASUS Q-Connector ASUS Q-Connector allows you easy ways to the motherboard. ASUS Express Gate Taking only 5 seconds to keep in OS. The actual boot time...

User Guide
Page 23
... your screen. See page 3-12 for a more colorful and vivid image on your system easier and faster. ASUS CrashFree BIOS 3 The ASUS CrashFree BIOS 3 allows users to convert your favorite photo into a 256-color boot logo for details. See page 4-10...BIOS setup menu helps you to launch the utility and update the BIOS without preparing a bootable diskette or using an OS-based flash utility. See page 3-42 for details. Profile The motherboard features the ASUS O.C. Simply press the predefined hotkey to select the language of your BIOS easily without entering the OS. ASUS P6T WS...
... your screen. See page 3-12 for a more colorful and vivid image on your system easier and faster. ASUS CrashFree BIOS 3 The ASUS CrashFree BIOS 3 allows users to convert your favorite photo into a 256-color boot logo for details. See page 4-10...BIOS setup menu helps you to launch the utility and update the BIOS without preparing a bootable diskette or using an OS-based flash utility. See page 3-42 for details. Profile The motherboard features the ASUS O.C. Simply press the predefined hotkey to select the language of your BIOS easily without entering the OS. ASUS P6T WS...

User Guide
Page 43
.... Make sure to the card. Refer to the tables on the system and change the necessary BIOS settings, if any. Refer to the table on the next page for information on BIOS setup. 2. Remove the bracket opposite the slot that they support. Secure the card to the ... necessary hardware settings for the card. 2. Otherwise, conflicts will arise between the two PCI groups, making the system unstable and the card inoperable. ASUS P6T WS Professional 2-17 Align the card connector with it by adjusting the software settings. 1. When using PCI cards on the slot. 5. Keep the screw...
.... Make sure to the card. Refer to the tables on the system and change the necessary BIOS settings, if any. Refer to the table on the next page for information on BIOS setup. 2. Remove the bracket opposite the slot that they support. Secure the card to the ... necessary hardware settings for the card. 2. Otherwise, conflicts will arise between the two PCI groups, making the system unstable and the card inoperable. ASUS P6T WS Professional 2-17 Align the card connector with it by adjusting the software settings. 1. When using PCI cards on the slot. 5. Keep the screw...

User Guide
Page 47
...Move the jumper cap from pins 1-2 (default) to overclocking, use the C.P.R. (CPU Parameter Recall) feature. Hold down and reboot the system so the BIOS can clear the CMOS memory of date, time, and system setup parameters by erasing the CMOS RTC RAM data. You can automatically reset parameter settings...the key during the boot process and enter BIOS setup to clear the Real Time Clock (RTC) RAM in CMOS, which include system setup information such as system passwords. Clear RTC RAM (CLRTC) This jumper allows you to re-enter data. ASUS P6T WS Professional 2-21 To erase the RTC RAM ...
...Move the jumper cap from pins 1-2 (default) to overclocking, use the C.P.R. (CPU Parameter Recall) feature. Hold down and reboot the system so the BIOS can clear the CMOS memory of date, time, and system setup parameters by erasing the CMOS RTC RAM data. You can automatically reset parameter settings...the key during the boot process and enter BIOS setup to clear the Real Time Clock (RTC) RAM in CMOS, which include system setup information such as system passwords. Clear RTC RAM (CLRTC) This jumper allows you to re-enter data. ASUS P6T WS Professional 2-21 To erase the RTC RAM ...

User Guide
Page 48
... these three jumpers. • DO NOT set the OV_CPU jumper to enable or disable the advanced CPU, DRAM Bus, and QPI DRAM overvoltage settings in BIOS. Pins 1-2 (Default) Pins 2-3 (OV Enabled) OV_CPU up to 1.70V up to 2.10V OV_DRAM_BUS up to 1.90V up to 2.46V OV_QPI_DRAM up to 1.70V up to... you install the DIMMs with the voltage requirement below 1.65V. • The system may need a better cooling system (for extra-high overvoltage ability, use the BIOS items first to Intel CPU spec, DIMMs with voltage requirement over 1.65V may cause the system to work stably under the highest...
... these three jumpers. • DO NOT set the OV_CPU jumper to enable or disable the advanced CPU, DRAM Bus, and QPI DRAM overvoltage settings in BIOS. Pins 1-2 (Default) Pins 2-3 (OV Enabled) OV_CPU up to 1.70V up to 2.10V OV_DRAM_BUS up to 1.90V up to 2.46V OV_QPI_DRAM up to 1.70V up to... you install the DIMMs with the voltage requirement below 1.65V. • The system may need a better cooling system (for extra-high overvoltage ability, use the BIOS items first to Intel CPU spec, DIMMs with voltage requirement over 1.65V may cause the system to work stably under the highest...

User Guide
Page 53
... connect Serial ATA boot/data hard disk drives to these connectors, set , refer to section 4.4.3 Intel RAID configurations or the manual bundled in the BIOS to Standard IDE mode by default. See section 3.3.5 Storage Configuration for Serial ATA hard disk drives and optical disc drives. ICH10R Serial ATA connectors (7-...• You must install the Windows® XP Service Pack 1 before using hot-plug and NCQ, set to [AHCI]. See section 3.3.5 Storage Configuration for details. ASUS P6T WS Professional 2-27 If you installed Serial ATA hard disk drives, you intend to [RAID].
... connect Serial ATA boot/data hard disk drives to these connectors, set , refer to section 4.4.3 Intel RAID configurations or the manual bundled in the BIOS to Standard IDE mode by default. See section 3.3.5 Storage Configuration for Serial ATA hard disk drives and optical disc drives. ICH10R Serial ATA connectors (7-...• You must install the Windows® XP Service Pack 1 before using hot-plug and NCQ, set to [AHCI]. See section 3.3.5 Storage Configuration for details. ASUS P6T WS Professional 2-27 If you installed Serial ATA hard disk drives, you intend to [RAID].

User Guide
Page 54
... set, see section 4.4.4 Marvell® SAS RAID configurations for SAS (Serial Attached SCSI) signal cables that you cannot enter the Marvell RAID utility and SAS BIOS setup during POST. 2-28 Chapter 2: Hardware information otherwise, you have connected the SAS signal cables and installed SAS hard disk drives; Before creating a RAID set...
... set, see section 4.4.4 Marvell® SAS RAID configurations for SAS (Serial Attached SCSI) signal cables that you cannot enter the Marvell RAID utility and SAS BIOS setup during POST. 2-28 Chapter 2: Hardware information otherwise, you have connected the SAS signal cables and installed SAS hard disk drives; Before creating a RAID set...

User Guide
Page 58
... this connector when a chassis component is set the item to avail of the front panel audio I /O module that the Front Panel Type item in the BIOS is removed or replaced. 7. The chassis intrusion sensor or switch sends a high-level signal to this connector, set to use the chassis intrusion detection feature...
... this connector when a chassis component is set the item to avail of the front panel audio I /O module that the Front Panel Type item in the BIOS is removed or replaced. 7. The chassis intrusion sensor or switch sends a high-level signal to this connector, set to use the chassis intrusion detection feature...

User Guide
Page 61
...-mounted reset button for the system power LED. The speaker allows you turn on the BIOS settings. Pressing the power button turns the system on or puts the system in sleep or soft-off the system power. ASUS P6T WS Professional 2-35 12. The IDE LED lights up when you to the HDD. •...
...-mounted reset button for the system power LED. The speaker allows you turn on the BIOS settings. Pressing the power button turns the system on or puts the system in sleep or soft-off the system power. ASUS P6T WS Professional 2-35 12. The IDE LED lights up when you to the HDD. •...

User Guide
Page 64
... D1 Enable IO device for bootlock D2 Check and wake up system D3 Prepare system for memory detection and sizing D4 Memory test D5 Copy BIOS from ROM to RAM C0 Early CPU initiation C5 Wake up AP 0A Initiate KBC8042 0B Detect PS2 mouse 0C Detect PS2 keyboard 2A Initiate... USB initiation 52 Display USB devices 75 Detect IDE 78 Initiate option ROM 85 Show post error 87 Enter BIOS setup A4 BIOS boot menu AC OS in PIC mode AA OS in APIC mode 01 S1 03 S3 04 S4 05 S5 10 Resume from S1 30 ...
... D1 Enable IO device for bootlock D2 Check and wake up system D3 Prepare system for memory detection and sizing D4 Memory test D5 Copy BIOS from ROM to RAM C0 Early CPU initiation C5 Wake up AP 0A Initiate KBC8042 0B Detect PS2 mouse 0C Detect PS2 keyboard 2A Initiate... USB initiation 52 Display USB devices 75 Detect IDE 78 Initiate option ROM 85 Show post error 87 Enter BIOS setup A4 BIOS boot menu AC OS in PIC mode AA OS in APIC mode 01 S1 03 S3 04 S4 05 S5 10 Resume from S1 30 ...

User Guide
Page 65
... beeps One continuous beep followed by four short beeps Hardware component failure 7. Monitor b. External SCSI devices (starting with a surge protector. 5. BIOS Beep Description One short beep VGA detected Quick boot set to the power connector at the back of the system chassis. 4. System power 6....LED may have failed a power-on self tests or POST. While the tests are off. 3. At power on the devices in Chapter 3. ASUS P6T WS Professional 2-39 If your retailer for the first time 1. 2.9 Starting up or switch between orange and green after the system LED turns on...
... beeps One continuous beep followed by four short beeps Hardware component failure 7. Monitor b. External SCSI devices (starting with a surge protector. 5. BIOS Beep Description One short beep VGA detected Quick boot set to the power connector at the back of the system chassis. 4. System power 6....LED may have failed a power-on self tests or POST. While the tests are off. 3. At power on the devices in Chapter 3. ASUS P6T WS Professional 2-39 If your retailer for the first time 1. 2.9 Starting up or switch between orange and green after the system LED turns on...

User Guide
Page 66
Click the Turn Off button to soft-off mode, depending on the BIOS setting. Click the Start button then select Turn Off Computer. 2. Pressing the power switch for details. 2-40 Chapter 2: Hardware information The power supply should turn ... While the system is ON, pressing the power switch for less than four seconds lets the system enter the soft-off mode regardless of the BIOS setting.
Click the Turn Off button to soft-off mode, depending on the BIOS setting. Click the Start button then select Turn Off Computer. 2. Pressing the power switch for details. 2-40 Chapter 2: Hardware information The power supply should turn ... While the system is ON, pressing the power switch for less than four seconds lets the system enter the soft-off mode regardless of the BIOS setting.

User Guide
Page 67
Detailed descriptions of the BIOS parameters are also provided. 3 BIOS setup This chapter tells how to change the system settings through the BIOS Setup menus.
Detailed descriptions of the BIOS parameters are also provided. 3 BIOS setup This chapter tells how to change the system settings through the BIOS Setup menus.

User Guide
Page 68
Chapter summary 3 3.1 Managing and updating your BIOS 3-1 3.2 BIOS setup program 3-9 3.3 Main menu 3-12 3.4 Ai Tweaker 3-17 3.5 Advanced menu 3-25 3.6 Power menu 3-32 3.7 Boot menu 3-36 3.8 Tools menu 3-40 3.9 Exit menu 3-44 ASUS P6T WS Professional
Chapter summary 3 3.1 Managing and updating your BIOS 3-1 3.2 BIOS setup program 3-9 3.3 Main menu 3-12 3.4 Ai Tweaker 3-17 3.5 Advanced menu 3-25 3.6 Power menu 3-32 3.7 Boot menu 3-36 3.8 Tools menu 3-40 3.9 Exit menu 3-44 ASUS P6T WS Professional


