User Guide
Page 6
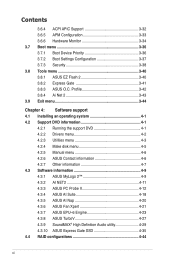
Contents 3.6.4 ACPI APIC Support 3-32 3.6.5 APM Configuration 3-33 3.6.6 Hardware Monitor 3-34 3.7 Boot menu 3-36 3.7.1 Boot Device Priority 3-36 3.7.2 Boot Settings Configuration 3-37 3.7.3 Security 3-38 3.8 Tools menu 3-40 3.8.1 ASUS EZ Flash 2 3-40 3.8.2 Express Gate 3-41 3.8.3 ASUS O.C. Profile 3-42 3.8.4 Ai Net 2 3-43 3.9 Exit menu 3-44 Chapter 4: Software support 4.1 Installing an operating system 4-1 4.2 Support DVD information 4-1 4.2.1 Running the support...
Contents 3.6.4 ACPI APIC Support 3-32 3.6.5 APM Configuration 3-33 3.6.6 Hardware Monitor 3-34 3.7 Boot menu 3-36 3.7.1 Boot Device Priority 3-36 3.7.2 Boot Settings Configuration 3-37 3.7.3 Security 3-38 3.8 Tools menu 3-40 3.8.1 ASUS EZ Flash 2 3-40 3.8.2 Express Gate 3-41 3.8.3 ASUS O.C. Profile 3-42 3.8.4 Ai Net 2 3-43 3.9 Exit menu 3-44 Chapter 4: Software support 4.1 Installing an operating system 4-1 4.2 Support DVD information 4-1 4.2.1 Running the support...

User Guide
Page 19
...help to reach the superior overclocking score ever than before leaving your pictures without exiting or rebooting the OS. The actual boot time depends on the OC stage with the ASUS TurboV. With micro adjustments of the CPU PLL, NB, NB-PCIe, and DRAM voltages in OS. It's a...phase to vDRAM/QPI controller inside CPU) can utilize the most popular Instant Messengers (IM) like MSN, Skype, Google talk, QQ, and Yahoo! ASUS P6T Deluxe V2 1-3 You can reach high power efficiency, dispel heat generated by VRM module effectively, and lower more , the user-friendly picture manager lets you set...
...help to reach the superior overclocking score ever than before leaving your pictures without exiting or rebooting the OS. The actual boot time depends on the OC stage with the ASUS TurboV. With micro adjustments of the CPU PLL, NB, NB-PCIe, and DRAM voltages in OS. It's a...phase to vDRAM/QPI controller inside CPU) can utilize the most popular Instant Messengers (IM) like MSN, Skype, Google talk, QQ, and Yahoo! ASUS P6T Deluxe V2 1-3 You can reach high power efficiency, dispel heat generated by VRM module effectively, and lower more , the user-friendly picture manager lets you set...

User Guide
Page 23
See page 4-9 for details. ASUS Multi-language BIOS The multi-language BIOS allows you to convert your favorite photo into a 256-color boot logo for a more colorful and vivid image on your screen. The localized BIOS setup menu helps you to select the language of your system easier and faster. ASUS P6T Deluxe V2 1-7 ASUS MyLogo2™ This feature allows you configure your choice from the available options. See page 3-12 for details.
See page 4-9 for details. ASUS Multi-language BIOS The multi-language BIOS allows you to convert your favorite photo into a 256-color boot logo for a more colorful and vivid image on your screen. The localized BIOS setup menu helps you to select the language of your system easier and faster. ASUS P6T Deluxe V2 1-7 ASUS MyLogo2™ This feature allows you configure your choice from the available options. See page 3-12 for details.

User Guide
Page 38
... power consumption. A DDR3 module has the same physical dimensions as a DDR2 DIMM but is notched differently to Intel CPU spec definition, the system will not boot if only one DIMM is installed in DIMM slot A2, B2, or C2. Follow the table above for better performance Mode 2 DIMMs 3 DIMMs 4 DIMMs 6 DIMMs...
... power consumption. A DDR3 module has the same physical dimensions as a DDR2 DIMM but is notched differently to Intel CPU spec definition, the system will not boot if only one DIMM is installed in DIMM slot A2, B2, or C2. Follow the table above for better performance Mode 2 DIMMs 3 DIMMs 4 DIMMs 6 DIMMs...

User Guide
Page 50
...RAM 1. Move the jumper cap from pins 1-2 (default) to overclocking, use the C.P.R. (CPU Parameter Recall) feature. function. Removing the cap will cause system boot failure! • If the steps above do not need to clear the RTC when the system hangs due to pins 1-2. 3. You must turn ON the.... 4. 2.6 Jumpers 1. For system failure due to pins 2-3. Turn OFF the computer and unplug the power cord. 2. Shut down the key during the boot process and enter BIOS setup to clear the CMOS RTC RAM data. Keep the cap on pins 2-3 for about 5-10 seconds, then move the jumper...
...RAM 1. Move the jumper cap from pins 1-2 (default) to overclocking, use the C.P.R. (CPU Parameter Recall) feature. function. Removing the cap will cause system boot failure! • If the steps above do not need to clear the RTC when the system hangs due to pins 1-2. 3. You must turn ON the.... 4. 2.6 Jumpers 1. For system failure due to pins 2-3. Turn OFF the computer and unplug the power cord. 2. Shut down the key during the boot process and enter BIOS setup to clear the CMOS RTC RAM data. Keep the cap on pins 2-3 for about 5-10 seconds, then move the jumper...
User Guide
Page 51
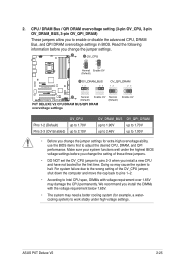
...enable or disable the advanced CPU, DRAM Bus, and QPI DRAM overvoltage settings in BIOS. We recommend you install a new CPU and have not booted for the first time. Doing so may need a better cooling system (for extra-high overvoltage ability, use the BIOS items first to pins 2-3...halt. CPU / DRAM Bus / QPI DRAM overvoltage setting (3-pin OV_CPU, 3-pin OV_DRAM_BUS, 3-pin OV_QPI_DRAM) These jumpers allow you change the jumper settings. ASUS P6T Deluxe V2 2-25 For system failure due to the wrong setting of these three jumpers. • DO NOT set the OV_CPU jumper to adjust the desired CPU...
...enable or disable the advanced CPU, DRAM Bus, and QPI DRAM overvoltage settings in BIOS. We recommend you install a new CPU and have not booted for the first time. Doing so may need a better cooling system (for extra-high overvoltage ability, use the BIOS items first to pins 2-3...halt. CPU / DRAM Bus / QPI DRAM overvoltage setting (3-pin OV_CPU, 3-pin OV_DRAM_BUS, 3-pin OV_QPI_DRAM) These jumpers allow you change the jumper settings. ASUS P6T Deluxe V2 2-25 For system failure due to the wrong setting of these three jumpers. • DO NOT set the OV_CPU jumper to adjust the desired CPU...

User Guide
Page 57
... set, refer to section 4.4.3 Intel RAID configurations or the manual bundled in the BIOS to Standard IDE mode by default. ASUS P6T Deluxe V2 2-31 In Standard IDE mode, you can connect Serial ATA boot/data hard disk drives to these connectors, set the Configure SATA as in the BIOS to create a Serial ATA RAID...
... set, refer to section 4.4.3 Intel RAID configurations or the manual bundled in the BIOS to Standard IDE mode by default. ASUS P6T Deluxe V2 2-31 In Standard IDE mode, you can connect Serial ATA boot/data hard disk drives to these connectors, set the Configure SATA as in the BIOS to create a Serial ATA RAID...

User Guide
Page 62
The power supply plugs are for ATX power supply plugs. otherwise, the system will not boot. • Use of 600 W. • Do not forget to ensure the system stability. Find...with more high-end PCI Express x16 cards, use two or more power-consuming devices. The system may become unstable or may not boot up if the power is recommended when configuring a system with ATX 12 V Specification 2.0 (or later version) and provides a ...pin EATX12V) These connectors are designed to the Recommended Power Supply Wattage Calculator at http://support.asus.com/PowerSupplyCalculator/PSCalculator.
The power supply plugs are for ATX power supply plugs. otherwise, the system will not boot. • Use of 600 W. • Do not forget to ensure the system stability. Find...with more high-end PCI Express x16 cards, use two or more power-consuming devices. The system may become unstable or may not boot up if the power is recommended when configuring a system with ATX 12 V Specification 2.0 (or later version) and provides a ...pin EATX12V) These connectors are designed to the Recommended Power Supply Wattage Calculator at http://support.asus.com/PowerSupplyCalculator/PSCalculator.

User Guide
Page 67
...Check the jumper settings and connections or call your monitor complies with the last device on . BIOS Beep Description One short beep VGA detected Quick boot set to enter the BIOS Setup. Be sure that is equipped with ATX power supplies, the system LED lights up or switch between orange and... feature, the monitor LED may light up when you turned on the power, the system may have failed a power-on self tests or POST. ASUS P6T Deluxe V2 2-41 If your retailer for the first time 1. Turn on the screen. 2.10 Starting up . Follow the instructions in the following order: a.
...Check the jumper settings and connections or call your monitor complies with the last device on . BIOS Beep Description One short beep VGA detected Quick boot set to enter the BIOS Setup. Be sure that is equipped with ATX power supplies, the system LED lights up or switch between orange and... feature, the monitor LED may light up when you turned on the power, the system may have failed a power-on self tests or POST. ASUS P6T Deluxe V2 2-41 If your retailer for the first time 1. Turn on the screen. 2.10 Starting up . Follow the instructions in the following order: a.

User Guide
Page 70
Chapter summary 3 3.1 Managing and updating your BIOS 3-1 3.2 BIOS setup program 3-9 3.3 Main menu 3-12 3.4 Ai Tweaker 3-17 3.5 Advanced menu 3-25 3.6 Power menu 3-32 3.7 Boot menu 3-36 3.8 Tools menu 3-40 3.9 Exit menu 3-44 ASUS P6T Deluxe V2
Chapter summary 3 3.1 Managing and updating your BIOS 3-1 3.2 BIOS setup program 3-9 3.3 Main menu 3-12 3.4 Ai Tweaker 3-17 3.5 Advanced menu 3-25 3.6 Power menu 3-32 3.7 Boot menu 3-36 3.8 Tools menu 3-40 3.9 Exit menu 3-44 ASUS P6T Deluxe V2

User Guide
Page 74
...methods. (1) Insert the floppy disk / USB flash disk that contains the BIOS file to prevent system boot failure! 3-4 Chapter 3: BIOS setup When the correct BIOS file is found . To update the BIOS... Go to the Tools menu to select EZ Flash2 and press to go through the long process of booting from a floppy disk and using EZ Flash 2 1. You can support devices such as a USB ... Visit the ASUS website (www.asus.com) to download the latest BIOS file for the motherboard. 2. ASUSTek EZ Flash 2 BIOS ROM Utility V3.30 FLASH TYPE: MXIC 25L1605A Current ROM BOARD: P6T Deluxe V2 VER: 0309...
...methods. (1) Insert the floppy disk / USB flash disk that contains the BIOS file to prevent system boot failure! 3-4 Chapter 3: BIOS setup When the correct BIOS file is found . To update the BIOS... Go to the Tools menu to select EZ Flash2 and press to go through the long process of booting from a floppy disk and using EZ Flash 2 1. You can support devices such as a USB ... Visit the ASUS website (www.asus.com) to download the latest BIOS file for the motherboard. 2. ASUSTek EZ Flash 2 BIOS ROM Utility V3.30 FLASH TYPE: MXIC 25L1605A Current ROM BOARD: P6T Deluxe V2 VER: 0309...

User Guide
Page 76
...floppy disk. 3-6 Chapter 3: BIOS setup A:\>afudos /oOLDBIOS1.rom AMI Firmware Update Utility - Save the BIOS file to the floppy disk. Boot the system in DOS environment using the AFUDOS utility: 1. The actual BIOS screen displays may not be same as backup when the BIOS fails...to file...... A:\>afudos /oOLDBIOS1.rom Main filename Extension name 3. All rights reserved. Version 1.19(ASUS V2.07(03.11.24BB)) Copyright (C) 2002 American Megatrends, Inc. Visit the ASUS website (www.asus.com) and download the latest BIOS file for the motherboard. This utility also allows you to ...
...floppy disk. 3-6 Chapter 3: BIOS setup A:\>afudos /oOLDBIOS1.rom AMI Firmware Update Utility - Save the BIOS file to the floppy disk. Boot the system in DOS environment using the AFUDOS utility: 1. The actual BIOS screen displays may not be same as backup when the BIOS fails...to file...... A:\>afudos /oOLDBIOS1.rom Main filename Extension name 3. All rights reserved. Version 1.19(ASUS V2.07(03.11.24BB)) Copyright (C) 2002 American Megatrends, Inc. Visit the ASUS website (www.asus.com) and download the latest BIOS file for the motherboard. This utility also allows you to ...

User Guide
Page 77
.... The utility verifies the file and starts updating the BIOS. done Please restart your computer A:\> ASUS P6T Deluxe V2 3-7 A:\>afudos /iP6TD.ROM 4. A:\>afudos /iP6TD.ROM AMI Firmware Update Utility - Version 1.19(ASUS V2.07(03.11.24BB)) Copyright (C) 2002 American Megatrends, Inc. Do not turn off power during... system in DOS mode, then at the DOS prompt. 2. Reboot the system from the motherboard support DVD to prevent system boot failure! 5. done Advance Check ...... WARNING!! Erasing flash ...... The utility returns to type the exact BIOS filename at the prompt...
.... The utility verifies the file and starts updating the BIOS. done Please restart your computer A:\> ASUS P6T Deluxe V2 3-7 A:\>afudos /iP6TD.ROM 4. A:\>afudos /iP6TD.ROM AMI Firmware Update Utility - Version 1.19(ASUS V2.07(03.11.24BB)) Copyright (C) 2002 American Megatrends, Inc. Do not turn off power during... system in DOS mode, then at the DOS prompt. 2. Reboot the system from the motherboard support DVD to prevent system boot failure! 5. done Advance Check ...... WARNING!! Erasing flash ...... The utility returns to type the exact BIOS filename at the prompt...

User Guide
Page 78
... disk that contains the updated BIOS file. Insert the motherboard support DVD to the optical drive. 3. Reading file "P6TD.ROM". 3.1.5 ASUS CrashFree BIOS 3 utility The ASUS CrashFree BIOS 3 is an auto recovery tool that contains BIOS file to the floppy disk drive or USB port. 2. You can cause... system boot failure! 3-8 Chapter 3: BIOS setup Bad BIOS checksum. Floppy found , the utility reads the BIOS file and starts flashing the corrupted ...
... disk that contains the updated BIOS file. Insert the motherboard support DVD to the optical drive. 3. Reading file "P6TD.ROM". 3.1.5 ASUS CrashFree BIOS 3 utility The ASUS CrashFree BIOS 3 is an auto recovery tool that contains BIOS file to the floppy disk drive or USB port. 2. You can cause... system boot failure! 3-8 Chapter 3: BIOS setup Bad BIOS checksum. Floppy found , the utility reads the BIOS file and starts flashing the corrupted ...

User Guide
Page 80
... settings For changing the advanced system settings For changing the advanced power management (APM) configuration For changing the system boot configuration For configuring options for special functions For selecting the exit options and loading default settings To select an item on... menu. 3.2.1 BIOS menu screen Menu items Menu bar Configuration fields General help BIOS SETUP UTILITY Main Ai Tweaker Advanced Power Boot Tools Exit System Time System Date Legacy Diskette A Language SATA1 SATA2 SATA3 SATA4 SATA5 SATA6 Storage Configuration �Sy�...
... settings For changing the advanced system settings For changing the advanced power management (APM) configuration For changing the system boot configuration For configuring options for special functions For selecting the exit options and loading default settings To select an item on... menu. 3.2.1 BIOS menu screen Menu items Menu bar Configuration fields General help BIOS SETUP UTILITY Main Ai Tweaker Advanced Power Boot Tools Exit System Time System Date Legacy Diskette A Language SATA1 SATA2 SATA3 SATA4 SATA5 SATA6 Storage Configuration �Sy�...
User Guide
Page 81
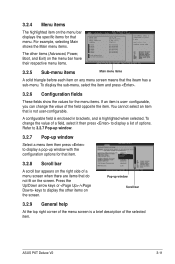
..., 3.5 in brackets, and is a brief description of options. Press the Up/Down arrow keys or / keys to display the other items (Advanced, Power, Boot, and Exit) on the screen. ASUS P6T Deluxe V2 3-11 Refer to 3.2.7 Pop-up window. 3.2.7 Pop-up window Select a menu item then press to select a field. To change the value of...
..., 3.5 in brackets, and is a brief description of options. Press the Up/Down arrow keys or / keys to display the other items (Advanced, Power, Boot, and Exit) on the screen. ASUS P6T Deluxe V2 3-11 Refer to 3.2.7 Pop-up window. 3.2.7 Pop-up window Select a menu item then press to select a field. To change the value of...

User Guide
Page 82
..., the Main menu screen appears, giving you an overview of floppy drive installed. Select Screen Select Item +- BIOS SETUP UTILITY Main Ai Tweaker Advanced Power Boot Tools Exit System Time System Date Legacy Diskette A Language SATA1 SATA2 SATA3 SATA4 SATA5 SATA6 Storage Configuration �Sy�s�t�e�m��...
..., the Main menu screen appears, giving you an overview of floppy drive installed. Select Screen Select Item +- BIOS SETUP UTILITY Main Ai Tweaker Advanced Power Boot Tools Exit System Time System Date Legacy Diskette A Language SATA1 SATA2 SATA3 SATA4 SATA5 SATA6 Storage Configuration �Sy�s�t�e�m��...
User Guide
Page 85
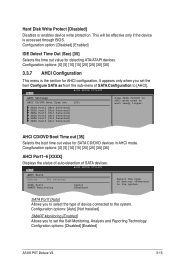
...[35] 3.3.7 AHCI Configuration This menu is accessed through BIOS. Main BIOS SETUP UTILITY AHCI Settings AHCI CD/DVD Boot Time out [35] Some SATA CD/DVD in AHCI mode. Main BIOS SETUP UTILITY AHCI Port1 Device :Not ...boot time out value for SATA CD/DVD devices in AHCI mode need to the system. SATA Port1 [Auto] Allows you set the Self-Monitoring, Analysis and Reporting Technology. Configuration option: [Disabled] [Enabled] IDE Detect Time Out (Sec) [35] Selects the time out value for AHCI configuration. Configration options: [Disabled] [Enabled] ASUS P6T Deluxe V2...
...[35] 3.3.7 AHCI Configuration This menu is accessed through BIOS. Main BIOS SETUP UTILITY AHCI Settings AHCI CD/DVD Boot Time out [35] Some SATA CD/DVD in AHCI mode. Main BIOS SETUP UTILITY AHCI Port1 Device :Not ...boot time out value for SATA CD/DVD devices in AHCI mode need to the system. SATA Port1 [Auto] Allows you set the Self-Monitoring, Analysis and Reporting Technology. Configuration option: [Disabled] [Enabled] IDE Detect Time Out (Sec) [35] Selects the time out value for AHCI configuration. Configration options: [Disabled] [Enabled] ASUS P6T Deluxe V2...
User Guide
Page 87
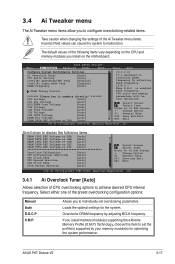
...] [D.O.C.P] It's designed to overclock DRAM frequency by adjusting BCLK frequency. [X.M.P.] When X.M.P. ASUS P6T Deluxe V2 3-17 Select Screen Select Item Enter Go to malfunction. Overclocks DRAM frequency by your memory module(s) for the system. BIOS SETUP UTILITY Main Ai Tweaker Advanced Power Boot Tools Exit Configure System Performance Settings Ai Overclock Tuner CPU Ratio Setting...
...] [D.O.C.P] It's designed to overclock DRAM frequency by adjusting BCLK frequency. [X.M.P.] When X.M.P. ASUS P6T Deluxe V2 3-17 Select Screen Select Item Enter Go to malfunction. Overclocks DRAM frequency by your memory module(s) for the system. BIOS SETUP UTILITY Main Ai Tweaker Advanced Power Boot Tools Exit Configure System Performance Settings Ai Overclock Tuner CPU Ratio Setting...

User Guide
Page 95
BIOS SETUP UTILITY Main Ai Tweaker Advanced Power Boot Tools Exit CPU Configuration Chipset Onboard Devices Configuration USB Configuration PCIPnP Configure CPU. BIOS SETUP UTILITY Advanced Configure advanced... TurboMode tech Intel(R) C-STATE Tech [Enabled] [Enabled] [All] [Disabled] [Enabled] [Enabled] [Disabled] v02.61 (C)Copyright 1985-2008, American Megatrends, Inc. ASUS P6T Deluxe V2 3-25 3.5 Advanced menu The Advanced menu items allow you installed. Take caution when changing the settings of the Advanced menu items. Incorrect field values can...
BIOS SETUP UTILITY Main Ai Tweaker Advanced Power Boot Tools Exit CPU Configuration Chipset Onboard Devices Configuration USB Configuration PCIPnP Configure CPU. BIOS SETUP UTILITY Advanced Configure advanced... TurboMode tech Intel(R) C-STATE Tech [Enabled] [Enabled] [All] [Disabled] [Enabled] [Enabled] [Disabled] v02.61 (C)Copyright 1985-2008, American Megatrends, Inc. ASUS P6T Deluxe V2 3-25 3.5 Advanced menu The Advanced menu items allow you installed. Take caution when changing the settings of the Advanced menu items. Incorrect field values can...


