User Guide
Page 4
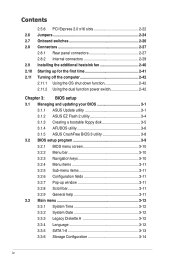
... 2-42 Chapter 3: BIOS setup 3.1 Managing and updating your BIOS 3-1 3.1.1 ASUS Update utility 3-1 3.1.2 ASUS EZ Flash 2 utility 3-4 3.1.3 Creating a bootable floppy disk 3-5 3.1.4 AFUDOS utility 3-6 3.1.5 ASUS CrashFree BIOS 3 utility 3-8 3.2 BIOS setup program 3-9 3.2.1 BIOS menu screen... 3-10 3.2.2 Menu bar 3-10 3.2.3 Navigation keys 3-10 3.2.4 Menu items 3-11 3.2.5 Sub-menu items 3-11 3.2.6 Configuration fields 3-11 3.2.7 Pop-up window 3-11 3.2.8 Scroll bar 3-...
... 2-42 Chapter 3: BIOS setup 3.1 Managing and updating your BIOS 3-1 3.1.1 ASUS Update utility 3-1 3.1.2 ASUS EZ Flash 2 utility 3-4 3.1.3 Creating a bootable floppy disk 3-5 3.1.4 AFUDOS utility 3-6 3.1.5 ASUS CrashFree BIOS 3 utility 3-8 3.2 BIOS setup program 3-9 3.2.1 BIOS menu screen... 3-10 3.2.2 Menu bar 3-10 3.2.3 Navigation keys 3-10 3.2.4 Menu items 3-11 3.2.5 Sub-menu items 3-11 3.2.6 Configuration fields 3-11 3.2.7 Pop-up window 3-11 3.2.8 Scroll bar 3-...

User Guide
Page 7
...Intel® RAID configurations 4-45 4.5 Creating a RAID driver disk 4-53 4.5.1 Creating a RAID driver disk without entering the OS.... 4-53 4.5.2 Creating a RAID driver disk in Windows 4-53 Chapter 5: Multiple GPU technology support 5.1 ATI® CrossFireX™ technology 5-1 5.1.1 Requirements 5-1 5.1.2 Before you begin 5-1 5.2 Installing CrossFireX™ graphics cards 5-2 5.2.1... 5-6 5.4.1 Requirements 5-6 5.4.2 Installing SLI™ graphics cards 5-6 5.4.3 Installing the device drivers 5-7 5.4.4 Enabling the NVIDIA® SLI™ technology in Windows®..... 5-7 vii
...Intel® RAID configurations 4-45 4.5 Creating a RAID driver disk 4-53 4.5.1 Creating a RAID driver disk without entering the OS.... 4-53 4.5.2 Creating a RAID driver disk in Windows 4-53 Chapter 5: Multiple GPU technology support 5.1 ATI® CrossFireX™ technology 5-1 5.1.1 Requirements 5-1 5.1.2 Before you begin 5-1 5.2 Installing CrossFireX™ graphics cards 5-2 5.2.1... 5-6 5.4.1 Requirements 5-6 5.4.2 Installing SLI™ graphics cards 5-6 5.4.3 Installing the device drivers 5-7 5.4.4 Enabling the NVIDIA® SLI™ technology in Windows®..... 5-7 vii

User Guide
Page 19
... the OC stage with friends, or quickly check on the weather and e-mails just before . See page 4-35 for details. ASUS P6T Deluxe V2 1-3 This extreme OC tool lets you to overclock without entering Windows at anytime! With the high quality power components such as low RDS (on the system configuration. You can reach high...
... the OC stage with friends, or quickly check on the weather and e-mails just before . See page 4-35 for details. ASUS P6T Deluxe V2 1-3 This extreme OC tool lets you to overclock without entering Windows at anytime! With the high quality power components such as low RDS (on the system configuration. You can reach high...

User Guide
Page 21
... stream while recording. Optional Fan (for a more secure working environment. See page 4-31 for details. See page 2-29 for details. ASUS P6T Deluxe V2 1-5 The TPM module is specifically designed to different ambient temperature, which provides you easy ways to achieve a quiet and cool environment. Noise...speed to install computer components, update the BIOS or back up your favorite settings. The TPM meets the Windows® Vista BitLocker™ Drive Encryption hardware requirement for Water-Cooling or Passive-Cooling only) The optional fan is purchased separately....
... stream while recording. Optional Fan (for a more secure working environment. See page 4-31 for details. See page 2-29 for details. ASUS P6T Deluxe V2 1-5 The TPM module is specifically designed to different ambient temperature, which provides you easy ways to achieve a quiet and cool environment. Noise...speed to install computer components, update the BIOS or back up your favorite settings. The TPM meets the Windows® Vista BitLocker™ Drive Encryption hardware requirement for Water-Cooling or Passive-Cooling only) The optional fan is purchased separately....
User Guide
Page 39
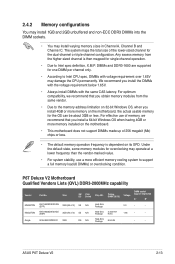
...Channel B and Channel C. Any excess memory from the same vendor. • Due to the memory address limitation on 32-bit Windows OS, when you obtain memory modules from the higher-sized channel is dependent on the motherboard, the actual usable memory for overclocking may...3) SS N/A Heat-Sink (1333-9-9Package 9-24) 1.65 • • 9CAASS37AZZ01D1 2GB DS N/A Heat-Sink Package 9-9-9-24 • • ASUS P6T Deluxe V2 2-13 2.4.2 Memory configurations You may install 1GB and 2GB unbuffered and non‑ECC DDR3 DIMMs into the DIMM sockets. • You may damage ...
...Channel B and Channel C. Any excess memory from the same vendor. • Due to the memory address limitation on 32-bit Windows OS, when you obtain memory modules from the higher-sized channel is dependent on the motherboard, the actual usable memory for overclocking may...3) SS N/A Heat-Sink (1333-9-9Package 9-24) 1.65 • • 9CAASS37AZZ01D1 2GB DS N/A Heat-Sink Package 9-9-9-24 • • ASUS P6T Deluxe V2 2-13 2.4.2 Memory configurations You may install 1GB and 2GB unbuffered and non‑ECC DDR3 DIMMs into the DIMM sockets. • You may damage ...

User Guide
Page 57
...pin SATA 1-6 [red]) These connectors are set the Configure SATA as item in the motherboard support DVD. • You must install the Windows® XP Service Pack 1 before using Serial ATA hard disk drives. In Standard IDE mode, you can connect Serial ATA boot/data hard ...174; ICH10R RAID controller. • These connectors are for the Serial ATA signal cables for Serial ATA hard disk drives and optical disc drives. ASUS P6T Deluxe V2 2-31 See section 3.3.6 Storage Configuration for details. • Before creating a RAID set the Configure SATA as in the BIOS to [RAID]. See...
...pin SATA 1-6 [red]) These connectors are set the Configure SATA as item in the motherboard support DVD. • You must install the Windows® XP Service Pack 1 before using Serial ATA hard disk drives. In Standard IDE mode, you can connect Serial ATA boot/data hard ...174; ICH10R RAID controller. • These connectors are for the Serial ATA signal cables for Serial ATA hard disk drives and optical disc drives. ASUS P6T Deluxe V2 2-31 See section 3.3.6 Storage Configuration for details. • Before creating a RAID set the Configure SATA as in the BIOS to [RAID]. See...

User Guide
Page 68
...Turning off the computer 2.11.1 Using the OS shut down function If you are using Windows® XP: 1. The power supply should turn off mode, depending on the BIOS setting. Refer to soft-off after Windows® shuts down. Click the Start button then select Shut Down. 2. Click the... dual function power switch While the system is ON, pressing the power switch for details. 2-42 Chapter 2: Hardware information If you are using Windows® Vista™: 1. Pressing the power switch for more than four seconds puts the system to sleep mode or to section 3.6 Power Menu...
...Turning off the computer 2.11.1 Using the OS shut down function If you are using Windows® XP: 1. The power supply should turn off mode, depending on the BIOS setting. Refer to soft-off after Windows® shuts down. Click the Start button then select Shut Down. 2. Click the... dual function power switch While the system is ON, pressing the power switch for details. 2-42 Chapter 2: Hardware information If you are using Windows® Vista™: 1. Pressing the power switch for more than four seconds puts the system to sleep mode or to section 3.6 Power Menu...

User Guide
Page 71
... utility allows you to manage, save, and update the motherboard BIOS in Windows® environment. Installing ASUS Update To install ASUS Update: 1. The ASUS Update utility is copied to restore the BIOS in the future. ASUS AFUDOS (Updates the BIOS using a floppy disk or USB flash disk.) ... requires an Internet connection either through a network or an Internet Service Provider (ISP). Place the support DVD in Windows® environment.) 2. ASUS P6T Deluxe V2 3-1 ASUS EZ Flash 2 (Updates the BIOS using a bootable floppy disk) 4. Copy the original motherboard BIOS using a bootable ...
... utility allows you to manage, save, and update the motherboard BIOS in Windows® environment. Installing ASUS Update To install ASUS Update: 1. The ASUS Update utility is copied to restore the BIOS in the future. ASUS AFUDOS (Updates the BIOS using a floppy disk or USB flash disk.) ... requires an Internet connection either through a network or an Internet Service Provider (ISP). Place the support DVD in Windows® environment.) 2. ASUS P6T Deluxe V2 3-1 ASUS EZ Flash 2 (Updates the BIOS using a bootable floppy disk) 4. Copy the original motherboard BIOS using a bootable ...
User Guide
Page 72
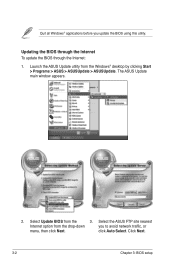
Select Update BIOS from the Windows® desktop by clicking Start > Programs > ASUS > ASUSUpdate > ASUSUpdate. The ASUS Update main window appears. 2. Quit all Windows® applications before you to avoid network traffic, or menu, then click Next. Launch the ASUS Update utility from the 3. click Auto Select. Updating the BIOS through the Internet To update the BIOS through the Internet: 1. Click Next. 3-2 Chapter 3: BIOS setup Select the ASUS FTP site nearest Internet option from the drop‑down you update the BIOS using this utility.
Select Update BIOS from the Windows® desktop by clicking Start > Programs > ASUS > ASUSUpdate > ASUSUpdate. The ASUS Update main window appears. 2. Quit all Windows® applications before you to avoid network traffic, or menu, then click Next. Launch the ASUS Update utility from the 3. click Auto Select. Updating the BIOS through the Internet To update the BIOS through the Internet: 1. Click Next. 3-2 Chapter 3: BIOS setup Select the ASUS FTP site nearest Internet option from the drop‑down you update the BIOS using this utility.
User Guide
Page 73
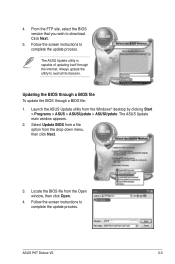
...select the BIOS version that you wish to avail all its features. Click Next. 5. The ASUS Update utility is capable of updating itself through a BIOS file: 1. Launch the ASUS Update utility from the drop‑down menu, then click Next. 3. Updating the BIOS ... BIOS from a file option from the Windows® desktop by clicking Start > Programs > ASUS > ASUSUpdate > ASUSUpdate. The ASUS Update main window appears. 2. Always update the utility to download. P6TD.ROM P6TD ASUS P6T Deluxe V2 3-3 Locate the BIOS file from the Open window, then click Open. 4. Follow the screen...
...select the BIOS version that you wish to avail all its features. Click Next. 5. The ASUS Update utility is capable of updating itself through a BIOS file: 1. Launch the ASUS Update utility from the drop‑down menu, then click Next. 3. Updating the BIOS ... BIOS from a file option from the Windows® desktop by clicking Start > Programs > ASUS > ASUSUpdate > ASUSUpdate. The ASUS Update main window appears. 2. Always update the utility to download. P6TD.ROM P6TD ASUS P6T Deluxe V2 3-3 Locate the BIOS file from the Open window, then click Open. 4. Follow the screen...
User Guide
Page 75
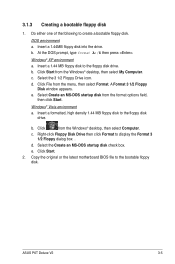
... to create a bootable floppy disk. c. 3.1.3 Creating a bootable floppy disk 1. c. Do either one of the following to the floppy disk drive. ASUS P6T Deluxe V2 3-5 Select the 3 1/2 Floppy Drive icon. d. Click File from the Windows® desktop, then select Computer. DOS environment a. b. Click Start. 2. Copy the original or the latest motherboard BIOS file to the bootable...
... to create a bootable floppy disk. c. 3.1.3 Creating a bootable floppy disk 1. c. Do either one of the following to the floppy disk drive. ASUS P6T Deluxe V2 3-5 Select the 3 1/2 Floppy Drive icon. d. Click File from the Windows® desktop, then select Computer. DOS environment a. b. Click Start. 2. Copy the original or the latest motherboard BIOS file to the bootable...
User Guide
Page 81
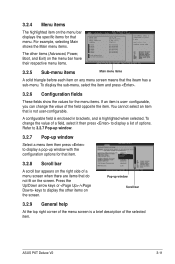
...[SHIFT-TAB] to select a field. configurable, you can change the value of a field, select it then press to display a pop-up window Scroll bar 3.2.9 General help At the top right corner of the menu screen is not user-configurable. For example, selecting Main shows the Main ...item on any menu screen means that is a brief description of options. ASUS P6T Deluxe V2 3-11 Use [+] or [-] to display the other items (Advanced, Power, Boot, and Exit) on the screen. Refer to 3.2.7 Pop-up window. 3.2.7 Pop-up window Select a menu item then press to display a list of the selected...
...[SHIFT-TAB] to select a field. configurable, you can change the value of a field, select it then press to display a pop-up window Scroll bar 3.2.9 General help At the top right corner of the menu screen is not user-configurable. For example, selecting Main shows the Main ...item on any menu screen means that is a brief description of options. ASUS P6T Deluxe V2 3-11 Use [+] or [-] to display the other items (Advanced, Power, Boot, and Exit) on the screen. Refer to 3.2.7 Pop-up window. 3.2.7 Pop-up window Select a menu item then press to display a list of the selected...
User Guide
Page 111
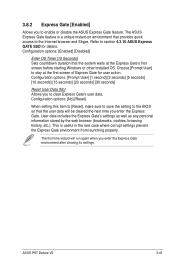
...to stay at the Express Gate's first screen before starting Windows or other installed OS. Configuration options: [Enabled] [Disabled]...time wizard will be cleared the next time you enter the Express Gate environment after clearing its settings. ASUS P6T Deluxe V2 3-41 Configuration options: [No] [Reset] When setting this item to [Reset], make sure to...seconds] [15 seconds] [20 seconds] [30 seconds] Reset User Data [No] Allows you to enable or disable the ASUS Express Gate feature. User data includes the Express Gate's settings as well as any personal information stored by the web browser...
...to stay at the Express Gate's first screen before starting Windows or other installed OS. Configuration options: [Enabled] [Disabled]...time wizard will be cleared the next time you enter the Express Gate environment after clearing its settings. ASUS P6T Deluxe V2 3-41 Configuration options: [No] [Reset] When setting this item to [Reset], make sure to...seconds] [15 seconds] [20 seconds] [30 seconds] Reset User Data [No] Allows you to enable or disable the ASUS Express Gate feature. User data includes the Express Gate's settings as well as any personal information stored by the web browser...
User Guide
Page 114
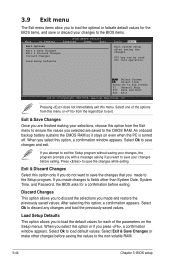
...System Date, System Time, and Password, the BIOS asks for a confirmation before exiting. Exit & Save Changes Once you press , a confirmation window appears. Select Screen Select Item Enter Go to load default values. Pressing does not immediately exit this option or if you are saved to ... Changes Exit & Discard Changes Discard Changes Load Setup Defaults Exit system setup after saving the changes. After selecting this option, a confirmation window appears. Load Setup Defaults This option allows you to load the default values for this option only if you do not want to save...
...System Date, System Time, and Password, the BIOS asks for a confirmation before exiting. Exit & Save Changes Once you press , a confirmation window appears. Select Screen Select Item Enter Go to load default values. Pressing does not immediately exit this option or if you are saved to ... Changes Exit & Discard Changes Discard Changes Load Setup Defaults Exit system setup after saving the changes. After selecting this option, a confirmation window appears. Load Setup Defaults This option allows you to load the default values for this option only if you do not want to save...
User Guide
Page 117
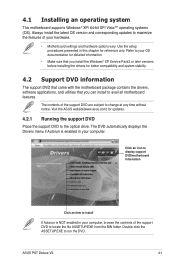
... corresponding updates to maximize the features of your OS documentation for detailed information. • Make sure that you install the Windows® XP Service Pack2 or later versions before installing the drivers for better compatibility and system stability. 4.2 Support DVD information... computer. Refer to run the DVD. The contents of the support DVD to avail all motherboard features. ASUS P6T Deluxe V2 4-1 4.1 Installing an operating system This motherboard supports Windows® XP/ 64-bit XP/ Vista™ operating systems (OS). The DVD automatically displays the Drivers...
... corresponding updates to maximize the features of your OS documentation for detailed information. • Make sure that you install the Windows® XP Service Pack2 or later versions before installing the drivers for better compatibility and system stability. 4.2 Support DVD information... computer. Refer to run the DVD. The contents of the support DVD to avail all motherboard features. ASUS P6T Deluxe V2 4-1 4.1 Installing an operating system This motherboard supports Windows® XP/ 64-bit XP/ Vista™ operating systems (OS). The DVD automatically displays the Drivers...
User Guide
Page 120
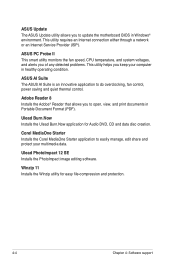
... allows you to update the motherboard BIOS in Windows® environment. Ulead PhotoImpact 12 SE Installs the PhotoImpact image editing software. Winzip 11 Installs the Winzip utility for Audio DVD, CD and data disc creation. ASUS Update The ASUS Update utility allows you to open, view, ...Corel MediaOne Starter Installs the Corel MediaOne Starter application to do overclocking, fan control, power saving and quiet thermal control. ASUS AI Suite The ASUS AI Suite is an innovative application to easily manage, edit share and protect your computer in healthy operating condition. This ...
... allows you to update the motherboard BIOS in Windows® environment. Ulead PhotoImpact 12 SE Installs the PhotoImpact image editing software. Winzip 11 Installs the Winzip utility for Audio DVD, CD and data disc creation. ASUS Update The ASUS Update utility allows you to open, view, ...Corel MediaOne Starter Installs the Corel MediaOne Starter application to do overclocking, fan control, power saving and quiet thermal control. ASUS AI Suite The ASUS AI Suite is an innovative application to easily manage, edit share and protect your computer in healthy operating condition. This ...
User Guide
Page 125
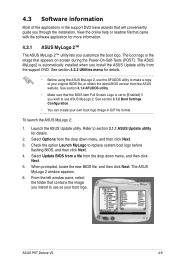
...See section 4.2.3 Utilities menu for details. 2. Select Options from the drop down menu, and then click Next. 5. The ASUS MyLogo 2 window appears. 6. Select Update BIOS from a file from the drop down menu, and then click Next. 3. Refer to make...software application for more information. 4.3.1 ASUS MyLogo 2™ The ASUS MyLogo 2™ utility lets you intend to use the AFUDOS utility to section 3.1.1 ASUS Update utility for details. • Before using the ASUS MyLogo 2, use as your boot logo. ASUS P6T Deluxe V2 4-9 To launch the ASUS MyLogo 2: 1. 4.3 Software information...
...See section 4.2.3 Utilities menu for details. 2. Select Options from the drop down menu, and then click Next. 5. The ASUS MyLogo 2 window appears. 6. Select Update BIOS from a file from the drop down menu, and then click Next. 3. Refer to make...software application for more information. 4.3.1 ASUS MyLogo 2™ The ASUS MyLogo 2™ utility lets you intend to use the AFUDOS utility to section 3.1.1 ASUS Update utility for details. • Before using the ASUS MyLogo 2, use as your boot logo. ASUS P6T Deluxe V2 4-9 To launch the ASUS MyLogo 2: 1. 4.3 Software information...

User Guide
Page 126
When the screen returns to the ASUS Update utility, flash the original BIOS to display the new boot logo during POST. 4-10 Chapter 4: Software support Adjust the boot image to enlarge by selecting a value on it. 8. After flashing the BIOS, restart the computer to load the new boot logo. 10. 7. When the logo images appear on the right window pane, select an image to your desired size by clicking on the Ratio box. 9.
When the screen returns to the ASUS Update utility, flash the original BIOS to display the new boot logo during POST. 4-10 Chapter 4: Software support Adjust the boot image to enlarge by selecting a value on it. 8. After flashing the BIOS, restart the computer to load the new boot logo. 10. 7. When the logo images appear on the right window pane, select an image to your desired size by clicking on the Ratio box. 9.
User Guide
Page 127
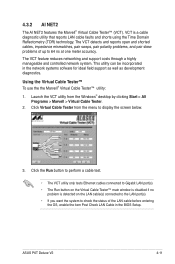
ASUS P6T Deluxe V2 4-11 VCT is detected on the LAN cable(s) connected to the LAN port(s). ...Virtual Cable Tester™ (VCT). This utility can be incorporated in the BIOS Setup. Click Virtual Cable Tester from the Windows® desktop by clicking Start > All Programs > Marvell > Virtual Cable Tester. 2. The VCT feature reduces networking and ...tests Ethernet cables connected to Gigabit LAN port(s). • The Run button on the Virtual Cable Tester™ main window is disabled if no problem is a cable diagnostic utility that reports LAN cable faults and shorts using the Time ...
ASUS P6T Deluxe V2 4-11 VCT is detected on the LAN cable(s) connected to the LAN port(s). ...Virtual Cable Tester™ (VCT). This utility can be incorporated in the BIOS Setup. Click Virtual Cable Tester from the Windows® desktop by clicking Start > All Programs > Marvell > Virtual Cable Tester. 2. The VCT feature reduces networking and ...tests Ethernet cables connected to Gigabit LAN port(s). • The Run button on the Virtual Cable Tester™ main window is disabled if no problem is a cable diagnostic utility that reports LAN cable faults and shorts using the Time ...
User Guide
Page 128
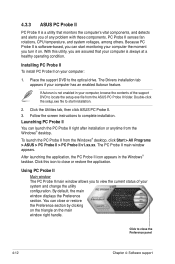
... With this icon to close or restore the Preference section by clicking on the triangle on the main window right handle. To launch the PC Probe II from the ASUS PC Probe II folder. 4.3.3 ASUS PC Probe II PC Probe II is a utility that your computer is always at a healthy operating ...desktop. Double-click the setup.exe file to locate the setup.exe file from the Windows® desktop, click Start > All Programs > ASUS > PC Probe II > PC Probe II v1.xx.xx. The PC Probe II main window appears. Click this utility, you are assured that monitors the computer's vital components, ...
... With this icon to close or restore the Preference section by clicking on the triangle on the main window right handle. To launch the PC Probe II from the ASUS PC Probe II folder. 4.3.3 ASUS PC Probe II PC Probe II is a utility that your computer is always at a healthy operating ...desktop. Double-click the setup.exe file to locate the setup.exe file from the Windows® desktop, click Start > All Programs > ASUS > PC Probe II > PC Probe II v1.xx.xx. The PC Probe II main window appears. Click this utility, you are assured that monitors the computer's vital components, ...


