User Guide
Page 4
... computer 2-42 2.11.1 Using the OS shut down function 2-42 2.11.2 Using the dual function power switch 2-42 Chapter 3: BIOS setup 3.1 Managing and updating your BIOS 3-1 3.1.1 ASUS Update utility 3-1 3.1.2 ASUS EZ Flash 2 utility 3-4 3.1.3 Creating a bootable floppy disk 3-5 3.1.4 AFUDOS utility 3-6 3.1.5 ASUS CrashFree BIOS 3 utility 3-8 3.2 BIOS setup program 3-9 3.2.1 BIOS menu screen 3-10 3.2.2 Menu bar 3-10 3.2.3 Navigation...
... computer 2-42 2.11.1 Using the OS shut down function 2-42 2.11.2 Using the dual function power switch 2-42 Chapter 3: BIOS setup 3.1 Managing and updating your BIOS 3-1 3.1.1 ASUS Update utility 3-1 3.1.2 ASUS EZ Flash 2 utility 3-4 3.1.3 Creating a bootable floppy disk 3-5 3.1.4 AFUDOS utility 3-6 3.1.5 ASUS CrashFree BIOS 3 utility 3-8 3.2 BIOS setup program 3-9 3.2.1 BIOS menu screen 3-10 3.2.2 Menu bar 3-10 3.2.3 Navigation...
User Guide
Page 9
... of the crossed out wheeled bin indicates that the product (electrical and electronic equipment) should not be placed in any damage, contact your power supply is broken, do not try to fix it by yourself. Check local regulations for the devices are unplugged before using an adpater or...crossed out wheeled bin indicates that the battery should not be placed in your retailer. If you are using, contact your local power company. • If the power supply is set to the correct voltage in municipal waste. DO NOT throw the mercury-containing button cell battery in municipal waste...
... of the crossed out wheeled bin indicates that the product (electrical and electronic equipment) should not be placed in any damage, contact your power supply is broken, do not try to fix it by yourself. Check local regulations for the devices are unplugged before using an adpater or...crossed out wheeled bin indicates that the battery should not be placed in your retailer. If you are using, contact your local power company. • If the power supply is set to the correct voltage in municipal waste. DO NOT throw the mercury-containing button cell battery in municipal waste...
User Guide
Page 13
... at 1MHz increment Overclocking Protection: - ASUS Fan Xpert - ASUS True 16+2 Phase Power Design - vCPU PLL: 36-step reference voltage control - vDRAM Bus: 49-step DRAM bus voltage control - ASUS EZ Flash 2 ASUS MyLogo 2 Multi-language BIOS ASUS TurboV utility Precision Tweaker 2: - P6T Deluxe V2 specifications summary ASUS Unique features ASUS Stylish Features ASUS Exclusive Overclocking Features ASUS Exclusive Features: - vNB-PCIe: 65...
... at 1MHz increment Overclocking Protection: - ASUS Fan Xpert - ASUS True 16+2 Phase Power Design - vCPU PLL: 36-step reference voltage control - vDRAM Bus: 49-step DRAM bus voltage control - ASUS EZ Flash 2 ASUS MyLogo 2 Multi-language BIOS ASUS TurboV utility Precision Tweaker 2: - P6T Deluxe V2 specifications summary ASUS Unique features ASUS Stylish Features ASUS Exclusive Overclocking Features ASUS Exclusive Features: - vNB-PCIe: 65...

User Guide
Page 14
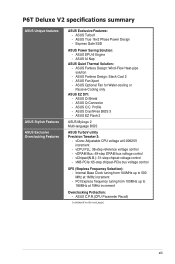
P6T Deluxe V2 specifications summary Back Panel I/O Ports Internal I/O Connectors BIOS Features Manageability Support DVD Contents Form Factor 1 x PS/2 Keyboard / Mouse combo port 1 x S/PDIF Out (Coaxial + Optical) 1 x External ... System Panel (Q-Connector) 1 x TPM connector 1 x Power on switch 1 x Reset switch 16 Mb AMI BIOS, PnP, DMI 2.0, WfM 2.0, SM BIOS 2.4, Multi-language BIOS WOL by PME, WOR by PME, Chassis Intrusion, PXE Drivers ASUS PC Probe II ASUS Update ASUS AI Suite Image-Editing Suite Anti-virus software (OEM version) ATX Form Factor, 12"x 9.6" (30...
P6T Deluxe V2 specifications summary Back Panel I/O Ports Internal I/O Connectors BIOS Features Manageability Support DVD Contents Form Factor 1 x PS/2 Keyboard / Mouse combo port 1 x S/PDIF Out (Coaxial + Optical) 1 x External ... System Panel (Q-Connector) 1 x TPM connector 1 x Power on switch 1 x Reset switch 16 Mb AMI BIOS, PnP, DMI 2.0, WfM 2.0, SM BIOS 2.4, Multi-language BIOS WOL by PME, WOR by PME, Chassis Intrusion, PXE Drivers ASUS PC Probe II ASUS Update ASUS AI Suite Image-Editing Suite Anti-virus software (OEM version) ATX Form Factor, 12"x 9.6" (30...
User Guide
Page 18
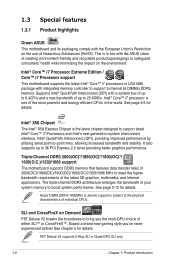
1.3 Special features 1.3.1 Product highlights Green ASUS This motherboard and its packaging comply with the European Union's Restriction on the use of the most powerful and energy efficient CPUs in the world. Intel® ...ASUS vision of the latest 3D graphics, multimedia, and Internet applications. Intel® Core™ i7 Processor Extreme Edition / Core™ i7 Processor support This motherboard supports the latest Intel® Core™ i7 processors in line with integrated memory controller to safeguard consumers' health while minimizing the impact on Demand P6T Deluxe V2...
1.3 Special features 1.3.1 Product highlights Green ASUS This motherboard and its packaging comply with the European Union's Restriction on the use of the most powerful and energy efficient CPUs in the world. Intel® ...ASUS vision of the latest 3D graphics, multimedia, and Internet applications. Intel® Core™ i7 Processor Extreme Edition / Core™ i7 Processor support This motherboard supports the latest Intel® Core™ i7 processors in line with integrated memory controller to safeguard consumers' health while minimizing the impact on Demand P6T Deluxe V2...

User Guide
Page 19
...page 4-27 for details. You can reach high power efficiency, dispel heat generated by VRM module effectively, and lower more , the user-friendly picture manager lets you to -use interface-allowing you view your house. ASUS P6T Deluxe V2 1-3 Messenger to keep in touch with friends, or... quickly check on the OC stage with an advanced and easy-to overclock without entering Windows at anytime! What's more temperature compared to break new OC records! ASUS Power Saving Solution ASUS Power Saving solution...
...page 4-27 for details. You can reach high power efficiency, dispel heat generated by VRM module effectively, and lower more , the user-friendly picture manager lets you to -use interface-allowing you view your house. ASUS P6T Deluxe V2 1-3 Messenger to keep in touch with friends, or... quickly check on the OC stage with an advanced and easy-to overclock without entering Windows at anytime! What's more temperature compared to break new OC records! ASUS Power Saving Solution ASUS Power Saving solution...

User Guide
Page 20
... Wind-Flow Heat-pipe solution Enjoy a super cool and quiet PC environment with the innovative Wind Flow Thermal Design. ASUS EPU-6 Engine The new ASUS EPU-the world's first power saving engine, has been upgraded to a new 6 engine version, which includes the CPU, VGA card, memory, ...chipset, hard drives and CPU cooler / system fans), the EPU automatically provides the most appropriate power usage via intelligent acceleration and overclocking...
... Wind-Flow Heat-pipe solution Enjoy a super cool and quiet PC environment with the innovative Wind Flow Thermal Design. ASUS EPU-6 Engine The new ASUS EPU-the world's first power saving engine, has been upgraded to a new 6 engine version, which includes the CPU, VGA card, memory, ...chipset, hard drives and CPU cooler / system fans), the EPU automatically provides the most appropriate power usage via intelligent acceleration and overclocking...

User Guide
Page 21
... Passive-Cooling only) The optional fan is specifically designed to provide sufficient airflow over the CPU power modules and chipset area when water-cooling or passive-cooling is utilized, ensuring effective heat dissipation for details. ASUS P6T Deluxe V2 1-5 TPM Support This motherboard supports the Trusted Platform Module (TPM), which is purchased separately. See page...
... Passive-Cooling only) The optional fan is specifically designed to provide sufficient airflow over the CPU power modules and chipset area when water-cooling or passive-cooling is utilized, ensuring effective heat dissipation for details. ASUS P6T Deluxe V2 1-5 TPM Support This motherboard supports the Trusted Platform Module (TPM), which is purchased separately. See page...

User Guide
Page 27
... strap or touch a safely grounded object or a metal object, such as the power supply case, before handling components to avoid damaging them due to static electricity. • Hold components by the edges to the motherboard, peripherals, and/or components. ASUS P6T Deluxe V2 2-1 Failure to do so may cause severe damage to avoid touching the...
... strap or touch a safely grounded object or a metal object, such as the power supply case, before handling components to avoid damaging them due to static electricity. • Hold components by the edges to the motherboard, peripherals, and/or components. ASUS P6T Deluxe V2 2-1 Failure to do so may cause severe damage to avoid touching the...

User Guide
Page 29
... 2-34 2-12 2-25 2-30 2-31 2-24 2-38 2-29 2-26 2-35 2-32 2-33 2-29 2-37 2-35 2-37 4-35 ASUS P6T Deluxe V2 2-3 CPU, chassis, and power fan connectors (4-pin CPU_FAN, 3-pin CHA_FAN1-3, 3-pin PWR_FAN) 4. Floppy disk drive connector (34-1 pin FLOPPY) 16. Front panel audio connector... 10. Digital audio connector (4-1 pin SPDIF_OUT) 19. DDR3 DIMM slots 5. IDE connector (40-1 pin PRI_EIDE) 7. ATX power connectors (24-pin EATXPWR, 8-pin EATX12V) 2. Onboard Power-on and Reset switch 12. USB connectors (10-1 pin USB910, USB1112, USB1314) 14. IEEE 1394a port connector (10...
... 2-34 2-12 2-25 2-30 2-31 2-24 2-38 2-29 2-26 2-35 2-32 2-33 2-29 2-37 2-35 2-37 4-35 ASUS P6T Deluxe V2 2-3 CPU, chassis, and power fan connectors (4-pin CPU_FAN, 3-pin CHA_FAN1-3, 3-pin PWR_FAN) 4. Floppy disk drive connector (34-1 pin FLOPPY) 16. Front panel audio connector... 10. Digital audio connector (4-1 pin SPDIF_OUT) 19. DDR3 DIMM slots 5. IDE connector (40-1 pin PRI_EIDE) 7. ATX power connectors (24-pin EATXPWR, 8-pin EATX12V) 2. Onboard Power-on and Reset switch 12. USB connectors (10-1 pin USB910, USB1112, USB1314) 14. IEEE 1394a port connector (10...

User Guide
Page 31
... installing the CPU. • Connect the chassis fan cable to the CHA_FAN1 connector to the PnP cap/socket contacts/motherboard components. ASUS will process Return Merchandise Authorization (RMA) requests only if the motherboard comes with a surface mount LGA1366 socket designed for the Intel... if the damage is shipment/transit-related. • Keep the cap after installing the motherboard. ASUS P6T Deluxe V2 2-5 ASUS will shoulder the cost of the motherboard, make sure that all power cables are not bent. Contact your retailer immediately if the PnP cap is on the LGA1366 socket...
... installing the CPU. • Connect the chassis fan cable to the CHA_FAN1 connector to the PnP cap/socket contacts/motherboard components. ASUS will process Return Merchandise Authorization (RMA) requests only if the motherboard comes with a surface mount LGA1366 socket designed for the Intel... if the damage is shipment/transit-related. • Keep the cap after installing the motherboard. ASUS P6T Deluxe V2 2-5 ASUS will shoulder the cost of the motherboard, make sure that all power cables are not bent. Contact your retailer immediately if the PnP cap is on the LGA1366 socket...

User Guide
Page 38
2.4 System memory 2.4.1 Overview The motherboard comes with less power consumption. A DDR3 module has the same physical dimensions as a DDR2 DIMM but is notched differently to Intel CPU spec definition, the system will not boot ...
2.4 System memory 2.4.1 Overview The motherboard comes with less power consumption. A DDR3 module has the same physical dimensions as a DDR2 DIMM but is notched differently to Intel CPU spec definition, the system will not boot ...

User Guide
Page 45
... socket such that it flips out with extra force. 2. Locked Retaining Clip 2.4.4 Removing a DIMM Follow these steps to unplug the power supply before adding or removing DIMMs or other system components. ASUS P6T Deluxe V2 2-19 The DIMM might get damaged when it fits in place and the DIMM is keyed with your fingers when...
... socket such that it flips out with extra force. 2. Locked Retaining Clip 2.4.4 Removing a DIMM Follow these steps to unplug the power supply before adding or removing DIMMs or other system components. ASUS P6T Deluxe V2 2-19 The DIMM might get damaged when it fits in place and the DIMM is keyed with your fingers when...

User Guide
Page 46
..., making the system unstable and the card inoperable. Align the card connector with the screw you intend to install expansion cards. Refer to unplug the power cord before adding or removing expansion cards. Keep the screw for information on the system and change the necessary BIOS settings, if any. Install the...
..., making the system unstable and the card inoperable. Align the card connector with the screw you intend to install expansion cards. Refer to unplug the power cord before adding or removing expansion cards. Keep the screw for information on the system and change the necessary BIOS settings, if any. Install the...
User Guide
Page 49
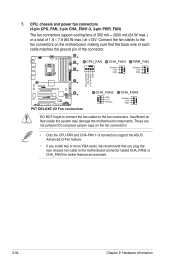
ASUS P6T Deluxe V2 2-23 See page 2-36 for details. • Connect a chassis fan to the motherboard connector labeled CHA_FAN1/2/3 when using multiple graphics cards for details. VGA configuration ... to the PCIe x16_3 slot, the three PCIe x16 slots will work at x16, x16, x1 link as the default. • If you provide sufficient power when running CrossFireX™ or SLI™ mode.
ASUS P6T Deluxe V2 2-23 See page 2-36 for details. • Connect a chassis fan to the motherboard connector labeled CHA_FAN1/2/3 when using multiple graphics cards for details. VGA configuration ... to the PCIe x16_3 slot, the three PCIe x16 slots will work at x16, x16, x1 link as the default. • If you provide sufficient power when running CrossFireX™ or SLI™ mode.

User Guide
Page 50
...) to overclocking, use the C.P.R. (CPU Parameter Recall) feature. Except when clearing the RTC RAM, never remove the cap on the power supply or unplug and plug the power cord before rebooting the system. 2-24 Chapter 2: Hardware information For system failure due to pins 2-3. function. Turn OFF the computer and...clear the CMOS RTC RAM data. You can automatically reset parameter settings to default values. • Due to the chipset behavior, AC power off and on CLRTC jumper default position. Shut down the key during the boot process and enter BIOS setup to clear the Real Time...
...) to overclocking, use the C.P.R. (CPU Parameter Recall) feature. Except when clearing the RTC RAM, never remove the cap on the power supply or unplug and plug the power cord before rebooting the system. 2-24 Chapter 2: Hardware information For system failure due to pins 2-3. function. Turn OFF the computer and...clear the CMOS RTC RAM data. You can automatically reset parameter settings to default values. • Due to the chipset behavior, AC power off and on CLRTC jumper default position. Shut down the key during the boot process and enter BIOS setup to clear the Real Time...

User Guide
Page 52
2.7 Onboard switches Onboard switches allow you to reboot the system. 2-26 Chapter 2: Hardware information Reset switch Press the reset switch to fine-tune performance when working on switch to enhance system performance. 1. Power-on switch Press the power-on a bare or open-case system. This is ideal for overclockers and gamers who continually change settings to wake/power up the system. 2.
2.7 Onboard switches Onboard switches allow you to reboot the system. 2-26 Chapter 2: Hardware information Reset switch Press the reset switch to fine-tune performance when working on switch to enhance system performance. 1. Power-on switch Press the power-on a bare or open-case system. This is ideal for overclockers and gamers who continually change settings to wake/power up the system. 2.
User Guide
Page 60
...components. Connect the fan cables to the fan connectors on the fan connectors! • Only the CPU-FAN and CHA-FAN 1-3 connectors support the ASUS Advanced Q-Fan feature. • If you plug the rear chassis fan cable to the fan connectors. DO NOT forget to connect the fan cables ...recommend that the black wire of each cable matches the ground pin of 1 A ~ 7 A (84 W max.) at +12V. These are not jumpers! 7. CPU, chassis and power fan connectors (4-pin CPU_FAN, 3-pin CHA_FAN1-3, 3-pin PWR_FAN) The fan connectors support cooling fans of 350 mA ~ 2000 mA (24 W max.) or a total of the...
...components. Connect the fan cables to the fan connectors on the fan connectors! • Only the CPU-FAN and CHA-FAN 1-3 connectors support the ASUS Advanced Q-Fan feature. • If you plug the rear chassis fan cable to the fan connectors. DO NOT forget to connect the fan cables ...recommend that the black wire of each cable matches the ground pin of 1 A ~ 7 A (84 W max.) at +12V. These are not jumpers! 7. CPU, chassis and power fan connectors (4-pin CPU_FAN, 3-pin CHA_FAN1-3, 3-pin PWR_FAN) The fan connectors support cooling fans of 350 mA ~ 2000 mA (24 W max.) or a total of the...

User Guide
Page 62
... designed to the Recommended Power Supply Wattage Calculator at http://support.asus.com/PowerSupplyCalculator/PSCalculator. otherwise, the system will not boot. • Use of 600 W. • Do not forget to connect the 4-pin / 8-pin EATX12 V power plug; aspx?SLanguage=en-us for details. • If you use a PSU with 1000 W power or above to...
... designed to the Recommended Power Supply Wattage Calculator at http://support.asus.com/PowerSupplyCalculator/PSCalculator. otherwise, the system will not boot. • Use of 600 W. • Do not forget to connect the 4-pin / 8-pin EATX12 V power plug; aspx?SLanguage=en-us for details. • If you use a PSU with 1000 W power or above to...
User Guide
Page 64
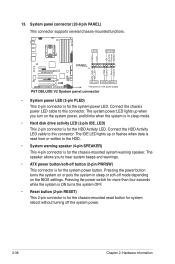
... • Reset button (2-pin RESET) This 2-pin connector is for the system power button. Connect the HDD Activity LED cable to hear system beeps and warnings. • ATX power button/soft-off the system power. 2-38 Chapter 2: Hardware information System panel connector (20-8 pin PANEL) This ...This 2-pin connector is for the chassis-mounted system warning speaker. The speaker allows you turn on the BIOS settings. Connect the chassis power LED cable to the HDD. • System warning speaker (4-pin SPEAKER) This 4-pin connector is for the chassis-mounted reset button for...
... • Reset button (2-pin RESET) This 2-pin connector is for the system power button. Connect the HDD Activity LED cable to hear system beeps and warnings. • ATX power button/soft-off the system power. 2-38 Chapter 2: Hardware information System panel connector (20-8 pin PANEL) This ...This 2-pin connector is for the chassis-mounted system warning speaker. The speaker allows you turn on the BIOS settings. Connect the chassis power LED cable to the HDD. • System warning speaker (4-pin SPEAKER) This 4-pin connector is for the chassis-mounted reset button for...


