Motherboard Installation Guide
Page 15
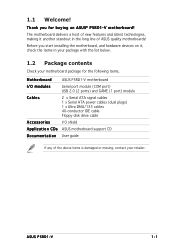
...following items. Motherboard ASUS P5RD1-V motherboard I/O modules Serial port module (COM port) USB 2.0 (2 ports) and GAME (1 port) module Cables 2 x Serial ATA signal cables 1 x Serial ATA power cables (dual plugs) 1 x Ultra DMA/133 cables 40-conductor IDE cable Floppy disk drive cable Accessories I/O shield A p p l i c a t i o n C D s ASUS motherboard support CD ... line of the above items is damaged or missing, contact your motherboard package for buying an ASUS® P5RD1-V motherboard! Thank you start installing the motherboard, and hardware devices on it another standout in...
...following items. Motherboard ASUS P5RD1-V motherboard I/O modules Serial port module (COM port) USB 2.0 (2 ports) and GAME (1 port) module Cables 2 x Serial ATA signal cables 1 x Serial ATA power cables (dual plugs) 1 x Ultra DMA/133 cables 40-conductor IDE cable Floppy disk drive cable Accessories I/O shield A p p l i c a t i o n C D s ASUS motherboard support CD ... line of the above items is damaged or missing, contact your motherboard package for buying an ASUS® P5RD1-V motherboard! Thank you start installing the motherboard, and hardware devices on it another standout in...

Motherboard Installation Guide
Page 48
... the USB connectors. USB connectors (10-1 pin USB56, USB78) These connectors are for a serial (COM) port. 5 . USB+5V USB_P6USB_P6+ GND NC USB+5V USB_P8USB_P8+ GND NC P5RD1-V ® USB78 1 USB56 1 USB+5V USB_P5USB_P5+ GND USB+5V USB_P7USB_P7+ GND P5RD1-V USB 2.0 connectors Never connect a 1 3 9 4 c a b l e to 480 Mbps connection speed. Connect the serial port module...
... the USB connectors. USB connectors (10-1 pin USB56, USB78) These connectors are for a serial (COM) port. 5 . USB+5V USB_P6USB_P6+ GND NC USB+5V USB_P8USB_P8+ GND NC P5RD1-V ® USB78 1 USB56 1 USB+5V USB_P5USB_P5+ GND USB+5V USB_P7USB_P7+ GND P5RD1-V USB 2.0 connectors Never connect a 1 3 9 4 c a b l e to 480 Mbps connection speed. Connect the serial port module...

Motherboard Installation Guide
Page 63
...prompt type: afudos /i[filename] where [filename] is the latest or the original BIOS file on a piece of paper. A:\>afudos /iP5RD1V.ROM ASUS P5RD1-V 4-3 Version 1.19(ASUS V2.07(03.11.24BB)) Copyright (C) 2003 American Megatrends, Inc. Boot the system in DOS mode, then at the DOS prompt. 2. ...Write to file ...ok A:\> The utility returns to a bootable floppy disk. Write the BIOS filename on the bootable floppy disk. Visit the ASUS website (www.asus.com) and download the latest BIOS file for the motherboard. Press . Save the BIOS file to the DOS prompt after copying the current BIOS...
...prompt type: afudos /i[filename] where [filename] is the latest or the original BIOS file on a piece of paper. A:\>afudos /iP5RD1V.ROM ASUS P5RD1-V 4-3 Version 1.19(ASUS V2.07(03.11.24BB)) Copyright (C) 2003 American Megatrends, Inc. Boot the system in DOS mode, then at the DOS prompt. 2. ...Write to file ...ok A:\> The utility returns to a bootable floppy disk. Write the BIOS filename on the bootable floppy disk. Visit the ASUS website (www.asus.com) and download the latest BIOS file for the motherboard. Press . Save the BIOS file to the DOS prompt after copying the current BIOS...

Motherboard Installation Guide
Page 66
... recovery... Checking for floppy... Checking for CD-ROM... The utility then updates the corrupted BIOS file. Doing so can cause system boot failure! 4. Visit the ASUS website (www.asus.com) to the optical drive. 3. Start flashing... Remove any floppy disk from the support CD: 1.
... recovery... Checking for floppy... Checking for CD-ROM... The utility then updates the corrupted BIOS file. Doing so can cause system boot failure! 4. Visit the ASUS website (www.asus.com) to the optical drive. 3. Start flashing... Remove any floppy disk from the support CD: 1.

Motherboard Installation Guide
Page 67
......| Flashed successfully. error message appears if there is found !" ASUS P5RD1-V 4-7 EZFlash starting BIOS update Checking for the motherboard and rename the same to P 5 R D 1 V . Visit the ASUS website (www.asus.com) to download the latest BIOS file for floppy... 4. Floppy found !" 4.1.4 ASUS EZ Flash utility The ASUS EZ Flash feature allows you rename the BIOS file to...
......| Flashed successfully. error message appears if there is found !" ASUS P5RD1-V 4-7 EZFlash starting BIOS update Checking for the motherboard and rename the same to P 5 R D 1 V . Visit the ASUS website (www.asus.com) to download the latest BIOS file for floppy... 4. Floppy found !" 4.1.4 ASUS EZ Flash utility The ASUS EZ Flash feature allows you rename the BIOS file to...

Motherboard Installation Guide
Page 71
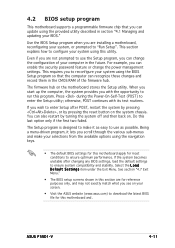
... BIOS Setup program when you are for reference purposes only, and may not exactly match what you to reconfigure your screen. • Visit the ASUS website (www.asus.com) to "Run Setup". This requires you see on the system chassis. If you can change the power management settings. You can also restart by... in the CMOS RAM of your BIOS." The firmware hub on . otherwise, POST continues with the opportunity to enter the Setup utility; Do this program. ASUS P5RD1-V 4-11
... BIOS Setup program when you are for reference purposes only, and may not exactly match what you to reconfigure your screen. • Visit the ASUS website (www.asus.com) to "Run Setup". This requires you see on the system chassis. If you can change the power management settings. You can also restart by... in the CMOS RAM of your BIOS." The firmware hub on . otherwise, POST continues with the opportunity to enter the Setup utility; Do this program. ASUS P5RD1-V 4-11

Motherboard Installation Guide
Page 101
...and hardware options vary. Double-click the A S S E T U P . E X E to locate the file ASSETUP.EXE from the BIN folder. ASUS P5RD1-V 5-1 Always install the latest OS version and corresponding updates to maximize the features of the support CD are subject to avail all motherboard features. Visit... the ASUS website(www.asus.com) for better compatibility and system stability. 5.2 Support CD information The support CD that came with the motherboard package ...
...and hardware options vary. Double-click the A S S E T U P . E X E to locate the file ASSETUP.EXE from the BIN folder. ASUS P5RD1-V 5-1 Always install the latest OS version and corresponding updates to maximize the features of the support CD are subject to avail all motherboard features. Visit... the ASUS website(www.asus.com) for better compatibility and system stability. 5.2 Support CD information The support CD that came with the motherboard package ...

Motherboard Installation Guide
Page 117
...RAID 0+1, and JBOD configurations. Boot up your screen. creates a new legacy RAID set or allocates spare drives. C r e a t e R A I D 0 + 1 f o r S t r i p i n g , M i r r o r i n g - ASUS P5RD1-V 5-17 RAID BIOS Setup Utility (c) 2004 ULi Electronics Inc. During POST, press . creates and maintains an identical image of both RAID 0 and RAID 1 configuration. C r e a t e R A I D 1 M i r r o r i n g f o r R ...n g f o r P e r f o r m a n c e - www.uli.com.tw Create RAID 0 Striping for Performance Create RAID 1 Mirroring for Reliability Create RAID 0+1 for Striping, ...
...RAID 0+1, and JBOD configurations. Boot up your screen. creates a new legacy RAID set or allocates spare drives. C r e a t e R A I D 0 + 1 f o r S t r i p i n g , M i r r o r i n g - ASUS P5RD1-V 5-17 RAID BIOS Setup Utility (c) 2004 ULi Electronics Inc. During POST, press . creates and maintains an identical image of both RAID 0 and RAID 1 configuration. C r e a t e R A I D 1 M i r r o r i n g f o r R ...n g f o r P e r f o r m a n c e - www.uli.com.tw Create RAID 0 Striping for Performance Create RAID 1 Mirroring for Reliability Create RAID 0+1 for Striping, ...

Motherboard Installation Guide
Page 125
... on the Monitor power section to the Advanced Menu, highlight CPU Configuration, then press . 3. Click the Power button on the EIST feature. ASUS P5RD1-V When the Display Properties window appears, click the Screen Saver tab. 7. Go to open the Power Options Properties window. Set the Intel(R)... kernel or later versions) A.1.2 Using the EIST To use the EIST feature: 1. Turn on the desktop, then select Properties from the ASUS website (www.asus.com/support/download/) if you need to update the BIOS. After the computer restarts, right click on a blank space on the computer, then...
... on the Monitor power section to the Advanced Menu, highlight CPU Configuration, then press . 3. Click the Power button on the EIST feature. ASUS P5RD1-V When the Display Properties window appears, click the Screen Saver tab. 7. Go to open the Power Options Properties window. Set the Intel(R)... kernel or later versions) A.1.2 Using the EIST To use the EIST feature: 1. Turn on the desktop, then select Properties from the ASUS website (www.asus.com/support/download/) if you need to update the BIOS. After the computer restarts, right click on a blank space on the computer, then...

Motherboard Installation Guide
Page 127
....com/info/hyperthreading. Using the Hyper-Threading Technology To use the Hyper-Threading compiler to E n a b l e d. See page 4-22 for details. Under the A d v a n c e d M e n u, make sure that supports Hyper-Threading Technology. 2. If you installed a CPU that supports Hyper-Threading Techonology. 3. T h r e a d i n g T e c h n o l o g y is supported under Windows® XP and Linux 2.4.x (kernel) and later versions only. ASUS P5RD1...
....com/info/hyperthreading. Using the Hyper-Threading Technology To use the Hyper-Threading compiler to E n a b l e d. See page 4-22 for details. Under the A d v a n c e d M e n u, make sure that supports Hyper-Threading Technology. 2. If you installed a CPU that supports Hyper-Threading Techonology. 3. T h r e a d i n g T e c h n o l o g y is supported under Windows® XP and Linux 2.4.x (kernel) and later versions only. ASUS P5RD1...

P5RD1-V User's Manual English Version E1785
Page 15
... the long line of the above items is damaged or missing, contact your motherboard package for buying an ASUS® P5RD1-V motherboard! ASUS P5RD1-V 1-1 Before you for the following items. Motherboard ASUS P5RD1-V motherboard I/O modules Serial port module (COM port) USB 2.0 (2 ports) and GAME (1 port) module Cables 2 x Serial ATA signal cables 1 x Serial ATA power cables (dual plugs...
... the long line of the above items is damaged or missing, contact your motherboard package for buying an ASUS® P5RD1-V motherboard! ASUS P5RD1-V 1-1 Before you for the following items. Motherboard ASUS P5RD1-V motherboard I/O modules Serial port module (COM port) USB 2.0 (2 ports) and GAME (1 port) module Cables 2 x Serial ATA signal cables 1 x Serial ATA power cables (dual plugs...

P5RD1-V User's Manual English Version E1785
Page 48
... connectors are for a serial (COM) port. These USB connectors comply with USB 2.0 specification that supports up to the USB connectors. Doing so will damage the motherboard! 2-28 Chapter 2: Hardware information USB+5V USB_P6USB_P6+ GND NC P5RD1-V ® P5RD1-V USB 2.0 connectors USB78 1 ...USB+5V USB_P5USB_P5+ GND USB+5V USB_P7USB_P7+ GND Never connect a 1 3 9 4 c a b l e to 480 Mbps connection speed. P5RD1-V ® COM1 PIN 1 P5RD1-V Serial port connector 6 . Serial port connector (10-1 pin COM1) This connector is for USB 2.0 ports. Connect the USB/GAME module cable...
... connectors are for a serial (COM) port. These USB connectors comply with USB 2.0 specification that supports up to the USB connectors. Doing so will damage the motherboard! 2-28 Chapter 2: Hardware information USB+5V USB_P6USB_P6+ GND NC P5RD1-V ® P5RD1-V USB 2.0 connectors USB78 1 ...USB+5V USB_P5USB_P5+ GND USB+5V USB_P7USB_P7+ GND Never connect a 1 3 9 4 c a b l e to 480 Mbps connection speed. P5RD1-V ® COM1 PIN 1 P5RD1-V Serial port connector 6 . Serial port connector (10-1 pin COM1) This connector is for USB 2.0 ports. Connect the USB/GAME module cable...

P5RD1-V User's Manual English Version E1785
Page 63
All rights reserved. done Write to file ...ok A:\> The utility returns to the floppy disk. A:\>afudos /iP5RD1V.ROM ASUS P5RD1-V 4-3 Boot the system in DOS mode, then at the DOS prompt. 2. Write the BIOS filename on the bootable floppy disk. The utility copies...file using the AFUDOS utility: 1. Save the BIOS file to the bootable floppy disk you created earlier. 3. Press . Reading flash ..... Visit the ASUS website (www.asus.com) and download the latest BIOS file for the motherboard. Copy the AFUDOS utility (afudos.exe) from the motherboard support CD to a bootable floppy ...
All rights reserved. done Write to file ...ok A:\> The utility returns to the floppy disk. A:\>afudos /iP5RD1V.ROM ASUS P5RD1-V 4-3 Boot the system in DOS mode, then at the DOS prompt. 2. Write the BIOS filename on the bootable floppy disk. The utility copies...file using the AFUDOS utility: 1. Save the BIOS file to the bootable floppy disk you created earlier. 3. Press . Reading flash ..... Visit the ASUS website (www.asus.com) and download the latest BIOS file for the motherboard. Copy the AFUDOS utility (afudos.exe) from the motherboard support CD to a bootable floppy ...

P5RD1-V User's Manual English Version E1785
Page 66
... checks the optical drive for floppy... Restart the system after the utility completes the updating process. When no floppy disk is found ! Visit the ASUS website (www.asus.com) to the optical drive. 3. Starting BIOS recovery... Floppy not found! Completed. Bad BIOS checksum. Checking for this motherboard. Doing so can cause system boot...
... checks the optical drive for floppy... Restart the system after the utility completes the updating process. When no floppy disk is found ! Visit the ASUS website (www.asus.com) to the optical drive. 3. Starting BIOS recovery... Floppy not found! Completed. Bad BIOS checksum. Checking for this motherboard. Doing so can cause system boot...

P5RD1-V User's Manual English Version E1785
Page 67
Floppy found !" Start erasing.......| Start programming...| Flashed successfully. ASUS P5RD1-V 4-7 To update the BIOS using a DOS-based utility. Visit the ASUS website (www.asus.com) to download the latest BIOS file for the motherboard and rename the same to a floppy disk, then restart ... O M. 2. Save the BIOS file to P 5 R D 1 V . Reading file "P5RD1V.ROM". error message appears if there is found !" 4.1.4 ASUS EZ Flash utility The ASUS EZ Flash feature allows you rename the BIOS file to P5RD1V.ROM. When the correct BIOS file is no floppy disk in the...
Floppy found !" Start erasing.......| Start programming...| Flashed successfully. ASUS P5RD1-V 4-7 To update the BIOS using a DOS-based utility. Visit the ASUS website (www.asus.com) to download the latest BIOS file for the motherboard and rename the same to a floppy disk, then restart ... O M. 2. Save the BIOS file to P 5 R D 1 V . Reading file "P5RD1V.ROM". error message appears if there is found !" 4.1.4 ASUS EZ Flash utility The ASUS EZ Flash feature allows you rename the BIOS file to P5RD1V.ROM. When the correct BIOS file is no floppy disk in the...
P5RD1-V User's Manual English Version E1785
Page 71
...Menu." • The BIOS setup screens shown in section "4.1 Managing and updating your system, or prompted to ensure system compatibility and stability. ASUS P5RD1-V 4-11 For example, you are installing a motherboard, reconfiguring your BIOS." If the system becomes unstable after POST, restart the system by ... not exactly match what you are for most conditions to use as easy to configure your screen. • Visit the ASUS website (www.asus.com) to enter the Setup utility; Being a menu-driven program, it as possible. otherwise, POST continues with the opportunity to...
...Menu." • The BIOS setup screens shown in section "4.1 Managing and updating your system, or prompted to ensure system compatibility and stability. ASUS P5RD1-V 4-11 For example, you are installing a motherboard, reconfiguring your BIOS." If the system becomes unstable after POST, restart the system by ... not exactly match what you are for most conditions to use as easy to configure your screen. • Visit the ASUS website (www.asus.com) to enter the Setup utility; Being a menu-driven program, it as possible. otherwise, POST continues with the opportunity to...

P5RD1-V User's Manual English Version E1785
Page 101
Visit the ASUS website(www.asus.com) for reference only. E X E to your hardware. • Motherboard settings and hardware options vary. 5.1 Installing an operating system This motherboard supports Windows® 2000/XP operating ... Click an item to install If A u t o r u n is enabled in your computer, browse the contents of the support CD are subject to avail all motherboard features. ASUS P5RD1-V 5-1 Use the setup procedures presented in your computer. The CD automatically displays the D r i v e r s menu if Autorun is NOT enabled in this chapter for updates. 5.2.1 Running...
Visit the ASUS website(www.asus.com) for reference only. E X E to your hardware. • Motherboard settings and hardware options vary. 5.1 Installing an operating system This motherboard supports Windows® 2000/XP operating ... Click an item to install If A u t o r u n is enabled in your computer, browse the contents of the support CD are subject to avail all motherboard features. ASUS P5RD1-V 5-1 Use the setup procedures presented in your computer. The CD automatically displays the D r i v e r s menu if Autorun is NOT enabled in this chapter for updates. 5.2.1 Running...

P5RD1-V User's Manual English Version E1785
Page 118
... MB RAID Array/Type RAID Array A : RAID Array B : RAID Array C : Capacity RAID Type Stripe Size RAID Name The Main Menu on your computer. 2. www.uli.com.tw Create RAID 0 Striping for Performance Select Boot Drive Create RAID 1 Mirroring for Reliability Create RAID 0+1 for Striping, Mirroring Create JBOD for reference only, and...
... MB RAID Array/Type RAID Array A : RAID Array B : RAID Array C : Capacity RAID Type Stripe Size RAID Name The Main Menu on your computer. 2. www.uli.com.tw Create RAID 0 Striping for Performance Select Boot Drive Create RAID 1 Mirroring for Reliability Create RAID 0+1 for Striping, Mirroring Create JBOD for reference only, and...

P5RD1-V User's Manual English Version E1785
Page 123
...Screen Saver tab. 7. You can download the latest BIOS file from the pop-up menu. 6. Click the Power button on the EIST feature. ASUS P5RD1-V A.1.1 System requirements Before using EIST, check your changes and exit the BIOS setup. 5. See page 4-23 for more information on the Monitor... computer, then enter the BIOS Setup. 2. See Chapter 4 for details. • Visit www.intel.com for details. 4. Turn on the desktop, then select Properties from the ASUS website (www.asus.com/support/download/) if you need to update the BIOS. Set the Intel(R) SpeedStep Technology item to open ...
...Screen Saver tab. 7. You can download the latest BIOS file from the pop-up menu. 6. Click the Power button on the EIST feature. ASUS P5RD1-V A.1.1 System requirements Before using EIST, check your changes and exit the BIOS setup. 5. See page 4-23 for more information on the Monitor... computer, then enter the BIOS Setup. 2. See Chapter 4 for details. • Visit www.intel.com for details. 4. Turn on the desktop, then select Properties from the ASUS website (www.asus.com/support/download/) if you need to update the BIOS. Set the Intel(R) SpeedStep Technology item to open ...

P5RD1-V User's Manual English Version E1785
Page 125
... and performance. • Installing Windows® XP Service Pack 1 or later version is supported under Windows® XP and Linux 2.4.x (kernel) and later versions only. ASUS P5RD1-V Under the A d v a n c e d M e n u, make sure that the item H y p e r - See page 4-22 for details. A.2 Intel®...Technology item in BIOS before installing a supported operating system. • For more information on Hyper-Threading Technology, visit www.intel.com/info/hyperthreading. Under Linux, use the Hyper-Threading Technology: 1. Restart the computer. If you installed a CPU that supports Hyper...
... and performance. • Installing Windows® XP Service Pack 1 or later version is supported under Windows® XP and Linux 2.4.x (kernel) and later versions only. ASUS P5RD1-V Under the A d v a n c e d M e n u, make sure that the item H y p e r - See page 4-22 for details. A.2 Intel®...Technology item in BIOS before installing a supported operating system. • For more information on Hyper-Threading Technology, visit www.intel.com/info/hyperthreading. Under Linux, use the Hyper-Threading Technology: 1. Restart the computer. If you installed a CPU that supports Hyper...


